


34
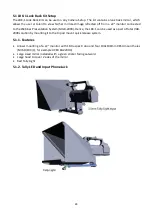
5.2.2. Shooting for Half-Body Screen
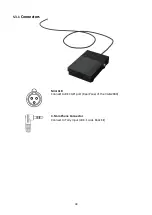
Step1: Please connect from the SDI OUT interface on the rear panel of the BC-100 to the CAMERA 1
SDI IN interface on the rear panel of the VGB-2000 2-Channel Pro Presentation System by an SDI cable.
Step 2. Please connect from the SDI OUT interface on the rear panel of the BC-100 to the CAMERA 2
SDI IN interface on the rear panel of the VGB-2000 2-Channel Pro Presentation System by an SDI cable.
Step 3. Please prepare a laptop and a Datavideo VP-840. After that, please connect from the HDMI
interface of the laptop to the HDMI IN interface of the VP-840 by an HDMI cable.
Step 4. Please connect from the HDMI OUT interface of the VP-840 to the HDMI interface of the short-
throw projector by an HDMI cable.
Step 5. Please connect from the HDMI OUT interface of the VP-840 to the SWITCHER HDMI IN (CAM2)
interface of the VGB-2000 2-Channel Pro Presentation System by an HDMI cable.
Step 6. Please connect from the SWITCHER HDMI OUT 1 interface from the rear panel of the VGB-
2000 to the HDNI interface on the monitor which is mounted on LBK-1 Look Back Kit.
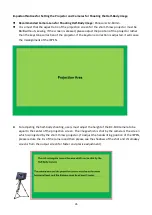
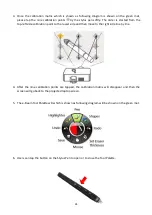
Step 7. Users can see the screen which is shot by the BC-100 to show that the teacher is standing in
front of the green mat and the Powerpoint slide is shown on the green mat.
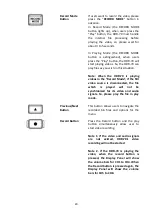
Important Notices for the BC-100 Setup
Camera Lens
Brand Selection
It is recommended to use the Olympus camera lens due to that for other camera
lens brands, it is easy to cause imprecise focal length when ZOOMING IN &
ZOOMING OUT.
Camera Focal
Length Selection
Basically, there is no special request for the camera focal length, the only
request is to make sure that the whole green mat and the half-body of the
teacher can be shot properly.
The recommended model numbers of the Olympus camera lens are listed as
following.
M.Zuiko Digital ED 7-14mm f/2.8 PRO
M.ZUIKO DIGITAL ED 12-100mm F4.0 IS PRO
Suggestions for the
Camera Setup
1. Please set the camera in the MF mode because the focus point will not be the
desired point when the camera is set in the AF mode.
2. Please turn off the Optical Image Stabilization (OIS) function due to that when
the camera is mounted on the tripod, abnormal shaking will be shown on the
image when the Optical Image Stabilization function is turned on.
Содержание VGB-2000
Страница 1: ...VGB 2000 Instruction Manual...
Страница 7: ...7 1 2 System Diagram 2 Channel Pro Presentation System VGB 2000...
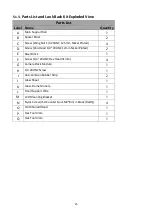
Страница 26: ...26 LBK 1 Look Back Kit Exploded View...
Страница 27: ...27 LBK1 1 1 Main Support Exploded View...
Страница 28: ...28 LBK1 1 2 22 Monitor and LCD Display Mount...
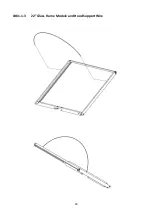
Страница 29: ...29 LBK1 1 3 22 Glass Frame Module and Hood Support Wire...
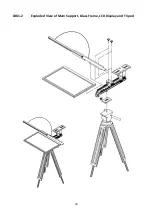
Страница 30: ...30 LBK1 2 Exploded View of Main Support Glass Frame LCD Display and Tripod...
Страница 31: ...31 LBK1 3 Look Back Kit Assembly...
Страница 71: ...71 Close Up with Chromakey Slides Close Up Interactive Pen Mark...
Страница 72: ...72 Wide Shot Interactive Pen Mark Logo Interactive Pen Mark Logo...
Страница 73: ...73 Dual Camera Effects Interactive Pen Mark Close Up Interactive Pen Mark...
Страница 74: ...74 Wide Angle with Chromakey Interactive Pen Mark Wide Shot Interactive Pen Mark Logo...
Страница 75: ...75 Interactive Pen Mark Logo Close Up with Chromakey...
Страница 76: ...76 Wide Angle with Chromakey...
Страница 79: ...79 14 Dimensions...
Страница 80: ...80 Unit mm...
Страница 83: ...83 Note...