background image

60

Operating the Web Control Panel

Cybernetics

UM-MV-86-B1-0801

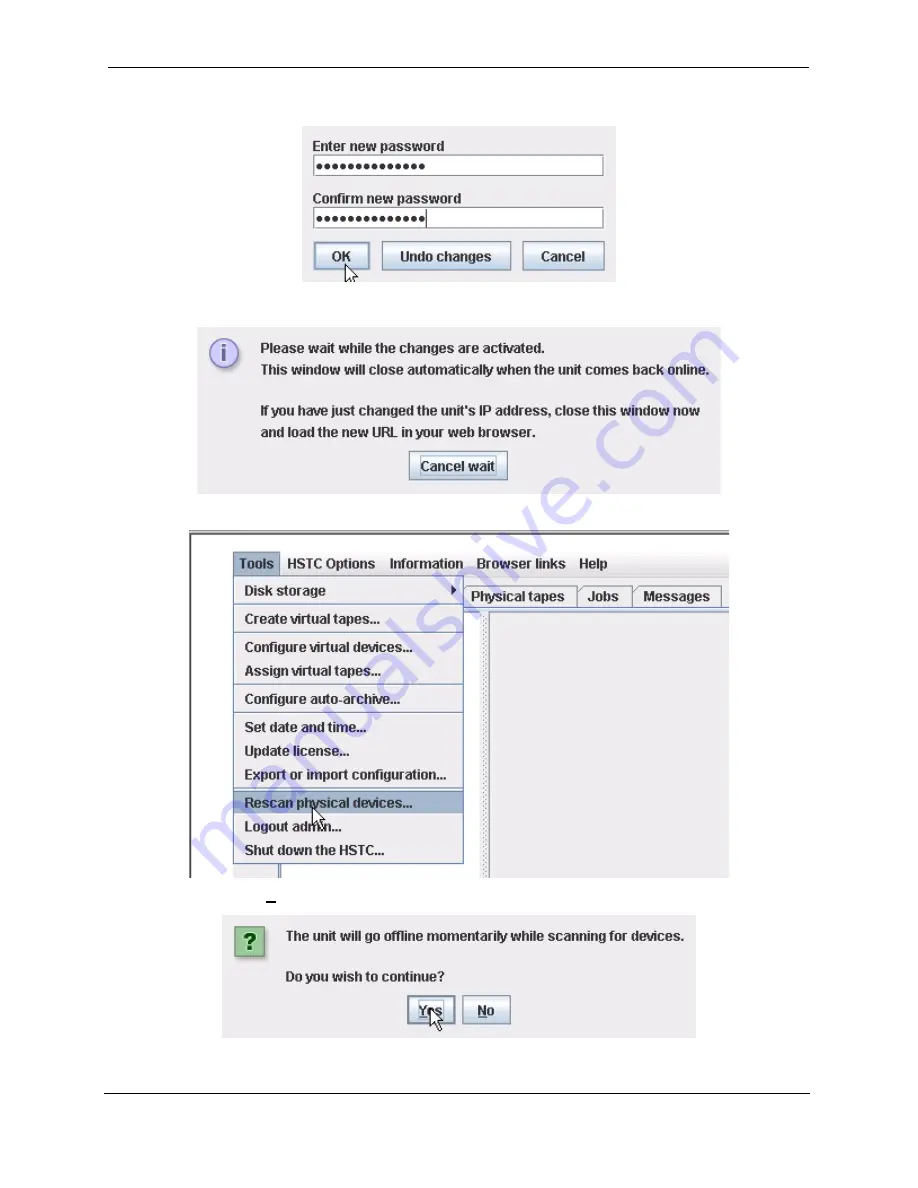
6. Enter new password. (Password must match the password on the iSCSI device

and is recommended to be 14 characters long). Press 

OK

7. A dialog box will pop up. Wait for it to disappear.

8. Select 

Rescan physical devices...

 form the 

Tools

 drop-down menu.

9. Select 

Yes

.

Содержание miSAN-V6

Страница 1: ...UM MV 86 B1 0801 Cybernetics Operator s M A N U A L miSAN V Series D2D2T Backup with removable AIT Tape Drive UM MV 86 Rev B1 0801 ...

Страница 2: ... in a commercial environment This equipment generates uses and can radiate radio frequency energy and if not installed and used in accordance with the instruction manual may cause harmful interference to radio communications Operation of this equipment in a residential area is likely to cause harmful interference in which case the user will be required to correct the interference at his own expens...

Страница 3: ...SCSI Initiator Driver Installation 15 Chapter 2 Setting Up the miSAN 17 Installation Requirements 17 Installing the Hardware Components 18 Rackmount Installation 18 Parallel SCSI 18 Connecting the Cables 18 Parallel SCSI 18 Network 19 Management LAN Port ETH0 19 iSCSI Network Ports ETH1 ETH2 19 Power 19 Connecting Power to an Uninterruptible Power Supply UPS 19 Power Button 20 Configuring the Netw...

Страница 4: ...n 34 Browser links 35 Help 35 Tabs introduction 35 Devices Tab 35 Virtual tape Tab 36 Physical tapes Tab 36 Jobs 36 Messages 36 Main Menu 36 Tools 36 Disk Storage 37 Create Virtual Tapes 38 Basic Tab 39 Advanced Tab 40 Format Disks Tab 40 Configure Virtual Devices 41 Assign Virtual Tapes 42 Physical Stacker Copy Profiles 43 Configure Auto archive 44 Set Date and Time 45 Update License 46 Export or...

Страница 5: ...tional Virtual Tape storage58 Network Configuration 62 Hostname 62 Default gateway 62 Nameserver 62 ethX 1000 Mbps 62 ethX IP bonding 64 ethX IP address 64 ethX subnet mask 64 ethX MTU 64 bondX 65 bondX IP address 65 bondX subnet mask 65 bondX MTU 65 Message Delivery 65 Send messages by email 66 SMTP server 66 SMTP username 66 SMTP password 66 Email address es 66 Accounts 67 Admin 67 User 67 Advan...

Страница 6: ...iSAN V Series Messages 106 Menu Operation 106 SCSI configuration 107 Configure iSCSI hosts 107 Assign virtual devices to hosts 107 Swap SCSI HBA ports 108 Offline Maintenance 108 Display debug output 108 Rescan SCSI buses 108 Reset options to defaults 109 Test system memory 109 Shut Down 109 109 Chapter 5 Using the 3ware Disk Manager 111 Browser Requirements 111 Accessing From a Browser 111 Loggin...

Страница 7: ...gs Page 134 E mail Notification 135 Password 135 Page Refresh 135 Remote Access 136 Incoming Port 136 Configuring Units 136 Creating a New Unit 136 Drives to Be Included in the Unit 136 Type of RAID Configuration 137 Rebuilding a Unit 137 Configuring Drives 138 Creating a Hot Spare 138 Adding a Drive 138 Removing a Drive 138 Chapter 6 Packing and Shipping Instructions 141 Removing the miSAN V Seri...

Страница 8: ...inux iSCSI Initiator B 163 Introduction 163 Installation 163 Linux Kernel 2 6 Notes 163 Core iSCSI Setup 164 Debian lk 2 6 164 Red Hat 9 Enterprise Linux 3 165 SuSE Linux Pro 9 1 165 Source Compilation 165 Setup 165 Test the setup 165 Appendix C Glossary C 167 Appendix D Common Questions D 175 Appendix E Return Policies E 179 Shipping Damage 179 Hardware Products 179 Software Products 180 Tape Med...

Страница 9: ... Devices Tab 71 Figure 3 23 Renaming a Virtual Tape Drive 71 Figure 3 24 Virtual Tape Drive Device Panel 72 Figure 3 25 Virtual Stacker Device Panel 73 Figure 3 26 Move to slot Popup Menu 74 Figure 3 27 Move to drive Popup Menu 74 Figure 3 28 Physical Tape Drive Device Panel 75 Figure 3 29 Setup offload Window 77 Figure 3 30 Select virtual tape Window 77 Figure 3 31 Clear VT for offloading Option ...

Страница 10: ...Tab 102 Figure 3 61 New Message Indicator 102 Figure 5 1 3DM Main Screen 112 Figure 5 2 3DM Menu Bar 113 Figure 5 3 Controller Summary Page 118 Figure 5 4 Controller Details Page 119 Figure 5 5 Unit Information Page 120 Figure 5 6 Unit Details Page 121 Figure 5 7 Drive Information Page 122 Figure 5 8 S M A R T Data Page 123 Figure 5 9 Controller Settings Page 124 Figure 5 10 Scheduling Page 127 Fi...

Страница 11: ...fering tape backup and archiving services to multiple hosts Virtual tape backups can be automatically duplicated to tape cartridges assuring data integrity by maintaining redundant tape backups The miSAN V Series increases the functionality and extends the usefulness of a current parallel SCSI backup solution iSCSI provides network accessibility for peripheral backup devices With virtual tape driv...

Страница 12: ...is powered on For more details on this feature please see the Removeable AIT manual that was included in your product documenta tion CD Features Hardware Two iSCSI interface ports for data transfer Gigabit Ethernet 10 100 1000Base T One Ethernet interface port for remote administration Gigabit Ethernet 10 100 1000Base T Web Control Panel and Telnet Menu System Two 68 pin VHDCI LVD ports Host Ultra...

Страница 13: ...d archiving speed Multiple Ethernet interfaces can be aggregated bonded for increased data transfer band width The RAID based disk storage provides enhanced data integrity and security The miSAN V Series makes efficient use of storage space and network bandwidth It transfers stored data in raw block format without the overhead of traditional file systems This can dramatically narrow the time requi...

Страница 14: ...tions Network Traffic Some network traffic is encrypted for security purposes and some network traffic isn t encrypted Encrypted Control link between miSAN and Java applet Web browser session to 3ware 3DM2 utility iSCSI passwords during login Not encrypted iSCSI data during backup or restore Telnet session to miSAN It would normally be safe to access the Java applet or 3ware 3DM2 utility over an u...

Страница 15: ...tems and download locations The miSAN V Series s Java based Web Control Panel will not be available until the unit is connected to the network and con figured as described later in this chapter Telnet Installation The miSAN V Series requires at least one host system installed with telnet client software for access to the text only Telnet Menu System The menu system will not be available until the ...

Страница 16: ...unning the Windows operating system Microsoft offers an iSCSI initiator driver See Appendix A Microsoft iSCSI Initiator Software Client for information on downloading installing and configuring the driver Linux users should see Appendix B Linux iSCSI Initiator setup Host systems for which iSCSI initiator drivers are not available cannot access iSCSI devices directly For these systems the Cyberneti...

Страница 17: ... the installation Level surface or 2U rackmount space near a readily accessible power outlet Cybernetics miSAN V Series unit Rackmount hardware kit and tools for rackmount installations Standard 3 prong AC power cord IEC320 C13 to NEMA 5 15P for each power supply 2 cords Ethernet cable CAT 5e or 6 unshielded twisted pair with RJ 45 connector for each standard network interface 3 Parallel SCSI cabl...

Страница 18: ...lel SCSI port is terminated internally The port marked host is an Ultra160 LVD which is factory set to connect to an initiator host system The port marked Reserved or Unused is used for the internal tape drive and should not be connected to by the user The miSAN V Series may not function properly if any device is attached to the reserved port Figure 2 1 shows the rear view of a typical miSAN V Ser...

Страница 19: ...up server using a CAT 5e or CAT 6 Ethernet cable Please note that in some configurations the ETH1 and ETH2 ports may be located in a different posi tion than shown in the above illustration Each port is clearly labeled Power Using the AC socket on both power supplies connect the miSAN V Series to a readily accessible AC power source using a standard 3 prong power cord for each socket Connecting Po...

Страница 20: ...lies must be connected to an AC power source preferably separate power mains The miSAN V Series uses both power suppl simultaneously to provide immediate failover in case one power supply fails If you use an APC Smart UPS model UPS with a Network Managem Card or a Tripp Lite SmartPro SmartOnline model UPS with SNMPWEBCARD you can configure the UPS to send messages to the HS when the power fails en...

Страница 21: ...rk Setup Preparation 1 Make sure the computer is powered on and ready for use 2 Connect a CAT 5e or CAT 6 ethernet cable between the Administrative LAN interface port ETH on the rear of the miSAN V Series and the network interface port on the rear of the computer 3 Power on the miSAN V Series using the momentary power switch on the front panel See Figure 2 2 Wait for the miSAN V Series to complete...

Страница 22: ... computer to see and communicate with the miSAN V Series on your network 5 Remove the ethernet cable between the Administrative LAN interface port ETH 0 on the rear of the miSAN V Series and the network interface port on the rear of the computer Replace with a cable that is attached to the network 6 Reload the Web Control Panel in the browser at the new miSAN V Series IP address for the Management...

Страница 23: ...s which are initiators If another iSCSI tape device is also on the network you can configure the miSAN V Series to use the device See below Before configuring the miSAN V Series to use remote iSCSI tape devices it must first be set up on the network See earlier Network Setup on page 22 This makes the miSAN V Series visible to host iSCSI initiators on the network and thus available as an initiator ...

Страница 24: ... one of the tape drives is vis ible only to a specific iSCSI initiator host system and the other tape drive is visible only to a different iSCSI initiator allowing simultaneous backups from both host systems without the possibility of inter ference This is explained in the Offline Maintenance on page 108 Host iSCSI Setup Once the miSAN V Series is available on the network as an iSCSI device it wil...

Страница 25: ...C Options Accounts Administrator Account The administrator password is used for the follow ing purposes Java applet login as administrator SSH and telnet login as menu Viewing the debug messages web page Viewing the menu settings web page Viewing the hardware information web page Performing a firmware upgrade The User The user account is disabled by default To enable the user account go to the men...

Страница 26: ...an offload with encryption disabled Accessing the Encryption Configuration menu Setting Up the miSAN V Series Virtual Components This section explains the basic setup operations for configuring the miSAN V Series virtual compo nents The Initial Setup Guide section includes a series of short instructions for setting up the miSAN V Series before its first use or a complete reconfiguration The Config...

Страница 27: ...ked up the intended backup schedule e g incremental vs full back ups the time length of the backup window and the number of backup host systems that can send data The miSAN V Series can be configured to create multiple virtual tape drives and stackers up to the purchased limit and can support multiple simultaneous backup and restore operations using the independent virtual devices Note The miSAN V...

Страница 28: ...r When setting the number of virtual stacker drives consider the number of physical drives in the external tape library You should create the same number of virtual drives as there are physical drives so that if you enable direct host access each physical drive will have a corresponding virtual drive You can enable host access with the physical stacker s popup menu Access from a virtual stacker pa...

Страница 29: ...e miSAN V Series commits the changes to the disk s The Create virtual tapes window will close when finished Creating Virtual Devices The miSAN V Series can be configured to emulate up to the purchased maximum number of virtual tape drives whether standalone or assigned to a virtual stacker based on the miSAN V Series model 1 Connect to the miSAN V Series using the Web Control Panel in a web browse...

Страница 30: ...e assignments 4 Select the desired unassigned virtual tapes to assign to the desired virtual device To select a range click the first tape in the range hold down SHIFT and then click the last tape in the range 5 Click Assign to assign the selected virtual tapes to the desired virtual device 6 Click OK when finished assigning virtual tapes Configuring a Physical Stacker When configured with the opt...

Страница 31: ...ing and configuring the miSAN V Series and creating virtual tapes and devices make sure to verify data and tape path integrity by performing a test backup and restore over the iSCSI network Some backup software packages include a VERIFY fea ture that will check to ensure the data on disk and the data on tape are identical If the backup software package does not include a VERIFY capability make sur...

Страница 32: ...l it powers off Failure to log off the iSCSI initiator before shutting down the miSAN V Series will result in error messages When Reboot is selected the shutdown routine explained above will occur and the miSAN V Series will restart and be ready for use again after about 90 seconds Note If the Host machine is connected to the miSAN V Series via Microsoft iSCSI Initiator software it is necessary to...

Страница 33: ...ual tapes If the miSAN V Series is configured with the Tape Library Control support option another tab labeled Physical tapes will show the status of physical tapes in an external tape library Main Menu Bar Introduction The Web Control Panel main menu bar appears at the top of the interface The menu bar offers five selections Tools HSTC Options Information Browser links and Help See Figure 3 1 The...

Страница 34: ...out admin and Shut down the HSTC See Figure 3 2 For detailed infor mation see Tools on page 36 HSTC Options The HSTC Options selection contains menu items that allow you to configure the optional HSTC engine components The menu offers the following items which are explained in the Menu Descriptions section Configuration SCSI configuration Net work Configuration Message Delivery Accounts and Advanc...

Страница 35: ...ttings and hardware configurations The menu offers the following items which are explained in the Menu Descriptions section View debug messages View list of menu settings and View hardware information See Browser links on page 70 Help The Help selection contains the Applet Acknowledgements See Figure 3 7 The applet acknowledgements text is reproduced in the Notices under Apache Software License Ta...

Страница 36: ...may use to do backups and restores The HSTC performs the following types of jobs Copy from virtual tape to physical tape Copy from physical tape to virtual tape Copy from virtual tape to virtual tape Auto archive Inventory a physical tape in a stacker Enable host access to a physical tape in a stacker using a standalone virtual tape drive Erase a virtual tape Jobs of different types are created in...

Страница 37: ...Only one of these options can be selected at a time they toggle the disks online and offline When the disks are online hosts can access the virtual tapes and the miSAN V Series operates normally When the disks are offline the host can create delete and reconfigure the RAID arrays via the 3DM 2 See above When you take the disks offline by selecting Disks offline for management the miSAN V Series wi...

Страница 38: ...n by the miSAN V Series is presented in the Item column The numbered disk is immediately followed by the names of the virtual tapes it contains The total capacity in gigabytes for each disk and virtual tape is shown in the Size column The Free Space for each disk is also listed The Create virtual tapes window presents the following three tabbed panels for man aging the disks used for the virtual t...

Страница 39: ...Once the desired virtual tapes have been configured click the Apply changes button to execute the changes to the tape cache While the miSAN V Series creates the virtual tapes the Create virtual tapes window will be greyed out and unavailable it will close when finished Basic Tab The Basic tab is used for setting a number of virtual tapes to be created as equally sized out of the total capacity for...

Страница 40: ...e tape size you can cre ate groups of virtual tapes having different sizes Format Disks Tab The Format disks tab is used for formatting erasing the disks used for the miSAN V Series virtual tape cache The tab indicates if any number of disks need to be for matted which is necessary before initially using the disk storage space See Figure 3 12 Figure 3 10 Create Virtual Tapes Basic Tab Figure 3 11 ...

Страница 41: ... is based on the model configuration When selected a window will appear showing the current number of virtual devices See Figure 3 13 To set the number of standalone tape drives or stackers enter the desired quantity for the device and then click OK When configuring a stacker the number of tape drives and slots must also be set The device tree on the Devices tab will reset to update the configurat...

Страница 42: ...pes Listboxes correspond ing to the virtual devices appear to the right of the unassigned tapes listbox The tapes in the unassigned listbox can be selected individually or in a contiguous range To select a range click the first tape in the range hold down SHIFT and then click the last tape in the range To assign the selected virtual tapes click Assign for the desired virtual device Click OK after ...

Страница 43: ...appear showing all the virtual tapes and all the physical stacker slots The Profiles frame shows all the existing copy pro files When a copy profile is selected its saved slot associations are shown in the Vir tual tape column in the Slot associations table To create a copy profile click New To rename the copy profile select it enter the new Profile name and then click Set To associate a virtual t...

Страница 44: ... group of virtual tapes to maintain backups for When this menu item is selected a window will appear showing a frame for each physical standalone tape drive The Unassigned tapes frame lists the virtual tapes not assigned to a physical drive See Figure 3 16 To assign virtual tapes to a physical tape drive to be used for automatic backups first enable Auto archive for the desired physical tape drive...

Страница 45: ... into the drive the Most recent backup mode will cause the miSAN V Series to auto matically duplicate only the most recent virtual tape backup regardless of how long ago the backup was made The miSAN V Series will not eject the tape after a suc cessful copy so the tape cartridge will be available for duplicating another backup Thus with the Most recent backup mode selected a user is assured a phys...

Страница 46: ... used to initialize changes to the miSAN V Series configuration Export or Import Configuration Clicking on this option will open a new web page Additional instructions are given as well as the ability to View Configuration Export Configuration to a File and Import Configuration from a File Rescan Physical Devices This item forces the miSAN V Series to rescan the parallel SCSI buses for connected d...

Страница 47: ...taneously users must not rescan for physical devices while other users are connected Doing so may interrupt current operations disconnect other clients or cause other browser control panels to display incorrect information If the miSAN V Series must be reconfigured while other users may be accessing the control panel wait until all current and queued jobs have completed To ensure no jobs are left ...

Страница 48: ...until it pow ers off Failure to log off the iSCSI initiator before shutting down the miSAN V Series will result in error messages When Reboot is selected the shutdown routine explained above will occur and the miSAN V Series will restart and be ready for use again after about 90 seconds Note If the Host machine is connected to the miSAN V Series via Microsoft iSCSI Initiator software it is necessa...

Страница 49: ...s or to a virtual standalone drive Drives then stacker If there is more than one virtual stacker each stacker and its virtual tape drives will be assigned SCSI IDs as a set Examples A miSAN V Series with two virtual standalone drives and with Base SCSI ID set to 2 will use SCSI ID 2 for the first tape drive and SCSI ID 3 for the second tape drive Figure 3 21 Configuration Note Some of the options ...

Страница 50: ...ces relative to host I O resources The option you choose for this setting determines the policy the HSTC will use when allocating I O resources The options are as follows Concurrent Host I O and job I O may proceed concurrently Host disk write exclusive Job I O is disabled only on disks the host is writing to Host disk exclusive Job I O is disabled only on disks the host is reading from or writing...

Страница 51: ...s of host write protect status a virtual tape can always be erased via the Virtual tapes tab on the Web Control Panel If Enabled a virtual tape will remain unprotected after a backup making it avail able for appending or overwriting by another backup Enabling the overwrite fea ture ensures a virtual tape is available for writing even if its contents have not been committed to tape This is useful i...

Страница 52: ...n to a physical tape cartridge If Disabled the virtual tape volume tags will remain unchanged after a copy to barcoded physical tapes See Virtual Tape Popup Menu on page 94 for informa tion about adding volume tags to virtual tapes Virtual Device Emulations If the miSAN V Series is configured with multiple emulation support See Define Emulations on page 68 this option will display a window that al...

Страница 53: ...ins operational but prepared for shutting down quickly AC power restored before UPS battery is drainedThe miSAN V Series returns to normal operation UPS battery is low The miSAN V Series shuts down cleanly ensuring the safety of saved data Configuring an APC Smart UPS model UPS with Network Management Card You must configure the Network Management Card s network parameters so the Smart UPS can com...

Страница 54: ...arning Level When you check SNMP Notification a window will pop up with more configuration options Under Message Settings set the two time values to 0 Under IP Addresses highlight the HSTC s IP address so the HSTC is notified of the event Also make sure the Shutdown action for the On Battery event is not checked since this could cause a loss of output power without an SNMP warning message Under Se...

Страница 55: ...rom the tape during a restore Tape drives handle data compression transparently in hardware the application software doesn t have to do anything except tell the tape drive to enable it Unfortunately a tape drive s internal compression is useless for encrypted PTs since the tape drive receives the data only after encryption see the rule above The HSTC always disables the tape drive s internal compr...

Страница 56: ...s no connection with the actual SCSI ID settings for any attached physi cal devices This setting and the Device ID Order setting below have no effect and will not be displayed on an iSCSI only system This item sets the base lowest numbered SCSI ID that the unit uses Default is 2 These are the SCSI IDs that will be seen by the host computer system Available selections are 0 through 15 The miSAN V S...

Страница 57: ...ems must be configured to use CHAP authentication with the same password set in order to connect to the iSCSI target devices To set change or remove the iSCSI access passwd follow the same proce dures as for the Menu password iSCSI host username This menu item is used together with the iSCSI host password See iSCSI host password to permit the miSAN V Series to identify itself as a legitimate devic...

Страница 58: ...eries to use up to four remote iSCSI target devices There are three submenu items for each numbered device Remote iSCSI device X Device X IP address and Device X iSCSI password Remote iSCSI device X Choices are Enabled and Disabled for each remote iSCSI device Device X DNS Name or IP address Set this to match the DNS Name or IP address of the remote iSCSI device tape drive library and or iSCSI sto...

Страница 59: ...ing the Web Control Panel Cybernetics UM MV 86 B1 0801 2 Enable Remote iSCSI device 1 3 Enter the IP address iSCSI device 4 Enter iSCSI username default iSCSI username is CyberneticsASP 5 Click on iSCSI password ...

Страница 60: ... 0801 6 Enter new password Password must match the password on the iSCSI device and is recommended to be 14 characters long Press OK 7 A dialog box will pop up Wait for it to disappear 8 Select Rescan physical devices form the Tools drop down menu 9 Select Yes ...

Страница 61: ...t Create virtual tapes from the Tools drop down menu 11 Open the Format disks tab Select either Format disks that need formatting or Format all disks After formatting the disks press the Apply changes 12 Use either the Basic or Advanced tabs to set up the new virtual tapes ...

Страница 62: ...default is 127 0 0 1 may be set in the same manner as the miSAN V Series default gateway IP address ethX 1000 Mbps Choices are Enabled Disabled and Bonded for each interface The primary Ethernet interface is eth0 Depending on the configuration there will usually be either three or five Ethernet interfaces installed They will be named in sequence eth0 eth1 etc Default for each interface is Enabled ...

Страница 63: ...nt eth0 192 168 1 1 255 255 255 0 eth1 192 168 2 1 255 255 255 0 This is a valid combination IP addresses looking like 192 168 1 X are routed to eth0 and addresses look ing like 192 168 2 X are routed to eth1 eth0 192 168 1 1 255 255 0 0 eth1 137 157 1 8 255 255 0 0 This is a valid combination IP addresses looking like 192 168 X X are routed to eth0 and addresses looking like 137 157 X X are route...

Страница 64: ...assigned static IP addresses The miSAN V Series does not support DHCP Dynamic Host Configuration Protocol since it is intended that the network interface s will be up indefinitely and lease renegotia tion might interrupt a backup operation in progress The default IP address for the first Ethernet interface is 192 168 1 1 Default IP addresses for subsequent interfaces are 192 168 2 1 192 168 3 1 et...

Страница 65: ...works that are jumbo packet capable See Appendix C Glossary Message Delivery The miSAN V Series can be configured to send email messages to notify selected recipients when any of the following events occur A copy from virtual to physical tape completes which also reports whether the copy was successful A disk error occurs which may require replacing the disk The miSAN V Series goes offline unexpec...

Страница 66: ...ices are Enabled and Disabled for the miSAN V Series email messaging feature Immediately after saving this setting as Enabled the miSAN V Series will send an email message to all addresses configured in the Email address es setting to test and verify the configured SMTP server settings SMTP server Set this menu item to the IP address and port of the SMTP server on the network Enter the IP address ...

Страница 67: ...ntrol Panel and or enter the Telnet Menu System and make configu ration changes Admin To set a password or to change an existing password Click on the No password set button The button may also be labeled Changed or Not changed Enter the desired new password and then save the change To disable password authentication remove an existing password clear the cur rent entry without entering a new passw...

Страница 68: ...ons are disabled by default Advanced Options Advanced Menu s These menu selections present a set of submenus named Advanced Menu 0 Advanced Menu 1 etc These are preset Do not change these settings unless directed by Cybernetics Technical Support Define Emulations This menu selection allows for configuring the miSAN V Series to support differ ent emulations for tape drives and stackers up to four e...

Страница 69: ...roduct Information This menu item displays the installed CY HSTC engine code version Version unit serial number EUI serial HASP security device ID number ID host bus mask Host bus mask miSAN V Series flags Flags Ethernet interface s numbered as eth and MAC address es HWaddr Host bus mask is a number indicating which SCSI ports are assigned as targets for host systems Host bus mask is a number indi...

Страница 70: ...em provides web browser clients with access to additional web pages on the miSAN V Series Each web page opens in a new browser window The following menu items are useful for troubleshooting and viewing settings and hardware configu rations View debug messages Shows the miSAN V Series message log which can be updated by refreshing the browser window If trouble occurs with the miSAN V Series this pa...

Страница 71: ...er Devices is fully expanded by default showing a folder for Virtual and Physical devices All configured virtual devices are found in the Virtual folder All external physi cal devices whether physically attached or connected over the network using iSCSI appear in the Physical folder If an externally connected physical device does not appear in a folder make sure the miSAN V Series is configured pr...

Страница 72: ...the miSAN V Series will automatically mount the next virtual tape listed in the Mounted medium listbox when a host issues an eject command This is useful during backups such as when the currently mounted tape is full and during restores such as when searching through tapes When Autoload is enabled tapes are changed sequentially allowing a virtual standalone drive to behave like an autoloading tape...

Страница 73: ...drive You can enable direct host access to a physical tape drive from the physical tape drive s Menu button See Physical Stacker Device Panel on page 82 Direct host access for a physical stacker pairs the physical stacker slots with the virtual stacker slots beginning at Slot 1 You can enable direct host access to a physical stacker with the physical stacker s popup menu See Physical Stacker Devic...

Страница 74: ... Web Control Panel Cybernetics UM MV 86 B1 0801 another slot See Figure 3 26 or drive See Figure 3 27 Unavailable slots and drives are greyed out Figure 3 26 Move to slot Popup Menu Figure 3 27 Move to drive Popup Menu ...

Страница 75: ...rive serial number as returned from the SCSI Inquiry command Drive state Current physical tape drive activity as one of the following Not in use Host access virtual tape drive Host access virtual stacker or Assigned to a job Physical stacker tape drives will also report when reading writing a physical tape header or copying to a virtual tape Drive status Tape drive mechanism condition which report...

Страница 76: ...Button brings up a drop down menu with the following options 1 Inventory Identify tape This option lets you manually identify the currently loaded tape from a list of tapes in the database Use this option after reinserting a tape that you had previously loaded and ejected so the miSAN V Series can use the same database entry for the tape as before This option is usually not necessary for AIT or LT...

Страница 77: ...ing from a virtual tape to the physical tape drive To specify which virtual tape to be offloaded to the physical tape 1 Click Select VT to offload 2 Select the virtual tape you want to copy to the physical tape 3 Click Use selected VT Figure 3 29 Setup offload Window Figure 3 30 Select virtual tape Window ...

Страница 78: ...ifferent physical tape Erase VT Choose this if the virtual tape contains data you no longer need for example if the virtual tape contains an older backup that has already been off loaded to physical tape Your backup software will see the virtual tape as a new blank tape Copy PT header VT Choose this if the virtual tape contains data which you no longer need and the physical tape contains a backup ...

Страница 79: ...ontain any data that you want to offload to the physical tape e g if the virtual tape was already offloaded successfully Deselect the Wait for backup option if the virtual tape does contain data from a backup that you want to offload Wait for backup is always selected if you choose Copy PT header VT or Copy PT VT Wait for backup is selected by default if you choose Erase VT or if the virtual tape ...

Страница 80: ...tinuously then any future backups will be offloaded Load tape onto disk Use this option to import the data from your physical tapes into the disk cache using Load tape onto disk Note you can also do this by selecting the Setup offload option and then the Copy PT VT option for the Action which is the preferred way if you intend to append to the backup and offload the appended data back to the physi...

Страница 81: ...y The miSAN V Series lets the software move the single physical tape around in the virtual stacker however the physical tape just remains loaded in the tape drive If you physically eject and replace the tape to your software it looks like you opened the stacker door changed the tape in the magazine slot and then closed the stacker door Disabling host access Go back to the Host access submenu and c...

Страница 82: ...on the popup menu Status Shows one of the following Door open or not ready Initializing Too many tapes loaded This happens if you have a tape in every magazine slot plus an additional tape in the tape drive Remove the the tape from the tape drive and try again Ready Moving tape In use by another machine Some other machine is using the stacker OFFLINE The stacker is not responding to commands Check...

Страница 83: ...option after loading tapes that you had used previously so the miSAN V Series can use the same database entries for the tapes as before You may find it easier to identify tapes in the data base if you rename them from the Physical tapes tab when you initially load them Physical Tapes Tab on page 97 To help you find the correct set of tapes from the database the tapes are grouped into sets that wer...

Страница 84: ...stacker inventory To assign a virtual tape to a physical tape for automatic copying first select the desired virtual tape in the Virtual tapes listbox Then select the row for the desired physical tape cartridge in the Physical tapes table Finish by clicking the button which assigns the virtual tape name in the Virtual tape column to the physical tape The Help button provides an explanation of how ...

Страница 85: ...a job to copy the data header from the physical tape to the virtual tape When your software sees the data header on the virtual tape it should purge the old backup from its data base when overwriting the virtual tape with a new backup Copy PT VT Choose this if the virtual tape contains data you no longer need and the physical tape contains a backup you want to either restore or append An alternati...

Страница 86: ...load disk to tapes This option creates jobs that do the actual work of copying the virtual tapes to physical tapes See Jobs Tab on page 99 for more information on Jobs Selecting Offload disk to tapes will show the Offload disk to tapes window with its two tabs Copy selections and Copy options Figure 3 37 Wait for backup Option Figure 3 38 Clear VT for offloading Option Note Offload disk to tapes c...

Страница 87: ... page 43 The Copy options tab is used for specifying when to initiate the copies It pre sents two sets of buttons for setting the frequency of the copies and an option for delaying their start See Figure 3 41 You can choose how many times the jobs will offload before stopping Offload each virtual tape only once If you need to do the offload again you can start more jobs later Run jobs continuously...

Страница 88: ...to Offload disk to tapes using multiple physical tapes Note you can also do this by selecting the Setup offload option and then the Copy PT VT option for the Action which is the preferred way if you intend to append to the backup and offload the appended data back to the physical tape If you want to import the data for restoring from the disk cache then Load tapes onto disk is easier To import the...

Страница 89: ...3 The Help button provides an explanation of how to set up the copy Once all the desired physical tapes have been assigned click Start After clicking Start the copy job will begin immediately or will be queued until the physical stacker tape drive becomes available During the copy process the physical stacker tape drive device panel will show the Drive state as Copying to virtual tape name Host ac...

Страница 90: ...irtual stacker the miSAN V Series simulates the operation of a stacker with only one tape in its inventory The miSAN V Series lets your backup software move the single physical tape around in the virtual stacker however the physical tape just remains loaded in the tape drive If you physically eject and replace the tape to your backup software it looks like you opened the stacker door changed the t...

Страница 91: ...of the stacker Stacker type Normal or Autoloader Number of magazine slots import export slots and tape drives These number give the actual number of elements rather than the HSTC license limited numbers Optical Drive Device Panel When selected in the device tree an optical drive will reveal a device panel in the frame on the Devices tab See Figure 3 45 The optical drive device panel shows the foll...

Страница 92: ...a single virtual tape of that size Backup a VT Allows for copying a virtual tape to optical disc After clicking Backup a VT a window will appear with a drop down listbox that includes all the virtual tapes To begin the copy select the desired virtual tape from the listbox See Figure 3 46 and then click OK The copy will begin immediately or be queued until the optical drive becomes available The mi...

Страница 93: ... the following tape fields See Figure 3 47 Tape name Virtual tape name tape label which can be renamed using the Control Popup Menu Status Current tape activity as one of the following Idle Mounted or Copying Capacity Total tape size gigabytes Used Used tape capacity gigabytes Free Free tape capacity gigabytes Use Tape use percentage Copies Number of copies committed to physical tape cartridge Fig...

Страница 94: ...quence click Next or Previous Set volume tag Allows for adding a volume tag to the virtual tape A volume tag contains information used to physically identify a tape cartridge such as is presented by a barcode label on a tape cartridge Thus the Set volume tag control allows a virtual tape to present a virtual barcode to a host Erase Erases the virtual tape contents After confirming the tape erase t...

Страница 95: ...tape and clicking OK a box will appear asking for confirmation about overwriting the contents of the destination virtual tape click Yes to start the copy When the copy begins the name of the destination virtual tape will be changed to show name of the source virtual tape inside brackets e g VT 1 During the copy the name of the destination virtual tape will be followed by an asterisk to indicate th...

Страница 96: ...Finish by clicking the Assign button which assigns the physical tape barcode to the virtual tape Volume Tag The Copy profiles frame see below allows for selecting and using one of the saved copy profiles to automatically assign physical tape barcodes to the virtual tape volume tags See Physical Stacker Copy Profiles on page 43 Edit tab Use this tab to enter the volume tag manually The volume tag c...

Страница 97: ... copies committed to physical tape cartridge and Last modified month day year and time of last update see Set Date Time See Figure 3 55 Physical Tapes Tab The Physical tapes tab shows the current status of tape cartridges in a physical library The HSTC remembers the contents for physical tapes containing copies of vir tual tapes displaying the status information on the Physical tapes tab The tab s...

Страница 98: ...alidate a tape cartridge and refresh the physical library slot first select the tape cartridge on the physical tapes tab Right click the selected tape and then a popup menu will appear with a command to Invalidate this information Status Fields The physical tapes in the library are presented in a table with rows for each tape cartridge and columns for the following tape fields See Figure 3 56 Name...

Страница 99: ...hysical tape in a stacker Enable host access to a physical tape in a stacker using a standalone virtual tape drive Erase a virtual tape Jobs of different types are created in different ways but once created all jobs can be managed using the Jobs tab The job database view is split into three parts the Jobs table showing summary information for all the jobs the Job log and the Activity monitor Jobs ...

Страница 100: ... a copy from virtual tape to physical tape encounters a problem with the physical tape then the HSTC will automatically sus pend the job until the user decides what to do If you try to start a new job that sus pends itself immediately then you will get a popup message to notify you of the problem You can resume a job by selecting the suspended job in the table right clicking for a popup menu and s...

Страница 101: ...opy ing the text in the Job log to the clipboard and then pasting the text into a text editor Activity Monitor The Activity monitor shows detailed information for the job selected in the Jobs table Only a job in the Running state will display any activity on the Activity monitor Figure 3 58 Exporting the Job log Note Multiple Running job statuses cannot be shown simultaneously on the Activity moni...

Страница 102: ...w ever to prevent data loss the user should click the Remove disk button in the Java applet first Offloading a Virtual Tape to a USB disk has a speed averaging about 28 MB s Restoring from a USB disk drive must be done through the miSAN V Series no other software understands the format of the data on the disk Virtual Tapes on USB disk drives may be treated like any other virtual tapes as long as t...

Страница 103: ...Ts on one USB disk just like any other disk drive Note that Tools Create virtual tapes does not list USB disks 2 Backup a VT creates a VT VT copy job to copy a VT to the USB drive The desti nation VT must be created first using the Create VTs button 3 Remove disk prepares the USB drive for hot unplug Always press this button and wait for the Ready for removal message before unplugging the USB driv...

Страница 104: ...104 Operating the Web Control Panel Cybernetics UM MV 86 B1 0801 ...

Страница 105: ...n no local echo and 80 24 characters or more Telnet access must be made via the TCP IP network connection If the unit includes more than one network interface a telnet session may by opened on any of the interfaces Access via a serial port is not supported Only one telnet session at a time is supported If a second telnet session is opened from the same or another host on any interface only a blank...

Страница 106: ...he Menu Descriptions section earlier in this chapter includes detailed explanations for menu selections and items options This section will focus on those menu items that are only found in the Telnet menu system as opposed to the Web Control panel At the initial screen typing m will bring up the Main Menu Each menu item is numbered and pressing a number will bring up the corresponding submenu Simi...

Страница 107: ... Menu 2 At the Main Menu type 2 to bring up Network Configuration 3 Type 1 to bring up the Hostname entry This will display the current hostname default is cyberasp 4 Enter the desired hostname and press ENTER This will change the hostname display and return to the Network Configuration menu 5 Type s to save the change and exit from the menu The message Changes saved will be displayed briefly then...

Страница 108: ...e unless the miSAN V Series is idle If possible eject all tapes from tape drives and stop host system device drivers that communicate with the miSAN V Series A prompt will appear for confirmation to bring the unit offline before entering Offline Maintenance mode and again to bring the unit back online when through Display debug output This menu item displays debugging information useful to Cyberne...

Страница 109: ...est result as though Display debug output had been selected from the Offline Maintenance menu Shut Down This menu item is used for safely shutting down or rebooting the miSAN V Series Shutting down the miSAN V Series engine before powering off the unit helps insure the integrity of data in the virtual tape cache If the Shutdown option is selected a confirmation dialog will be displayed with the fo...

Страница 110: ...110 Telnet Menu System Cybernetics UM MV 86 B1 0801 ...

Страница 111: ...figured Browser Requirements 3DM 2 3ware Disk Manager displays information in a web browser It requires the fol lowing Microsoft Internet Explorer 5 5 and later or Mozilla 1 2 or later JavaScript must be enabled Cookies must be enabled For best viewing screen resolution should be 1024 768 with 16 bit color or more Accessing From a Browser The 3DM runs a web server on its default HTTPS SSL Encrypte...

Страница 112: ...k status configure and maintain the equipment 1 On the 3DM logon screen select whether you are a User or Administrator 2 Enter the password and click Login Working with the 3DM Screens 3DM s features are organized on a series of pages you view in your browser After you log in to 3DM the Summary page shows a list of controllers installed in the com puter at the URL specified Note The default passwo...

Страница 113: ...te enabling of unit write cache and policies that affect all units managed by the controller tasks that can be scheduled rebuild verify and self test and maintenance of individual units Unit configuration can also be done through the Management Maintenance page The Alarms page shows a list of alarms including the specific alarm message and the exact date and time it occurred The 3DM Settings page ...

Страница 114: ...t Shows the SMART data for a specific drive To see this page click the Port for a Drive at Specific Port drive on the Drive Information page Controller Settings Allows for viewing and changing settings that affect the units on the current controller To see this page choose Management Controller Settings from the menu bar Scheduling Allows for viewing and changing the schedule for tasks that affect...

Страница 115: ...r Administrator 3 Type the current password in the Current Password field If you are changing the password for the first time the factory set default password is blank leave the Current Password field empty 4 Enter the new password in the New Password field and again in the Confirm New Password field 5 Click the Change Password button to enact the change Managing E mail Event Notification 3DM can ...

Страница 116: ...hed to your 3ware RAID controller can change while you are viewing information about them in 3DM it s important to refresh the page infor mation regularly That way you can be assured that the information you see in 3DM is current You can manually refresh the information on a page by clicking Refresh Page in the menu bar But you can also have 3DM refresh the information on a regular basis Caution D...

Страница 117: ...ures available on the pages you work with throughout 3DM 2 It is organized by page as the pages are organized on the 3DM menu bar Controller Summary Page Controller Details Page Unit Information Page Unit Details Page Drive Information Page SMART Details About Drive at Particular Port Page Controller Settings Page Scheduling Page Maintenance Page Alarms Page 3DM Settings Page Note If you don t wan...

Страница 118: ...o printed on a sticker on the outside bracket of the controller Serial The serial number of the controller The serial number is also printed on a sticker on the outside bracket of the controller Firmware The firmware version running on the controller Driver The driver version being used to interact with the controller Status The overall status of the controller Possible statuses include OK Warning...

Страница 119: ...g on the controller Driver The driver version being used to interact with the controller BIOS The BIOS version on the controller Boot Loader Boot Loader version on the controller This field appears only for 9000 series controllers of Units The number of units on the controller of Ports The number of total ports on the controller regardless of whether each currently has a drive connected of Ports T...

Страница 120: ...nit column Unit The unit number assigned to the unit by the firmware Type The type of unit specified during configuration RAID 0 RAID 1 RAID 5 RAID 10 RAID 50 Single Disk JBOD or Spare For details about each of the RAID levels see Appendix C Glossary Capacity The logical capacity size of the unit Status The operational status of the unit OK Rebuilding Initializing Verifying Degraded or Inoperable ...

Страница 121: ...e details about the unit and each subunit However if the unit was a Single Disk only information about one disk would be shown Details on this page may include all or some of the following information described below To see details about a particular drive click the Port You ll see a list of all drives with the drive you selected highlighted Status The operational status of the unit or subunit OK ...

Страница 122: ...e showing the port you clicked on is highlighted The Drive Information page shows a list of drives on the controller specified in the drop down list on the menu bar and a summary of each one To see the SMART data for a drive click the link in the Port column Port The port to which the drive is connected Model The model of the drive Capacity The physical capacity of the drive Note that the capacity...

Страница 123: ...s shown for the drive can be useful to customer support SMART Details About Drive at Particular Port Page The SMART Details page appears when you click a Port on the Drive Information page SMART data is displayed as hex values Consult your disk drive manufacturer for information on how to interpret the SMART data The SMART data meaning varies by disk drive manufacturer and model Note In most cases...

Страница 124: ...The Controller Settings page appears when you choose Management Controller Set tings from the menu bar The Controller Settings page lets you view and change settings that affect the units on the controller specified in the drop down list on the menu bar Figure 5 9 Controller Settings Page ...

Страница 125: ...gorithms determine that a verify task is needed This feature is designed to make verification of units easier When you check this box the controller will run verify tasks as they are required If there is no schedule set up for verify tasks then the controller firmware can initiate a verify task at any time If a verify time window is scheduled then the controller will not start a verify task for th...

Страница 126: ...ntaining 2TB and the second volume containing 0 5 TB If the unit is 5 0 TB then it will contain 3 volumes with the first two volumes containing 2TB each and the last volume containing 1TB Number of Drives Per Spin up Number of drives that will spin up at the same time when the controller is powered up Delay between Spin ups The delay between drive groups that spin up at one time on this particular...

Страница 127: ...uding Rebuild tasks also applies to initialization and migration tasks Verify tasks also applies to media scans Self tests You select the type of task for which you want to set the schedule from the drop down list at the top of the page You can also enable or disable use of the schedule for the selected background tasks by selecting either Follow Schedule or Ignore Schedule When these schedules ar...

Страница 128: ...ing of rebuilds and verifies scheduling of self tests is always followed To disable self tests you either remove all schedule times or uncheck the tests listed in the Tasks column Two self tests can be scheduled Upgrade UDMA mode This test checks the speed at which data transfer to drives is occurring to see if the UDMA mode can be increased If you are already running at the fastest UDMA mode then...

Страница 129: ...seful in a variety of maintenance tasks For example if you physically plug in a drive and want the controller to recognize the newly plugged in drive Rescan checks empty ports for newly plugged in drives If those drives were previously part of a 3ware RAID configuration and they still have valid DCB Disk Configuration Block information on them the controller tries to piece them back together into ...

Страница 130: ... percentage complete is also shown The complete can be active or paused To see whether this task is currently active or paused click on the unit number to display the Unit Information page which has that information Drive Information Port The port to which the drive is connected Model The model of the drive Capacity The capacity size of the drive Status The status of the drive OK Not Supported Not...

Страница 131: ...available drive and begins rebuilding the RAID When you select a degraded unit and click Rebuild Unit a dialog box listing available drives appears so that you can select the drive you want to use If the degraded unit has more than one degraded drives for example a RAID 10 where both mirrored pairs each have a degraded drive you will repeat this process a second time If rebuild scheduling is enabl...

Страница 132: ...eld appears in which you select the number of drives per subunit 3 4 or 6 Stripe The drop down list of stripe sizes lists the possible stripe sizes for the configuration you selected in the RAID level drop down The default stripe size of 64KB will give the best performance with applications that have many sequentia reads and writes A larger stripe size will give better performance with application...

Страница 133: ...ldest alarms are deleted as new ones occur You can sort the alarms by severity or time To do so just click the column header Clear Alarms The Clear Alarms button removes all alarms shown in the list Sev Shows the severity of the event Three levels are provided Errors are shown next to a red box Warnings are shown next to a yellow box Information is shown next to a blue box Time The time shown for ...

Страница 134: ...ngs on the menu bar Use this page to set preferences including email notification for alarms passwords page refresh frequency whether remote access is permitted and the incoming port for 3DM to listen for requests The initial settings for most of these preferences are specified during installation of 3DM Figure 5 12 3DM Settings Page ...

Страница 135: ...ess Save E mail Settings button Saves the e mail notification settings Send Test Message button Sends a test message using the saved e mail settings Password Use the fields in this section to set the passwords for the User and Administrator When 3DM is first installed the default password for both is 3ware Change Password For Select the access level for which you are setting the password User or A...

Страница 136: ...one to eight depending on the number available However you may only include drives that are not already part of a unit If you want to use drives that are currently part of a different unit you must delete a unit first to make the drives avail able If the drives are listed under Incomplete Drives and Others they must be deleted Caution Do not disable Remote Access If Remote Access is disabled it wi...

Страница 137: ... Port number for each one If you are creating single drive units single disks or hot spares you can configure multiple drives at once 3 Click Create Unit 4 In the dialog box that appears select the RAID configuration you want 5 If stripe size applies to the RAID type you select select a Stripe Size 6 Click OK The new unit will appear in the Unit Maintenance list at the top of the page and the miSA...

Страница 138: ...e by checking the box next to it 2 Click Create Unit 3 In the dialog box that appears select the configuration type Spare 4 Click OK You will see the spare appear at the top of the page under Unit Maintenance Adding a Drive If you have a hot swap carrier you can add a drive to your system and make it available through 3DM without powering down the system To add a drive through 3DM when you have ho...

Страница 139: ... units and next to drives in the Available Drives list 2 Locate the drive you want to remove and click the Remove Drive link You can remove a drive that is part of a unit or that is shown in the list of Available Drives 3 When 3DM asks you to confirm that you want to remove the drive click OK Caution If you unplug a drive without first removing it through 3DM Rescan will not recognize it as gone A...

Страница 140: ...e Disk Manager Cybernetics UM MV 86 B1 0801 You can now remove the drive from your system If you removed a drive that was part of a unit the unit may become degraded Figure 5 14 Result of Removing Drive from Unit in 3DM ...

Страница 141: ...sk arrays tape drives or libraries ready for removal from the SCSI bus in accordance with the user manual for those devices 2 Power down the miSAN V Series Disconnect all cables network upstream and downstream SCSI power Remove SCSI terminator s if installed 3 If the miSAN V Series is rack mounted remove it from the rack and remove the slides from the sides of the unit This will require a No 2 Phi...

Страница 142: ...rnet ics Technical Support at 757 833 9200 Cybernetics box for the accessories and two filler boxes for spacing Anti static bag for the chassis Two cardboard and clear plastic shells Cybernetics box Packing Tape Note Styrofoam pellets or peanuts are not adequate for packing since they may shift and allow the miSAN V Series to move about in the shipping box Wadded newspaper computer printouts and s...

Страница 143: ...in an anti static bag to prevent ESD damage 2 Place the Cybernetics box on a level surface 3 Place one of the cardboard shellsl identified in Using the Proper Packing Materials on page 142 plastic side up at the bottom of the Cybernetics box Make sure it is settled in properly 4 Place the chassis on the cardboard shell so it is centered on the plastic ...

Страница 144: ... 0801 5 Place the second cardboard shell on top of the chassis 6 Open the accessory box place the accessories inside e g cables terminators and AC power cord if requested by Cybernetics and close the box 7 Place the two filler boxes on top of the cardboard shell ...

Страница 145: ...ight picture 9 The figure below illustrates the previous steps 10 Tape the box shut and place the shipping label on the box 11 If the box is being shipped to Cybernetics make sure the Return Authorization Number RAN received from Cybernetics Customer Support is prominently displayed on the outside of the box 12 Since the box contains delicate electronic components it should be shipped fully insure...

Страница 146: ...146 Packing and Shipping Instructions Cybernetics UM MV 86 B1 0801 ...

Страница 147: ... product sn5000 sn5400 iscsidrv index htm Sun Solaris 10 Go to http www sunsolve sun com search document do assetkey 1 21 119090 20 1 QLogic SANblade iSCSI HBA QLA4010C Windows 2000 2003 Server Sun Solaris SPARC Linux 32 bit and 64 bit Go to http www qlogic com support product_resources asp id 341 Protocols and Standards CHAP RFC 1334 IP RFC 791 894 1092 iSCSI IETF draft version 20 RFC 3720 SCSI 2...

Страница 148: ...eight 3 5 in 8 9 cm 2U Width chassis 16 9 in 42 9 cm front panel 18 9 in 48 0 cm Depth 26 4 in 67 1 cm Weight 48 8 lbs 22 1 kg with 6 disk drives Power Supply Power supply input voltage is auto sensing Voltage 100 240 VAC 47 63 Hz 8 4 A Consumption 460 W maximum each power supply Watts Amps Volts Volt Amps BTU HR Idle 216 5 W 1 81 A 118 75 V 215 39 VA 740 62 Typical Activity 249 0 W 2 09 A 118 0 V...

Страница 149: ... on your computer depending on what software you are running and whether you are updating or newly installing the Microsoft iSCSI Initiator Client Downloading the Setup Program The iSCSI Initiator setup program can be downloaded from the Microsoft Web site by doing the following 1 Go to the Web site http www microsoft com downloads 2 Type Microsoft iSCSI Software Initiator in the Keywords box and ...

Страница 150: ...oad section and then click the applicable fre link for a 32 bit x86 or 64 bit ia64 system 5 Click Save in the File Download dialog box Note It is also recommended that you download and study the release notes and user guide They are shown above as relnotes txt and uguide doc ...

Страница 151: ...on Installing the Software To install and set up the iSCSI Initiator software complete the following steps 1 To install the driver first double click the msi file to run the setup program The Setup Wizard will then execute Note The information presented here is provided as a courtesy only and may not reflect the current software version provided by Microsoft ...

Страница 152: ...152 Cybernetics UM MV 86 B1 0801 2 Click Next to continue 3 Read the license agreement in the License Agreement window select I agree and then click Next ...

Страница 153: ...nd then click Next to continue 5 Click Next to continue in the Confirm Installation window Note The ability to select a location for the installation of the Microsoft iSCSI Initiator is only available for new installations If you are upgrading to a newer version of the initiator the options will be different than shown here ...

Страница 154: ...once the setup files have been copied 6 Choose to Install Complete iSCSI Initiator and then click OK Configuring the iSCSI Initiator The iSCSI Initiator Properties window is used for configuring the driver and can be accessed by launching the iSCSI Initiator from the Windows Control Panel ...

Страница 155: ...devices for assigning control of storage resources This name is displayed on the Gen eral tab and can be changed if a target has not yet been assigned to it To change the name click the Change button and type in the new name Adding Target Devices 1 Select the Discovery tab to allow for adding target devices 2 Click Add in the Target Portals area to enter the IP address or DNS name and socket numbe...

Страница 156: ...6 B1 0801 3 Clicking Advanced allows access to security settings such as CHAP authentication which is supported by Cybernetics iSCSI devices The CHAP password must be between 12 and 16 characters Figure A 1 Advanced Settings ...

Страница 157: ...ally restore this connection when the system boots to make a target persistent so the iSCSI Initiator will attempt to reconnect to it each time the computer is rebooted Click OK to log onto the target 5 If you added a CHAP password in step 3 you will need to click on Advanced This will bring up the menu shown in Advanced Settings Enter the Target secret and press OK This will bring up the Log on t...

Страница 158: ...file shares This is because the Server service cannot create file shares for iSCSI disk devices until the iSCSI Initiator service is initialized If the services are not started in the proper order the file shares located on the iSCSI disk device may not be re created when you restart the iSCSI host computer that the shares are created on To start the services in the proper order you can use system...

Страница 159: ...om the menu bar 5 Enter the Value Name DependOnService 6 Select REG_MULTI_SZ for the Data Type 7 Click OK 8 Make the value DependOnService set to the iSCSI Initiator service MSiSCSI 9 After you are finished editing the registry be sure to restart the computer to make sure the settings will take effect ...

Страница 160: ...start the services in the correct sequence The following instructions explain how to set up the dependencies for a backup product 1 Run the Windows Registry Editor by opening regedt32 exe using Start Run 2 Go to HKEY_LOCAL_MACHINE SYSTEM CurrentControlSet Services 3 Make sure each backup software service has a DependOnService value If the DependOnService value does not exist for the service you mu...

Страница 161: ...Logging Off If it becomes necessary to shut down the miSAN V Series use the following steps to log off the iSCSI connections between the host and the miSAN V Series 1 Open the Targets Tab in iSCSI Initiator Properties Caution It is necessary to log off the iSCSI connections before shutting down a target in order to avoid possible data loss Failure to log off the iSCSI connections will cause Micros...

Страница 162: ...162 Cybernetics UM MV 86 B1 0801 2 Highlight one of the targets and press Details 3 Click Log off 4 Repeat the process for each target on the machine you are shutting down ...

Страница 163: ...As of now this version is still experimental Since it is drastically different it will not be covered in this appendix Installation In all cases you should get the latest packaged version of linux iscsi from the Linux dis tro s package manager if a packaged version exists Linux Kernel 2 6 Notes Version 4 02 only supports up to Linux kernel 2 6 9 According to the linux iscsi developers you should u...

Страница 164: ...cksums To login logout use etc init d initiator start etc init d initiator stop To login to multiple iSCSI targets at the same IP address e g a HSTC with two virtual devices use something like the following in etc sysconfig initiator CHANNEL 0 1 eth0 192 168 1 1 3260 0 HeaderDigest None DataDigest None none eui 000b560000004a41 CHANNEL 1 1 eth0 192 168 1 1 3260 0 HeaderDigest None DataDigest None ...

Страница 165: ... file for your kernel version You will probably want to make a directory such as usr src iscsi to download to Read the README file and make sure that all dependencies are resolved Extract the source folder gunzip the file and then tar xvf the unzipped file Change to the folder and run make to build the driver Then run make install to build the installation script and start the installation Setup E...

Страница 166: ...1 0801 Also try a tar to write read to the drive tar cvf dev st0 somedir will backup the somedir directory tar tvf dev st0 will display the file listing on the drive tar xvf dev st0 somedir will restore to the somedir directory ...

Страница 167: ... When enabled the miSAN V Series will mount the next virtual tape listed in the Mounted medium listbox when a host issues an eject command Barcode label A label affixed to a tape cartridge that shows a barcode Basic disk A physical disk drive containing basic volumes such as primary partitions and logical drives CAT 5 5e 6 Ethernet cable standards defined by the Electronic Industries Association a...

Страница 168: ...torage device and then periodically copied again to a tape storage device or to an optical disc drive Daisy chaining Connecting multiple devices one to another in a series Distributed Parity Parity works in combination with striping on RAID 5 and RAID 50 Parity information is written to each of the striped drives in rotation Should a failure occur the data on the failed drive can be reconstructed ...

Страница 169: ...ing to determine the priority of host I O relative to job I O Logical Disk A number of areas on one or more disk drives that the computer system considers as one filesystem The areas of disk space are not necessarily contiguous but are presented to the computer system as a single disk drive In disk arrays drives are presented as individual logical disks See JBOD or are configured by a RAID control...

Страница 170: ...rive and its slotted tapes RAID Redundant Array of Independent Disks RAID is a grouping of disk drives an array combined in such a way as to provide fault tolerance and increased write read per formance Several disk grouping methods exist called RAID levels which are configured by a disk array controller in the storage enclosure Most storage enclosures implement the RAID levels described below Con...

Страница 171: ...as in accounting or finance RAID 10 This RAID level originally called RAID 1 0 is implemented as a striped array RAID 0 whose segments are RAID 1 arrays RAID 10 requires a minimum of four disks installed and is basically several RAID 1 drives linked together with RAID 0 This yields the speed benefits of RAID 0 with the redundancy benefits of RAID 1 The high I O rates are achieved by striping RAID ...

Страница 172: ...le For use with the miSAN V Series a shielded cable having a VHDCI 68 pin male connector for an LVD bus or an HD 68 pin male connector for an HVD bus SCSI Terminator A device attached to the end points of a bus network or daisy chain The purpose of the terminator is to absorb signals so that they do not reflect back down the line Striping A data storage technique used in most RAID levels Striping ...

Страница 173: ...ts must handle all the pros and cons thereof e g drivers device configuration media rotation etc Virtual Stacker An emulated tape library recognized by iSCSI host initiators as having a SCSI media changer Virtual Tape An emulated tape cartridge which allows for storing volume tag informa tion as if a barcode label had been applied This is the backup media used by the virtual devices Virtual Tape D...

Страница 174: ...174 Cybernetics UM MV 86 B1 0801 ...

Страница 175: ...68 2 1 subnet mask 255 255 255 0 ETH2 IP 192 168 3 1 subnet mask 255 255 255 0 Problem The tape cartridges in my attached tape library have barcode labels How do I copy the label information to the virtual tapes Note The miSAN V Series will only be able to query for barcode information if the external library reportsbarcodes i e the library has a barcode reader Solution From the Web Control Panel ...

Страница 176: ...N V Series is not meant to connect directly to an external physical tape drive 3 Check all cabling for damage and replace if necessary 4 Rescan physical devices from the Web Control Panel See Rescan SCSI buses on page 103 5 Save the Debug Log accessible from the Web Control Panel Browser Links View debug messages and then contact Technical Support See Technical Support on page 179 Problem The miSA...

Страница 177: ...See Drive Information Page on page 122 If the disk drive is bad follow instructions for removing the drive in Removing a Drive on page 138and then instructions for adding a drive in Adding a Drive on page 138 A good way to test the disk drive once it is removed from the miSAN V Series is to install it in a PC and run a low level long format If the format completes successfully then the problem may...

Страница 178: ...I HBA and that the miSAN V Series is synchronizing at 160 MB sec Verify that the manufacturer s drivers are loaded for the SCSI HBA Disable all virus scanning software on the backup server and the data source machines 2 Slower than expected speeds from the miSAN V Series copying virtual to physical tape a Make sure Drive compression for copying is enabled before copying from virtual to physical ta...

Страница 179: ...ndix for free telephone support within 30 days of receipt of your order If we determine that the hardware is incompatible and fails to function in your environment we will issue a RAN Return Authorization Number for the equipment Upon receipt of the equipment in new condition we will issue a credit or refund for the purchase price paid less shipping and handling If the equipment is returned for an...

Страница 180: ...rdware Return Policy Special order products and accessories are not eligible for return Custom built products and configurations are not eligible for return Return Procedure To return products you must first contact Cybernetics Technical Support or Customer Service at 757 833 9200 to request a Return Authorization Number RAN within the return policy period applicable to the product you want to ret...

Страница 181: ...refund of the purchase price paid less shipping han dling and applicable restocking fees Warning The customer accepts full responsibility for any and all products that are lost or damaged in transit when shipped without insurance or with insufficient insurance Note Before you ship the product s to us make sure to back up the data on the hard drive s and any other storage device s in the product s ...

Страница 182: ...182 Cybernetics UM MV 86 B1 0801 ...

Страница 183: ...ted on the rear of the device case and on the Product Documentation CD The following information about your system and problem System Configuration SCSI Daisy Chaining Termination Configuration Drive Switch Settings Computer System Type Operating System and Version Number Backup Procedure and Software Error Behavior System Errors and Messages Drive Errors and Messages This information may instead ...

Страница 184: ...184 Cybernetics UM MV 86 B1 0801 ...

Страница 185: ...Cybernetics makes no representation or warranties with respect to the contents of this document and specifically disclaims any implied warranties of merchantability or fitness for any particular purpose Further Cybernetics reserves the right to revise this publica tion and to make changes in it from time to time without obligation to notify any person or organization of such revision or changes Tr...

Страница 186: ...pparatus as set out in the radio interference regulations of the Canadian Department of Communications GNU GPL Notice A portion of the software contained in this Cybernetics product is used under the GNU General Public License The GPL is published by the Free Software Foundation at http www gnu org copyleft gpl html The source code for the software used under that license is available from Cyberne...

Страница 187: ...the original version of the Work and any modifications or additions to that Work or Derivative Works thereof that is intentionally submitted to Licensor for inclusion in the Work by the copyright owner or by an individual or Legal Entity authorized to submit on behalf of the copyright owner For the purposes of this definition submitted means any form of electronic verbal or written communication s...

Страница 188: ...that do not pertain to any part of the Derivative Works and d If the Work includes a NOTICE text file as part of its distribution then any Derivative Works that You distribute must include a readable copy of the attribution notices contained within such NOTICE file excluding those notices that do not pertain to any part of the Derivative Works in at least one of the following places within a NOTIC...

Страница 189: ...cense or out of the use or inability to use the Work including but not limited to damages for loss of goodwill work stoppage computer failure or malfunction or any and all other commercial damages or losses even if such Contributor has been advised of the possibility of such damages 9 Accepting Warranty or Additional Liability While redistributing the Work or Derivative Works thereof You may choos...

Страница 190: ...ries is physically abused or is used in a manner inconsistent with the operating instructions or product specifications defined by Cybernetics the miSAN V Series fails because of abuse accident acts of God alteration excessive dirt dust buildup faulty installation misapplication mishandling misuse modification neglect or service by anyone other than Cybernetics or authorized service personnel the ...

Отзывы: