


7
Install Disk Drives in a 2U24 Enclosure
Prerequisites
●
A disk drive has failed and has been removed from the 2U24 enclosure
●
A T10 Torx screwdriver may be required to unlock the drive carrier
About this task
Disk drives in the 2U24 enclosure are installed at the factory and do not need to be installed during a
system installation. This procedure is for reference only.
CAUTION:
●
EQUIPMENT OVERHEATING
●
All drive slots must have a disk drive carrier module or a dummy carrier module installed to maintain a
balanced airflow.
CAUTION:
●
EQUIPMENT DAMAGE
●
Observe ESD precautions when handling this equipment. Failure to do so can result in equipment
damage.
Procedure
1. If the disk drives are already installed in the 2U24 enclosure, skip this procedure.
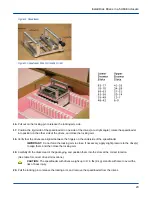
2. Remove the disk drive in its drive carrier from its anti-static protective package.
3. Verify that the drive carrier handle is released and in the open position.
A T10 Torx screwdriver may be required to unlock the drive carrier.
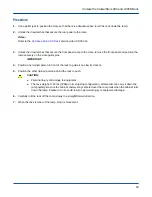
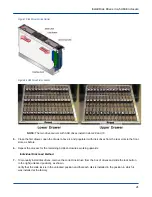
4. Insert the drive carrier module into the desired empty drive slot in the enclosure.
Drive slots are numbered 0 through 23, from left to right.
Install Disk Drives in a 2U24 Enclosure
25
Содержание ClusterStor L300
Страница 1: ...ClusterStor L300 and L300N Field Installation Guide 3 0 0 H 6163...
Страница 33: ...Figure 18 Trip the Circuit Breaker Cable the External Power Connections 33...
Страница 90: ...MGMT0 cscli unmount f testfs Perform the First Run Configuration 90...
Страница 125: ...Figure 85 Base Rack Inverted Power Distribution for PX2 5965X3 V2 ClusterStor L300 and L300N Reference 125...


