


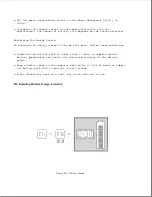


By pressing the Fn+F8 hotkeys, the battery gauge window displays the
operating time and percentage of battery power remaining (Figure B-1). The
battery gauge can be displayed when operating the computer under battery
power or AC power.
The time remaining on the battery gauge varies
depending on the power requirements of any applications currently being
used, and options currently installed.
NOTE: When the power cord is connected to an external outlet, the battery
gauge displays a power cord plug symbol.
If question marks are displayed in the battery gauge, it means that the
gauge is no longer accurate. To restore the accuracy of the battery gauge
condition the battery pack.
B.3 Conditioning A Battery Pack
>>>>>>>>>>>>>>>>>>>>>>>>>>>>>>>>> CAUTION <<<<<<<<<<<<<<<<<<<<<<<<<<<<<<<<<
To avoid a loss of data, ensure that all data is saved before discharging
a battery pack.
>>>>>>>>>>>>>>>>>>>>>>>>>>>>>>>>>>>>><<<<<<<<<<<<<<<<<<<<<<<<<<<<<<<<<<<<<<
The battery fastcharger option can condition a battery pack
automatically.
To condition a battery pack without the battery fastcharger option,
complete the following steps:
1. Turn off the computer.
2. Undock the computer if it is docked in a convenience base or expansion
base.
3. Disconnect any external power source (AC power or Automobile Adapter)
from the computer.
4. Turn on the computer.
5. Use the Fn+F7 hotkeys to select the drain level of power conservation
from the popup window.
6. Leave the computer on until it discharges to at least the LowBatt2
level.
NOTE: An alternate method of discharging the battery pack is to leave the
computer on overnight. The power/low battery light turns off when the
battery pack is discharged.
7. Connect the AC power cord to the computer.
8. Turn on the computer. The battery LED turns on to indicate that the
battery pack is charging. When the battery LED goes off, the battery
pack is fully charged.
Содержание LTE Elite
Страница 139: ...6 Rotate the front edge of the keyboard up and lay it face down on the cloth covered display panel Figure 4 31 ...
Страница 140: ...7 Remove the hard drive security clips by gently lifting up on them Figure 4 32 ...
Страница 248: ...4 Remove the keylock from the outside of the bottom cover Figure 9 5 ...
Страница 249: ...5 Slide the plastic keylock barrel out of the bottom cover Figure 9 6 ...
Страница 258: ...6 Remove the power supply and bezel as an assembly by sliding it out of the rear of the expansion base Figure 9 15 ...
Страница 269: ...3 Disconnect the harness extension cable from the system board Figure 9 26 ...
Страница 279: ...5 Tighten the screws 6 Place the first end of the drive spacer 1 into the slot 2 of the first drive cage Figure 9 35 ...
Страница 297: ...5 Slide the switch board out of the switch frame Figure 9 52 ...
Страница 304: ...5 Replace the eject switch and screw Figure 9 59 ...
Страница 309: ...5 Replace the power switch and screw Figure 9 64 ...
Страница 319: ...Table A 5 Compaq LTE Elite Numeric Keypad Connector Pin Signal Pin Signal Ring Ground Tip Data Power ...
Страница 331: ...Table A 14 Compaq SmartStation Drive Power Connector Pin Signal Pin Signal 1 12V 4 Ground 2 Key 5 5V 3 Ground ...
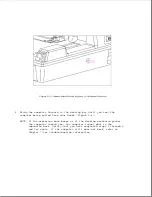
Страница 348: ...7 Unlock the expansion base keylock Figure D 3 ...
Страница 369: ...9 Push the lever toward the back of the convenience base Figure D 16 ...
Страница 373: ...5 Slide the computer toward you to remove it from the convenience base ...
Страница 387: ......


