background image

65

TM

7.9 Printing using WIFI communication

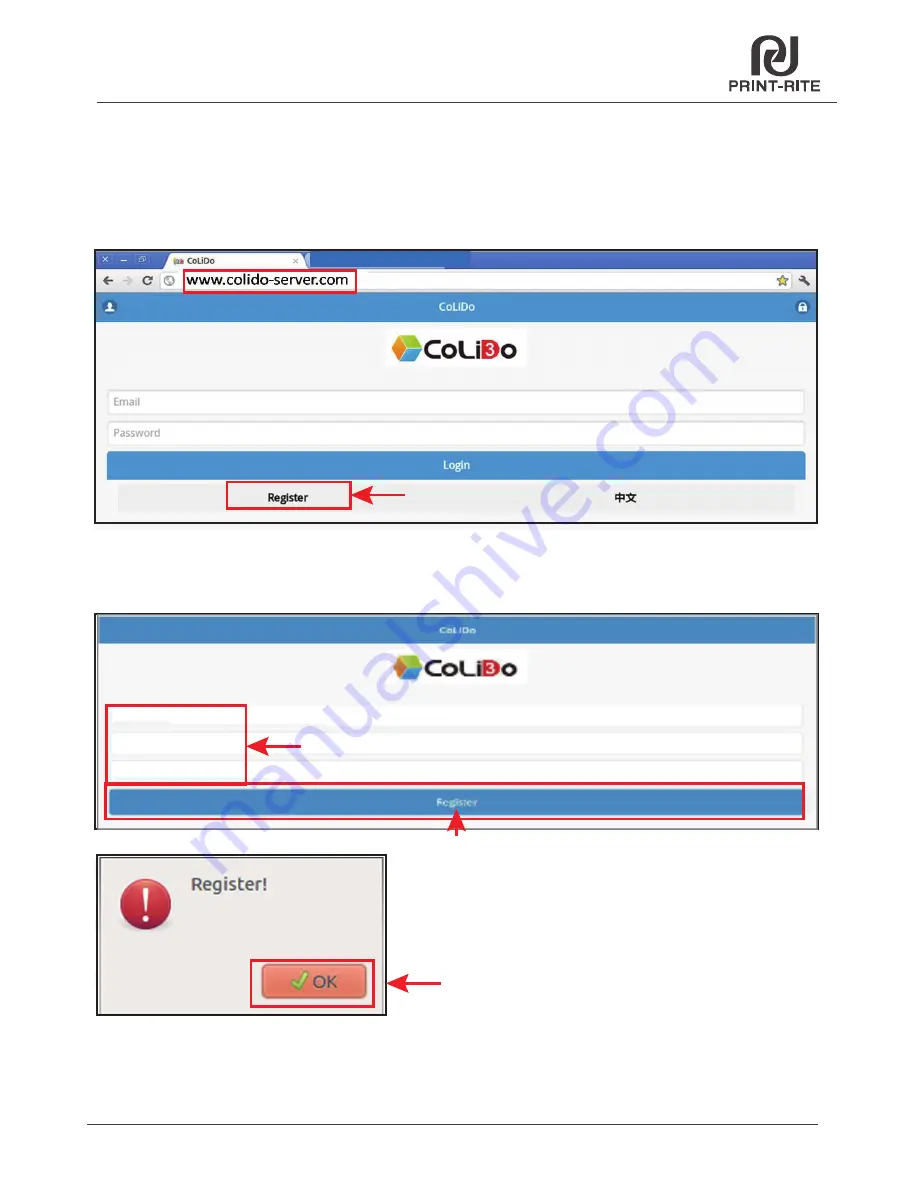
Step 2. Register with email
Connect with  internet from router, enter “ www.colido-server.com” 
in Google browser go to page as Fig. shown below.
Click “Register”.

Enter the valid email address and new password.  The success message will be 
shown after click “Register”, and then click “OK”.

Click on “Register”

Click “Register” 

Click “OK” 

Enter valid email address and new password

Содержание X3045 Duo

Страница 1: ...X3045 Duo Industrial 3D Printer Carefully and thoroughly read this manual before using All rights reserved Print Rite USER MANUAL View us at www colido com TM V1 35...

Страница 2: ...with SD Card 27 6 5 Prepare Menu 28 6 6 Choose Nozzle 31 33 6 8 Color Mixing Chapter 6 CoLiDo Printer Calibrate and Test Chapter 8 Maintenance 78 Chapter 7 REPETIER HOST Setup Slice and Print 7 1 Inst...

Страница 3: ...n the basics knowledge of CoLiDo X3045 Duo 3D Printer how to unbox safely how to assemble correctly In Chapter 6 9 you can learn how to calibrate the platform printing maintenance and troubleshooting...

Страница 4: ...ON Disconnect power plug from power socket during emergency CAUTION Power socket must be located near the Printer and within reach CAUTION Place CoLiDo 3D Printer in well ventilated area as it will me...

Страница 5: ...there is no warranty to the interference if the Printer is installed in a special environment If the Printer does cause harmful interference to the receiver of radio or television which can be determ...

Страница 6: ...feeding tubes Platform Coated Glass XYZ Bearing Steel Stepper Motors 1 8 step angle 1 16 micro stepping Mechanical Storage Temperature 0 o C 32 o C 32 o F 90 o F Operating Temperature 15 o C 32 o C 6...

Страница 7: ...The designed 3D files are converted into CoLiDo command and sent to the Printer via SD Card or computer software Repetier Host Then the printer head will heat up and melt the PRINT RITE PLA ABS filame...

Страница 8: ...ec com mo 3 Carefully lift up the printer when taking it out of the box Place the Printer on flat ground and carefully remove the package foam and bag of the Printer NOTE Do not pull or twist the cabl...

Страница 9: ...pool Holder 2PCS SD Card 1PC Power Cable 1PC USB Cable 1PC Tools 1 Set SD Card Reader 1PC Test Sheet 1PC PLA Glass Platform 1PC ABS Glass Platform 1PC PLA ABS 3D printed samples 1 Set Nozzle Unit 1 Se...

Страница 10: ...Lifting Handle Front Door LCD Panel Power Port SD Card Slot USB Port LCD Knob Printer Head T1 T2 TM 10 5 3 CoLiDo X3045 Duo 3D Printer Structure Illustration...

Страница 11: ...g brackets by unlocking the screws to release the printer head Use the Allen Key in the Accessory Locking bracket TM Reminder Remove the locking bracket by unlocing the screws before using Remove the...

Страница 12: ...se the Power Cable included in the package Power Supply Socket should be near to the Printer such the power can be disconnected easily in case of emergency Properly insert the SD Card in SD Card slot...

Страница 13: ...2 Push the knob to go to submenu rotate the knob to select Auto Home and push the knob to confirm Then the heat table will be moved up to HOME position Please do not rotate the left right Z screw rod...

Страница 14: ...tion in cleaning the glass platform it will damage the glass coating 3 Please wait for the platform temperature to cooldown 25 30 before removing the printed object Quickly removing the printed object...

Страница 15: ...nter 5 6 Install Filament 5 6 3 Mount two filament cartridges on the spool holder NOTE The black thumb pin and the printed Note must be facing front Spring of Spool Holder TM Spool Holder Spool Holder...

Страница 16: ...er inside the cartridge 5 6 6 Insert the two filament tubes to the top connector of the extruder 1 and extruder 2 at the back of the printer to lock Filament Tube 5 6 7 Push down the extruder arm 1 In...

Страница 17: ...ad to lock NOTE The filament from Extruder1 must be inserted to T1 as Nozzle1 The filament from Exturder2 must be inserted to T2 as Nozzle 2 5 6 9 If want to remove the filament tube from the printer...

Страница 18: ...TM 5 7 Install Camera 18 5 7 1 Put magnet under the camera and install camera on the corner inside the printer...

Страница 19: ...Test 19 Initial display of LCD Panel 6 1 Main Menu 6 1 1 Push the knob to go to main menu and you can see three submenus picture A 6 1 2 Rotate the knob and select Prepare picture B then push the knob...

Страница 20: ...e F 6 2 1 Rotate the LCD knob and select Calibrate Mode picture D then push the LCD knob to start the calibration NOTE Calibrate Mode is to guide user to operate the printer and to check if the printe...

Страница 21: ...le tip Condition 1 There is a gap between the nozzle tip and the test sheet Adjustment 1 Rotate the butterfly nut under the platform counterclockwise until the test sheet just touch the nozzle tip as...

Страница 22: ...6 2 4 After rotate the adjusting knob to meet the Calibration Standard Condition rotate the LCD knob to select Next Step as picture J then press the LCD knob to next point to calibrate 6 2 5 Follow 6...

Страница 23: ...the filament will auto load into the nozzle and flow out from the nozzle N Filament Nozzle Setting Temperature PLA 205 ABS 230 NOTE the setting temperature for PLA and ABS is different as below Incor...

Страница 24: ...be the equal to the set temperature and according to the filament material melting temperature b Nozzle Cleanliness No Clogging by refer to troubleshoot clogged nozzle label on the side of the printe...

Страница 25: ...test file is saved in the SD Card The test file name will be updated base on the shipped printer For example PDT2 gco for PLA filament and ADT2 gco for ABS filament 6 4 2 Once the platform temperature...

Страница 26: ...efore removing the printed object 6 4 5 LCD Display Screen Definition Nozzle Setting Temp Nozzle Actual Temp Platform SettingTemp Fan Running Speed Filament Consume Length Printing Speed Printing Cons...

Страница 27: ...the position of the platform and the printer head manually 4 Auto Home Printer Head will go to initial position 5 Reset X Home Printer Head return to X initial position Y Z position will not change 6...

Страница 28: ...le and its corresponding extruder will be taken as default to work Then the default extruder will be changed to the one you selected The original default is exturder1 Nozzle1 T1 NOTE if you want to ch...

Страница 29: ...s 2 Unload Filament Remove filament from the nozzle 6 7 1 Select Load Filament and proceed as below picture b e a d c a Select the filament material you are using d Once reach the setting temperature...

Страница 30: ...emperature as picture i b Once the temperature reach the setting temperature as below picture g the default extruder will work to auto unload its filament from the nozzle c When unload ok finish the f...

Страница 31: ...percentage means the mixing printing percentage of the default extruder such as T1 Then the another extruder T2 mixing printing percentage will be 100 deduct the T1 mixing printing percentage For Exa...

Страница 32: ...m and input is 3mm the T1 is the default extruder then 1 The print height from 0mm to 300mm T1 filament decrease progressively 1 color per 3mm from 100 0 T2 filament will increase progressively 1 colo...

Страница 33: ...mm T2 filament Yellow PLA print 2 4mm T1 filament print 4 6mm again T2 filament print 6 8mm until finish printing 6 8 4 If want to switch or stop the color mixing when already select color mixing need...

Страница 34: ...ter Setting method Rotate the knob to select the parameter that you want to adjust and push the knob to confirm Then rotate the knob to adjust the setting you want and push the knob to confirm the num...

Страница 35: ...he printer 6 9 3 Printer Info menu as below It is to show the printer basic information such as Printer type Version No and License No The printer version No The printer type The printer version relea...

Страница 36: ...temperature reach the setting temperature the printer start to print NOTE The printer just can read the G code GCO You can print GCO file with SD Card directly Otherwise you can convert STL file to G...

Страница 37: ...the remained filament outside the nozzle tip before resume printing b If resume printing after pause long time please make sure the nozzle no clogged by pressing the printer head arm and pushing the f...

Страница 38: ...ncreases the printer speed also increases the number can be set from 10 to 200 too fast speed will impact printing effect b Nozzle1 Nozzle2 Bed and Fan Speed refert to 6 9 1 The nozzle and the platfor...

Страница 39: ...r please click Yes to continue installation REPETIER HOST is a software which is used to slice the 3D models GCO or STL and command CoLiDo Printer to print Chapter 7 REPETIER HOST Setup Slice and Prin...

Страница 40: ...select the components should be installed then click Next and Install 7 1 Install REPETIERHOST Cont Click Next Click Create a desktop icon Click Next Click Install if antivirus message appear please a...

Страница 41: ...lick Install Arduino driver Install FTDI serial driver and Launch Print Rite CoLiDo Repetier Host and then click Finish 7 1 Install REPETIER HOST Cont Install Arduino drivers Click Finish Click Next C...

Страница 42: ...ct Click Next Click Finish 7 Find the configure folder Slice3r in SD Card copy it to the computer path C Users User Name AppData Roaming as below NOTE AppData folder maybe will be hided in the compute...

Страница 43: ...7 2 3 Click Printer Settings Printer Settings Connect the printer to the computer using USB Cable and Turn ON the printer 7 2 2 Select language you want in the software Config Language When the comput...

Страница 44: ...n be located and matched with COMx in Device Manager as below Printer Shape as below data After checked click Apply and OK Connection Select Printer CoLiDo X3045 3D Printer Baud rate 115200 Select the...

Страница 45: ...the effect that you want to print Step 3 Select printer type CoLiDo X3045 3D Printer CoLiDo Best For small object CoLiDo standard For big object CoLiDo standard ABS For ABS material object CoLiDo dra...

Страница 46: ...sage CoLiDo ABS_110 For ABS Filament with nozzle temp 220 and platform temp 110 CoLiDo PLA_70 For PLA Filament with nozzle temp 205 and platform temp 70 Step 4 Select the nozzle and the platform heati...

Страница 47: ...Panel Hardware and Sound Power Options Edit Plan Settings select all settings to Never then click Save changes 7 4 2 If want to print the file using Repetier Host need remove SD Card from the printer...

Страница 48: ...e setting temperature the printer will start to print After the printer is really connected with the Repetier software the actual extruder and bed temperature of the printer will be shown in the botto...

Страница 49: ...p down from Temperature Curve 3 During printing you can click Pause Print and Continue Printing to pause resume printing the printer head will pause and will not go to home position Also You can click...

Страница 50: ...nal input 50 b Select Prepare Change Filament Load Filament Refer to 6 7 1 to check the mixing filament flowing 7 5 2 1 Select Prepare Color mixing from LCD Dispaly to choose the mixing function that...

Страница 51: ...tween 0 and 100 51 7 5 3 Print the file using Repetier Host 7 5 3 1 Click Connect to connect the printer to the Repetier Host Refer to 7 4 2 1 7 5 3 2 Select Prepare Color mixing from LCD Dispaly to c...

Страница 52: ...st software 7 6 2 Click Printer Settings 7 6 3 Printer Settings as below Select CoLiDo X3045 3D Printer revise the name to CoLiDo X3045 Duo 3D Printer Click Extruder revise Number of Extruder to 2 Che...

Страница 53: ...use extruder T2 7 7 Slice_Two Color 7 7 1 Click Load select the first print file that you want to print and click Open Note The print file should be STL format 7 7 2 Click Load select the second print...

Страница 54: ...the platform heating temperature base on the filament you are using NOTE The Extruder 1 and Extruder2 settings must be same If the two filaments loaded in the printer are different type need select t...

Страница 55: ...roduct and another one is support material Two material2 One material is product and another one is infill material 7 8 3 Click Print Settings to revise the settings 7 8 3 1 Setting for Two material1...

Страница 56: ...st 1 as below picture Set the filament of extruder2 to print the infill 7 8 4 Select the slice settings to slice 7 8 4 1 Sllcie Two material 1 Printer Setting CoLiDo support Duo Printer Settings CoLiD...

Страница 57: ...Printer Settings CoLiDo X3045 Duo 3D Printer Extruder 1 Extruder 2 Select the nozzle and the platform heating temperature base on the filament you are using NOTE The Extruder 1 and Extruder2 settings...

Страница 58: ...As picture shown below under the WIFI connection to connect ColidoWifi_XXXX and default password is 12345678 Select ColidoWifi_xxxx to connect NOTE Make sure the Wifi USB receiver plug in the printer...

Страница 59: ...fter reboot Enter into monitor page and printer operation page Enter into Smart phone operation interface Click to login NOTE When powering off the printer login to control panel page under the System...

Страница 60: ...ion During the print can use Pause Start and Stop button to control Select Upload Print the model GCO will show on the list and start print automaticlly Select Upload the model Gco will show on the li...

Страница 61: ...ther functions Can adjust and check the print settings and file print information Control menu Actual nozzle temperature Target nozzle temperature Actual bed temperature Target bed temperature TM 7 9...

Страница 62: ...d Printed file and filament comsume Reset function Reset button is inside the small hole located at the left side of the printer Press the reset button 1 second Wifi will reboot Press the reset button...

Страница 63: ...rt the monintoring the printer printing state NOTE Every time click on Start Preview only have 15 seconds for the preview Click again to refreash the page and start again Enter into monitoring page Cl...

Страница 64: ...select STA then enter the router user name and password click Setup to get STA IP as Fig shown below Enter address 10 10 11 1 Enter the Wifi name and the wifi password of the CoLiDo printer Enter the...

Страница 65: ...uter enter www colido server com in Google browser go to page as Fig shown below Click Register Enter the valid email address and new password The success message will be shown after click Register an...

Страница 66: ...word press Connect will pop up the bind succeed message Step 4 Remotely control printer Connect with WAN internet enter www colido server com in Google browser Enter the bind email address and passwor...

Страница 67: ...7 Enter the user name and password connected with print wifi then click Login Click Unbind to unbind printer with account Select the printer Select the printer TM 7 9 Printing using WIFI communication...

Страница 68: ...a Print manage page Click Select file to select the Gco model want to print Select Upload Print the model GCO will show on the list and start print automaticlly Select Upload the model Gco will show o...

Страница 69: ...shown click Operation The operation page can setup the heated bed temperature nozzle temperature print speed Gcode and so on 3 Monitoring page As Fig A shown click Monitoring to check the current pri...

Страница 70: ...or on the platform due to no supporter to the layer So you need add supporter for overhang object Remark OA the structure is upward to stretch OB the structure is parallel to stretch OC the structure...

Страница 71: ...lament Printer Settings in Slic3r for advanced user 7 11 Repetier Host Advanced 3D Printing 7 11 1 1 Print Settings For example CoLiDo standard a Layers and perimeters Lower the Layer height and highe...

Страница 72: ...nting b Infill c Skirt and brim Higher fill density and longer printing time Select Only infill where needed will only print the outside single perimeter 4 fill pattern as right picture Line Rectiline...

Страница 73: ...port material will auto print supporter on the model Once the angle of the overhang structure OA is bigger than the setting angle the support material will be auto generated We suggest 45degree Z O A...

Страница 74: ...ent Settings For example CoLiDo PLA_70 NOTE To revise the temperature need click the up donw narrow instead of revise the number directly a Filament b Cooling Setup the extruder and bed setting temper...

Страница 75: ...inter Settings b Custom G code Action before printing Action after printing a Extruder 1 When printing many objects at the same time revise the Lift Z from 0 to 2 5 to avoid the nozzle cross the objec...

Страница 76: ...ut object it is better to lower the nozzle temperature by 5 10 degrees to avoid silky threads c If the object is bigger than the printer printing area it is better to divide the object in several part...

Страница 77: ...raEngine It is another slicer software to convert 3D model to g code Step1 Select CuraEngine Step2 Select Print Settings and Filament Settings If you want to view or customize CuraEngine settings cilc...

Страница 78: ...rm of the 3D Printer 3 Use a clean lint free cloth to spread the grease onto the top bottom of the Z axis screw rod 4 Make sure the grease cover the inside of the Z axis screw rod To lubricate X Y Rod...

Страница 79: ...length of filament straight and re load it into the printer head Make sure that the filament is properly inserted into the nozzle receiving port 3 Disassemble the printer head check the gear which is...

Страница 80: ...model website cannot be printed well 1 Refer to chapter 7 in user manual re setup Repetier Host and select correct filament material to print 2 The printed object will have different printing effect w...

Страница 81: ...ad free stl 3d models http www hongkiat com blog 60 excellent free 3d model websites If you need more assistance kindly please contact with us Email 3Dsupport utec com mo Question Solution 3D Printer...

Отзывы: