Page 25
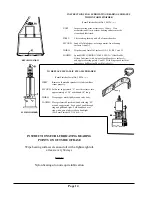
ET240-ELECTRIC TIMER (120/240 V.,50/60 Hz.)
Replaces: ET106/ET1065, ET 1062/ET10625, ET224, ET225, ET230, ET230A
CAUTION: BEFORE INSTALLING, DISCONNECT ELECTRICAL POWER TO MACHINE. ATTACH TIMER TO
MACHINE PER INSTRUCTIONS BEFORE RESTORING POWER. DO NOT TAMPER WITH TIMER. FAILURE TO
FOLLOW THESE INSTRUCTIONS MAY VOID THE WARRANTY.
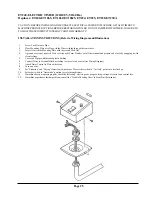
INSTALLATION INSTRUCTIONS (Refer to Wiring Diagram and Illustration)
1.
Screw Lock Nut onto Pipe.
2.
Place Mounting Plate over Pipe with the Wires sticking through the center hole.
3.
Securely fasten the Mounting Plate with the second Lock Nut.
4.
A ground wire is not required. If one exists on the Form Finisher, cut off the terminal and prepare end of wire by wrapping it with
electrical tape.
5.
Cover end of pipe with threaded plastic bushing.
6.
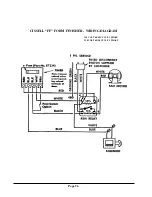
Connect Wires to Terminal Block according to wire color on control (see Wiring Diagram).
7.
Attach Timer Control to Plate with screws.
8.
Turn on power.
9.
Set Steaming and Drying timers to mid-positions. Place rocker switch in Air Only position to size the bag.
10.
Set rocker switch in Automatic position to cycle through timers.
11.
If machine does not operate properly, check the following: electric power, proper wiring, voltage at control, and control fuse.
12.
If machine experiences further problems, consult the Trouble Shooting Chart in Form Finisher manual.
Содержание FFCD
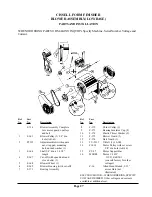
Страница 3: ...Page 3 FF FORM FINISHER LOW BASE OVERALL DIMENSIONS...
Страница 6: ...Page 6...
Страница 16: ...Page 16...
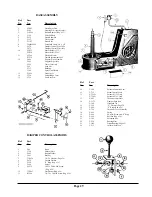
Страница 17: ...Page 17...
Страница 26: ...Page 26 CISSELL FF FORM FINISHER WIRING DIAGRAM 110 VOLT 60 50 CYCLE 1 PHASE 220 VOLT 60 50 CYCLE 1 PHASE...

