Page 10
2.
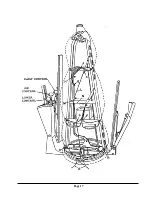
ADJUST FORM. Set Timer for continuous operation of air, move air control to
minimum setting. Adjust waist, hip, and lower controls as required. Never allow
nylon form to be larger than garment. It is unnecessary to adjust hip and lower
controls for childrens garments or very short jackets; or to adjust the lower
control for sack coats or medium length jackets. The control governing the width of
the form immediately below the lower edges of the garment is the important
adjustment; the control governing the width of the form within the garment is
next. Insert expanding sleever in one sleeve - POSITION CORRECTLY. Before inserting
second sleever, step No. 3 may be started.
3.
STEAM AND DRY COAT. Move Air Control to obtain required pressure. Set Timer for
automatic steaming and drying. With Steam on, operator may proceed immediately with touch-
up of garment previously removed from form, as steaming and drying is fully automatic.
4.
REMOVE COAT. With AIR OFF, withdraw sleevers, relieving spring tension while
withdrawing. Release front and rear clamps. (Remove coat, and place on hanger or press for
touch-up.) If next garment is a smaller size, reduce form to its smallest size with air off. It is
unnecessary to make repeated adjustments for successive garments when they are approximately
the same size and type.
PRODUCTION HINTS
In many instances, the nylon form can be expanded only to the inner lining of a garment, when it is
smaller than the garment. To solve this problem, adjust hip and lower width controls to the lining, or
as large as possible, whichever comes first. Then, during the steam cycle, pull the lower edges of the
garment until the entire garment is progressively brought into contact with the form for steaming; then
follow with normal drying procedure.
When the front clamp is used on full-nap soft fabrics, interchange the lapels after the initial steaming
period and resteam. During the drying cycle, release front (and rear) clamps slowly to avoid impres-
sion marks.
Содержание FFCD
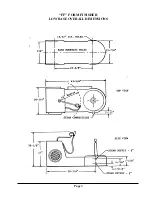
Страница 3: ...Page 3 FF FORM FINISHER LOW BASE OVERALL DIMENSIONS...
Страница 6: ...Page 6...
Страница 16: ...Page 16...
Страница 17: ...Page 17...
Страница 26: ...Page 26 CISSELL FF FORM FINISHER WIRING DIAGRAM 110 VOLT 60 50 CYCLE 1 PHASE 220 VOLT 60 50 CYCLE 1 PHASE...

