


What to do next
The next task is to remove the upper rear fan tray as described in the next section.
Removing the Upper Fan Tray
This section describes how to remove the upper fan tray from the LCC.
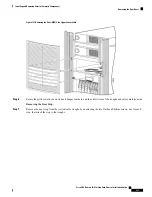
Figure 130: Fan Tray
Prerequisites
Before performing this task, you must first remove the upper rear grille as described in the previous section.
Required Tools and Equipment
You need the following tools to perform this task:
• ESD-preventive wrist strap
• Large flat head screwdriver
• Step platform
Steps
To remove the upper fan tray, follow these steps:
SUMMARY STEPS
1.
Attach the ESD-preventive wrist strap to your wrist and connect its leash to one of the ESD connection
sockets on the front (PLIM) side of the chassis or a bare metal surface on the chassis.
2.
If necessary, use a step platform to reach the upper fan tray comfortably.
3.
Using the screwdriver, loosen the two captive screws on the fan tray cover faceplate.
4.
Pull firmly on the cover to swing it free; some force may be required, as the rubber seals can stick.
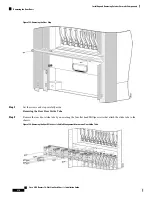
5.
Grasp the fan tray handle and pull it straight out to disconnect the fan tray from the connector mounted
on the front of the fan tray bay on the rear (MSC) side of the chassis. Slide the fan tray halfway from the
fan tray bay.
6.
Use your free hand to support the fan tray, then slide the fan tray completely from the fan tray bay.
7.
Set the fan tray carefully aside.
Cisco CRS Routers 16-Slot Line Card Chassis Installation Guide
224
Upgrading Chassis Components
Removing the Upper Fan Tray
Содержание CRS-16-LCC/M
Страница 20: ...Cisco CRS Routers 16 Slot Line Card Chassis Installation Guide xx Preface Preface ...
Страница 118: ...Cisco CRS Routers 16 Slot Line Card Chassis Installation Guide 98 Installing and Removing Power Components Steps ...
Страница 252: ...Cisco CRS Routers 16 Slot Line Card Chassis Installation Guide 232 Upgrading Chassis Components Steps ...


