


Required Tools and Equipment
You need the following tools and parts to perform this task:
• ESD-preventive wrist strap
• Pillow block replacement kit—Cisco product number: CRS-PILLBLK=
The following items are included in the CRS-PILLBLK= pillow block replacement kit:
• 2 replacement pillow blocks
• 6 Torx-head screws
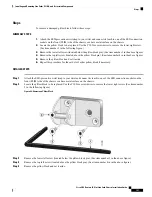
• 1 T10 Torx screwdriver (See item 1 in the following figure)
Steps
To install a pillow block, follow these steps:
SUMMARY STEPS
1.
Attach the ESD-preventive wrist strap to your wrist and connect its leash to one of the ESD connection
sockets on the front (PLIM) side of the chassis or a bare metal surface on the chassis.
2.
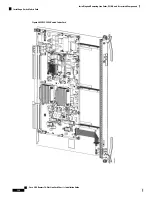
Locate the slot where the pillow block was removed.
3.
Have the replacement T10 Torx-head screws near at hand.
4.
Position the pillow block and align the screw holes.
5.
Use the T10 Torx screwdriver to install the top left screw (located above the pillow block pin). (See item
number 2 in the following figure.)
6.
Install the lower right screw (see item number 3 in the above figure).
7.
Install the lower left screw (located below the pillow block pin). (See item number 4 in the above figure).
8.
Repeat this procedure for the card slot’s other pillow block if necessary.
DETAILED STEPS
Step 1
Attach the ESD-preventive wrist strap to your wrist and connect its leash to one of the ESD connection sockets on the
front (PLIM) side of the chassis or a bare metal surface on the chassis.
Step 2
Locate the slot where the pillow block was removed.
Step 3
Have the replacement T10 Torx-head screws near at hand.
Step 4
Position the pillow block and align the screw holes.
Step 5
Use the T10 Torx screwdriver to install the top left screw (located above the pillow block pin). (See item number 2 in
the following figure.)
Cisco CRS Routers 16-Slot Line Card Chassis Installation Guide
119
Installing and Removing Line Cards, PLIMs, and Associated Components
Required Tools and Equipment
Содержание CRS-16-LCC/M
Страница 20: ...Cisco CRS Routers 16 Slot Line Card Chassis Installation Guide xx Preface Preface ...
Страница 118: ...Cisco CRS Routers 16 Slot Line Card Chassis Installation Guide 98 Installing and Removing Power Components Steps ...
Страница 252: ...Cisco CRS Routers 16 Slot Line Card Chassis Installation Guide 232 Upgrading Chassis Components Steps ...


