60
61
the approximate range for the intended effect.
You can process just one image, or an entire
scene, or in the extreme case the entire story-
board.
(
1
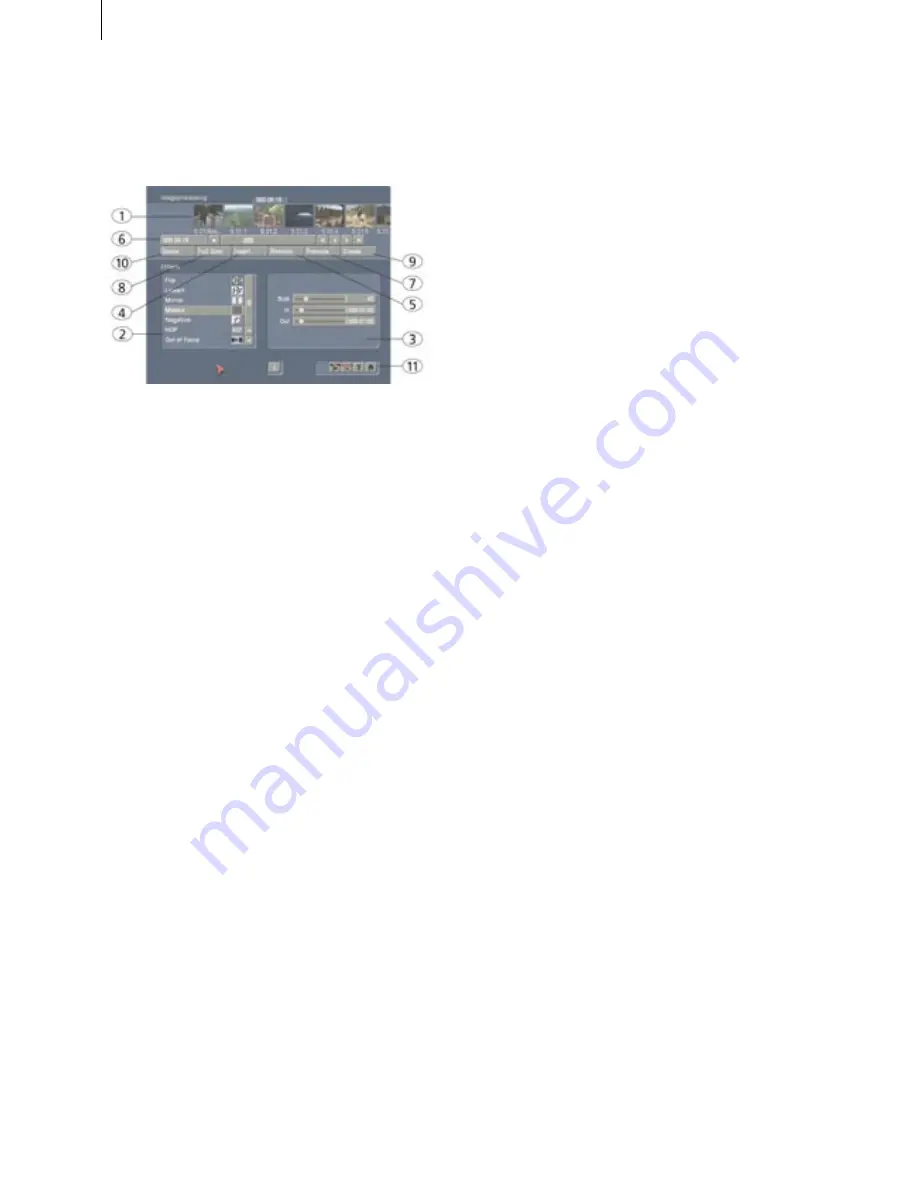
) The long-term effects menu displays the
familiar
storyboard
. You now bring the scene (to
which you would like to add effect) into the center
of the storyboard.
A difference to the storyboard from the "
Edit
"
menu is the Play button. In the Image Processing
effects screen the Play button does not play the
entire storyboard, only the selected scene in the
center. If an effect has been added, then the length
of the entire effect is played.
(
2
) You can select an effect in the
effect list
. Either
click on the effect directly so that it is highlighted
by the dark-gray bar, or use the slider or arrow
buttons in order to move the desired effect to the
correct position. If you do use the slider, then
after selecting the effect you must press the left
trackball button so that the light-blue bar again
changes to dark-blue.
(
3
) After you have chosen an effect that is availab-
le with further options, the corresponding
effect
options
are displayed in the field to the right next
to the effect list. There you can define, for examp-
le, the colors and intensity of the effect.
(
4
) With the "
Add
" button you can apply the
selected and configured effect to the scene lo-
cated in the center. The effect symbol appears
in the scene outlined in red. If you select a new
long-term effect even though there is already
one in the scene, the new effect replaces the old,
without you having to click again on "
Add
". The
length of the newly inserted effect corresponds at
first to the length of the actual scene, but can be
changed with the button located to the above-left
(item(
6
)).
(
5
) A click on the "
Remove
" button removes the
inserted effect from the storyboard. If you want
to replace the current effect with another, simply
select the new effect and it will replace the one in
the storyboard. In this case you don't have to click
on the "
Remove
" button.
(
6
) After you have inserted a scene the scene
length is displayed in this button (and thus the
maximum length of the effect). Click this button
so that the "
Specify Range
" menu opens and you
are given four selection options. You can let the
effect run "
1 sec at beginning
", "
1 sec at end
",
over the "
complete scene
", or over a specifiable
"
Range
".
Choosing the function "
Range
" opens a Trim
menu, similar to "
Trim
" from the "
Edit
" menu,
in which you can set the applicable range for the
effect. The effect will begin at the In point (first
frame of the scene), and end at the Out point (the
last frame). Some segments of the storyboard
cannot be selected. The reason is that other effects
are already defined. Overlapping between long-
term effects and titling is not possible. (However,
you can do this by using the Special function in
the Edit screen to create new scenes with included
IP effects.)
When you have set the range of your choice,
return to the "
Image Processing
" screen (click on
the right button).
If you have extended the effect to other scenes,
then you will also see the effect symbol in these
scenes. (By choosing the option "
complete scene
"
you can remove the selected effect from the other
scenes.) The range that you just set is displayed in
this button.
(
7
) Clicking on the "
Preview
" button opens a
small screen in which the video plus the effect
runs. In this way you can judge and perhaps make
corrections (for color, intensity, time, etc.) to the
effect before creating it.
The running time of the preview will correspond
approximately to the time of the calculated effect.
The preview may be a little "jittery", because it
does not run at the normal frame rate. This will
Содержание Prestige
Страница 1: ...Casablanca Prestige User manual ...
Страница 20: ...20 ...
Страница 40: ...40 ...
Страница 88: ......


