Chapter 2
2-23
thereby varying the separation between the face of the printhead and the paper.
The printhead height is detected from the lift cam sensor within the carriage and the distance of rotation of the lift motor.
g) Multi sensor
The multi sensor attached to the lower left part of the carriage consists of four LEDs (red, blue, green, infrared) and two light-receiving sensors to detect the leading
edges and width of paper and skews in it, and to adjust its registration and head height.
The multi sensor reference has a white plate attached to it, so that a reference value can be calculated during carriage height measurement by measuring the intensity
of light reflected upon the white plate.
(Service mode: SERVICE MODE>ADJUST>GAP CALIB.)
h) Rail cleaner
The shaft cleaner located in the right side of the carriage helps keep the main rail clean.
i) Internal unit temperature sensor
One thermistor is installed on the head relay PCB on the back of the head holder to detect the internal unit temperature.
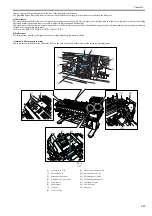
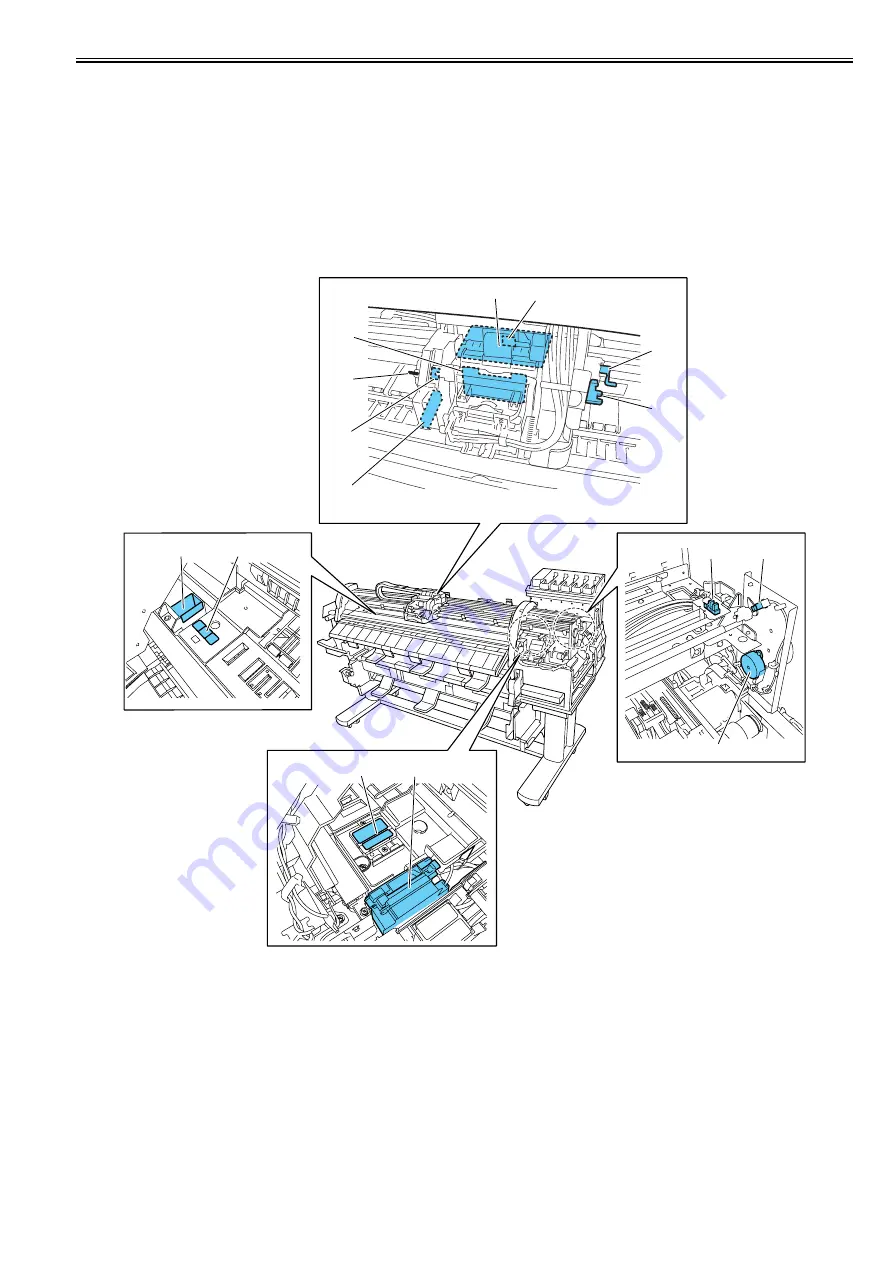
F-2-13
T-2-7
[1]
Carriage relay PCB
[9]
Multi sensor reference plate
[2]
Head relay PCB
[10] BP maintenance jet tray
[3]
Slant adjustment lever
[11] HP maintenance jet tray
[4]
Printhead fixer lever sensor
[12] Head management sensor
[5]
Multi sensor
[13] Carriage HP sensor
[6]
Shaft cleaner
[14] Lift cam sensor
[7]
Lift cam
[15] Lift motor
[8]
Linear encoder
[13]
[14]
[11]
[12]
[14]
[10]
[9]
[1]
[7]
[6]
[2]
[3]
[4]
[5]
[8]
Содержание iPF800 Series
Страница 1: ...Aug 13 2008 Service Manual iPF800 series ...
Страница 2: ......
Страница 6: ......
Страница 11: ...Chapter 1 PRODUCT DESCRIPTION ...
Страница 12: ......
Страница 14: ......
Страница 38: ...Chapter 1 1 24 Hold this lever to pull out the lower roll unit ...
Страница 90: ...Chapter 1 1 76 3 Push in the left and right Basket Rods toward the back all the way until they stop F 1 41 ...
Страница 100: ...Chapter 1 1 86 ...
Страница 101: ...Chapter 2 TECHNICAL REFERENCE ...
Страница 102: ......
Страница 147: ...Chapter 2 2 43 This function relays the image data from the main controller PCB to the printhead ...
Страница 158: ......
Страница 159: ...Chapter 3 INSTALLATION ...
Страница 160: ......
Страница 162: ......
Страница 176: ...Chapter 3 3 14 ...
Страница 177: ...Chapter 4 DISASSEMBLY REASSEMBLY ...
Страница 178: ......
Страница 180: ......
Страница 227: ...Chapter 4 4 47 Media type Gloss photo paper 2 Paper gap adjustment Service mode SERVICE MODE ADJUST GAP CALIB ...
Страница 238: ...Chapter 4 4 58 ...
Страница 239: ...Chapter 5 MAINTENANCE ...
Страница 240: ......
Страница 242: ......
Страница 246: ...Chapter 5 5 4 5 Close upper cover 1 F 5 6 1 ...
Страница 247: ...Chapter 5 5 5 ...
Страница 248: ......
Страница 249: ...Chapter 6 TROUBLESHOOTING ...
Страница 250: ......
Страница 252: ......
Страница 274: ......
Страница 275: ...Chapter 7 SERVICE MODE ...
Страница 276: ......
Страница 278: ......
Страница 301: ......
Страница 302: ......
Страница 303: ...Chapter 8 ERROR CODE ...
Страница 304: ......
Страница 306: ......
Страница 318: ...Chapter 8 8 12 ...
Страница 319: ...Aug 13 2008 ...
Страница 320: ......

