Chapter 2
2-4
2.1.4 Print Driving
0013-5398
iPF810 / iPF820
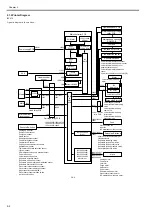
Print and control signals are transferred via the carriage relay PCB and head relay PCB to the printheads to discharge inks from the nozzle assembly at printing.
Each printhead has 12 trains of nozzles arranged in a zigzag pattern.
This printer uses one printhead.
(In installed state, from left to right, C, M, Y, MBK, MBK, BK)
Print signals directed at each nozzle train are even-numbered nozzle data (Hx-x-DATA-x-EV) and odd-numbered nozzle data (Hx-x-DATA-x-OD). These are
transferred in timing with a data transfer clock (Hx-CLK) and data latch pulses (Hx-LT).
The Heat Enable (Hx-x-HE-x) drive control signal enables inks to be discharged from the nozzles.
1. Pint drive control
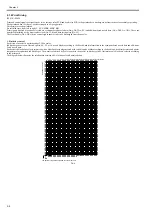
Each train of nozzles in a printhead has 2,560 nozzles.
Ink discharge nozzles are selected split in 40-, 20- or 10-nozzle blocks according to the Block Enable information in the even-numbered nozzle data and odd-num-
bered nozzle data.
Each selected block of nozzles is impressed with a Heat Enable signal generated with variable pulse widths according to the head rank, head temperature and printer
temperature for optimized ink discharges. The nozzles are driven by heater boards in the nozzles to discharge inks. Optimal nozzle blocks are selected according
to the print path.
The diagram below illustrates the relationship between a 40-block nozzle and nozzles driven.
F-2-4
23
22
21
20
19
18
17
16
15
14
13
12
11
10
9
8
7
6
5
4
3
2
1
0
2559
0
1
2
3
4
5
6
7
8
9
10
11
12
13
14
15
16
17
18
19
20
21
22
23
24
25
26
27
28
29
30
31
32
33
34
35
36
37
38
39
40
41
42
43
44
45
46
47
39
38
37
36
35
34
33
32
31
30
29
28
27
26
25
24
48
49
50
51
52
53
54
55
56
57
58
59
60
61
62
63
64
65
66
67
68
69
70
71
72
73
The pattern is repeated until 2560 nozzles is reached.
Pr
inthead
nozzle
No
.
Block No.
Содержание iPF800 Series
Страница 1: ...Aug 13 2008 Service Manual iPF800 series ...
Страница 2: ......
Страница 6: ......
Страница 11: ...Chapter 1 PRODUCT DESCRIPTION ...
Страница 12: ......
Страница 14: ......
Страница 38: ...Chapter 1 1 24 Hold this lever to pull out the lower roll unit ...
Страница 90: ...Chapter 1 1 76 3 Push in the left and right Basket Rods toward the back all the way until they stop F 1 41 ...
Страница 100: ...Chapter 1 1 86 ...
Страница 101: ...Chapter 2 TECHNICAL REFERENCE ...
Страница 102: ......
Страница 147: ...Chapter 2 2 43 This function relays the image data from the main controller PCB to the printhead ...
Страница 158: ......
Страница 159: ...Chapter 3 INSTALLATION ...
Страница 160: ......
Страница 162: ......
Страница 176: ...Chapter 3 3 14 ...
Страница 177: ...Chapter 4 DISASSEMBLY REASSEMBLY ...
Страница 178: ......
Страница 180: ......
Страница 227: ...Chapter 4 4 47 Media type Gloss photo paper 2 Paper gap adjustment Service mode SERVICE MODE ADJUST GAP CALIB ...
Страница 238: ...Chapter 4 4 58 ...
Страница 239: ...Chapter 5 MAINTENANCE ...
Страница 240: ......
Страница 242: ......
Страница 246: ...Chapter 5 5 4 5 Close upper cover 1 F 5 6 1 ...
Страница 247: ...Chapter 5 5 5 ...
Страница 248: ......
Страница 249: ...Chapter 6 TROUBLESHOOTING ...
Страница 250: ......
Страница 252: ......
Страница 274: ......
Страница 275: ...Chapter 7 SERVICE MODE ...
Страница 276: ......
Страница 278: ......
Страница 301: ......
Страница 302: ......
Страница 303: ...Chapter 8 ERROR CODE ...
Страница 304: ......
Страница 306: ......
Страница 318: ...Chapter 8 8 12 ...
Страница 319: ...Aug 13 2008 ...
Страница 320: ......


