background image

E

Fast Graphic Process

Turning this setting on may help produce the expected results if image colors are inconsistent in printed docu-
ments or if lines are printed in varying thicknesses.

Note

This function cannot be used on 64-bit version of Windows.

F

Reduce Print Unevenness

If you want to reduce unevenness of the printed image, turn this on to improve the print result. However, print-
ing may take longer for some images.

G

Adjust faint lines

Turn this off to obtain expected results when fine lines have been printed in a color different from other dia-
grams and illustrations. However, lines in some colors may appear broken.

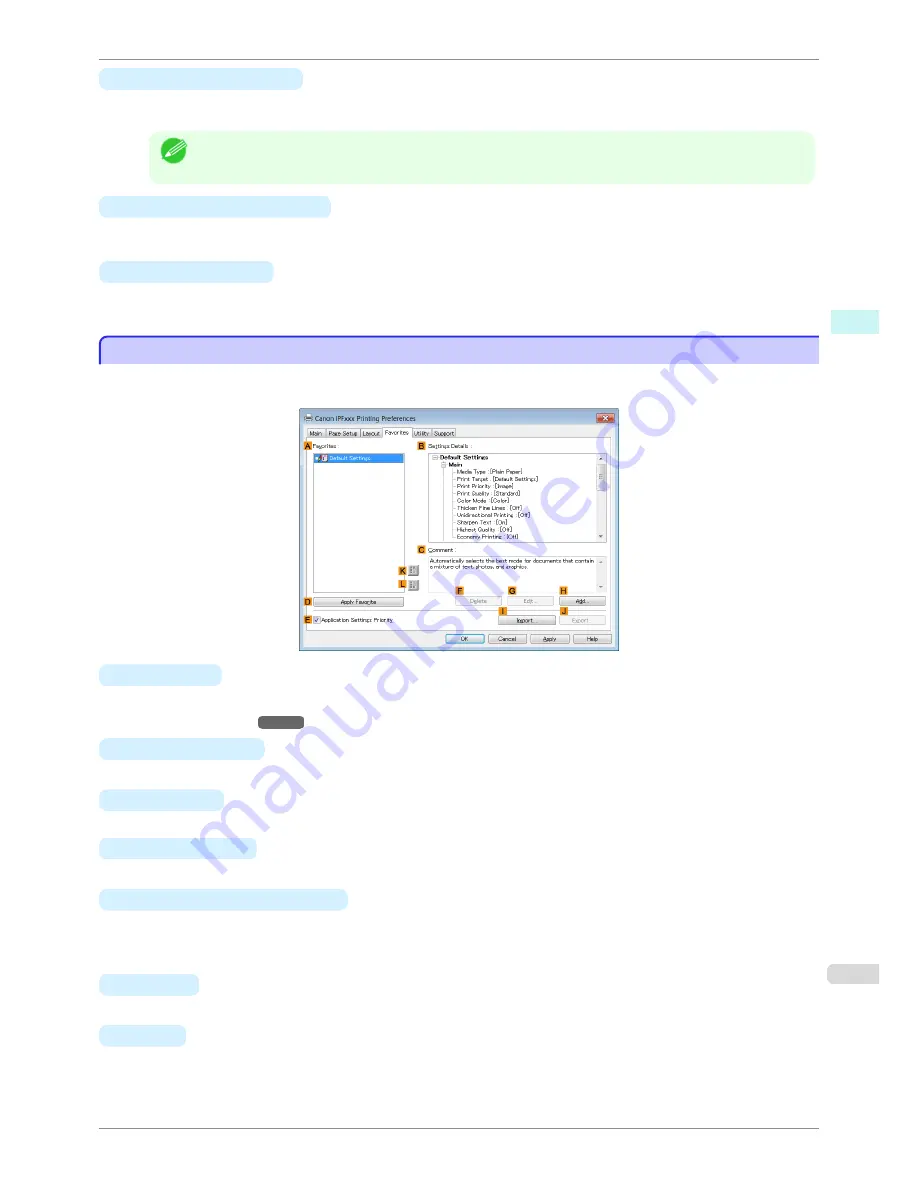
Favorites Sheet

Favorites Sheet

The following settings are available on the 

Favorites

 sheet. For details on settings items, refer to the printer driver

help.

A

Favorites

Printing favorites you have created are listed with 

Default Settings

 favorites.

Using Favorites

P.137

B

Settings Details

Displays details of the favorite selected in the 

A

Favorites

.

C

Comment

Displays notes registered in the favorite.

D

Apply Favorite

Click to change the current print settings to those of the favorite selected in the 

A

Favorites

.

E

Application Settings Priority

Activate this setting to use settings values specified in the source application in preference to favorite settings
selected in the 

A

Favorites

, when clicking 

D

Apply Favorite

. For details on the settings items used in prefer-

ence, refer to the printer driver help.

F

Delete

Click to delete the selected favorite from the 

A

Favorites

 list.

G

Edit

Click to display the 

Edit

 dialog box, which enables you to change the name and icon for the favorite selected

in the 

A

Favorites

 list.

iPF780


Favorites Sheet

User's Guide


Windows Software

Printer Driver

167


Содержание imagePROGRAF iPF780

Страница 1: ...NNER Enlargement Copy 202 Print Plug In for Office 211 and so on Mac OS Software 247 Printer Driver 248 Preview 265 Free Layout 286 Color imageRUNNER Enlargement Copy 309 and so on Handling and Use of...

Страница 2: ...se Originals 38 Printing CAD Drawings 40 Printing CAD Drawings 40 Printing Line Drawings and Text 40 Printing Line Drawings and Text Windows 41 Printing Line Drawings and Text Mac OS 42 Printing from...

Страница 3: ...ges Continuously 104 Printing Multiple Pages Continuously Windows 105 Printing Multiple Pages Continuously Mac OS 106 Printing Multiple Pages Per Sheet 108 Printing Multiple Pages Per Sheet Windows 10...

Страница 4: ...Object Adjustment Dialog box Color 157 Matching Sheet 157 Color Adjustment Sheet Monochrome 159 Object Adjustment Dialog box Monochrome 160 Page Setup Sheet 161 Paper Size Options Dialog Box 163 Layou...

Страница 5: ...g In for Officefeatures 211 Steps to install 211 Steps to uninstall 214 When Print Plug In for Office is not displayed 214 To start from Microsoft Word 217 Print Matching Roll Width Word 219 Borderles...

Страница 6: ...m 282 Print Page Rotated 90 Degrees 283 Display with Fitting to the Width of the Paper 283 Display with All 283 Display with Actual Size 284 Moving a Page 284 Free Layout 286 The Features of Free Layo...

Страница 7: ...ion 332 Handling rolls 336 Attaching the Roll Holder to Rolls 336 Loading Rolls in the Printer 339 Changing the Type of Paper 341 Specifying the Paper Length 343 Removing the Roll from the Printer 343...

Страница 8: ...r Menu 404 Printer Menu Operations 404 Menu Operations 405 Menu Structure 408 Menu Settings 414 Status Print 423 Printing Interface Setting Reports 426 Printer Parts Printer Parts 429 Printer parts 43...

Страница 9: ...g Unit Costs in Accounting Manager 466 Setting the Unit Cost for Ink 467 Setting the Unit Cost for Paper 468 Setting the Unit Cost for Items Other Than Ink and Paper 469 Configuring Units and Display...

Страница 10: ...s 526 Frequently Asked Questions 526 Problems Regarding Paper 527 Clearing Jammed Roll Paper 527 Clearing a Jammed Sheet 530 Clearing Jammed Paper Paper Feed Slot 532 Roll paper cannot be inserted int...

Страница 11: ...HP GL 2 jobs are printed 6 mm larger than specified 548 HP GL 2 jobs are printed at maximum size even if a standard size is specified 548 HP GL 2 printing takes a long time 548 Replotting with HP GL...

Страница 12: ...567 Wrong printhead 567 Printhead error 567 Cannot recognize print head 567 Execute printhead cleaning 568 Messages regarding the maintenance cartridge 569 Insert the maintenance cartridge 569 Wrong...

Страница 13: ...ppendix 577 Safety Precautions 578 Safety Precautions 578 Legal Notices 580 Manuals for this printer 582 Manuals for this printer 582 About This User Manual 582 Disposal of the product 584 WEEE Direct...

Страница 14: ...14...

Страница 15: ...9 Windows Software 141 Mac OS Software 247 Handling and Use of Paper 325 Control Panel 395 Printer Parts 429 Network Setting 437 Print Job Management 457 Adjustments for Better Print Quality 475 Maint...

Страница 16: ...format printing Easily print vertical or horizontal banners from familiar applications such as Microsoft Office applications See Printing Vertical or Horizontal Banners Large Format Printing P 88 Bor...

Страница 17: ...d Off Turning the printer on 1 Press the Power button to turn on the printer The printer will now start up After the Display Screen shows the Canon logo Starting up Please wait is displayed 2 The Powe...

Страница 18: ...shing the printer is receiving a print job Turn off the printer only after printing is finished 2 Hold down the Power button for more than a second After Shut Down Please Wait is shown on the Display...

Страница 19: ...ff P 17 2 Load the roll on the Roll Holder See Attaching the Roll Holder to Rolls P 336 3 Load the roll in the printer See Loading Rolls in the Printer P 339 iPF780 Loading and Printing on Rolls User...

Страница 20: ...Paper Length P 343 5 Complete settings in the printer driver for the type of paper and other details Specifying Paper in the Printer Driver Windows P 144 Specifying Paper in the Printer Driver Mac OS...

Страница 21: ...Guide See Paper Sizes P 326 See Types of Paper P 326 1 Turn the printer on See Turning the Printer On and Off P 17 2 Complete settings in the printer driver for the type of paper and other details Spe...

Страница 22: ...most cases the dia log box includes basic printing options and enables you to choose the printer specify the range of pa ges number of copies and so on Example Print dialog box displayed by the appli...

Страница 23: ...nt During this setup process the printer will not be listed among available printers if it is off or disconnected Printing from the application software 1 In the application software select Print from...

Страница 24: ...press the Stop button during printing printer operation varies depending on the current status If you press the Stop button before printing starts Pressing the Stop button before printing starts will...

Страница 25: ...us sheet click Cancel Job Note The screen may differ slightly depending on the model you are using Canceling Print Jobs from Mac OS Canceling Print Jobs from Mac OS In the printer window you can cance...

Страница 26: ...ete the print job Note The screen may differ slightly depending on the model you are using The job sent to the printer is canceled 5 Exit imagePROGRAF Printmonitor In the printer window click Resume P...

Страница 27: ...ing cases the status is cleared even if you do not set Pause Print to Off and printing from the job queue resumes When paper is advanced When you execute Chg Paper Type in the Paper Menu 1 During prin...

Страница 28: ...iPF780 User s Guide 28...

Страница 29: ...standard sizes 88 Tiling and multiple pages per sheet 101 Centering originals 115 Conserving roll paper 123 Checking Images Before Printing 130 Other useful settings 131 Windows Software 141 Mac OS S...

Страница 30: ...An error message is displayed on the printer Control Panel if the media type specified in the printer driver does not match the media type specified in the printer Although you can print under these...

Страница 31: ...s are too vivid Important Depending on the Media Type setting some Print Target options may not be available Note You can check the settings values for each print target by clicking View Settings You...

Страница 32: ...u change pa per information by using the Media Configuration Tool For details see Media Configuration Tool P 367 5 After confirming that DEasy Settings is selected click Photo Color in the EPrint Targ...

Страница 33: ...es dialog box Note The configuration method varies depending on the OS and application software you are using If Page Setup is displayed in the application menu the settings are configured by opening...

Страница 34: ...ing the Media Configuration Tool For details see Media Configuration Tool P 380 8 After confirming that DEasy Settings is selected click Photo Color in the EPrint Target list Note For information on s...

Страница 35: ...et by clicking View Settings You can also fine tune these values as needed Advanced Settings For details on Advanced Settings see Giving Priority to Particular Graphic Elements and Colors for Print in...

Страница 36: ...ils on available printing conditions see Printer Driver Settings P 142 10 Confirm the print settings and print as desired Note For tips on confirming print settings see Confirming Print Settings P 145...

Страница 37: ...re menu 2 Select the printer in the BFormat for list 3 In the CPaper Size list click the size of the original In this case click ISO A4 for Paper Tray Large Margins 4 Click FOK to close the dialog box...

Страница 38: ...u can print a variety of source documents from word processing or spreadsheet programs or screen shots from web browsers after composing an original with them using PosterArtist This topic describes h...

Страница 39: ...the document will not be printed yet 8 Choose the page to load in PosterArtist 9 Edit and rearrange the image in the PosterArtist window as desired Without closing the PosterArtist window repeat step...

Страница 40: ...nting is easy when you simply choose the type of original to print Easy Settings Simply choose the printing application in the list for optimal printing results Print Target Choose presets that match...

Страница 41: ...omput er and operating system Printing Line Drawings and Text Windows P 41 Printing Line Drawings and Text Mac OS P 42 Printing Line Drawings and Text Windows Printing Line Drawings and Text Windows T...

Страница 42: ...printing conditions see Printer Driver Settings P 142 11 Confirm the print settings and print as desired Note For tips on confirming print settings see Confirming Print Settings P 145 Printing Line D...

Страница 43: ...re menu 2 Select the printer in the BFormat for list 3 In the CPaper Size list click the size of the original In this case click ISO A3 4 Click FOK to close the dialog box 5 Choose Print in the applic...

Страница 44: ...rinting from AutoCAD Printer Driver Optimization Module for AutoCAD is software for printing optimally from AutoCAD with the printer driver By optimally controlling the processing resolution of raster...

Страница 45: ...n Color CAD is selected in Color Mode Colors can be adjusted before printing as follows when Color Compatibility is selected Note Color CAD is displayed when you select Advanced Settings on the Main s...

Страница 46: ...in Color Mode Note Color CAD is displayed when you select Advanced Settings on the Main sheet and set Print Priority to Line Drawing Text 1 Click start Printers and Faxes or Printers 2 Select the pri...

Страница 47: ...Graphics Language 2 and HP RTL is an abbreviation of Hewlett Packard Raster Transfer Language Emulation is good for obtaining results similar to printing on other printers When printing from applicat...

Страница 48: ...nochrome Bitmap Print in a color mode for CAD using Col or Ink with all non white portions printed in black No color adjustment is supported No color correction 1 Prints without performing color match...

Страница 49: ...ng optimized for printing typical photos attractively Smooth gra dation is a feature This is also an easy to use mode when performing color ad justment using application software Colorimetric Color ma...

Страница 50: ...k DAdvanced Settings to switch the print mode 6 Click Color in the GColor Mode list 7 Click HColor Settings to display the Color Settings dia log box 8 On the Color Adjustment sheet adjust the color t...

Страница 51: ...ard gradation increase the contrast JSaturation Adjust the level of color saturation in a range from subdued to vivid Note Click Object Adjustment to open the Object Adjustment dialog box which allows...

Страница 52: ...s displayed in the application menu the settings are configured by opening the Page At tributes dialog box from Page Setup If it is not displayed the settings are configured in the upper part of the p...

Страница 53: ...inged with red and so on HBrightness Adjust the brightness of printed images while keeping the darkest and lightest portions intact IContrast Adjust the contrast of the darkest and lightest portions r...

Страница 54: ...0 Printing Office Documents P 35 Print Priority Choose the graphic elements that you want to emphasize for printing Print Priority 1 Description Image A setting for posters or other documents made up...

Страница 55: ...Cyan Magenta Yellow Gray Tone Brightness Contrast Saturation You can adjust the levels of cyan magenta and yellow as well as the brightness contrast satura tion and gray tones If you choose Monochrome...

Страница 56: ...ings before printing refer to the following topics as appropriate for your computer and operating system Choosing the Document Type and Printing Conditions Windows P 56 Choosing the Document Type and...

Страница 57: ...ettings Note For instructions on adjusting color see Adjusting the Color in the Printer Driver P 48 10 Select the KSharpen Text check box 11 Click the Page Setup tab to display the Page Setup sheet 12...

Страница 58: ...displayed in the application menu the settings are configured by opening the Page At tributes dialog box from Page Setup If it is not displayed the settings are configured in the upper part of the pri...

Страница 59: ...t 12 To adjust the brightness and contrast click ISet Note For instructions on adjusting brightness and contrast see Adjusting the Color in the Printer Driver P 48 13 Access the Page Setup pane 14 Con...

Страница 60: ...you are using For instructions on printing with resizing to fit the paper size refer to the following topics Resizing Originals to Match the Paper Size Windows P 60 Note To print with resizing to fit...

Страница 61: ...int Target list 6 Click the Page Setup tab to display the Page Setup sheet 7 Select and click a roll paper in the LPaper Source list 8 Select the width of the loaded roll in the MRoll Paper Width list...

Страница 62: ...riginals to Fit the Roll Width Windows Resizing Originals to Fit the Roll Width Windows This topic describes how to enlarge originals before printing to match the roll width based on the following exa...

Страница 63: ...Paper Width Note After you click EFit Roll Paper Width the Information dialog box is displayed Select the width of the loaded roll in the Roll Paper Width list and click OK Make sure the roll paper w...

Страница 64: ...per part of the printer driver displayed when you se lect Print from the application software menu 2 Select the printer in the BFormat for list 3 In CPaper Size click the size of the original In this...

Страница 65: ...as desired Enlarged Reduced Printing Enlarge or reduce the original in the printer driver as desired Scaling Enlarge or reduce originals by a particular amount as desired For instructions on entering...

Страница 66: ...ect the printer in the dialog box and then display the printer driver dialog box See Accessing the Print er Driver Dialog Box from Applications P 148 3 Make sure the Main sheet is displayed 4 In the A...

Страница 67: ...this case you can center originals by selecting EPrint Centered on the Lay out sheet 13 Confirm the print settings and print as desired Note For tips on confirming print settings see Confirming Print...

Страница 68: ...splayed when you se lect Print from the application software menu 2 Select the printer in the BFormat for list 3 In CPaper Size click the size of the original In this case click ISO A4 4 Click FOK to...

Страница 69: ...case the portion off the edge of the paper will not be printed If the original size after enlargement or reduction is smaller than the paper size the original is printed in the upper left corner In th...

Страница 70: ...oper ations outside of the region of the original to give the result as shown in Figure c The A4 size print as shown in Figure b can then be obtained by trimming the margins from the periphery after...

Страница 71: ...log box See Accessing the Print er Driver Dialog Box from Applications P 148 3 Make sure the Main sheet is displayed 4 In the AMedia Type list select the type of paper that is loaded In this case clic...

Страница 72: ...the application menu to display the Page Attributes dialog box Note The configuration method varies depending on the OS and application software you are using If Page Setup is displayed in the applica...

Страница 73: ...etup pane 11 Select and click a roll paper in the APaper Source list 12 Select the paper width of the roll loaded in the printer for BRoll Width In this case ISO A2 A3 420 0mm is selected 13 Confirm t...

Страница 74: ...riph ery of the original If the length of the image to print is short then since the roll paper is fed out to a prescribed length before cutting in order to prevent cutting problems and ejection probl...

Страница 75: ...at 0 mm For instructions on specifying the margin refer to the software documentation The extra 3 mm 0 12 in on each side will not be printed Create the original so that it fits inside the paper area...

Страница 76: ...ng print settings see Confirming Print Settings P 145 Borderless Printing at Actual Size Mac OS Borderless Printing at Actual Size Mac OS This topic describes how to print borderlessly at actual size...

Страница 77: ...configured in the upper part of the printer driver displayed when you se lect Print from the application software menu 2 Select the printer in the BFormat for list 3 In the CPaper Size list choose a p...

Страница 78: ...ding on frequency of use In this kind of situation change the ink drying time in Between Pages in the Paper Detailed Settings dialog box 10 Access the Page Setup pane 11 Select and click a roll paper...

Страница 79: ...following cases it becomes borderless only on the left and right 2 edge borderless because the top and bottom of the printed image are not automatically cut When paper where the borderless printing is...

Страница 80: ...indows This topic describes how to enlarge originals before borderless printing to match the paper size based on the fol lowing example Important When borderless printing is used the edge of the paper...

Страница 81: ...aces that are not dry yet it may damage the paper or the edge of the document that is cut depending on frequency of use In this kind of situation change the ink drying time using the fol lowing proced...

Страница 82: ...ng you can print documents without the margin so that the printed image covers the entire surface of the paper Borderless printing is only available with rolls Paper you can use for borderless printin...

Страница 83: ...er documents to match the roll paper width refer to the following topics as appropriate for your computer and operating system Borderless Printing by Resizing Originals to Fit the Roll Width Windows P...

Страница 84: ...touches printing surfaces that are not dry yet it may damage the paper or the edge of the document that is cut depending on frequency of use In this kind of situation change the ink drying time using...

Страница 85: ...es how to enlarge originals before borderless printing to match the roll width based on the follow ing example Important When borderless printing is used the edge of the paper is cut during printing T...

Страница 86: ...tware menu 2 Select the printer in the BFormat for list 3 In CPaper Size click the size of the original In this case click ISO A4 Note All sizes are available in borderless printing if you resize orig...

Страница 87: ...Select and click a roll paper in the APaper Source list 12 Select the paper width of the roll loaded in the printer for BRoll Width In this case 10 in 254 0mm is selected 13 Select the DEnlarged Redu...

Страница 88: ...Paper Width To match the width of vertical and horizontal banners with the width of rolls use the printer driver function for auto matically enlarging reducing and printing For example if you automati...

Страница 89: ...epeatedly from the paper size list Custom Paper Size can be set up to 18 0 m 2 In the application create an original in the size you registered 3 Print the banner using the settings that correspond to...

Страница 90: ...applications such as Microsoft PowerPoint that do not enable you to choose registered paper sizes use the custom paper size setting in Custom and specify 100 500 mm 3 9 19 7 in 4 Set the printing orie...

Страница 91: ...oll paper in the LPaper Source list 10 After you click EFit Roll Paper Width the Information dialog box is displayed 11 Select the width of the loaded roll in the Roll Paper Width list In this case cl...

Страница 92: ...er Roll paper width 16 inches 406 4 mm The print procedure is as follows 1 In the application create an original in the format of a horizontal or vertical banner 2 In Page Setup register Custom Paper...

Страница 93: ...Printable Area Here too measurements are entered in millime ters 8 Click OK to close the Custom Paper Sizes dialog box 9 In the FPaper Size list click the size of the original In this case click 100 5...

Страница 94: ...ge Setup pane 7 Select and click a roll paper in the APaper Source list 8 Select the paper width of the roll loaded in the printer for BRoll Width In this case 16 in 406 4mm is selected 9 Select the D...

Страница 95: ...e paper first register the paper size in the printer driver Call a non standard paper size registered in the printer driver with Custom Paper Size Once you register Custom Paper Size you then can sele...

Страница 96: ...10 Select mm in Units 11 Enter 430 16 9 in in both Width and Height Note If you select the Fix the Ratio of the Width to Height check box after you enter a value in either Width or Height the other va...

Страница 97: ...9 16 9 in in the printer 2 Choose Print in the application menu 3 Select the printer in the dialog box and then display the printer driver dialog box See Accessing the Print er Driver Dialog Box from...

Страница 98: ...s you then can select it repeatedly from the paper size list Custom Paper Sizes can be set up to 18 0 m This topic describes how to register a non standard paper size by the name of 430 430 and print...

Страница 99: ...e the Custom Paper Sizes dialog box 10 In the FPaper Size list click the size of the original In this case click 430 430 the size you registered 11 If you configured the settings using the Page Attrib...

Страница 100: ...m the print settings and then click MPrint to start printing Note For tips on confirming print settings see Confirming Print Settings P 250 Printing on Non Standard Paper Sizes Mac OS iPF780 User s Gu...

Страница 101: ...n Sections 113 Printing Large Posters Windows 113 Printing Multiple Originals Next to Each Other Printing Multiple Originals Next to Each Other By arranging originals from word processing or spreadshe...

Страница 102: ...Mac OS P 103 Printing Multiple Originals Next to Each Other Windows Printing Multiple Originals Next to Each Other Windows This topic describes how to arrange multiple originals using the Free Layout...

Страница 103: ...ations on the same page For instructions on editing and rearranging images refer to the imagePROGRAF Free Layout help topic 9 Print from the imagePROGRAF Free Layout menu Note For details on imagePROG...

Страница 104: ...tions on the same page For instructions on editing and rearranging images refer to the Canon imagePROGRAF Free Layout help topic 7 Print from the Canon imagePROGRAF Free Layout menu Note For details o...

Страница 105: ...nuously Windows This topic describes how to print multiple pages as a single continuous image without margins between pages Important This feature is only available with rolls It cannot be used when p...

Страница 106: ...ttings P 145 Printing Multiple Pages Continuously Mac OS Printing Multiple Pages Continuously Mac OS This topic describes how to print multiple pages as a single continuous image without margins betwe...

Страница 107: ...er part of the printer driver displayed when you se lect Print from the application software menu 2 Select the printer in the BFormat for list 3 Choose the original size in the CPaper Size list 4 Clic...

Страница 108: ...into areas for each page Page Layout Specify a number of pages of the original to print on a single sheet in a layout of multiple pages per sheet Important This function cannot be combined with the fo...

Страница 109: ...3 roll 420 0 mm 16 5 in 1 Choose Print in the application menu 2 Select the printer in the dialog box and then open the printer driver dialog box See Accessing the Printer Driver Dialog Box from Appli...

Страница 110: ...reduced about 5 to create space for the printed border If None is selected then the images are not reduced for printing 14 Confirm the print settings and print as desired Note For tips on confirming...

Страница 111: ...e printer driver displayed when you se lect Print from the application software menu 2 Select the printer in the BFormat for list 3 In the CPaper Size list click the size of the original In this case...

Страница 112: ...Select and click a roll paper in the APaper Source list 14 Select the paper width of the roll loaded in the printer for BRoll Width In this case ISO A2 A3 420 0mm is selected 15 Confirm the print set...

Страница 113: ...s Windows Printing Large Posters Windows You can enlarge an original to print it in sections on several sheets By assembling the printed sheets you can create a poster larger than the maximum supporte...

Страница 114: ...ge Layout list Note Follow the steps below to print only a portion of the poster as divided for printing Click BSet under APage Layout to display the Pages to Print dialog box On the Pages to Print di...

Страница 115: ...ons on centering originals when printing on rolls refer to the following topics as appropriate for your computer and operating system Printing Originals Centered on Rolls Windows P 115 Printing Origin...

Страница 116: ...he APage Size list click the size of the original as specified in the application In this case click ISO A4 or Letter 8 5 x11 8 Select and click a roll paper in the LPaper Source list 9 Select the wid...

Страница 117: ...nu to display the Page Attributes dialog box Note The configuration method varies depending on the OS and application software you are using If Page Setup is displayed in the application menu the sett...

Страница 118: ...ck a roll paper in the APaper Source list 12 Select the paper width of the roll loaded in the printer for BRoll Width In this case ISO A3 A4 297 0mm is selected 13 Select the JPrint Centered check box...

Страница 119: ...ting Originals Centered on Sheets Mac OS P 120 Printing Originals Centered on Sheets Windows Printing Originals Centered on Sheets Windows This topic describes how to reduce an original 50 for printin...

Страница 120: ...entered check box 14 Confirm the print settings and print as desired Important If you have selected Manual as the paper source follow the instructions on the printer control panel to enter the paper s...

Страница 121: ...gured in the upper part of the printer driver displayed when you se lect Print from the application software menu 2 Select the printer in the BFormat for list 3 In the CPaper Size list click the size...

Страница 122: ...t settings and then click MPrint to start printing Note For tips on confirming print settings see Confirming Print Settings P 250 Important If you have selected Manual as the paper source follow the i...

Страница 123: ...Width to print rotated pages For tips on conserving roll paper refer to the following topics as appropriate for your computer and operating system Conserving Roll Paper by Rotating Originals 90 Degre...

Страница 124: ...tate Page 90 degrees Conserve Paper check box 10 Confirm the print settings and print as desired Note For tips on confirming print settings see Confirming Print Settings P 145 Conserving Roll Paper by...

Страница 125: ...gured by opening the Page At tributes dialog box from Page Setup If it is not displayed the settings are configured in the upper part of the printer driver displayed when you se lect Print from the ap...

Страница 126: ...ing the paper for blank portions of originals if there are top and bottom margins in originals This enables you to conserve as much paper as the size of the margins Important Printing without the top...

Страница 127: ...printer in the dialog box and then display the printer driver dialog box See Accessing the Print er Driver Dialog Box from Applications P 148 3 Make sure the Main sheet is displayed 4 In the AMedia T...

Страница 128: ...Paper Roll paper width A3 A4 roll 297 0 mm 11 7 in 1 Choose Page Setup from the application menu to display the Page Attributes dialog box Note The configuration method varies depending on the OS and...

Страница 129: ...paper width of the roll loaded in the printer for BRoll Width In this case ISO A3 A4 297 0mm is selected 11 Select the KNo Spaces at Top or Bottom check box 12 Confirm the print settings and then clic...

Страница 130: ...view screen Note Under some settings and in some environments PageComposer may be started Preview Mac OS While viewing the preview screen you can also adjust layout or size settings and your changes w...

Страница 131: ...Important Watermarks are not printed if you select poster as the type of page layout The following watermarks are provided CONFIDENTIAL COPY DRAFT FILE COPY FINAL PRELIMINARY PROOF TOP SECRET You can...

Страница 132: ...alog box and then display the printer driver dialog box See Accessing the Print er Driver Dialog Box from Applications P 148 3 Make sure the Main sheet is displayed 4 In the AMedia Type list select th...

Страница 133: ...e Paper Orientation You can specify the original orientation to match the orientation of the paper for printing Orientation Paper is usually loaded in the printer in portrait orientation When you have...

Страница 134: ...er driver dialog box See Accessing the Printer Driver Dialog Box from Applications P 148 3 Make sure the Main sheet is displayed 4 In the AMedia Type list select the type of paper that is loaded In th...

Страница 135: ...oose Page Setup from the application menu to display the Page Attributes dialog box Note The configuration method varies depending on the OS and application software you are using If Page Setup is dis...

Страница 136: ...and click a roll paper in the APaper Source list 13 Select the paper width of the roll loaded in the printer for BRoll Width In this case ISO A2 A3 420 0mm is selected 14 Confirm the print settings a...

Страница 137: ...e the Paper Reference Guide See Types of Paper P 326 Automatic Cutting Roll paper is cut automatically after printing If you prefer you can print continuously without cutting the roll or you can print...

Страница 138: ...tings see Confirming Print Settings P 145 Roll paper will be automatically cut after printing Cutting Roll Paper After Printing Mac OS Cutting Roll Paper After Printing Mac OS This topic describes how...

Страница 139: ...t is not displayed the settings are configured in the upper part of the printer driver displayed when you se lect Print from the application software menu 2 Select the printer in the BFormat for list...

Страница 140: ...click Print Cut Guideline Important If the automatic cut function has been deactivated on the printer change the auto cut setting on the printer Control Panel 12 Click OK to close the Paper Detailed...

Страница 141: ...e 211 Status Monitor 458 Accounting 462 Device Setup Utility 453 Media Configuration Tool 367 Mac OS Software 247 Handling and Use of Paper 325 Control Panel 395 Printer Parts 429 Network Setting 437...

Страница 142: ...et 164 Page Options Dialog Box 165 Special Settings Dialog Box 166 Favorites Sheet 167 Utility Sheet 168 Support Sheet 169 Settings Summaries Dialog Box 169 Device Settings Sheet 170 Printer Driver Se...

Страница 143: ...n be edited or used at the time of printing as desired Utility Sheet P 168 You can specify settings related to maintenance for the Printhead and feed amount as well as settings for Color imageRUNNER E...

Страница 144: ...at is loaded Note Click the BGet Information button to display the Paper Information on Printer dialog box On the Pa per Information on Printer dialog box you can obtain information on the paper in th...

Страница 145: ...illustrations Illustrations indicate the feed source orientation borderless printing selection and other settings information Note To confirm the Print Target specified in Easy Settings click GView S...

Страница 146: ...n imagePROGRAF Preview functions see Preview P 171 Using Favorites Using Favorites This topic describes how to register favorites and print using favorite settings Registering a favorite This section...

Страница 147: ...to close the Add dialog box The favorite you have added is now displayed in AFavorites Note To save a favorite as a file click JExport and specify the file to save Printing using the favorite Follow...

Страница 148: ...Applications Accessing the Printer Driver Dialog Box from Applications 1 Choose Print from the File menu to display the dialog box for printing conditions 2 Select the printer and then display the pr...

Страница 149: ...ilable after you exit the application You can also access the printer driver dialog box from the Windows system menu To use the settings continuously in all applications open the printer driver from t...

Страница 150: ...changes you make to the settings will apply to all applications you use for printing You can also access the printer driver dialog box from applications See Accessing the Printer Driver Dialog Box fro...

Страница 151: ...time Paper Detailed Settings Dialog Box P 154 LOpen Preview When Print Job Starts When the check box is selected imagePROGRAF Preview is launched before printing This allows you to check on screen pr...

Страница 152: ...lors for Printing P 54 GView Settings Displays the EPrint Target setting values You can view and change the order of EPrint Target setting values View Settings Dialog Box for the Printing Application...

Страница 153: ...able to select UEconomy Printing GColor Mode Choose the color mode Giving Priority to Particular Graphic Elements and Colors for Printing P 54 Note Depending on the AMedia Type setting some GColor Mod...

Страница 154: ...time to wait after printing 1 document page until ejecting the paper Since waiting time is re quired for ink to dry before a roll is cut you can deliver paper in the Output Stacker with the ink dried...

Страница 155: ...d When the Standard setting does not result in cutting the surface cleanly select this Standard Select this when you do not have any problems in automatic cutting Low Speed This helps prevent adhesive...

Страница 156: ...ays as desired Choose Cool Black tinged with blue or Warm Black tinged with red HBrightness Adjust the overall image brightness as desired You can adjust the brightness if the printed document is ligh...

Страница 157: ...AImage Select this option to apply color adjustment to image areas such as photos BGraphics Select this option to apply color adjustment to graphics such as lines and circles CText Select this option...

Страница 158: ...matching method that suits the document to be printed Various Matching Method options are available depending on your selection in Matching Mode EGamma You can adjust the gradation of intermediate to...

Страница 159: ...CC profile needs to be saved in the following folder on the computer you are using C Windows system32 spool drivers color folder Note C may vary according to the user environment Note For details on s...

Страница 160: ...Click to restore all settings on the sheet to the default values Note For details on settings items see Adjusting the Color in the Printer Driver P 48 Object Adjustment Dialog box Monochrome Object Ad...

Страница 161: ...nals to Fit the Roll Width P 82 Borderless Printing at Actual Size P 74 DFit Paper Size Scales the document image to match the paper size EScale to fit Roll Paper Width Scales the document image to ma...

Страница 162: ...ntation Match the Paper Orientation P 133 KRotate Page 90 degrees Conserve Paper Activate this setting to rotate the document image by 90 degrees before printing Conserving Roll Paper by Rotating Orig...

Страница 163: ...y the Paper Size Options dialog box on the Page Setup sheet click Paper Size Options See Page Setup Sheet P 161 APaper Size List Shows the names and sizes of paper that can be used with the printer dr...

Страница 164: ...boxes depending on the selection in APage Layout In these dia log boxes you can specify layout details and which pages to print as well as other settings Page Layout Printing Pages to Print Free Layou...

Страница 165: ...r footer Page Options Dialog Box P 165 JSpecial Settings If the printing results are not as you expected click this option to display the Special Settings dialog box and change how printing is process...

Страница 166: ...etting details under the frame ASpooling at Printer Driver Sets whether or not print jobs are spooled in the printer driver and processed by PageComposer Printing results may be improved in some cases...

Страница 167: ...to the printer driver help AFavorites Printing favorites you have created are listed with Default Settings favorites Using Favorites P 137 BSettings Details Displays details of the favorite selected i...

Страница 168: ...sheet For details on the utilities refer to the relevant utility help AMaintenance Click to start the imagePROGRAF Status Monitor which offers the following maintenance for the printer Nozzle ink ejec...

Страница 169: ...he Internet and display the printer user s manual CSettings Summaries Click to display the View Settings dialog box which enables you to confirm the settings for the Main Page Setup Layout and Favorit...

Страница 170: ...r The following settings are available on the Device Settings sheet AColor Compatibility Click to display the Color Compatibility dialog box which enables you to adjust colors if you have selected Col...

Страница 171: ...will be instantly applied on the preview screen and you can print the preview screen as it is seen Note The media type image size detailed media settings and the printer settings can cause the actual...

Страница 172: ...ew main window consists of the menu and tool bars preview and dialog area and status bar Note You can use the View menu to show or hide the tool bar Menu Bar This allows you to select menus required f...

Страница 173: ...ialog Area This allows you to set the print conditions and perform a print job For more information about Dialog Area see Dialog Area P 174 Status Bar This shows the message Pages and Output Size iPF7...

Страница 174: ...ginals Across Roll see Print on the Center P 179 Note Available only if rolls are selected in Paper Source No Spaces at Top or Bottom You can save paper on not to feed roll paper for the empty spaces...

Страница 175: ...a Page You can move a page to display when you select Go to Page from the View menu Setting Details First Page Go to the first page Previous Page Go to the previous page Next Page Go to the next page...

Страница 176: ...se across the roll Use Driver Settings Follows printer driver settings when determining whether to rotate pages Selecting Rotate 90 Degrees If Possible or Placing a checkmark for Rotate Page 90 degree...

Страница 177: ...ting the layout 1 In Layout Selection click the layout button to use Button Details Upper Button Turn at the position of Right Button Turn at the position of Left Button Turn at the position of Lower...

Страница 178: ...rinting in landscape orientation on roll paper You can select only Upper Button or Lower But ton if Cut Sheet is selected Button Details The button is selected currently The button can be selected The...

Страница 179: ...f the media loaded in the printer 1 Click the Center Originals Across Roll check box on 2 Click the Print button Printing on the center begins Note Available only if rolls are selected in Paper Source...

Страница 180: ...paper for the empty spaces when the print data contains spaces at the top or bottom 1 Click the No Spaces at Top or Bottom check box on 2 Click the Print button Printing on the settings with no spaces...

Страница 181: ...res of Free Layout The Features of Free Layout The main features of Free Layout are as follows Allows you to lay out at will and print a document created with application software You can not only lay...

Страница 182: ...ted in the lower left area of this screen 4 In the Layout sheet click on the Page Layout check box and select Free Layout from the list Click the OK button to save the settings Note When you select Fr...

Страница 183: ...View menu to show or hide the tool and status bar Menu Bar This allows you to select menus required for operations Tool Bar This allows you to select tool buttons required for major operations Layout...

Страница 184: ...ailed Settings the only three sheets displayed are the Main sheet the Page Setup sheet and theLayout sheet Some of the printer driver settings may be disabled Preferences Dialog Box Preferences Dialog...

Страница 185: ...clicking either button or button Object Frame Style You can select the object frame style for printing The following settings are available for the object frame style Setting Details None You can pri...

Страница 186: ...s are laid out from upper right to left Lower Left to Top The objects are laid out from lower left to top Note When you have selected Roll Paper Length Auto Settings and Paper Orientation Vertical you...

Страница 187: ...selected you cannot select Rotate Enl Red When you place a checkmark here you can select Scaling Fit Paper Size or Fit Photo Size Setting Details Scaling Allows you to input the value of the enlargem...

Страница 188: ...os You can input the number of the page position in numerical characters Object Size You can confirm the object size Note When several objects are selected you cannot display Object Size Laying out a...

Страница 189: ...the Layout sheet click on the Page Layout check box and select Free Layout from the list Note Your printer is depicted in the lower left area of this screen When you select Free Layout all other sett...

Страница 190: ...g out a Document Created with Multiple Application Programs on One Page Laying out a Document Created with Multiple Application Programs on One Page You can lay out and print a document created with m...

Страница 191: ...eet click on the Page Layout check box and select Free Layout from the list Note Your printer is depicted in the lower left area of this screen When you select Free Layout all other setting items will...

Страница 192: ...th application software in the layout area as an ob ject 7 Leaving Free Layout running open other files with other application software and repeat the above steps Selecting an Object Selecting an Obje...

Страница 193: ...ratio remains unchanged when the object is enlarged or reduced Resizing by means of mouse operation 1 Select an object 2 Place the pointer at a corner of the selection box around the object to show th...

Страница 194: ...ly you may click on the Rotate check box in the Format Dialog Box P 187 then select Rotate Right or Rotate Left and click the OK button Laying out Objects Automatically Laying out Objects Automaticall...

Страница 195: ...ys out the objects justifying them to the top Center Vertically Lays out the objects justifying them to the verti cal center Align Bottom Lays out the objects justifying them to the bot tom Align Left...

Страница 196: ...u can change the object overlapping order 1 Select an object 2 Select the Overlapping Order menu from the Object menu Note The order of overlapping affects the order of objects automatically laid out...

Страница 197: ...Cut from the Edit menu 2 Click Paste from the toolbar Alternatively you may select Paste from the Edit menu Note The copied or cut object is laid out at the end of the page You can also select by clic...

Страница 198: ...es added The Folded Duplex window consists of the menu and tool bars layout area and status bar Note The toolbar and status bar can be toggled between hidden and displayed from the View menu Menu Bar...

Страница 199: ...Setting Details Fit Roll Paper Width Prints by automatically enlarging or reducing the entire document so that the width of the document matches the roll paper width Specify Folded Size Prints by auto...

Страница 200: ...res the color and type of fold lines Note To not print fold lines clear the Print Fold Lines checkbox Fold Line Color You can select the fold lines Fold Line Type You can select the fold lines The fol...

Страница 201: ...is selected 5 Click OK to save the settings 6 Open the Binding Settings dialog box from the Edit menu 7 Select Bottom or Top in Binding Edge 8 Specify the Binding width in Binding 9 Configure the Fold...

Страница 202: ...matching methods in addition to borderless printing and enlargement reduction process without growing through the printer driver Note The media type image size detailed media settings and the printer...

Страница 203: ...ton 1 From the Windows start button select Color image RUNNER Enlargement Copy 2 The Color imageRUNNER Enlargement Copy dia log box displays Color imageRUNNER Enlargement Copy Dialog Box Color imageRU...

Страница 204: ...button to display the name and the version number of the utility Operation Guide Button Click the button to display the Color imageRUNNER Enlargement Copy Setup Manual Hot Folder Hot Folder Hot folder...

Страница 205: ...he Next button 4 Select the media type to print Note If the Borderless Printing checkbox is checked only media types that can be used for borderless print ing are displayed in the list Click the Next...

Страница 206: ...a document scanned with the Color imageRUNNER you need to share a folder Enter the folder shared name in Shared Name Click the Next button Note This shared name is used as the name of the hot folder...

Страница 207: ...an Existing Shared Folder as a Hot Folder 1 Share the folder you want to specify as a hot folder 2 Open the Color imageRUNNER Enlargement Copy dialog box and then click the Add button Note For the st...

Страница 208: ...r name in Name Click the Browse botton with selecting Specify a folder to set the existing shared folder 5 The location of the folders will appear Select the folder to specify a hot folder and click t...

Страница 209: ...rge ment Copy dialog box Setting the Print Parameters Setting the Print Parameters The printer driver opens when you click the Properties button in the Add Edit Hot Folder dialog box The printer drive...

Страница 210: ...NER to send scanned originals to the hot folder After these settings are complete you can print enlarged copies of scanned originals from the Color imageRUN NER Completing the scanning settings on the...

Страница 211: ...e It is displayed on the toolbar ribbon so it is easily accessible It can be set by just selecting from the Wizard Large Format Printing custom size can also be set in the Wizard from Microsoft Word o...

Страница 212: ...een does not display open the CD ROM icon from My Computer click iPFInst exe and open the icon 2 Click the imagePROGRAF Print Plug In button 3 Click the Nextbutton 4 Read the License Agreement and cli...

Страница 213: ...imagePROGRAF PrintPlugIn may be installed If you want to use this software do not uninstall the virtual printer Canon imagePROGRAF PrintPlugIn The Print Plug In for Office toolbar ribbon might not be...

Страница 214: ...lling Print Plug In for Office If a problem occurs such as the system or an application terminating abnormally the Microsoft Office application disables add ins as a safety precaution In this event yo...

Страница 215: ...n the Manage combo box and click the Go button 4 If Addin imageprograf print plug in ipfaddinif dll is dis played in the Disabled Items dialog box select it and click the Enable button 5 Close all the...

Страница 216: ...s in the Manage combo box and click the Go button 4 If Addin imageprograf print plug in ipfaddinif dll is dis played in the Disabled Items dialog box select it and click the Enable button 5 Close all...

Страница 217: ...start the Office application To start from Microsoft Word To start from Microsoft Word Below are the steps to start Print Plug In for Office from Microsoft Word 1 Start Microsoft Word 2 If Start image...

Страница 218: ...nt to display all printer drivers or update the display PrintButton The print Wizard is displayed The settings Print Matching Roll Width Borderless Printing Multi Page Printing and Print Using Registe...

Страница 219: ...the edge of the roll width You can print large exhibits and posters and also print Portrait and Landscape orientations made in Large Format Printing Wizard 1 Start Microsoft Word 2 If Start imagePROGR...

Страница 220: ...n is selected you can print posters etc vividly The settings are registered when the One Touch Registration is pressed This is convenient if you to need print multiple times using the same setting Pre...

Страница 221: ...to another file or application while the Printing Wizard is open close the Printing Wizard dialog box Otherwise you may not be able to change displays or operate the tool bar ribbon 4 Click Borderless...

Страница 222: ...n is selected you can print posters etc vividly Press the One Touch Registration button to register the settings This is useful for multiple printing using the same settings Press the Print Preview bu...

Страница 223: ...olbar ribbon The Printing Wizard dialog box is displayed Important If you want to change the display to another file or application while the Printing Wizard is open close the Printing Wizard dialog b...

Страница 224: ...preview screen The maximum length for Multi Page Printing is the lesser of 5 587 times the roll paper width or 18 0m 11 Press Print to start printing Register the settings Word Register the settings...

Страница 225: ...Using Registered Settings Word Prints using the registered settings 1 Start Microsoft Word 2 If Start imagePROGRAF Print Plug In is displayed click it 3 Click Print from the imagePROGRAF Print Plug In...

Страница 226: ...int quality is poor When Saturation is selected you can print posters etc vividly Press the Print Preview button to display the preview screen You can check and make changes to the layout in the previ...

Страница 227: ...rt imagePROGRAF Print Plug In is displayed click it 3 Click Paper Settings from the imagePROGRAF Print Plug In toolbar ribbon The Large Format Printing Wizard dialog box is displayed Note If you want...

Страница 228: ...Important If the imagePROGRAF Print Plug In toolbar ribbon is not displayed refer to the following When Print Plug In for Office is not displayed P 214 3 Check that the imagePROGRAF Print Plug In too...

Страница 229: ...zard cannot be run Large Format Printing Wizard dialog box Important If you want to change the display to another file or application while the Large Format Printing Wizard is open close the Large For...

Страница 230: ...om the imagePROGRAF Print Plug In toolbar ribbon The Printing Wizard dialog box is displayed Important If you want to change the display to another file or application while the Printing Wizard is ope...

Страница 231: ...e setting Press the Print Preview button to display the preview screen You can check and make changes to the layout in the preview screen When you print to the edge of the roll width the maximum lengt...

Страница 232: ...not be able to change displays or operate the tool bar ribbon 4 Click Borderless Printing 5 A confirmation dialog box is displayed If the data fills up the page confirm that Continue using the plug in...

Страница 233: ...multiple printing using the same settings Press the Print Preview button to display the preview screen You can confirm and make changes to the layout in the preview screen The maximum length for Borde...

Страница 234: ...n while the Printing Wizard is open close the Printing Wizard dialog box Otherwise you may not be able to change displays or operate the tool bar ribbon 4 Click Multi Page Printing 5 Select Roll Paper...

Страница 235: ...settings PowerPoint If you are going to print multiple times using the same setting you can select One Touch Registration Registered settings can be recalled from Print Using Registered Settings 1 Set...

Страница 236: ...Print Plug In toolbar ribbon The Printing Wizard dialog box is displayed Important If you want to change the display to another file or application while the Printing Wizard is open close the Printing...

Страница 237: ...oll paper width or 18 0m 9 Press Print to start printing Portrait Orientation Landscape Orientation PowerPoint Portrait Orientation Landscape Orientation PowerPoint Print to the edge of the roll width...

Страница 238: ...ard dialog box Otherwise you may not be able to change displays or operate the toolbar ribbon 4 Click Portrait Orientation or Landscape Orientation Note The steps taken to create a Portrait Page Size...

Страница 239: ...olbar ribbon is not displayed refer to the following When Print Plug In for Office is not displayed P 214 3 Check that the imagePROGRAF Print Plug In toolbar ribbon is displayed 4 Click the buttons on...

Страница 240: ...set page break check the page break preview and change the setting If you click the Print button with a page range set a message dialog box will appear asking if you want to continue printing If you...

Страница 241: ...e Layout menu will appear automatically Note If data analysis requires time a message dialog will appear If you select No you will return to the appli cation 5 Select Roll Paper Width that is set in t...

Страница 242: ...t to the edge of the roll width the maximum print length is 18 0m 13 Press Print to start printing Important If divided into plural pages try reducing the data size or the range you select You cannot...

Страница 243: ...e print area The Printing Wizard dialog box is displayed 4 Click Print Selected Area Important If only one cell is selected Print Selected Area cannot be selected A message will appear informing you t...

Страница 244: ...log will appear If you select No you will return to the appli cation 5 Select Roll Paper Width that is set in the printer 6 Select image size 7 Select layout 8 To configure Binding click the Binding S...

Страница 245: ...ect it for a worksheet with no data displayed Configuring Binding Excel Configuring Binding Excel You can configure Binding margins for binding printouts 1 Configure the settings up to Layout Selectio...

Страница 246: ...is on printing is performed with the top bottom left and right margins layed out equally When this setting is off printing is per formed without changing the position This function is only valid in M...

Страница 247: ...imageRUNNER Enlargement Copy 309 Printmonitor 460 Media Configuration Tool 380 Handling and Use of Paper 325 Control Panel 395 Printer Parts 429 Network Setting 437 Print Job Management 457 Adjustment...

Страница 248: ...cessing the Mac OS printer driver refer to the following topics Accessing the Printer Driver Dialog Box from Applications P 252 For information on the Mac OS printer driver settings refer to the follo...

Страница 249: ...he Printer Driver Specifying Paper in the Printer Driver If you have replaced the paper you must complete the following settings in the printer driver 1 This sets the BFormat for and CPaper Size Note...

Страница 250: ...inting applications For details on available printing conditions see Printer Driver Settings P 248 Confirming Print Settings Confirming Print Settings The ways to confirm what printing conditions have...

Страница 251: ...check box 4 Click MPrint 5 The Canon imagePROGRAF Preview window is displayed 6 Check the layout and adjust settings in the Canon imagePROGRAF Preview window as desired 7 Print from the Canon imagePR...

Страница 252: ...es number of copies and so on 2 Select the printer in the Printer list 3 Click Print to start printing As shown in the following illustration you can switch to other panes in this dialog box to comple...

Страница 253: ...match the type of media such as the ink drying time Paper Detailed Settings Dialog Box P 256 OPrint Preview When the check box is selected imagePROGRAF Preview is launched before printing This allows...

Страница 254: ...Choose the level of print quality GView set Click to display the View set dialog box which enables you to confirm the settings for the selected item from the EPrint Target list or change the order of...

Страница 255: ...lity settings this mode may not be available Note If you set FPrint Quality to Fast you can select KEconomy Printing However depending on AMedia Type you may not be able to select KEconomy Printing RF...

Страница 256: ...paper in the Output Stacker with the ink dried even if Cutting Mode is set to Automatic Setting Item Details Printer Default The setting of the control panel of the printer is applied None Paper is e...

Страница 257: ...applied High Speed When the Standard setting does not result in a clean cut surface select this Standard Select this when you do not have any problems in automatic cutting Low Speed This helps preven...

Страница 258: ...and an icon CDetails Here you can confirm detailed settings values for each item selected in the Print Target list Matching pane Matching pane On the Matching pane you can specify color matching to co...

Страница 259: ...nt to be printed Various BMatching Method options are available depending on your selection in AMatching Mode EGamma You can adjust the gradation of intermediate tones in an image 2 2 is normally sele...

Страница 260: ...Printer Driver P 48 Color Settings Pane Color Color Settings Pane Color In general make any needed adjustments to the color of documents in the application used to create them Howev er if the color t...

Страница 261: ...more subdued KObject Adjustment Select this option to display the Object Adjustment dialog box in which you can specify objects subject to color adjustment Object Adjustment dialog box Color P 261 Obj...

Страница 262: ...genta FYellow Not available GGray Tone Not available HBrightness Adjust the overall image brightness as desired You can adjust the brightness if the printed document is lighter or darker than the orig...

Страница 263: ...tment to image areas such as photos BGraphics Select this option to apply color adjustment to graphics such as lines and circles CText Select this option to apply color adjustment to text Page Setup P...

Страница 264: ...ument images in the center of the paper Printing Originals Centered on Rolls P 115 Printing Originals Centered on Sheets P 119 KNo Spaces at Top or Bottom Select this checkbox to print the next image...

Страница 265: ...main features of Preview are as follows While viewing this screen you can adjust layout settings of a document created with application software You can not only adjust layout settings but also your c...

Страница 266: ...the Print button in the Print dialog box Note Your printer is depicted in the lower left area of this screen 5 Preview main window is displayed Starting Preview iPF780 User s Guide Mac OS Software Pre...

Страница 267: ...rea Note You can use the View menu to show or hide the tool bar Menu Bar This allows you to select menus required for operations Tool Bar This allows you to select tool buttons required for major oper...

Страница 268: ...ea This allows you to display the thumbnails of a document This area appears when you click Drawer from the tool bar Alternatively you may select Drawer from the View menu Status Area This shows Input...

Страница 269: ...tings available on each mode are as follows Easy Settings P 270 Advanced Settings P 271 Paper Source You can select the paper source The following settings are available for paper source Setting Detai...

Страница 270: ...re of text photographs and graphics Poster The best setting for posters Prints using vivid and high impact colors CAD Color Line Drawing Prints the fine lines of CAD drawings and other such documents...

Страница 271: ...lower For Highest quality the resolution is not displayed Advanced Settings Advanced Settings Presents detailed settings for the print quality the color mode and other items so you can select the valu...

Страница 272: ...h however print quality is lower For Highest quality the resolution is not displayed Output Settings Panel Output Settings Panel This panel appears when you select Output Settings in the dialog area E...

Страница 273: ...Borderless Printing No Spaces at Top or Bottom You can save paper on not to feed roll paper for the empty spaces when the print data contains spaces at the top or bottom For more information about No...

Страница 274: ...ck ink No color correction Prints without performing color matching in the printer driver Select this when color match ing is performed by the application such as Adobe Photoshop or when you want to p...

Страница 275: ...Magenta Adjusts the strength of colors to compensate the hues Yellow Adjusts the strength of colors to compensate the hues Brightness Adjusts the brightness of the entire image When the results of th...

Страница 276: ...of the printout are brighter than the original images such as the original photo before scanning and graphics cre ated on the display or when you want to print in different degrees of brightness use...

Страница 277: ...ync function of OS X Select this if you want to perform soft proofing using ColorSync before printing Note You need to set each correction on the printer driver ColorSync needs to be selected in the C...

Страница 278: ...hics Text Perceptual Color matching optimized for printing typical photos attractively Smooth gradation is a feature This is also an easy to use mode when performing color adjustment using ap plicatio...

Страница 279: ...colors in input color space This is the easiest to use mode when you want to adjust the color and print However gradation may be lost for colors of wider range than the color reproduction range of the...

Страница 280: ...erences from the imagePROGRAF Advanced Preview menu You can set the preferences for Preview Units Set the unit for paper length margins and so on Zoom Dialog Box Zoom Dialog Box This dialog box appear...

Страница 281: ...ders Print with No Borders You can use the borderless printing function to print without margins surrounding the image Note With some media borderless printing can be performed only between two edges...

Страница 282: ...t Print Spaces at the Top Bottom You can save paper on not to feed roll paper for the empty spaces when the print data contains spaces at the top or bottom Note This is not displayed when a checkmark...

Страница 283: ...eft 90 Degrees 4 Click the Print button Printing on rotating 90 degrees begins Display with Fitting to the Width of the Paper Display with Fitting to the Width of the Paper In the preview area you can...

Страница 284: ...m the tool bar 2 Actual size is displayed Moving a Page Moving a Page You can move a page to display in the preview area 1 Select each button in Go to Page on the tool bar Setting Details Go to the fi...

Страница 285: ...2 The target page appears Note You can also move a page by clicking the page on the thumbnails iPF780 Moving a Page User s Guide Mac OS Software Preview 285...

Страница 286: ...Free Layout The Features of Free Layout The main features of Free Layout are as follows Allows you to lay out at will and print a document created with application software You can not only lay out m...

Страница 287: ...lower left area of this screen 5 Free Layout main window is displayed Free Layout Main Window Free Layout Main Window The Free Layout main window consists of the menu and tool bars layout area and dia...

Страница 288: ...to select menus required for operations Tool Bar This allows you to select tool buttons required for major operations Layout Area This allows you to lay out objects and edit the object size and orient...

Страница 289: ...nd perform a print job Paper Settings Panel Paper Settings Panel This panel appears when you select Paper Settings in the dialog area Media Type This allows you to select the media type iPF780 Paper S...

Страница 290: ...ing Details Manual Select for manual paper feed printing Roll Paper Select to print on roll paper Roll Paper Width This selects the width of the roll media set to the printer Note Available only if ro...

Страница 291: ...ive printing of 3D CAD drawings perspective drawings and GIS draw ings including maps Photo Color Suitable for printing photographic images captured with a digital camera Office Document Suitable for...

Страница 292: ...e that is appropriate for the print job Setting Details Image This mode achieves the best results for printing photographic images and illustrations Line Drawing This mode is best for printing CAD dra...

Страница 293: ...Color Settings in the dialog area Color Mode You can select a color mode to suit the print job Setting Details Color Enables color printing Monochrome Disables color printing and converts image from c...

Страница 294: ...Adjustment You can set the color adjustment Adjusting Color Normally colors should be adjusted in the software application but if you see colors in the printout that do not match colors on the screen...

Страница 295: ...ectly to increase or decrease the value Adjusting Monochrome Use the monochrome setting to print monochrome images of color photographs captured with a scanner or digital camera or other color images...

Страница 296: ...input profile printer profile and matching method in detail This allows you to use ICC pro files for digital cameras and scanners ICC profiles created using the profile creation tool etc ColorSync P 2...

Страница 297: ...er ColorSync has been selected in Matching Mode Driver Matching Mode Driver Matching Mode 1 Under Matching Mode select Driver Matching Mode 2 Click the Matching Method list and then select a setting S...

Страница 298: ...t using ap plication software Saturation Color matching optimized for printing posters etc vividly Colorimetric Color matching optimized for printing image data with accurate colors in input color spa...

Страница 299: ...e imagePROGRAF Advanced Preview menu You can set the preferences for Free Layout Units Set the unit for paper length margins and so on Gridlines You can input a grid line width value in numerical char...

Страница 300: ...ing Change the object to object spacing to be applied in the operation of laying out objects automatically Note You can input between 0 0 and 100 0 mm between 0 00 and 3 94 inch You can change the num...

Страница 301: ...pper left to bottom Note When you have selected Roll Paper Length Auto Settings and Paper Orientation Vertical you can choose only Upper Left to Right When you have selected Roll Paper Length Auto Set...

Страница 302: ...nd 400 You can change the numbers by clicking either button or button Object Size You can confirm the object size Note When several objects are selected you cannot display Object Size Laying out a Mul...

Страница 303: ...re in the layout area as an ob ject 4 Leaving Free Layout running open the files with other application software and repeat the above steps Selecting an Object Selecting an Object When an object is se...

Страница 304: ...ither enter numbers directly Note You can input between 25 and 400 You can change the numbers by clicking either button or button 4 Click the OK button Moving an Object Moving an Object You can move t...

Страница 305: ...y Click Auto Arrange in the tool bar This automatically lays out objects Alternatively you may select Auto Arrange Object from the Object menu Note The object layout order varies depending on the Orde...

Страница 306: ...r Align Bottom Lays out the objects justifying them to the bot tom Align Left Lays out the objects justifying them to the left Center Horizontally Lays out the objects justifying them to the hori zont...

Страница 307: ...bject overlapping order 1 Select an object 2 Select the overlapping order menu from the Object menu Bring to Front Moves the object to the frontmost position Send to Back Moves the object to the backm...

Страница 308: ...ck Copy or Cut from the toolbar Alternatively you may select Copy or Cut from the Edit menu 2 Click Paste from the toolbar Alternatively you may select Paste from the Edit menu Note The copied or cut...

Страница 309: ...ement Copy are as follows Allows the document scanned with the Color imageRUNNER to be automatically enlarged and printed You can perform basic printer settings such as printer selection media type an...

Страница 310: ...only files in the hot folder Add Button Click the button to open the Destination Selection dialog box so that you can add a hot folder Edit Button From the Hot Folder list select a hot folder and cli...

Страница 311: ...09 2 Click the Add button in Enlarged Copy Settings to open the Destination Selection dialog box 3 From the printer list in Destination select the printer of destination 4 Click the OK button to open...

Страница 312: ...o configure the sharing For OS X v10 7 and later Check the File Sharing checkbox and click the Options button Check the Share files and folders using SMB checkbox to configure the sharing Note You can...

Страница 313: ...ings in the Paper Settings Panel P 315 5 Make the necessary settings in the Output Settings Panel P 318 iPF780 Editing a Hot Folder Setting Print Conditions User s Guide Mac OS Software Color imageRUN...

Страница 314: ...oxes to configure the sharing For OS X v10 7 and later Check the File Sharing checkbox and click the Options button Check the Share files and folders using SMB checkbox to configure the sharing Note I...

Страница 315: ...ettings Panel P 318 Color Settings Panel P 320 Paper Settings Panel Paper Settings Panel Easy Settings Advanced Settings Two modes are available to provide the optimum print settings for jobs The sett...

Страница 316: ...ge is not cut after it is printed and printing continues without interruption Print Cut Guideline A print cut guideline is printed after each page and printing continues without interruption Note Avai...

Страница 317: ...rs of the original image Custom Settings Suitable for printing documents for which Advanced Settings have been specified Note The number of settings available for selection depends on the media type P...

Страница 318: ...d resolution settings are displayed in the following combinations Setting Details Print Quality Highest High Standard Fast Resolution 1200dpi 600dpi 300dpi Note The availability of settings is determi...

Страница 319: ...ced the bottom and right margins are enlarged and the top and left margins remain un changed At that point you can set all margins evenly with this feature No Spaces at Top or Bottom You can set the p...

Страница 320: ...edia type selections Matching Mode Under Matching Mode select the matching mode Setting Details Driver Matching Mode P 321 Enables printing of optimal color tones using a driver specific color profile...

Страница 321: ...ment using ap plication software Saturation Color matching optimized for printing posters etc vividly Colorimetric Color matching optimized for printing image data with accurate colors in input color...

Страница 322: ...ati cally after enlargement according to printing conditions you specify for that folder This processing sequence is called the Color imageRUNNER Enlargement Copy function To use Color imageRUNNER Enl...

Страница 323: ...Done on the touch panel display Scanned originals are sent to the hot folder and automatically enlarged and printed following the conditions you specified for the folder iPF780 Printing Enlargements o...

Страница 324: ...iPF780 User s Guide 324...

Страница 325: ...dling sheets 356 Output Stacker 362 Media Configuration Tool Windows 367 Media Configuration Tool Mac OS 380 Control Panel 395 Printer Parts 429 Network Setting 437 Print Job Management 457 Adjustment...

Страница 326: ...per Reference Guide from imagePROGRAF Support Information See Displaying the Paper Reference Guide P 329 1 Method of Updating Supported Paper Photo Paper To use newly released paper register the lates...

Страница 327: ...4 00 in ISO A2 420 0 594 0 mm 16 54 23 39 in ISO A3 329 0 483 0 mm 12 95 19 02 in ISO A3 297 0 420 0 mm 11 69 16 54 in ISO A4 210 0 297 0 mm 8 27 11 69 in ISO B1 707 0 1000 0 mm 27 83 39 37 in ISO B2...

Страница 328: ...described in Paper Sizes See Paper Sizes P 326 Paper where the thickness is described in Paper Thickness in Specifications See Specifica tions P 574 Paper where bleeding and ink overflow does not occ...

Страница 329: ...Paper HWPhotoPaper LI 1 Heavyweight Photo Paper LowInk 1 Proof 80 g m 0 10 mm 0 0039 in News Proof 2 Sign CAD Paper 150 g m 0 11 mm 0 0043 in CAD Clear Film CAD Clear Film 90 g m 0 08mm 0 0031 in CAD...

Страница 330: ...splaying the Paper Reference Guide from the imagePROGRAF Printmonitor are as follows 1 Click the System Preferences icon in the Dock 2 Click Print Scan This is identified as Printers Scanners or Print...

Страница 331: ...rinter from the list of printers and click Op tions Supplies 4 Click Utility 5 Click Open Printer Utility 6 Click Support iPF780 Displaying the Paper Reference Guide User s Guide Handling and Use of P...

Страница 332: ...guration Tool P 367 Windows Media Configuration Tool P 380 Mac OS Important When your version of Media Configuration Tool is older than the version released on the imagePROGRAF website download and in...

Страница 333: ...accessing the dedicated website from the imagePROGRAF Printmonitor are as fol lows 1 Click the System Preferences icon in the Dock 2 Click Print Scan This is identified as Printers Scanners or Print...

Страница 334: ...4 Click Utility 5 Click Open Printer Utility 6 Click Support Updating paper information iPF780 User s Guide Handling and Use of Paper Paper 334...

Страница 335: ...k the Support Information button The default browser on your computer is started and the imagePROGRAF webpage is displayed iPF780 Updating paper information User s Guide Handling and Use of Paper Pape...

Страница 336: ...ment installed Using Rolls with a 2 Inch Paper Core Using Rolls with a 3 Inch Paper Core Holder Stopper Left Side Roll Holder Right Side Holder Stopper Left Side Roll Holder Right Side 2 Inch Paper Co...

Страница 337: ...the shaft side to unlock it Holding the Holder Stopper at the position indicated b remove it from the Roll Holder 2 Insert the respective attachments for the roll paper core on the Roll Holder and Hol...

Страница 338: ...he roll paper facing forward as shown insert the Roll Holder from the right of the roll Insert it firmly until the roll touches the flange a of the Roll Holder leaving no gap 4 Insert the Holder Stopp...

Страница 339: ...See Cleaning Inside the Top Cover P 514 1 Press the Load button 2 Press or to select Load Roll Paper and then press the OK button Note If any paper has been advanced that will not be used a message is...

Страница 340: ...d it in the Roll Holder Slot Caution Do not force the Roll Holder into the printer with the right and left ends reversed This may damage the printer and Roll Holder Do not release the flanges until th...

Страница 341: ...Not prin ted A menu for selection of the paper type and length is automatically shown on the Display Screen Press or to select the type and length of paper loaded and then press the OK button Note For...

Страница 342: ...on screen of the Control Panel press or to select the Paper tab Note If the Tab Selection screen is not displayed press the Menu button 2 Press the OK button The Paper Menu is displayed 3 Press or to...

Страница 343: ...th as follows Note Specify the paper length when you have set ManageRemainRoll to On See Keeping Track of the Amount of Roll Paper Left P 347 1 On the Tab Selection screen of the Control Panel press o...

Страница 344: ...nd ejected Caution If you have selected ManageRemainRoll On in the Control Panel menu a barcode is printed on the leading edge of the roll Do not remove the roll before the barcode is prin ted You wil...

Страница 345: ...Roll Cov er Note To load new roll paper in the printer at this point see Loading Rolls in the Printer P 339 Removing the Roll Holder from Rolls Removing the Roll Holder from Rolls 1 Lift the Holder S...

Страница 346: ...Holder Stopper side 2 Inch Paper Core Attachment Important Store the roll in the original bag or box away from high temperature humidity and direct sunlight If paper is not stored properly the printi...

Страница 347: ...the Control Panel will print a barcode with text on the roll when the roll is removed that identifies the type of paper and amount left When ManageRemainRoll is On and you load rolls with printed bar...

Страница 348: ...Cutting Mode on the menu of the printer to Eject See Specifying the Cutting Method for Rolls P 349 The settings can also be made from the Control Panel on the printer Select the type of paper from Pap...

Страница 349: ...nding on printer settings Cutting Method Printer Setting Driver Setting Automatic The roll is automatically cut by the Cutter Unit fol lowing printer driver settings Media Menu Paper De tails Various...

Страница 350: ...sed Yes No Print Cut Guideline Note Automatic and Eject are valid only when you have selected Automatic Cutting Yes in the printer driver With Eject printing does not resume after a series of jobs hav...

Страница 351: ...t be cut with the Cutter Unit 1 On the Tab Selection screen of the Control Panel press or to select the Paper tab Note If the Tab Selection screen is not displayed press the Menu button 2 Press the OK...

Страница 352: ...rs or the like 10 Press the OK button After the roll is rewound it stops automatically Paper cutting to have the roll cut at your specified position 1 Press the Feed button 2 Press the button to advan...

Страница 353: ...e of the paper varies depending on the media type and is cut to a prescribed length For more information on the prescribed length see the leading edge precut length in the Paper Reference Guide See Di...

Страница 354: ...more likely to generate debris when cut select CutDustReduct On in the Paper Menu of the Control Panel This option reduces debris from cutting by printing black lines at the leading and trailing edges...

Страница 355: ...tton 4 Press or to select the type of paper loaded in the printer and then press the OK button 5 Press or to select CutDustReduct and then press the OK button 6 Press or to select On and then press th...

Страница 356: ...inkled or warped may jam If necessary straighten the paper and reload it Load the paper straight Loading paper askew will cause an error See Paper is crooked P 561 Note Store unused paper in the origi...

Страница 357: ...eet printing side up in the Paper Feed Slot with the right edge aligned with the Paper Alignment Guide a to the right of the Roll Cover Insert the paper until the leading edge makes contact and you he...

Страница 358: ...e of paper to select See Displaying the Paper Refer ence Guide P 329 Printing From a Desired Starting Point Printing From a Desired Starting Point When printing inside boundaries or in other situation...

Страница 359: ...n Note If a print job was received before paper was advanced the media type and size specified by the job are shown on the Display Screen Thus this screen is not displayed Go to step 2 2 Width Detecti...

Страница 360: ...paper at the position from which to start printing 6 Pull the Release Lever forward and close the Top Cover Removing Sheets Removing Sheets Remove sheets from the printer as follows 1 On the Tab Selec...

Страница 361: ...e OK button 4 Press or to select Yes and then press the OK button The paper is ejected from the front of the printer 5 Holding the paper push the Release Lever back and remove the sheet 6 Pull the Rel...

Страница 362: ...mportant When storing printed documents on the Output Stacker always use it in position 1 If you do not printed docu ments may not be dropped into the Output Stacker and the printed surface may become...

Страница 363: ...xtended position A Switch the stacker to Extended position A as follows 1 Lift the Support Rod to the position shown a and switch the stacker to Extended position A iPF780 Using the Output Stacker Use...

Страница 364: ...wing procedure to return to the regular position 1 Lower the Support Rod to the position shown a to return to the regular position If the Adjustable Stop per b is extended retract it 2 Return to the r...

Страница 365: ...uides a This completes the procedure of switching to Extended position B Once the printing has finished use the following procedure to return to the regular position 1 Push the Output Stacker Ejection...

Страница 366: ...Output stacker release lever b towards you 3 While continuing to hold the Output stacker handle a slowly lower the Output Stacker 4 Return to the regular position Using the Output Stacker iPF780 User...

Страница 367: ...control panel and in printer driver dialog boxes and rename them in addition to other functions Important Normally the Media Configuration Tool is installed and the media information is configured whe...

Страница 368: ...used Select a country or territory then click the Next button 3 The License Agreement is displayed If you accept the agreement click Yes 4 The Change Installation Location screen appears Select the d...

Страница 369: ...Configuration Tool the media information on the printer control panel and in the printer driver is not updated If this screen is displayed select Add Genuine Paper in the main window and click the Upd...

Страница 370: ...dia Type Information for Genuine Paper and Feed Confirmed Paper To add genuine paper and feed confirmed paper to the printer control panel and printer driver and edit the media type information click...

Страница 371: ...Media Types Display Show Hide P 376 Change Display Order button or To change the display order of a media type in the printer control panel and printer driver select the paper to change and click this...

Страница 372: ...cted folder are displayed in Media Informa tion File in the Add Media Type dialog box Select the check box for the paper you want to add and click the OK button Note If Master Media Information File i...

Страница 373: ...data to the printer that differs from the data to be updated the selected media informa tion file is updated When you would like to remain the data that is set to the printer click the Cancel button...

Страница 374: ...ames click the Restore button The characters that can be entered for Name in Printer Driver and Name on Control Panel are stated below alphanumeric space _ For Name in Printer Driver up to 32 one Byte...

Страница 375: ...ith the printer 6 Click the OK button Deleting Media Types You Have Added Deleting Media Types You Have Added 1 Open the Edit Media Types dialog box Note For details on the procedure for opening the E...

Страница 376: ...printer click the Cancel button Do not attempt to print or turn the printer off while the program is communicating with the printer 5 Click the OK button Switching Media Types Display Show Hide Switc...

Страница 377: ...edia Types dialog box click the Update button 4 The Confirm Update dialog box is displayed Configure Update Target and click the Execute but ton Communication with the printer begins Note You should n...

Страница 378: ...e Infor mation for Genuine Paper and Feed Confirmed Paper P 370 2 Select the paper in the Media Type list for which to change the display order and then click the buttons to move the item or The selec...

Страница 379: ...mmunicating with the printer 5 Click the OK button Checking the update Checking the update After updating the media information using the Media Configuration Tool you can check whether the update has...

Страница 380: ...ed by Canon You can rearrange lists of the types of paper on the printer control panel and in printer driver dialog boxes and rename them in addition to other functions Important Normally the Media Co...

Страница 381: ...ave read Canon Software License Agreement click the Continue button 3 The next screen presents selections for the country or area where the printer is used Select a country or territory then click the...

Страница 382: ...g folder Applications Canon Utilities iPFxxxx Media Configuration Tool The iPFxxxx in the folder above will be the printer name in use Starting Method Starting Method Follow the procedure below to sta...

Страница 383: ...to open the Media Configuration Tool main window see Starting Method P 382 Add Genuine Paper button When this button is clicked the Edit Media Types dialog box is displayed which allows you to add me...

Страница 384: ...screens you cannot change the printer where media type information is to be updated Note Paper that is displayed grayed out does not appear in the printer driver or printer panel Add Button To add ge...

Страница 385: ...nformation perform the same update on all of the PCs that are using that print er Note It may not be possible to deleting showing hiding and changing the display order under some conditions If a displ...

Страница 386: ...box Select the check box for the paper you want to add and click the OK button Note If Master Media Information File is displayed as the Type of the Media Information File the media type display orde...

Страница 387: ...nd printer driver Important When setting a data to the printer that differs from the data to be updated the selected media informa tion file is updated When you would like to remain the data that is s...

Страница 388: ...g box is displayed Edit the names in Name in Printer Driver and Name on Control Panel and click the OK button Note To restore the original names click the Restore button The characters that can be ent...

Страница 389: ...d printer driver Important When setting a data to the printer that differs from the data to be updated the selected media informa tion file is updated When you would like to remain the data that is se...

Страница 390: ...Type Infor mation for Genuine Paper and Feed Confirmed Paper P 384 2 In the Media Type list select the name of the media to delete Click the Delete button Note Only paper for which Status in the Media...

Страница 391: ...on Do not attempt to print or turn the printer off while the program is communicating with the printer 5 Click the OK button Switching Media Types Display Show Hide Switching Media Types Display Show...

Страница 392: ...edia Types dialog box click the Update button 4 The Confirm Update dialog box is displayed Configure Update Target and click the Execute but ton Communication with the printer begins Note You should n...

Страница 393: ...e Infor mation for Genuine Paper and Feed Confirmed Paper P 384 2 Select the paper in the Media Type list for which to change the display order and then click the buttons to move the item or The selec...

Страница 394: ...mmunicating with the printer 5 Click the OK button Checking the update Checking the update After updating the media information using the Media Configuration Tool you can check whether the update has...

Страница 395: ...g and Use of Paper 325 Control Panel Operations and Display Screen 396 Printer Menu 404 Printer Parts 429 Network Setting 437 Print Job Management 457 Adjustments for Better Print Quality 475 Maintena...

Страница 396: ...t jobs Otherwise this lamp flashes when the print job is paused or the printer is updating the firmware Off There are no active print jobs when the Data lamp is off c Message Lamp orange On A warning...

Страница 397: ...s of each tab for which is displayed at left will move to the lower level of the menu item enabling you to execute menu commands or set menu values Also press this button if the Display Screen indicat...

Страница 398: ...ighlighted Middle line displayed Indicates the printer status and shows menu names Bottom line displayed Here the remaining ink level is indicated See Checking Ink Tank Levels P 497 Job tab A tab indi...

Страница 399: ...five minutes that is if no print jobs are received or buttons are pressed while all covers are closed You can specify the period before the printer enters Sleep mode in the Sleep Timer menu See Menu S...

Страница 400: ...eived or buttons are pressed while all covers are closed However it does not enter Sleep mode while error messages are displayed or when a roll can be manually advanced by pressing the Feed but ton 2...

Страница 401: ...t have occurred other than the currently displayed error are displayed flashing You can move between the tabs to check the errors by pressing the and keys If multiple errors have occurred in the Job t...

Страница 402: ...orming other operations on the printer control panel 1 Press the Navigate button 2 Press or to select the desired navigation menu 3 Press or to select View Op Guide and then press the OK button Instru...

Страница 403: ...itched every four seconds and the se quence of operations is shown repeatedly When all actions in the sequence are finished the instruction screen for the next step is displayed Example Ink tank repla...

Страница 404: ...print jobs Set Adj Menu Menu operations for printer adjustment and maintenance For a description of specific menu items available see Menu Settings P 414 For instructions on selecting menu items see...

Страница 405: ...splay menus Menus can be selected after you resolve the problem Simply press buttons on the Control Panel to access menus on various tabs from the Tab Selection screen and set or execute Menu items Th...

Страница 406: ...1 Press or to select the desired setting and then press the OK button After two seconds the display reverts to the upper level menu Note If a confirmation message is displayed regarding the setting y...

Страница 407: ...he on screen instruc tions If you have changed the Interface Setup menu settings a message confirming whether to register the settings is displayed if you press Back button or Menu button Follow the i...

Страница 408: ...Fifth Level Load Paper Roll Paper Cut Sheet Eject Paper Chg Paper Type 1 Roll Paper The paper type is displayed here 1 Cut Sheet The paper type is displayed here 1 Chg Paper Size Sheet Size The size...

Страница 409: ...t Name User Name Page Count Job Status OK CANCELED Print Start Time yyyy mm dd hh mm ss Print End Time yyyy mm dd hh mm ss Print Time xxxsec Print Size xxxxxxxxsq mm Media Type Interface USB Network I...

Страница 410: ...5mm Conserve Paper Off On Auto Rotate Off On Line Pen Manager Enable merge Off On Pen Setup Select Pa lette Software Palette A Palette B Factory Define Pa lette Palette A Select the pen number Width...

Страница 411: ...7 IPv6 Sup port 7 On Off IPv6 Stles sAddrs 7 9 On Off DHCPv6 7 9 On Off DNS Set tings 8 9 DNS Dync update 8 Statefull Addr 8 On Off Stateless Addr 8 On Off Pri DNS SrvAddr 8 Sec DNS SrvAddr 8 DNS Hos...

Страница 412: ...00mm Roll Roll Selec tion 2 10in 254mm JIS B4 257mm Keep Paper Size Off On TrimEdge Reload Automatic Off On Rep P head Print Off On Nozzle Check Frequency Standard 1 page 10 pages Off Warning Off On U...

Страница 413: ...ply if a password is configured using Change Password in the Admin Menu Viewing and configuration is possible for administrators only 9 Not displayed if IPv6 Support is Off 10 Default setting for the...

Страница 414: ...ou prefer not to print the barcode See Keeping Track of the Amount of Roll Paper Left P 347 Paper Details The type of pa per is displayed here 1 Head Height Adjust the Printhead height See Troubleshoo...

Страница 415: ...fy a margin at the leading edge of sheets to ensure better printing quality at the leading edge Note that if you choose 3mm it may lower the printing quality at the leading edge and affect feeding acc...

Страница 416: ...ounter for maintenance purposes Indicates the head height when jobs wereprinted Temp Humidity A counter for maintenance purposes Indicates the tem perature and humiditywhen jobs were printed Adjustmen...

Страница 417: ...lative to the printing direction Enter the adjustment val ue manually based on the resulting pattern See Manual Adjustment to Straighten Lines and Colors P 477 Head Inc Adj Print a test pattern for ad...

Страница 418: ...a warning message that the remain ing Maintenance Cartridge capacity is low Repl maint cart Execute when replacing the Maintenance Cartridge Fol low the instructions displayed to complete the require...

Страница 419: ...to merge or print over colors where lines overlap Choose Off to print the second line over the first Choose On to merge all overlapping colors Pen Set up Select Palette As pen values choose Software P...

Страница 420: ...cancellation of print jobs that cannot be received by the printer TCP IP IPv4 IPv4 Mode Choose whether the printer IP address is configured auto matically or a static IP address is entered manually Pr...

Страница 421: ...urrent date Time Set the current time Available only if the Date setting is specified Date Format Specify the date format Language Specify the language used on the Display Screen Time Zone Specify the...

Страница 422: ...er page Choose 10 pages to check once per 10 pages Choose Off to not execute check If On is selected in Warning a warning may be displayed on the Control Panel depending on the result of the nozzle ch...

Страница 423: ...s up to five Use Situation A counter for maintenance purposes Displays printer usage related information 1 A rough estimate of how much ink was consumed per job is displayed Actual ink consumption may...

Страница 424: ...S N Printer serial number Date Indicates when the status print report was prin ted Paper Menu Information on the loaded paper Roll Media Type Cut Sheet Type ManageRemainRoll Keep Paper Type Job Menu...

Страница 425: ...ink color is dis played here Ink levels The remaining ink is displayed in a five level scale System Info Indicates the total amount of RAM RAM Error Log The past five error codes HEAD LOT NUMBER DATE...

Страница 426: ...to select Test Print and then press the OK button 5 Press or to select Interface Print and then press the OK button Confirming Interface Print information The following information is included in the...

Страница 427: ...ateless address Stateless Address 1 Prefix Length 1 Stateless Address 2 Prefix Length 2 Stateless Address 3 Prefix Length 3 Stateless Address 4 Prefix Length 4 Stateless Address 5 Prefix Length 5 Stat...

Страница 428: ...the manual address Network Interface Physical Interface Network interface settings values Transmission Rate MAC Address Auto Detect Communication Ethernet Type Spanning Tree Use the Jumbo Frame Funct...

Страница 429: ...dling and Use of Paper 325 Control Panel 395 Printer Parts Printer parts 430 Optional accessories 436 Network Setting 437 Print Job Management 457 Adjustments for Better Print Quality 475 Maintenance...

Страница 430: ...ere c Roll Ledge When loading rolls rest the Roll Holder here before loading it in the Roll Holder Slot d Release Lever When releasing the Paper Retainer push this lever back e Control Panel Use this...

Страница 431: ...this rail to cut paper l Output Tray All printed documents are ejected from this slot m Ejection Guide Supports output paper n Top Cover Open this cover to install the Printhead and remove any jammed...

Страница 432: ...p Cover Inside a Carriage Moves the Printhead The carriage serves a key role in printing See Carriage P 433 b Carriage Shaft The Carriage slides along this shaft c Paper Retainer Important in supplyin...

Страница 433: ...his holder b Holder Stopper Secure rolls on the Roll Holder with this part c Roll Loading Slots Slide the Roll Holder along these slots d Roll Holder Slot Load the Roll Holder into this holder slot Ca...

Страница 434: ...Lift and press down the lever when replacing an Ink Tank b Ink Color Label Load an Ink Tank that matches the color and name on this label c Ink Lamp Red Indicates the state of the Ink Tank as follows...

Страница 435: ...e Output Stacker P 362 e Paper Guide Guides printed documents into the output stacker f Output stacker handle This handle is grasped and supports the sliding output stacker when putting the output sta...

Страница 436: ...per cores Use the correct attachment for the particular paper core See Attaching the Roll Holder to Rolls P 336 Roll Holder Set RH2 33 Roll Holder for 2 and 3 inch paper cores Attachments Using the 2...

Страница 437: ...nter Parts 429 Network Setting Network Environment 438 Using RemoteUI 440 Initial Settings 442 Mac OS Settings 449 Other Settings 450 Device Setup Utility Windows 453 Print Job Management 457 Adjustme...

Страница 438: ...operating systems Windows Vista Windows Server 2008 Windows 7 Windows 8 Windows Vista x64 Windows Server 2008 x64 Windows Server 2012 x64 Windows 7 x64 Windows 8 x64 OS X v10 6 8 or later Note When u...

Страница 439: ...ndows networks print over TCP IP Note NetBIOS is not supported Example of a Mac OS network In Mac OS networks print over TCP IP using the Bonjour function iPF780 Network Environment User s Guide Netwo...

Страница 440: ...address see Configuring the IP Address on the Printer P 442 What You Can Do With RemoteUI With RemoteUI you can access the printer via a network configure network settings and display the current sta...

Страница 441: ...sure the DNS settings are correctly configured Depending on the network environment you may not be able to start RemoteUI Confirm whether System Setup Use RemoteUI is set to On on the Control Panel o...

Страница 442: ...Important If you use a DHCP server for automatic assignment of the printer s IP address printing may no longer be possible after the printer is turned off and on This is because an IP address differe...

Страница 443: ...tings and then press the OK button 11 Press the Menu button If you have changed the settings a confirmation message is dis played Press or to select Yes and then press the OK but ton Important Be sure...

Страница 444: ...as specified in the ARP command l 479 Example ping xxx xxx xxx xxx l 479 Note In l the l is the letter l In Mac OS when using Terminal enter the ping command in the format ping s 479 xxx xxx xxx xxx F...

Страница 445: ...o open the printer properties window 3 Click the Port tab to display the Port sheet 4 Click Add Port to display the Printer Ports dialog box 5 In the Available Port list select Standard TCP IP Port 6...

Страница 446: ...r configuring the IP address Off Enable DNS Dynamic Update Activate this setting to perform DNS server registration automatically Off Use Zeroconf Func tion Activate this setting to use Bonjour On IP...

Страница 447: ...s and DNS domain name in Primary DNS Server Address Secondary DNS Server Address and DNS Domain Name respectively When using an IPv6 IP address 1 Start the web browser and enter the following URL in t...

Страница 448: ...r the last character blank Perform dynamic updating of state ful addresses Activate this setting to automatically register the stateful ad dress with the DNS server Off Dynamically update the stateles...

Страница 449: ...jour Network Configuring the Destination for Bonjour Network If you use the printer in a network that uses the Bonjour function register the printer in Print Scan This is identi fied as Printers Scann...

Страница 450: ...n the Security group 5 Refer to the table of settings for device information and security as you complete these settings Security setting items are displayed when you click the Change Password button...

Страница 451: ...everts to the Ethernet Driver menu 7 Press or to select Comm Mode and then press the OK button 8 Press or to select the communication mode and then press the OK button The display reverts to the Ether...

Страница 452: ...store the network settings to the default values as follows Important Initializing the network settings will also restore the default value of the printer s IP address As a result the Re moteUI page c...

Страница 453: ...F Device Setup Utility For details refer to the imagePROGRAF Device Setup Utility help Installing imagePROGRAF Device Setup Utility Installing imagePROGRAF Device Setup Utility Install imagePROGRAF De...

Страница 454: ...6 Enter the IP address assigned to the printer and click the Set button 7 Click OK after the Confirmation message is displayed 8 Exit imagePROGRAF Device Setup Utility Note To configure the IP addres...

Страница 455: ...ment select On in Stateless Address Additionally when there is an DHCPv6 compatible server in the network environment select On in DHCPv6 Note When there is no IPv6 compatible router or DHCPv6 compati...

Страница 456: ...iPF780 User s Guide 456...

Страница 457: ...per 325 Control Panel 395 Printer Parts 429 Network Setting 437 Print Job Management Status Monitor Windows 458 Printmonitor Mac OS 460 Accounting Windows 462 Adjustments for Better Print Quality 475...

Страница 458: ...ly Printer status can be checked in real time on a computer monitor Displays the ink level of every color in the printer An icon and warning message will notify you when ink levels are low The type of...

Страница 459: ...ng of the selected job To resume printing of a paused print job select the print job and click the Resume button Note Once all the print data for a print job has been sent to the printer the job can n...

Страница 460: ...problems or errors to email addresses you des ignate in advance Note If the status of the desired printer is not shown in imagePROGRAF Printmonitor select the printer again as follows 1 Make sure the...

Страница 461: ...printing of the selected job To resume printing of a paused print job select the print job and click the button Note Once all the print data for a print job has been sent to the printer the job can n...

Страница 462: ...ted from each printer who printed them and when Calculation of the Total Pages Used and the Total Cost This allows you to use the collected print job logs to calculate totals for items such as the num...

Страница 463: ...Chg Admin Pswd Init Admin Pswd in the Admin Menu in the Set Adj Menu in the printer The administrator menu can only be displayed and configured by the administrator Accounting Manager Main Window Acc...

Страница 464: ...odically acquired jobs See Job List Area P 465 Note You can change the items that are displayed and the display order using the Advanced Display Settings dialog box The Advanced Display Settings dialo...

Страница 465: ...cess was not executed Media Type This is the type of paper used in printing Output Image Size The size of the image used for printing Note If the job has multiple pages the size of the last page is di...

Страница 466: ...unting Manager P 466 2 Set options such as the units displayed For details of the unit settings see Configuring Units and Display Settings in Accounting Manager P 470 3 If you are using Regular Data A...

Страница 467: ...the Tank Capacity and corresponding Price 3 Click the OK button Important Your settings are not applied until you click the OK button To set different unit costs for each ink color 1 Select the ink co...

Страница 468: ...ed width x height 3 Click the Add button To change the unit cost of a media type that has already been configured click the Overwrite button 4 Click the OK button Important The settings are not applie...

Страница 469: ...gs dialog box The settings are not applied until you click the OK button Setting the Unit Cost for Items Other Than Ink and Paper Setting the Unit Cost for Items Other Than Ink and Paper Open the Othe...

Страница 470: ...ed for ink consumption Paper Width Use this to select the unit used for paper width Paper Length Use this to select the unit used for paper length Area Display Format Use this to select the unit used...

Страница 471: ...eld on printers You can change the number of jobs displayed per page using the Print Jobs Shown Per Page setting in the View menu or the toolbar You can skip to a particular page using the Go to optio...

Страница 472: ...en selecting Show Job Proper ties or by using the icon in the toolbar Displaying the Period Properties Dialog Box Select a period from the Regularly Acquired Jobs list and then select Show Period Prop...

Страница 473: ...ed as a file Load Unit Cost Data Selecting Load Unit Cost Data in the File menu loads saved unit cost data Showing the Total Amount of Ink and Paper Consumed Showing the Total Amount of Ink and Paper...

Страница 474: ...iPF780 User s Guide 474...

Страница 475: ...per 325 Control Panel 395 Printer Parts 429 Network Setting 437 Print Job Management 457 Adjustments for Better Print Quality Adjusting the Printhead 476 Adjusting the feed amount 483 Maintenance and...

Страница 476: ...results See Troubleshooting Paper Abrasion and Blurry Images P 481 Automatic Adjustment to Straighten Lines and Colors Automatic Adjustment to Straighten Lines and Colors If printed vertical lines ar...

Страница 477: ...elect Head Posi Adj and then press the OK button 6 Press or to select Auto Standard or Auto Advanced and then press the OK button A test pattern is printed for adjustment Adjustment is now finished if...

Страница 478: ...the Tab Selection screen is not displayed press the Menu button 3 Press the OK button The Set Adj Menu is displayed 4 Press or to select Adjust Printer and then press the OK button 5 Press or to sele...

Страница 479: ...ligned execute Head Inc Adj to adjust the angle of inclination of the Printhead Executing Head Inc Adj requires you to examine a printed test pattern and enter an adjustment value Paper to Prepare Rol...

Страница 480: ...Angle Adjustment Lever with the red square and close the Top Cover A test pattern is printed for adjustment Important Do not touch the Linear Scale a or Carriage Shaft b Touching these parts may damag...

Страница 481: ...d On the other hand specifying a high Printhead height will prevent paper from rubbing against the Printhead but may reduce the printing quality Important Paper rubbing against or becoming caught on t...

Страница 482: ...d Height and then press the OK button 6 Press or to select the desired setting value and then press the OK button Note Using Automatic will ensure that the printer adjusts the Printhead height to the...

Страница 483: ...t Adj Priority to suit your particular printing application Print Quality Adjusts the feed amount to reduce banding across the sheet in printed documents Adj Quality settings are applied When Adj Fine...

Страница 484: ...OtherPaper Use this mode with paper not in the Paper Reference Guide or if Auto GenuinePpr does not eliminate banding See Types of Paper P 326 Note Always check the Adj Priority values before using Au...

Страница 485: ...size for Auto OtherPaper a confirmation message is shown on the Display Screen requesting you to continue printing Press the OK button and follow the instructions on the Display Screen Manual Banding...

Страница 486: ...K button The Set Adj Menu is displayed 4 Press or to select Adjust Printer and then press the OK button 5 Press or to select Feed Priority and then press the OK button 6 Press or to select Adj Quality...

Страница 487: ...Once you execute Adj Quality the Adj Fine Feed value will revert to 0 See Automatic Banding Adjustment P 484 See Manual Banding Adjustment P 485 Perform adjustment as follows 1 On the Tab Selection s...

Страница 488: ...Rolls P 336 Loading Rolls in the Printer P 339 Loading Sheets in the Printer P 356 Important Always make sure the loaded paper matches the type of paper specified Adjustment cannot be comple ted corr...

Страница 489: ...bing against or becoming caught on the Printhead may jam or result in printed documents that are soiled 1 On the Tab Selection screen of the Control Panel press or to select the Paper tab Note If the...

Страница 490: ...iPF780 User s Guide 490...

Страница 491: ...nel 395 Printer Parts 429 Network Setting 437 Print Job Management 457 Adjustments for Better Print Quality 475 Maintenance and Consumables Ink Tanks 492 Printheads 500 Maintenance Cartridge 508 Clean...

Страница 492: ...I 207C Magenta PFI 207M Yellow PFI 207Y Note For instructions on Ink Tank replacement see Replacing Ink Tanks P 492 Replacing Ink Tanks Replacing Ink Tanks Compatible ink tanks For information on the...

Страница 493: ...or prepare a new ink tank See When to Replace Ink Tanks P 497 If a message requests you to replace an Ink Tank press the OK button In this case you can skip the step Access the menu for ink tank repla...

Страница 494: ...remove it Press the OK but ton Important Do not turn off the printer while the Ink Tank is removed It may cause the interior of the Ink Tank Cover to become soiled If there is still ink in the Ink Ta...

Страница 495: ...the ink holes or electrical contacts This may cause stains damage the Ink Tank and affect printing quality 3 Press the OK button and install the Ink Tank into the holder as shown with the ink holes f...

Страница 496: ...ink tank is installed facing the wrong direction the rotating part of the Ink Tank Lock Lever come out of place If this happens open the Ink Tank Lock Lever to return it to the proper position 5 Make...

Страница 497: ...is low if no ink is left and if you have deactivated ink level detection The remaining ink level is indicated as shown below If the Display Screen indicates to replace the Ink Tank replace the Ink Ta...

Страница 498: ...nk Tank at this point Attach the Ink Tank Cover to the printer Attach the Ink Tank Cover to the printer If too much force is applied to the Ink Tank Cover while it is open Ink Tank Cover may become de...

Страница 499: ...Tank Cover and place it on the printer 4 Push down on the near side of the Ink Tank Cover from the top until it clicks 5 Open the Ink Tank Cover and check that it is attached to the print er iPF780 A...

Страница 500: ...zzles are periodically checked to ensure they are clear Configure the settings on the Control Panel menu in Nozzle Check See Menu Settings P 414 Paper to Prepare When Using Rolls An unused roll at lea...

Страница 501: ...ending on the prob lem to resolve Head Cleaning A Use this mode if printing is faint or contains foreign substances This method of cleaning consumes the least amount of ink It takes about three minute...

Страница 502: ...thead Caution For safety keep the Printhead out of the reach of children If ink is accidentally ingested contact a physician immediately Do not touch the Printhead immediately after printing The Print...

Страница 503: ...displayed on the Display Screen It takes about two minutes to complete Replace the Printhead 1 Open the Top Cover Instructions are now shown on the Display Screen regard ing Printhead replacement Impo...

Страница 504: ...Important Do not touch the Linear Scale a or Carriage Shaft b Touching these parts may damage them Never touch the metal contacts of the Carriage This may damage the printer 3 Pull the Printhead Fixer...

Страница 505: ...the new Printhead by the grips a remove it from the pouch Important When handling the Printhead always hold it by the grips a Never touch the nozzles b or metal con tacts c This may damage the Printhe...

Страница 506: ...ea If ink accidentally spills wipe off the ink with a dry cloth If you need to put a Printhead somewhere temporarily before installation do not keep the nozzles and metal contacts facing down If the n...

Страница 507: ...After Printhead has been replaced and filled with ink Head Posi Adj Auto Advanced is performed if you have selected Rep P head Print On in the Control Panel menu See Menu Settings P 414 In this case f...

Страница 508: ...mmediately Important Do not remove the Maintenance Cartridge except to replace it Ink may leak out Do not remove an Maintenance Cartridge during initialization immediately after turning on the printer...

Страница 509: ...the Menu button 2 Press the OK button The Set Adj Menu is displayed 3 Press or to select Maintenance and then press the OK button 4 Press or to select Repl maint cart and then press the OK button A me...

Страница 510: ...Maintenance Cartridge or store it at an angle ink may leak and cause stains The remaining Maintenance Cartridge capacity is recorded on each printer Do not install a used Mainte nance Cartridge in ano...

Страница 511: ...e printer now initializes the Maintenance Cartridge Important Do not remove the Maintenance Cartridge during initialization immediately after replacing the Mainte nance Cartridge The Maintenance Cartr...

Страница 512: ...Cartridge as needed See Replacing the Maintenance Cartridge P 508 When to Replace the Maintenance Cartridge When to Replace the Maintenance Cartridge Replace or prepare to replace the Maintenance Cart...

Страница 513: ...mp flashes and a message to replace the Maintenance Cartridge is shown on the Display Screen Printing is disabled and you cannot replace the Printhead or transfer the printer Replace the Maintenance C...

Страница 514: ...appear dirty because it may actually be covered with paper dust 4 Plug the power cord into the outlet Cleaning Inside the Top Cover Cleaning Inside the Top Cover Clean inside the Top Cover about once...

Страница 515: ...e it away Note If the Cleaning Brush is dirty rinse it in water 3 Using a damp cloth that you have wrung out completely wipe inside the Top Cover to clean it Wipe away any ink residue on the Platen as...

Страница 516: ...s may create a static charge which may attract dust and affect the printing quality Do not touch the Linear Scale a or Carriage Shaft b This may stain your hands and damage the print er Note When clea...

Страница 517: ...part replacement may be necessary when preparing to transfer the printer that is when you execute the printer menu item to prepare for transfer Remove paper 1 Remove the paper Rolls See Removing the...

Страница 518: ...ust be replaced the message Consumables must be replaced Call for service is shown on the Display Screen and preparation is not possible If this message is displayed press the OK button and contact yo...

Страница 519: ...the ink may leak out 7 When the processing is complete Completed Turn Power Off is displayed Press the Power button to turn the power off Pack the printer 1 Disconnect the power cord and interface ca...

Страница 520: ...edure in reverse 5 Repack the Roll Holder Holder Stopper and printer in shipping materials and then package them in a shipping box Reinstalling the Printer Reinstalling the Printer The basic workflow...

Страница 521: ...njury or damage the area of installation or basket cloth Install the printer 1 Mount the printer on the assembled Stand and tighten the screws firmly Caution Moving the printer requires at least three...

Страница 522: ...on the right side of the printer 4 Plug the power cord into the outlet 5 Press the power button to turn the printer on Instructions are displayed on the Display Screen 6 Open the Ink Tank Cover and i...

Страница 523: ...printer In this case be sure to reconfigure the printer s IP address Updating the Firmware Updating the Firmware Update the printer firmware to take advantage of new and improved printer functions Con...

Страница 524: ...obtain the latest firmware visit the Canon website If the firmware available online is newer than the installed firmware update the printer firmware For details on downloading and updating the firmwa...

Страница 525: ...tments for Better Print Quality 475 Maintenance and Consumables 491 Troubleshooting Frequently Asked Questions 526 Problems Regarding Paper 527 Printing does not start 536 The printer stops during a p...

Страница 526: ...et likewise on the printer See Specifying the Ink Drying Time for Rolls P 348 See Menu Structure P 408 How do I print without borders When printing on rolls you can perform borderless printing by conf...

Страница 527: ...film cannot be detected 535 Roll Paper is Continuously Ejected 535 Clearing Jammed Roll Paper Clearing Jammed Roll Paper If paper from a roll becomes jammed Paper jam is shown on the Display Screen o...

Страница 528: ...de manually away from the jam Important Do not move the Carriage over jammed paper This may damage the Printhead 2 Clear any jammed paper from inside the Top Cover After removing the paper make sure t...

Страница 529: ...paper from the Paper Feed Slot After removing the paper make sure there are no other scraps of paper in the printer If the paper is jammed by the Ejection Guide Remove the jammed paper from the Outpu...

Страница 530: ...reen of the Control Panel Remove the jam med paper as follows 1 Push the Release Lever back 2 Remove the jammed paper If paper is jammed inside the Top Cover 1 Open the Top Cover and move the Carriage...

Страница 531: ...printer 3 Close the Top Cover Important Do not touch the Linear Scale a or Carriage Shaft b This may stain your hands and damage the print er If the paper is jammed by the Paper Feed Slot Remove the j...

Страница 532: ...ever forward Clearing Jammed Paper Paper Feed Slot Clearing Jammed Paper Paper Feed Slot Follow these steps to remove any scraps left in the Paper Feed Slot after you clear jammed sheets or roll paper...

Страница 533: ...Feed Slot Push the scrap out toward the Platen 5 Remove the scrap when it is pushed out onto the Platen 6 If any scraps remain inside the paper feed slot repeat steps 4 and 5 7 Holding it at the posit...

Страница 534: ...utting Mode in the Control Panel menu and use scissors or a cutting tool to cut the roll after printing See Specifying the Cutting Method for Rolls P 349 Cut Speed is not configured correctly in the C...

Страница 535: ...op Cover and clean the entire Platen See Cleaning Inside the Top Cover P 514 Roll Paper is Continuously Ejected Roll Paper is Continuously Ejected Cause Corrective Action Although sheets are selected...

Страница 536: ...w 2 Clear Pause Printing in the File menu to restart the print job In Mac OS restart the print job as follows 1 Click Print Scan This is identified as Printers Scanners or Print Fax in other versions...

Страница 537: ...e Action The leading edge of the roll paper was cut to straighten it The leading edge of rolls may be cut to straighten it if Trim Edge First is set to a value other than Off in the Control Panel menu...

Страница 538: ...de the Top Cover 1 Open the Top Cover and make sure the Carriage is not over the Platen 2 Remove any scraps of paper inside the Top Cover See Clearing Jammed Roll Paper P 527 See Clearing a Jammed She...

Страница 539: ...ect the correct type of paper in the Control Panel menu when loading paper See Loading Rolls in the Printer P 339 See Loading Sheets in the Printer P 356 The edges of the paper are dirty The edges of...

Страница 540: ...pen the Top Cover and clean the Platen See Cleaning Inside the Top Cover P 514 Open the Top Cover and clean the Platen After this manually advance the roll onto the Platen before printing See Cleaning...

Страница 541: ...rs In Print Priority in the Advanced Settings of the printer driver choose Image You are printing on paper that curls easily Printed colors may appear uneven on the leading edge of paper that is susce...

Страница 542: ...er as you have loaded in the printer 1 Press the Stop button and stop printing 2 Change the type of paper in the printer driver and try printing again The contrast becomes uneven during printing The c...

Страница 543: ...Settings button in the Layout sheet open the Special Settings dia log box and set Fast Graphic Process to Off The type of paper specified in the printer driver does not match the type loaded in the pr...

Страница 544: ...manually specifying the communi cation mode in use See Configuring the Communication Mode Manually P 451 Cannot print over a TCP IP network Cannot print over a TCP IP network Cause Corrective Action...

Страница 545: ...3 Click Yes after the Warning message is displayed 4 Make sure that the printer has been removed from the list and then click Exit Removing imagePROGRAF Status Monitor Windows Remove imagePROGRAF Stat...

Страница 546: ...3 Follow the instructions on the screen to remove imagePROGRAF Device Setup Utility Removing Installed Printer Drivers iPF780 User s Guide Troubleshooting Installation problems 546...

Страница 547: ...Off and print again See Menu Settings P 414 PageSizeProcess1 in the Control Panel menu is set to On Set PageSizeProcess1 to Off in the Control Panel menu See Menu Settings P 414 Lines are printed too...

Страница 548: ...nted when Input Resolution in the Control Panel menu was set to 600dpi In the Control Panel menu set Input Resolution to 300dpi and print again See Menu Settings P 414 Replotting with HP GL 2 jobs is...

Страница 549: ...s used a valve is automatically activated to switch the area for paper suction which may make a sound This mechanism prevents suction from Vacuum holes where there is no paper In addition ink is eject...

Страница 550: ...tanks specified for this printer feature an ink level detection function to prevent the ink from running out during printing which prevents printer damage See Ink Tanks P 492 This function will not w...

Страница 551: ...ress the button 8 Press or to select Yes and then press the OK button 9 A confirmation message about updating ink information is shown on the Display Screen After checking the message press the button...

Страница 552: ...iPF780 User s Guide 552...

Страница 553: ...7 Adjustments for Better Print Quality 475 Maintenance and Consumables 491 Troubleshooting 525 Error Message Error Messages 554 Messages regarding paper 556 Messages regarding ink 564 Messages regardi...

Страница 554: ...Insert the maintenance cartridge 569 Insufficient paper for job 559 Leading edge detection error 561 Maint cart The level is low 569 Maintenance cartridge full 569 Maintenance cartridge problem 569 Me...

Страница 555: ...l 557 The paper is too small 557 The roll is empty 559 This paper cannot be used 559 This type of paper is not compatible with HP GL 2 570 Top cover is open 572 Unknown file 572 Wrong ink tank 565 Wro...

Страница 556: ...a test pattern for adjustment use sheets of the same size and type of paper in the required quantity Press or to select Change Paper press the OK button and replace the paper See Loading and Printing...

Страница 557: ...hange Paper and then press the OK button to stop printing 2 Replace the loaded paper to match the settings in the printer driver and try print ing again See Loading and Printing on Rolls P 18 See Load...

Страница 558: ...from the Printer P 343 See Removing the Roll Holder from Rolls P 345 2 Replace with paper of the width configured in the printer driver See Attaching the Roll Holder to Rolls P 336 See Loading Rolls i...

Страница 559: ...been loaded Push the Release Lever back and load paper of the correct size See Paper Sizes P 326 Paper has been loaded that is too small to print the test pattern for printhead adjustment or nozzle c...

Страница 560: ...You have attempted to print on a sheet but no sheet is loaded Press or to select Load Paper and then press the OK button Load a sheet and then print See Loading and Printing on Sheets P 21 Press or an...

Страница 561: ...u However this may cause jams and printing problems because paper may be askew when printed Also the Platen may become soiled which may soil the back of the next document when it is printed Paper not...

Страница 562: ...back and remove the paper In other cases the Cutter Unit may be damaged Contact your Canon dealer for assistance End of paper feed End of paper feed Cause Corrective Action Although an attempt was mad...

Страница 563: ...suppor ted width for borderless printing Press or to select Stop Printing and then press the OK button Use each type of paper only where the recommended environmental conditions are met For de tails o...

Страница 564: ...ace the Ink Tank for the color that does not have enough ink See Replacing Ink Tanks P 492 No ink left No ink left Cause Corrective Action There is no ink left There are no ink colors with displayed a...

Страница 565: ...the printer Load the Ink Tank See Replacing Ink Tanks P 492 There is a problem with the Ink Tank Replace it with a new Ink Tank See Replacing Ink Tanks P 492 The following ink tanks cannot be recogni...

Страница 566: ...ogging P 500 3 Clean the Printhead if the nozzles are clogged See Cleaning the Printhead P 501 4 Execute Adj Quality again See Automatic Banding Adjustment P 484 Highly transparent film is loaded that...

Страница 567: ...execute Head Posi Adj again 1 Press the OK button to clear the error 2 Use Head Inc Adj to adjust the angle of inclination of the Printhead See Adjusting Line Misalignment P 479 3 Execute Head Posi A...

Страница 568: ...p Printing 2 Clean the Printhead See Cleaning the Printhead P 501 If the message is still displayed when printing replace the Printhead See Replacing the Printhead P 502 Press or to select Print and t...

Страница 569: ...ll You can continue to print but prepare a new Maintenance Cartridge to use when the message for replacement is displayed No Maintenance Cartridge capacity No Maintenance Cartridge capacity Cause Corr...

Страница 570: ...ity GL2 Wxxxx The memory is full xxxx is 0501 0903 or 0904 GL2 Wxxxx The memory is full xxxx is 0501 0903 or 0904 Cause Corrective Action The printer memory is full Because the entire print job could...

Страница 571: ...ror xxxxxxxx xxxx x represents a letter or number Cause Corrective Action The last portion of roll paper was used during a print job The paper was not advanced because the trailing edge is taped to th...

Страница 572: ...ation is in the wrong format Check the data Turn off the printer and wait a while before restoring power and then resend the data You have uploaded firmware for a different model Check the firmware ve...

Страница 573: ...247 Handling and Use of Paper 325 Control Panel 395 Printer Parts 429 Network Setting 437 Print Job Management 457 Adjustments for Better Print Quality 475 Maintenance and Consumables 491 Troubleshoot...

Страница 574: ...not include Printhead and Ink Tank Approx 67 9 kg 153 7 lb Space for installation W D H Printer and Stand 1 704 1 700 1 362 mm 67 1 66 9 53 6 in Related standards International Energy Star Program La...

Страница 575: ...r diameter 2 inches 3 inches Print area For details see Print Area P 575 1 Varies depending on the operating system or application Roll Holder Set Roll Holder Set RH2 33 Print Area Print Area A margin...

Страница 576: ...quired Rolls Printable Area A margin of 3 mm 0 12 in on all sides is required During borderless printing the margin on all sides is 0 mm For information on paper compatible with borderless printing se...

Страница 577: ...Paper 325 Control Panel 395 Printer Parts 429 Network Setting 437 Print Job Management 457 Adjustments for Better Print Quality 475 Maintenance and Consumables 491 Troubleshooting 525 Error Message 5...

Страница 578: ...nter or cause malfunction Power Supply Warning Never handle the power cable with wet hands Doing so may cause electrical shock Insert the power cable securely and completely into the power source If t...

Страница 579: ...nd the printer Moving the Printer Caution Moving the printer requires at least three people holding it on both sides and from behind Be careful to avoid back strain and other injuries When moving the...

Страница 580: ...space for installation Legal Notices Legal Notices FCC Regulations U S A Canon Large Format Printer iPF780 This device complies with Part 15 of the FCC Rules Operation is subject to the following two...

Страница 581: ...egistered trademarks or trademarks of Microsoft Corporation in the U S and or other countries Mac Mac OS Bonjour Safari and OS X are trademarks of Apple Inc registered in the U S and other coun tries...

Страница 582: ...d explanations on restric tions or precautions in use Warning Indicates warning items for which operating error poses a risk of death or serious injury To ensure safe use always follow these warnings...

Страница 583: ...Figures and software screens Figures in this user manual may be different from the actual appearance of the printer in some cases Screens depicted in this user manual for the printer driver or other...

Страница 584: ...findet bedeutet dies gem der Batter ien Richtlinie dass in dieser Batterie oder diesem Akkumulator ein Schwermetall Hg Quecksilber Cd Cadmi um Pb Blei in einer Konzentration vorhanden ist die ber eine...

Страница 585: ...ci le dienst voor klein chemisch afval of afvalstortplaats of kunt u terecht op www canon europe com weee of www canon europe com battery S lo para la Uni n Europea y el rea Econ mica Europea Noruega...

Страница 586: ...nto inadequado deste tipo de res duos pode ter um impacto negativo no ambiente e na sa de humana devido a subst ncias potencialmente perigo sas que est o associadas com equipamentos do tipo EEE A sua...

Страница 587: ...tai viralliseen s hk ja elektroniikkalaiteromun tai paristojen ja akkujen ker yspisteeseen S hk ja elek troniikkalaiteromun virheellinen k sittely voi vahingoittaa ymp rist ja ihmisten terveytt koska...

Страница 588: ...A term k jrahasznos t s t illet en inform l djon a helyi polg rmesteri hivataln l a helyi k zter let fenntart v lla latn l a hivatalos hullad klerak telephelyen vagy a h ztart si hullad k begy jt s t...

Страница 589: ...ur smagos met lus Hg dz vsudrabs Cd kadmijs Pb svins un to koncentr cijas l menis p rsniedz direkt v par baterij m un akumulatoriem min to piem rojamo slieks ni is izstr d jums ir j nodod piem rot sav...

Страница 590: ...terii acest simbol indic prezen a n baterie sau acumulator a unui metal greu Hg Mercur Cd Cadmiu Pb Plumb ntr o concentra ie mai mare dec t pragul admis specificat n Directiva referitoare la baterii A...

Страница 591: ...les subst ncies potencialment perilloses que normalment estan associades a l RAEE La vostra cooperaci a l hora de rebutjar correctament aquest producte contribuir a la utilitzaci efectiva dels re curs...

Страница 592: ...iPF780 User s Guide 592...

Страница 593: ...ance Cartridge 508 512 569 Menu Operations 404 405 Menu Structure 408 N Navigate 402 Nozzle 500 O Orientation 133 134 135 227 237 Oversize 70 P Page Setup Pane 263 Page Setup Sheet 161 Paper Feed Slot...

Страница 594: ...iPF780 User s Guide ENG CANON INC 2014...

Отзывы: