6
6
6-5
6-5
Troubleshooting > Drive/Sensor check > Motor,Solenoid
Troubleshooting > Drive/Sensor check > Motor,Solenoid
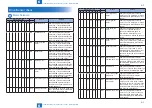
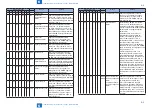
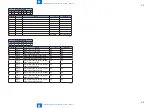
DIPSW(SW382)
Name
details
1
2
3
4
5 6 7 8
-
-
On -
On -
-
On M203
M206
"Upper Neat Stack
Unit Rear Alignment
Moter
Lower Neat Stack
Unit Rear Alignment
Moter"
After pressing ENTER to start the
motor, use + to select upper or lower
(0: Upper Neat/1: Lower Neat).
Every press of ENTER changes
the operation as follows; Alignment
Plate phase alignment => Alignment
Plate positioning => Alignment Plate
initialization Then, use +/- to move 21
mm. Press ENTER again to terminate
the motor.
-
-
On -
On -
On On M204
M207
"Upper Neat Stack
Unit Alignment Plate
Lifting Motor
Lower Neat Stack
Unit Alignment Plate
Lifting Motor"
After pressing ENTER to start the
motor, use + to select upper or lower
(0: Upper Neat/1: Lower Neat).
Every press of ENTER changes the
operation as follows; Alignment Plate
phase alignment => Alignment Plate
positioning Then, use + to move to the
alignment position or - to move to the
shift position. Press ENTER again to
terminate the motor.
-
-
On -
On On -
-
M208
M209
"Lower Neat Stack
Unit Return Roller
Lifting Motor
Upper Neat Stack
Unit Return Roller
Lifting Motor"
After pressing ENTER to start the
motor, use + to move to the return
position or - to move to the standby
position. Press ENTER again to
terminate the motor.
-
-
On -
On On On -
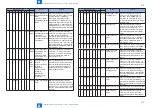
SL1
SL2
SL10
SL11
"Buffer path switch
solenoid
Upper path switch
solenoid
Assist Roller
Disengagement
Solenoid 1
Assist Roller
Disengagement
Solenoid 2
"
"After pressing ENTER, the solenoid
turns ON/OFF in the following order,
and then automatically terminates.
(1) Upper Path/Lower Path Switch
Flapper (2) Buffer Path Flapper (3)
Assist Roller Solenoid"
-
-
On On -
-
-
-
M106 Saddle folder/feeder
motor
After pressing ENTER to start the
motor, use + to accelerate clockwise
in units of 30 mm/s in the range of 175
to 295 mm/s, or - to switch the rotation
direction. Press ENTER to terminate
the motor.
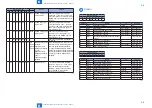
DIPSW(SW382)
Name
details
1
2
3
4
5 6 7 8
-
-
On On -
-
-
On M105 Saddle paper push-
on plate motor
After pressing ENTER to start the
motor, use + to conduct push-on
operation. Press ENTER again to
terminate the motor. (NOTE: Push-
on is not performed unless the Roller
Guide is in HP.)
-
-
On On -
-
On -
M109 Stitcher motor
After pressing ENTER to start the
motor, use + to move to the standby
position of A3 (250 mm/s) or - to
perform press operation (100 mm/s).
Press ENTER again to terminate the
motor.
-
-
On On -
-
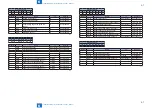
On On M101 Saddle transport
motor
After pressing ENTER to start the
motor (665 mm/s), use +/- to switch
the speed (between 665 mm/s and
250 mm/s). Press ENTER again to
terminate the motor.
-
-
On On -
On -
-
M104 Saddle guide motor Press ENTER to enter the mode, and
use + (Open)/-(Close). Press ENTER
again to terminate the mode (Open).
-
-
On On -
On -
On M103 Saddle lead edge
stopper motor
After pressing ENTER to start the
motor, use +/- to move in units of 20
mm in the range of 0 to 200 mm. Press
ENTER again to terminate the motor
(Home).
-
-
On On -
On On -
M102 Saddle alignment
guide motor
After pressing ENTER to start the
motor, use +/- to move in units of 10
mm in the range of 0 to 100 mm. Press
ENTER again to terminate the motor
(Home).
-
-
On On -
On On On M114 Saddle lead-in roller
disengage motor
After pressing ENTER to start the
motor, use + to engage (in 2 stages,
switched alternately) or - to disengage.
Press ENTER again to terminate the
motor (Home).
-
-
On On On -
-
-
M107 Saddle delivery belt
motor
After pressing ENTER to start the
motor, use + to rotate clockwise or - to
rotate counterclockwise. Press ENTER
again to stop the rotation and terminate
the motor.
-
-
On On On -
-
On M109 Saddle sticher motor Press ENTER to start clinch operation,
which then terminates automatically.
-
-
On On On -
On -
M113 Saddle tapping
motor
After pressing ENTER to start the
motor, use + to tap or - to escape.
Press ENTER again to terminate the
motor.
Содержание Booklet Finisher-D1
Страница 12: ... Notes Before Servicing Points to Note at Cleaning Safety Precautions ...
Страница 14: ...1 1 Product Outline Product Outline Product Specifications Names of Parts ...
Страница 60: ...3 3 Periodic Servicing Periodic Servicing User Maintenance Maintenance and Inspection ...
Страница 177: ...5 5 Adjustment Adjustment Basic Adjustment Adjustment at Time of Parts Replacement Auxiliary Adjustment ...
Страница 315: ...6 6 Troubleshooting Troubleshooting Upgrading ...
Страница 357: ... Service Tools Solvents and Oils List of Signals General Circuit Diagram Appendix ...

