background image


6-201 

Disassembly / Replacement / Adjustment

Assembly 

(1) 

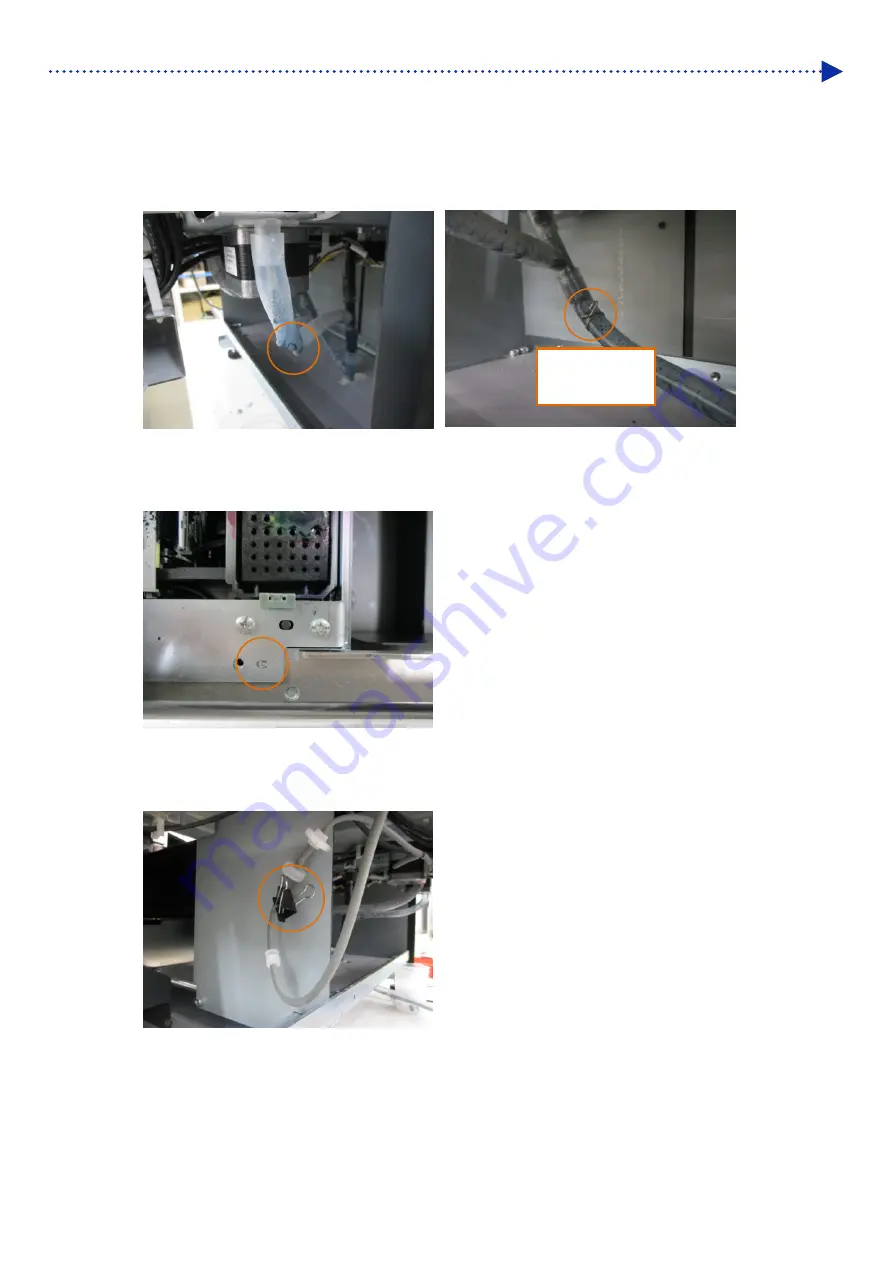
To perform the assembly, take the reverse procedures to disassembly operation. 

(2) 

The waste ink tube must be assembled without causing distortion or breakage. 


(3) 

When attaching the tube in the main unit, assemble it so that the boss located on the front of the main unit does not 

run on the main maintenance unit. 


(4) 

As it is impossible to detect the introduction of the cleaning solution on the main unit side, be sure to remove the 

rubber band or clip clogging the tube extending from the cleaning solution tank. 


(5) 

After turning on the power, be sure to perform head cleaning and print the nozzle-check pattern to check the head 

state. 

Attach the tube 
stopper 2. 

Содержание GTX-4

Страница 1: ...GTX 4 GARMENT PRINTER Service Manual ...

Страница 2: ...y pulling out the holder in the direction of the arrow 3 Pickup the Lithium Battery 1 to the direction of the arrow 1 1 1 Note based on California law USA on the use and handling of Perchlorate This product contains a CR Coin Lithium Battery which contains Perchlorate Material special handling may apply See http www dtsc ca gov hazardouswaste perchlorate ...

Страница 3: ...CAUTION The instructions which follow this term indicate situations where failure to follow the instructions may result in minor or moderate injury IMPORTANT The instructions which follow this term indicate situations where failure to follow the instructions may result in damage to property NOTE The instructions which follow this term indicate precautions and restrictions for use Symbols This symb...

Страница 4: ...reign object gets inside the printer immediately turn off the power disconnect the power cord and contact the place of purchase or a qualified technician If you continue to use the printer while there is a foreign object inside it may result in fire or electric shocks or problems with correct operation Do not allow the printer to come into contact with liquids Otherwise it may cause fire or electr...

Страница 5: ...cord until installation is complete The printer may operate if the power is turned on by mistake which could result in injury Do not climb onto the printer or place heavy objects on top of it Otherwise it may become unbalanced and tip over or fall down and cause injury Be careful not to touch the claws of the mounting portion on the upper side of the rear cover Otherwise you may be injured Printin...

Страница 6: ... rub but immediately rinse the eyes with water Keep the liquids out of the reach of children Be sure to wear protective goggles and gloves when handling the grease so that it does not get into your eyes or onto your skin It can cause inflammation Do not drink or eat the grease It may cause diarrhea or vomiting Keep the liquids out of the reach of children When replacing parts and installing option...

Страница 7: ... should be within 10 of the rated voltage for the printer Voltage fluctuations which are greater than this may cause problems with correct operation The power supply capacity should be greater than the requirements for the printer s power consumption Insufficient power supply capacity may cause problems with correct operation In the event of an electrical storm turn off the power and disconnect th...

Страница 8: ...8 SAFETY INSTRUCTIONS Warning labels X0125 9 1 3 3 8 8 8 8 10 11 7 6 5 4 2 Grease Pretreatment 5 kg 11 lb Pretreatment 20 kg 44 lb Ink pouch Maintenance solution pouch Cleaning solution Waste ink tank ...

Страница 9: ...ng labels displayed on it Follow the precautions given on each warning label for your work When the label is peeled off or illegible contact the place of purchase 1 6 7 8 2 3 9 4 10 11 5 Watch your fingers or you may be injured High temperature warning display ...

Страница 10: ...osure Cleaning 1 30 1 6 6 Characteristic of Ink cartridges 1 30 1 6 7 About Head maintenance mechanism 1 33 2 Installation and preparation 2 1 2 1 Installation of printer 2 2 2 2 Levelness adjustment for GTX 4 2 4 2 3 Power supply of printer 2 5 2 3 1 Turning on the power 2 5 2 3 2 Turning off the power 2 6 2 3 3 When there is no prospect of electric power recovery for a while due to power outage ...

Страница 11: ...tween firmware updates conducted using Firmware Update Tool and USB memory 3 14 3 2 2 Procedures for firmware updates conducted using an USB memory 3 14 3 2 3 Procedures for when update is interrupted 3 15 3 2 3 1 Procedures for when update is interrupted 3 15 3 2 3 2 Resuming update for firmware other than the main program 3 15 3 2 3 3 Update using the boot system program 3 16 3 3 GTX 4 Service T...

Страница 12: ...e of platen 6 28 6 1 12 Replacement of carriage belt 6 30 6 1 13 Carriage belt tension adjustment 6 36 6 1 14 Replacement of carriage motor 6 38 6 1 15 Replacement of ball bushing 6 42 6 1 16 Height adjustment of carriage 6 47 6 1 17 Replacement of encoder strip 6 49 6 1 18 Replacement of maintenance unit 6 51 6 1 19 Replacing the wiper cleaner 6 56 6 1 20 Exchanging Wiper Blade Assembly 6 58 6 1 ...

Страница 13: ...20 Replacement of encoder circuit board 6 188 6 2 21 Replacement of obstacle sensor 6 190 6 2 22 Replacement of platen origin sensor 6 192 6 2 23 Replacement of maintenance circuit board 6 193 6 2 24 Preparation for replacement of electric components inside maintenance unit 6 194 6 2 25 Replacement of maintenance motor 6 195 6 2 26 Replacement of maintenance sensor circuit board 6 199 6 2 27 Repla...

Страница 14: ...rcuitry 9 1 10 Specifications 10 1 10 1 Apparatus 10 1 10 2 Software 10 2 10 3 Ink maintenance solution cleaning solution pretreatment 10 3 10 3 1 Ink 10 3 10 3 2 Maintenance solution 10 3 10 3 3 Cleaning solution 10 4 10 3 4 Pretreatment 10 4 10 4 About consumable supplies optional items and replacement parts 10 5 ...

Страница 15: ...ation Otherwise the printer may break down or a print job may end up in failure Also as the power will be turned off if you open the front cover avoid opening the cover while the printer is operating Until the ink is firmly fixed on the surface of a T shirt handle the T shirt with care If a T shirt is soiled with such ink that has not been firmly fixed on its surface such ink stain cannot be remov...

Страница 16: ...d strongly against a printed surface with only white ink color transfer may occur in the same fashion When a color transfer occurs wipe the color transferred area clean of dirt with a soft and clean cloth or a toothbrush that is moistened with a small amount of mild detergent for home use or alcohol Wash away any imprint of the pretreatment by washing with water About maintenance In order to keep ...

Страница 17: ...ered trademark of Brother Industries Ltd Apple Macintosh Mac OS iOS OS X Safari iPad iPhone iPod and iPod touch are the trademarks or registered trademarks of Apple Inc in the United States and other countries The official name of Windows 7 is Microsoft Windows 7 operating system represented as Windows 7 in this manual Also the official name of Windows 8 1 is Microsoft Windows 8 1 operating system...

Страница 18: ...e Using Your Printer for the First Time About software This printer uses its own software To use this printer you are required to agree with the End User License Agreement for Brother Software as mentioned below ...

Страница 19: ... the SOFTWARE to create any derivative software iv rent or lease the SOFTWARE v make available to download the SOFTWARE to the public or vi transfer the SOFTWARE to any third person or parties by wire or any other means 3 WARRANTIES DISCLAIMER TO THE EXTENTALLOWED BY LAW THIS SOFTWARE IS PROVIDED TO YOU AS IS WITHOUT WARRANTIES OR CONDITIONS OF ANY KIND WHETHER ORAL OR WRITTEN EXPRESS OR IMPLIED B...

Страница 20: ...ver Flushing foam 2 2 2 Cable clamp 1 3 Grease 1 11 Waste ink tank 1 4 Clean stick R 6 12 Waste ink tube fixing rubber 1 1 5 Cleaning cup 1 13 Print head 2 6 Filter cover and Fan filter 2 14 Rear cover installation screws 2 2 7 Gloves for changing the wiper cleaner for cleaning the maintenance unit 4 15 Rear cover 1 16 Adult platen 1 8 Carriage fixing pin 1 17 Setup Manual 1 9 Tweezers 1 1 The rub...

Страница 21: ...ater It refers to such water as distilled water and purified water which is used to dilute the pretreatment with it NOTE Avoid using such water as tap water in which impurities are contained Heat press It must deliver the performance through which the print range of the size of a platen to be used can be covered and 180 C 356 F can be kept for 35 seconds or more At a fixing stage of the pretreatme...

Страница 22: ...rm a printing test on it beforehand Some textiles may leave noticeable imprints of the pretreatment after it is fixated In that case wash them away with water Perform a printing test beforehand Then the following phenomena may occur The textiles may be discolored by the pretreatment and cannot be restored to the original color even if they are washed A deep colored polyester blended yarn fabric di...

Страница 23: ... head 4 Platen sheet It helps to keep the T shirt from moving shifting during printing so that an image can be clearly printed 5 Platen It secures a T shirt in place which is to be printed 6 Shoulder bar Align the position of a T shirt with this bar 7 T shirt tray This T shirt tray holds such portions of T shirt that droop down on it and feeds the entire T shirt into the printer 8 USB flash insert...

Страница 24: ... of the main unit of printer 13 Operation panel Operate the printer using this panel 1 4 2 Right side view X0032 3 2 1 No Name Function 1 Cartridge insertion port Ink cartridges placed here are from the left in the top row black K and yellow Y from the left in the middle row cyan C and magenta M and from the left in the bottom row white W12 and white W34 Be sure to put each of the ink cartridges i...

Страница 25: ...part from the nearest wall by 7 9 in 20 cm or more 2 Fan filter It absorbs ink mist which is generated inside the printer on its surface 3 Waste ink tube This tube is used to direct the flow of waste ink down into the waste ink tank 4 Waste ink tank This tank collects waste ink 5 Cleaning liquid tank It is the tank that reserves the cleaning solution used for maintenance 6 Rear cover It protects t...

Страница 26: ...is shaft supports the carriage 4 Maintenance unit In order to keep good printing quality this unit performs maintenance functions to the print heads on a regular basis Example Auto Cleaning Function 5 Cap rear on the white side It protects the surface of heads on the white side and sucks ink during head cleaning 6 Wiper cleaner rear on the white side It removes waste ink attached to the wiper surf...

Страница 27: ...ction 12 Carriage fixing pin To prevent drying of print heads in an emergency such as a blackout it fixes the carriage to the cap position of the maintenance unit Refer to 2 3 3 When there is no prospect of electric power recovery for a while due to power outage ...

Страница 28: ...o adjust the platen s height 4 Knob Use this knob to secure the platen bearing in place This lever should be used to change the platen s height Keep it tightened when printing For details please refer to 6 4 2 Platen height adjustment of the Instruction Manual 5 Platen bearing This is used to secure and hold the platen in place 6 Collars Used to change the platen s height by changing the number Fo...

Страница 29: ...en the printer is placed in the standby state the menu screen will appear While the menu screen or the error screen is being displayed use this button to finalize and accept the currently displayed content 6 Down arrow button While the menu screen is being displayed use this button to select your desired menu item In the numeric value setting menu use this button to decrease the target value 7 Bac...

Страница 30: ...ertain whether the platen is set to a proper height after the platen s height is adjusted For details refer to 6 5 Placing print medium in position of the Instruction Manual 11 Head cleaning button Perform a normal cleaning for the selected heads 12 Power LED When it remains off The power of the printer is turned off When it remains on The printer remains turned on powered on ...

Страница 31: ... Platen size Platen size that is specified by the print driver during file creation is indicated here 4 Number of printed sheets The total number of printed sheets of which printing operation is completed in response to the received print data is displayed here 0 to 999 5 Warning mark This mark appears when any warning is issued Pressing causes the current screen to move to the warning screen wher...

Страница 32: ...eview image The preview display screen of received print data is shown in this window The preview display screen shown here is indicated upside down as opposed to the page orientation the upper side of the preview image is oriented toward the front of the printer main unit Furthermore it is possible to change the direction of the preview display screen as well For the change method refer to 8 14 P...

Страница 33: ...nge to another menu item which is one level lower in the menu layer Pressing causes the currently displayed menu to be acknowledged Return to previous menu in upper menu layer Pressing causes the current menu to change to another menu item which is one level higher in the menu layer Exit If you press when a menu in the uppermost menu layer remains displayed the menu will exit and the system will r...

Страница 34: ...int heads Black In the event that no ink jet droplets are ejected this menu item enables you to perform cleaning of only the black nozzles of the color heads Yellow Cyan Magenta In the event that no ink jet droplets are ejected this menu item enables you to perform cleaning of only the yellow cyan and magenta nozzles of the color heads Powerful Cleaning All Colors Perform one of the powerful clean...

Страница 35: ...etails refer to 6 Basic printing procedures 7 Precautions to keep good printing quality use printer over the long term or 9 Troubleshooting of the Instruction Manual White Ink Refilling Maintenance Part Clean Replace White Head Cleaning Install White Ink After Cleaning Head Replacement Install Ink after Replacing Head Initial Ink Installation White Ink Pause Mode Exchange Filter Log copy to USB Pr...

Страница 36: ...int For details please refer to 8 What to do when needed of the Instruction Manual Temperature Humidity Info Confirm network setting IP Address Subnet Mask Default Gateway Host name MAC address Language English Español Français Deutsch Italiano 日本語 中文 Version Firm Version Data Info Serial No ...

Страница 37: ...iffers in individual characteristics due to the material characteristics of the piezoelectric material and processing accuracy The front end component is attached with a label indicating the characteristics corresponding to individual parts V rating Upon assembly of the print head the characteristic data needs to be registered to the on board memory of the main circuit board The processor drives t...

Страница 38: ...s Right chamber within the diagram Air flushing unit In the presence of large amounts of air within the tubing during the initial introduction of ink or upon exchanging the print head the air is flushed from the tubings by the air flushing unit The air vent rods attached to the air vent cap within the maintenance unit presses on the shutoff valve of the air flushing unit within the head carriage u...

Страница 39: ... occasionally develops into large bubbles under the influence of pressure variation applied to the ink Pressure differences within the ink jet head channels are caused by the movement of the piezoelectric actuators In order to prevent large air bubbles from developing within ink channels and adversely affecting the print quality it becomes necessary to remove most of the bubbles before the ink rea...

Страница 40: ...ing through boundary between the ink and bubble is constant the surface area of the air ink boundary decreases causing the air passing through into the ink to decrease in proportion to the reduction of the surface area When the pressure within the tubings are reduced the air dissolved in the fluid attempts to escape and pass through into the air bubble As a result the air bubble expands and increa...

Страница 41: ...rs absorbing the pressure change inhibiting the performance of the ink jet The following diagram depicts the situation where a large air bubble is formed in the ink channel leading to the nozzle The dotted line indicates the condition where the piezoelectric element is extended under the voltage applied to the laminated electrode The pressure generated by the piezoelectric element is absorbed by t...

Страница 42: ...to agitate the titanic oxide and prevent the ingredient from subsiding White Ink Circulation is implemented automatically 1 6 3 About white ink refilling White ink is refilled as a means of agitating the ink within the white ink cartridge and white print head other than the ink supply tubings to agitate the titanic oxide and prevent the ingredient from subsiding Message prompting for refilling of ...

Страница 43: ...annel block diagram Color C Sub tank C Ink cartridge C Nozzle Y Sub tank Y Ink cartridge Y Nozzle K Sub tank K Ink cartridge K Nozzle M Sub tank M Ink cartridge M Nozzle White head W12 Ink cartridge W2 Nozzle P W1 Nozzle P W34 Ink cartridge W4 Nozzle P W3 Nozzle P ...

Страница 44: ... up shaft using the force of flat spiral springs The mechanism does not work while large quantities of ink is contained in the pouch but starts to wind once the ink quantity decreases The wind up shaft is locked and immobilized when the ink cartridge is lifted and unlocked when the cartridge is placed on a flat surface Wind up is released when the lid of the ink cartridge is lifted allowing for th...

Страница 45: ... occur When the remaining ink level becomes low the lock is unlocked and ink pouch wind up starts before the remaining ink volume drops below approx 400 g The ink level detection plate moves according to the wind up shaft position and the remaining ink level is displayed on the display panel X0223 Sliding tape The lock is unlocked Ink level detection plate Upper portion ...

Страница 46: ...Before Using Your Printer for the First Time Approximate position of the wind up shaft upper portion Ink level detection plate Panel display X0225 Switched based on the software count value X0219 X0220 X0221 ...

Страница 47: ...echanism Mechanism designed to secure the print head and carriage unit while printer is idle powered OFF and during transportation to prevent the head from being disengaged from the head cap mechanism by external impact and vibration Purging mechanism Mechanism designed to remove air bubbles and deteriorated ink from the head nozzle and clean the print head by generating negative pressure with the...

Страница 48: ... head wiper removes the ink remaining on the surface of the print head nozzles the head wiper is cleaned of any ink by contacting the head wiper cleaner Mechanism is designed to maintain the cleaning performance of the head wiper Head wiper cleaner requires replacement at regular intervals ...

Страница 49: ...down disconnect the power cord and contact the place of purchase or a qualified technician If you continue to use it it may result in fire or electric shocks or poor printing quality Do not place the printer on a shaky table or high shelf or other unstable location Otherwise it may tip over or fall down and cause injury Furthermore the table that supports the printer should be at least 35 4 in 90 ...

Страница 50: ...r wider space free above the unit as well As the air is exhausted toward the rear side keep 7 9 in 20 cm or more space open behind the exhaust opening In order for the waste ink tube not to be placed horizontally be sure to install the main unit in such a manner that it is inclined toward the left anterior side of its table Be sure to use a table that supports the printer should be at least 35 4 i...

Страница 51: ...2 3 Installation and preparation X0161 Platen top surface Seismic protection example Leg dimension Platen height dimension surface Leg 34 1 in 86 7 cm 16 7 in 42 3 cm 1 3 in 33 mm 12 5 in 31 8 cm Base ...

Страница 52: ...1 in 13 mm open end wrench 1 Press on control panel to move platen frontward 2 Refer to 6 1 11 Level setting for top surface of platen to confirm levelness of platen top surface 3 Place level gauge on top of platen 4 Adjust height of 4 legs to establish levelness of the printer by checking gauge ...

Страница 53: ...n whether the rear cover is put in position Ascertain whether there is enough cleaning solvent in the cleaning liquid tank and the tank is mounted correctly in place Ascertain whether the required space at least approx 11 8 in 30 cm for the platen to be moved forward is kept and the min clearance 7 9 in 20 cm is maintained at the back side of the printer for exhausting air from the exhaust opening...

Страница 54: ...enance of the printer etc When moving the printer elsewhere In the event that the power supply interruption is anticipated in advance including the case where a planned power outage is scheduled 1 Press the power button After the shutting down cleaning cycle is performed the power will be turned off IMPORTANT Do not press and hold the power button for 3 seconds or more If you press and hold the bu...

Страница 55: ...age to the cap position TIPS Note that the carriage fixing pin is housed in the area on the left side of maintenance unit The front cover will not close completely if the carriage is fixed with the carriage fixing pin X0192 X0200 3 When the current state is brought to an available condition to turn on the power pull out the carriage fixing pin return it to its stowed position and reactivate the pr...

Страница 56: ...al Installing the printer driver 2 4 1 Installing printer driver onto your PC When connecting via USB When connecting via LAN Add a Printer to PC 2 4 2 Connect with USB2 0 cable Set static IP address on PC Set static IP address on Printer main unit Printer static IP Address Set 2 4 3 When connecting via LAN Printer static IP address setting Printer static IP Address Set Instruction Manuals 8 13 St...

Страница 57: ...r to your PC yet TIPS You must log into your PC with administrator privileges 1 Activate the PC 2 Complete all of the current sessions 3 Double click on the setup exe to execute the installer 4 Then the installation procedures will begin Follow the on screen instructions to complete the installation 5 When the dialog box shown below appears click Install 6 After the installation is completed react...

Страница 58: ...ion window is displayed click Skip obtaining driver software from Windows Update and select Yes on the next screen The installation procedures will be automatically performed and the relevant information is displayed on the lower right area of the PC screen TIPS This screen may prompt more than once And this also may require several minutes to complete 3 After the installation is completed open th...

Страница 59: ...ion is not required configuration task on the PC is now completed Follow the table below to adjust the printer Menu name Things to prepare Document 1 CR Speed Adjustment 2 5 1 CR Carriage speed adjustment 2 V rating s settings 2 5 2 V rating setting 3 Firing Adjustment Black paper or transparent sheet such as OHP sheet White paper 2 5 3 Firing adjustment 4 Platen Rolling Adjustment White paper 2 5...

Страница 60: ...AN Printer static IP address needs to be obtained beforehand IP address designation may not be correct if PC does not detect printer upon conducting procedures indicated in 2 4 4 When connecting via LAN Adding a printer to PC Consult your administrator 1 With the printer powered on make a connection with a USB 2 0 cable between the printer and your PC TIPS For this connection of the USB cable secu...

Страница 61: ... desired IP address setting method and click Next Manual setting 5 Enter each of the pre determined values of the printer for IP Address Subnet Mask and Default Gateway and click Next One instance of each value is cited as shown in the window below ...

Страница 62: ...2 14 Installation and preparation Automatic acquisition 5 Enter the host name to be set for the printer and click Next TIPS The host name can contain up to 31 characters ...

Страница 63: ...inter is displayed the process is complete If there is any error in each of the values you have entered for the static IP Address Subnet Mask and Default Gateway an error message to inform you thereof accordingly will appear In this case correct the error and attempt the process again ...

Страница 64: ...nection and power on the printer TIPS For this connection of the LAN cable secure it in place by means of the cable clamp as required 2 Select the Devices and Printers from Control Panel TIPS In the case of Windows 8 1 select the View devices and printers from Control Panel In the case of Windows 10 select Settings Device Devices and Printers 3 Click the Add a printer ...

Страница 65: ...ect The printer that I want isn t listed Add a local printer or network printer with manual settings then click Next In the case of Windows 10 select The printer that I want isn t listed Add a local printer or network printer with manual settings then click Next 5 Select the Create a new port then select Standard TCP IP Port for Type of port and finally click Next ...

Страница 66: ...lly select the driver to use and click Next One instance of each value is cited as shown in the window below 7 Then the detection window of TCP IP port appears and the current window will automatically go to the additional port information window after the detection is completed 8 After the window shown below appears select the Custom in the Device Type and click Settings ...

Страница 67: ...ation 9 In the Protocol select the LPR enter BINARY_P1 in Queue Name of the LPR Settings and click OK When the current screen goes back to the previous screen click Next 10 After the window shown below appears click the Have Disk ...

Страница 68: ...the installer according to the PC s OS 32 bit version 64 bit version After the file path appears click OK 12 Make sure that a list of printer drivers is shown for the selected folder After that click Next 13 After the window shown below appears select the Replace the current driver and click Next ...

Страница 69: ...tion and preparation 14 Enter Printer name and click Next 15 Then the specified printer will be added to the system following which the window shown below appears select the Do not share this printer and click Next ...

Страница 70: ...ent 2 5 1 CR Carriage speed adjustment 2 V rating s settings 2 5 2 V rating setting 3 Firing Adjustment Black paper or transparent sheet such as OHP sheet White paper 2 5 3 Firing adjustment 4 Platen Rolling Adjustment White paper 2 5 4 Platen feed adjustment 5 White Color Alignment Pretreated black or dark color T shirt 2 5 5 White color alignment 6 Setting of the time displayed on the nozzle che...

Страница 71: ...de press on the operation panel to bring the menu screen into view 2 From the menu select Printer Setting CR Speed Adjustment and press 3 Select Start or Start after cleaning setup and press Start If you cannot clean the internal area of the printer such as carriage shaft immediately after the head replacement or when the error message is displayed Start after cleaning setup After cleaning the car...

Страница 72: ...een the printer and your PC 2 On the PC from All Programs in the Start menu select the GTX 4 Maintenance from Brother GTX 4 Tools 3 After the window shown below appears select V rating s settings and click Next 4 Perform the required operation by following the on screen instructions in the dialog box After the adjustment is completed the currently displayed screen will go back to the window mentio...

Страница 73: ...guring the V rating settings 1 Make several sheets of A4 size or letter size paper black paper or transparent sheet such as OHP sheet and white paper available for use 2 Make sure that a connection of USB 2 0 cable or LAN cable is made between the printer and your PC 3 On the PC from All Programs in the Start menu select the GTX 4 Maintenance from Brother GTX 4 Tools 4 After the window shown below...

Страница 74: ...ets of A4 size or letter size white paper available for use 2 Make sure that a connection of USB 2 0 cable or LAN cable is made between the printer and your PC 3 On the PC from All Programs in the Start menu select the GTX 4 Maintenance from Brother GTX 4 Tools 4 When the window shown below is displayed select Platen Rolling Adjustment and click Next 5 Perform the required operation by following t...

Страница 75: ...usting the firing timing and adjusting the platen feed 1 Make a black or deep colored pretreated T shirt ready for use 2 Make sure that a connection of USB 2 0 cable or LAN cable is made between the printer and your PC 3 On the PC from All Programs in the Start menu select the GTX 4 Maintenance from Brother GTX 4 Tools 4 After the window shown below appears select the White Color Alignment and cli...

Страница 76: ...e check pattern 1 Make sure that a connection of USB 2 0 cable or LAN cable is made between the printer and your PC 2 On the PC from All Programs in the Start menu select the GTX 4 Maintenance of Brother GTX 4 Tools 3 After the window shown below appears select Setting of the time displayed on the nozzle check pattern and click Next ...

Страница 77: ...quired operation by following the on screen instructions in the dialog box CAUTION Confirm that the date and time of your PC are set correctly and continue 5 After the setting is completed the currently displayed screen will go back to the Main screen ...

Страница 78: ...f your hand gets caught between the platen or the T shirt tray and the covers it may be injured Wait at least 1 minute after turning off the power switch before opening the front cover Contact with heat sink located at the top of the head may lead to a burn injury Be careful not to get your fingers caught when closing the front cover otherwise it may result in injury to your fingers Do not move th...

Страница 79: ...types and method of operation available for the user menu items please refer to the Instruction Manual This section supplements the contents of the descriptions for the menu provided within the Instruction Manual 3 1 2 1 Maintenance Part Clean Replace When warnings or error messages requiring the cleaning or replacement of maintenance parts are displayed select Maintenance Part Clean Replace menu ...

Страница 80: ...regular basis and dispose of any waste ink before the tank overflows The following are examples of functions terminated while printer is set to White Ink Pause Mode Regular circulation operation for the white ink tube Terminal cleaning operation upon powering off Regular indication of message prompting for the agitation of the white ink cartridge Indication of the warning error messages prompting ...

Страница 81: ...orated into the printer is output 12 Log Level Not used under normal circumstances 13 Set Info Restore Not used under normal circumstances Backed up setting information is restored forcefully 14 Cap pump check Check if the pump is operating properly 3 1 5 Description of Advanced menu items Respective items of the Advanced menu are described within this section Basic method of panel operation is li...

Страница 82: ...olution in the maintenance solution pouch is running short there may be cases where the pouch needs to be replaced with a new one during the cleaning depending on such remaining volume If the remaining volume is 500 g 17 6 oz or less prepare a new maintenance solution pouch 1 Detach cartridge front cover upon reference to step 18 of 6 1 2 Disassembly Assembly of covers 2 Select Color Tube Cleaning...

Страница 83: ...idge with a waste cloth non fuzzy cloth Clean the printer on a regular basis X0119 7 Put the maintenance solution pouch in the cartridge Push the tip end of the maintenance solution pouch into the cartridge until it clicks into place Straighten the maintenance solution pouch in such a manner that it will be aligned with the gutter of the lid of the cartridge and mount in position by pulling it wit...

Страница 84: ...side For details on exchanging the filter for the white side refer to 6 1 28 Replacement of filters of print head on white side 3 1 5 7 Setting special work mode Item is used when exchanging components including ink tubes Execution of regular functions agitation of white ink etc is terminated in Special Work Mode IMPORTANT Always cancel the Special Work Mode upon completing the required task Other...

Страница 85: ...To Center 3 Solenoid test Sub tank This serves to turn on or off respective solenoids within the maintenance unit and those for sub tank Maintenance unit K Maintenance unit YCM Maintenance unit W1 Maintenance unit W2 4 Maintenance unit LANCE color Maintenance unit LANCE white Maintenance unit ALL IMPORTANT Take care not to operate the Cleaner To Post Wipe Position under the condition of Wiper To U...

Страница 86: ...ensors Carriage Platen Obstacle Sensor Turns ON when light receiving is successfully performed by the light receiving section and turns OFF when such action is failed Platen Sensor Turns ON when light receiving is successfully performed by the origin sensor and turns OFF when such action is failed Maintenance unit MntCam Turns ON when light receiving is successfully performed by the origin sensor ...

Страница 87: ...it W1 WASTE 6 Maintenance unit W2 4 WASTE Number Sub menu Solenoid 7 Maintenance unit LANCE color WASH 8 Maintenance unit K WASH 9 Maintenance unit YMC WASH 10 Maintenance unit LANCE white WASH 11 Maintenance unit W1 WASH 12 Maintenance unit W2 4 WASH 13 Maintenance unit LANCE color AIR 14 Maintenance unit LANCE white AIR 7 8 9 10 11 12 14 13 On the white side On the color side On the white side 1...

Страница 88: ... of ink the pattern should be printed on a cloth exceeding 14 by 16 inches in size instead of paper The print consists of the following pattern as represented by black ink IMPORTANT Print pattern for checking nozzles is provided as a sub menu item under the Solid Print item and includes Nozzle Check White 420 Nozzle Check White 420 is used when printout from this menu is required by the Brother se...

Страница 89: ...t board may be restored onto the main circuit board using the GTX 4 Service Tool For details refer to 6 2 4 Replacement of main circuit board Under normal circumstances part replacement process using the GTX 4 Service Tool should always be implemented upon replacement of the main circuit board As emergency measures in case the GTX 4 Service Tool is unavailable for restoration the Advanced menu pro...

Страница 90: ...ap Please Wait Cap pump check Carriage is Moving Cap pump check remains on cap Check that no cleaning solution Press OK to close cap Cap pump check W234 suction cap W1 suction cap Color exhaust cap MCY suction cap K suction cap OK Cap pump check Pump is running K suction cap Cap pump check Press OK to start pump cleaning solution Fill target cap with K suction cap Cap pump check ...

Страница 91: ... using an USB memory 1 Copy the firmware update data onto the root folder of the USB memory Assign the file extension bwf to the firmware update data No more than 10 files with the designated file extension may be placed in the root folder of the USB memory In case more than 11 firmware update data exist within the root folder the excess files do not show up on the LCD display of the printer 2 Ins...

Страница 92: ...4400 4401 4402 Maintenance PCB version error error code 5260 signifies the completion of the update for the main program In this situation refer to procedures specified for 3 2 3 2 Resuming update for firmware other than the main program The update of the main program has failed in the event the following is displayed upon power ON In this situation refer to procedures specified for 3 2 3 3 Update...

Страница 93: ... printer with the power OFF 4 Manually press print button and power ON the printer with the button depressed Keep on pressing the Print button until the lamp on the button lights up then release button If the timing for releasing the Print button is too slow error code 6032 is indicated In this case repeat process after powering OFF the printer 5 When the printer is activated select Version Firm V...

Страница 94: ... If the software is to be carried in CD R or DVD R the GTX 4 Service Tool must be copied onto the hard drive of the PC running the program If GTX 4 Service Tool is copied for use on customer PCs be sure to delete the program from the customer PCs after use Please refrain from leaving the GTX 4 Service Tool software installed within customer PCs or provide the software to customers for their use GT...

Страница 95: ...urposes other than as stated 3 4 2 Acquisition of log file In case of malfunction with the printer customers may be requested by the service personnel to acquire logs from the printer Please store the printer log data onto USB memories Logs are automatically assigned with filenames with file extensions zlg or log allowing for the identification of the printer 1 Connect an USB memory to the USB mem...

Страница 96: ...d the acquired log files TIPS Just for checking the content of the acquired logs GTX 4 main unit and printer driver are not required 2 Execute the GTX 4 Service Tool select the View the DataLog and Settings contained in a Saved Log File and click the Next 3 Press the Browse to select the desired log file and click the Next ...

Страница 97: ... viewpoints CAUTION The clock time recorded in the log represents the clock time of the timer incorporated in the GTX 4 currently operated Therefore the clock time may be different from the time when the GTX 4 is actually operated 5 Click the Finish to terminate the GTX 4 Service Tool ...

Страница 98: ...g If your hand gets caught between the platen or the T shirt tray and the covers it may be injured Wait at least 1 minute after turning off the power switch before opening the front cover Contact with heat sink located at the top of the head may lead to a burn injury Be careful not to get your fingers caught when closing the front cover otherwise it may result in injury to your fingers Do not move...

Страница 99: ...t quality problem occurs please refer to 9 2 Solutions to print quality problems of the instruction manual to solve the problem If any ink ejection failure of the head occurs please refer to 4 1 1 Check flow when ink ejection failure of head occurs to improve such non ejection problem ...

Страница 100: ...nk ejection nozzle How about the state of non ink ejection nozzles Print out the nozzle check pattern Head Replacement Perform the powerful cleaning NO NO NO YES YES YES To Flow 3 To Flow 2 To Flow 1 C Only a couple of nozzle pins A Most of the nozzles don t eject ink There are possibilities of electric failure head failure and maintenance suction failure B Half of the nozzles don t eject ink Elec...

Страница 101: ...ilure YES Heads of non ink ejection are replaced Electric failure of main unit side 2 After checking the wiring of carriage circuit board through main circuit board is such failure cleared OK NO 3 After replacing the carriage circuit board is such failure cleared OK 4 Replace the main circuit board 5 After cleaning the maintenance parts is such failure cleared OK Replacement of maintenance unit 6 ...

Страница 102: ...ere is a possibility of wipe failure Head Replacement D Non ink ejecting occurs in some specific nozzles 11 After cleaning the surrounding areas of wiper and nozzle surface is such failure cleared YES OK NO Head Replacement YES OK NO 12 After replacing the wiper cleaner is such failure cleared 9 After cleaning the surrounding areas of wiper and nozzle surface is such failure cleared YES OK NO Head...

Страница 103: ...nting does non ink ejecting occur in the process of printing 14 After cleaning the exhaust portion is such failure cleared NO YES There is a possibility of refill insufficiency YES OK OK 15 After replacing the filter is such failure cleared NO YES OK Head Replacement NO ...

Страница 104: ... s proper function to wipe clean Replacing the wiper cleaner Refer to 6 1 19 Replacing the wiper cleaner Is the flushing foam floated If the flushing foam is not placed appropriately it may touch the nozzle surface to stop ejection from the nozzle Replacing the flushing foam Refer to Replacing the flushing foam Is the ink accumulated on the flushing foam If an ink accumulates on the flushing foam ...

Страница 105: ...enu select Maintenance Maintenance Part Clean Replace and press IMPORTANT If any other error or message is displayed on the operation panel or warning message window follow the message to solve the problem then perform the cleaning TIPS Pressing causes the platen to start moving Do not put anything around the platen 3 Follow the on screen message and turn off the power IMPORTANT Please complete th...

Страница 106: ...r the printer provided gloves X0057 6 From the flushing receiver remove the flushing foam X0059 7 Use a waste cloth and wipe away any dirt from the outboard end portions of flushing receiver and any ink debris accumulated therein IMPORTANT If any ink debris or dust is accumulated on the outboard end portions of flushing receiver the print heads may come into contact with such portions which may re...

Страница 107: ...tions of flushing receiver If it sticks out of the end portions it may interfere with any nozzles and may result in non ejection of ink jet droplets 10 Mount the flushing receiver back to its original place in the maintenance unit TIPS Direct its orientation with a hole on the bottom to the front 11 Close the front cover 12 Turn on the power NOTE Dispose of any waste resulting from the replacement...

Страница 108: ... the waste ink spilled from the tube will not be discharged onto the floor etc NOTE Dispose of the waste ink properly as water based waste fluid in accordance with applicable laws and ordinances X0045 X0046 2 Return the waste ink tank to its original state and insert the waste ink tube into the tank NOTE Be sure to ascertain that a flow path for the waste ink is provided properly and the waste ink...

Страница 109: ...aning operation avoid replacing any ink pouch with a new one Otherwise the printer may break down TIPS If you replace an ink pouch that still has much amount of remaining ink in the way of use the remaining ink volume indication window may not display the correct remaining volume Any ink pouch has been designed to leave a small amount of ink in it when reading the end of its service life This is r...

Страница 110: ... depleted ink pouch from the cartridge CAUTION Remove the accumulated ink at the tip of the cartridge with a waste cloth non fuzzy cloth Clean the printer on a regular basis X0119 4 Unpack a new ink pouch from its shipping carton For the white ink pouch shake it 100 times each in the side to side direction with its obverse side and reverse side facing upward separately as shown below NOTE Shake th...

Страница 111: ...the cartridge until it clicks into place Straighten the ink pouch in such a manner that it will be aligned with the gutter of lid of cartridge and mount in position by pulling it with your hand NOTE If the edge of the ink pouch is bent or undulating significantly make it straight with your hand X0049 7 Put the ink pouch in its correct position CAUTION Avoid touching the portion a of cartridge Othe...

Страница 112: ... print head may be adversely affected If a cartridge of different color is placed please set it into the right position If colors are mixed on the print result or within the ink pouch please contact your dealer NOTE Dispose of any waste resulting from the replacement in accordance with applicable laws and ordinances 9 Attach a shelf life seal included with ink pouch onto the front surface of the c...

Страница 113: ...and press 3 Press to select one of the options All Colors All Whites All Print Heads Black Yellow Cyan Magenta White 1 or White 2 4 and press Yellow Cyan Magenta Black All Print Heads All Whites All Colors Initial Ink Installation 4 According to the message displayed on the operation panel press Initial ink installation will be operated TIPS Estimated time to complete the process is 15 minutes for...

Страница 114: ...hen the paper is loosely fitted fix its edge with a tape or the like AT shirt can also be used instead TIPS When printing out a nozzle check pattern on the white side print it on a pretreated black or dark color textile or black paper or a transparent sheet such as OHP sheet X0043 3 From the menu select Test Print Nozzle Check CMYK and press Then printing will begin 4 After printing on the color s...

Страница 115: ...4 18 Improvement of print quality Normal nozzle check pattern A Most of the nozzles don t eject ink B Half of non ink ejection nozzles are missing ...

Страница 116: ...4 19 Improvement of print quality C Only a couple of nozzle pins don t eject ink D Non ink ejecting occurs in some specific nozzles Due to nozzle clogging 1st try 2nd try 3rd try ...

Страница 117: ...Improvement of print quality E Nozzles of non ink ejection are horizontally in a row There is a possibility of wipe failure 1st try 2nd try 3rd try F Nozzles of non ink ejection vary 1st try 2nd try 3rd try ...

Страница 118: ...iage circuit board are failed Non ink ejection state Before replacing After replacing White head Color Such a nozzle does not exist that does not eject any ink jet droplets Such a nozzle exists that does not eject any ink jet droplets 2 After checking the wiring of carriage circuit board through main circuit board is such failure cleared If non ink ejection nozzle s are not replaced Head or mainte...

Страница 119: ...rence to 6 2 4 Replacement of main circuit board check to see if the FFC of the carriage circuit board is disconnected to the main board IMPORTANT Check to see if the FFC is slanted or it is poorly inserted Check to see if the lock black portion is securely hooked 4 Print out a nozzle check pattern to check the result If non ink ejection nozzle is not found OK Assembly failure or there is a possib...

Страница 120: ... power switch to turn off the power 2 With reference to 6 2 19 Replacement of carriage circuit board replace the carriage circuit board 3 Print out a nozzle check pattern to check the result If non ink ejection nozzle is not found OK If the state of non ink ejection nozzle is not changed NG 4 After replacing the main circuit board is such failure cleared ...

Страница 121: ...rd is such failure cleared 1 In the case that the power is turned on press the power switch to turn off the power 2 With reference to 6 2 4 Replacement of main circuit board replace the main circuit board with a new one 3 Print out a nozzle check pattern to check the result ...

Страница 122: ...orm the cleaning TIPS Pressing causes the platen to start moving Do not put anything around the platen 3 Follow the on screen message and turn off the power IMPORTANT Please complete the task within 30 minutes in order to prevent the print heads from drying up When the task will take more than 30 minutes to complete close the front cover and turn on the power then select Maintenance Part Clean Rep...

Страница 123: ...hey may damage the print heads Do not return the cleaning solution which has been put in the cleaning cup to the cleaning solution bottle NOTE For a proper work operation be sure to wear the printer provided gloves X0051 3 Wipe clean the sides of the nozzle guard with the clean stick R IMPORTANT Be sure not to touch the nozzle surface as well as the level surface and sidling surface of the nozzle ...

Страница 124: ...he level surface and sidling surface of the nozzle guard X0172 Cleaning conditions Pre cleaning state Post cleaning state 5 Rinse the clean stick R in the cleaning cup to use it for cleaning of the wiper to be performed next IMPORTANT Be sure to use the clean stick R separately for white ink and color ink Clean this part Resin part Nozzle surface Nozzle guard Resin part Resin part ...

Страница 125: ...The clean stick R used for cleaning the nozzle guard should be rinsed in the cleaning cup before the next use Be sure to use the clean stick R separately for color ink and white ink 2 Use the clean side of clean stick R to wipe clean the back of the wiper X0195 3 Rinse the clean stick R in the cleaning cup to use it for cleaning of the exhaust cap to be performed next IMPORTANT Be sure to use the ...

Страница 126: ...nk 2 Use the clean stick R to soak up the ink accumulated in the exhaust cap and remove it IMPORTANT If there is any ink clot in the exhaust cap move the clean stick R in the direction as illustrated below If the stick is moved toward yourself any of the exhaust suction ports may be clogged with ink clot X0196 3 Rinse the clean stick R in the cleaning cup to use it for cleaning of the suction cap ...

Страница 127: ...nt of print quality X0203 Cleaning conditions Pre cleaning state Post cleaning state On the white side On the color side Exhaust cap rubber part Exhaust cap rubber part Exhaust cap rubber part Exhaust cap rubber part ...

Страница 128: ...se the clean stick R separately for color ink and white ink X0197 2 When an ink clot comes to the surface pinch it with tweezers and remove it IMPORTANT Be sure not to pinch the rubber seal If it is damaged its sealing property will be degraded which in turn may lead to non ejection of ink jet droplets from the print heads 3 Replace the clean stick R with a new one rinse the cleaning cup and clean...

Страница 129: ...cordance with applicable laws and ordinances TIPS Then the head cleaning will be performed to prevent any ink from drying up Because the cleaning cup will be reused rinse it in clean cleaning solution and store it in a safe place 6 Print out a nozzle check pattern to check the result If non ink ejection nozzle is not found OK If the state of non ink ejection nozzle is not changed NG 6 Is maintenan...

Страница 130: ...ge is displayed on the operation panel or warning message window follow the message to solve the problem then perform the cleaning TIPS Pressing causes the platen to start moving Do not put anything around the platen 3 Follow the on screen message and turn off the power IMPORTANT Please complete the task within 30 minutes in order to prevent the print heads from drying up When the task will take m...

Страница 131: ...ing cup to the cleaning solution bottle NOTE For a proper work operation be sure to wear the printer provided gloves X0051 7 With a clean stick R clean the surrounding area of nozzle surface of print head Manually move the carriage to such a position that you can perform the cleaning with ease IMPORTANT Be sure not to bring the clean stick R into contact with the nozzle surface The used clean stic...

Страница 132: ...from the cleaning in accordance with applicable laws and ordinances TIPS Then the head cleaning will be performed to prevent any ink from drying up Because the cleaning cup will be reused rinse it in clean cleaning solution and store it in a safe place 10 Print out a nozzle check pattern to check the result If non ink ejection nozzle is not found OK If the state of non ink ejection nozzle is not c...

Страница 133: ...o be check and press Then the suction will begin If the suction is enabled Most of the liquid within the cap is consumed 7 After replacing the suction cap is such failure cleared If the suction is disabled Most of the liquid within the cap is not consumed There may be such problem in the maintenance unit that the waste tube or cap tube are removed Check the following matters again Prior confirmati...

Страница 134: ...k ejection nozzle is not found OK If the state of non ink ejection nozzle is not changed NG There is a possibility of the head being failed With reference to 4 1 2 White head cleaning perform the head cleaning White Head Only 3 Check the result of cleaning the head If non ink ejection nozzle is not found OK If the state of non ink ejection nozzle is not changed NG With reference to 6 1 31 Replacem...

Страница 135: ...r three times TIPS Check the printed check pattern results against the check items D through F If non ink ejection nozzle is not found OK D If non ink ejection occurs in some specific nozzles NG There is a possibility of nozzle clogging With reference to 5 1 4 Cleaning of head nozzle clean the nozzles Print out the nozzle check pattern once again and if the print quality is not regained clean the ...

Страница 136: ...ning the nozzle guard should be rinsed in the cleaning cup before the next use Be sure to use the clean stick R separately for color ink and white ink 2 Use the clean side of clean stick R to wipe clean the back of the wiper X0195 3 Rinse the clean stick R in the cleaning cup to use it for cleaning of the exhaust cap to be performed next IMPORTANT Be sure to use the clean stick R separately for wh...

Страница 137: ...ge is displayed on the operation panel or warning message window follow the message to solve the problem then perform the cleaning TIPS Pressing causes the platen to start moving Do not put anything around the platen 3 Follow the on screen message and turn off the power IMPORTANT Please complete the task within 30 minutes in order to prevent the print heads from drying up When the task will take m...

Страница 138: ...ing cup to the cleaning solution bottle NOTE For a proper work operation be sure to wear the printer provided gloves X0051 7 With a clean stick R clean the surrounding area of nozzle surface of print head Manually move the carriage to such a position that you can perform the cleaning with ease IMPORTANT Be sure not to bring the clean stick R into contact with the nozzle surface The used clean stic...

Страница 139: ...rom the cleaning in accordance with applicable laws and ordinances TIPS Then the head cleaning will be performed to prevent any ink from drying up Because the cleaning cup will be reused rinse it in clean cleaning solution and store it in a safe place 10 Print out a nozzle check pattern to check the result If non ink ejection nozzle is not found OK If the state of non ink ejection nozzle is not ch...

Страница 140: ...PORTANT Please complete the task within 30 minutes in order to prevent the print heads from drying up When the task will take more than 30 minutes to complete after attaching the flushing receiver wiper cleaner and wiper close the front cover and turn on the power then select Maintenance Part Clean Replace again to restart the task Then the head cleaning will be performed to prevent any ink from d...

Страница 141: ...ill drop off from the hole on the bottom of flushing receiver Press a waste cloth against the bottom surface and lift the flushing receiver vertically to remove it X0057 7 Remove the spring under the wiper from the maintenance unit latch X0149 Flushing receiver Front cover Wiper Spring Latch Waste cloth Waste cloth ...

Страница 142: ...e the wiper from the maintenance unit IMPORTANT There are two protruded parts underneath Thoroughly remove the wiper not to damage these parts X0150 9 Insert a new wiper into the printer from above X0151 Wiper Protrusion Protrusion Wiper Wiper ...

Страница 143: ...ove tip it leftward and put it in place TIPS During this process it is recommended to also replace the wiper cleaner with a new one First insert the shaft from above Then fold it to the left press the area with the PUSH indication until a clicking sound is heard and get the latch into position X0056 Wiper cleaner Shaft Shaft Wiper Spring Latch Latch Latch ...

Страница 144: ...ill be performed to prevent any ink from drying up 15 Print out a nozzle check pattern to check the result If non ink ejection nozzle is not found OK If the state of non ink ejection nozzle is not changed NG With reference to 5 1 4 Cleaning of head nozzle clean the nozzles Print out the nozzle check pattern once again and if the print quality is not regained clean the head with reference to 7 2 2 ...

Страница 145: ...g the nozzle guard should be rinsed in the cleaning cup before the next use Be sure to use the clean stick R separately for color ink and white ink 2 Use the clean side of clean stick R to wipe clean the back of the wiper X0195 3 Rinse the clean stick R in the cleaning cup to use it for cleaning of the exhaust cap to be performed next IMPORTANT Be sure to use the clean stick R separately for white...

Страница 146: ...ge is displayed on the operation panel or warning message window follow the message to solve the problem then perform the cleaning TIPS Pressing causes the platen to start moving Do not put anything around the platen 3 Follow the on screen message and turn off the power IMPORTANT Please complete the task within 30 minutes in order to prevent the print heads from drying up When the task will take m...

Страница 147: ...ing cup to the cleaning solution bottle NOTE For a proper work operation be sure to wear the printer provided gloves X0051 7 With a clean stick R clean the surrounding area of nozzle surface of print head Manually move the carriage to such a position that you can perform the cleaning with ease IMPORTANT Be sure not to bring the clean stick R into contact with the nozzle surface The used clean stic...

Страница 148: ...the cleaning in accordance with applicable laws and ordinances TIPS Then the head cleaning will be performed to prevent any ink from drying up Because the cleaning cup will be reused rinse it in clean cleaning solution and store it in a safe place 10 Print out a nozzle check pattern to check the result If non ink ejection nozzle is not found OK If the state of non ink ejection nozzle is not change...

Страница 149: ... ink ejection nozzle is not found OK If the state of non ink ejection nozzle is not changed NG With reference to 5 1 4 Cleaning of head nozzle clean the nozzles Print out the nozzle check pattern once again and if the print quality is not regained clean the head with reference to 7 2 2 Head cleaning Print out the nozzle check pattern once again and if the print quality is not regained clean the he...

Страница 150: ...height to scale C To reduce the paper deformation fix the edge of the papers 3 From the Advanced menu select Solid Print desired head and press 4 Start the printing following the on screen instructions 5 Perform solid printing and check the result If a large amount of non ink ejection doesn t occur in the process of printing OK If a large amount of non ink ejection occurs in the process of printin...

Страница 151: ...hen performing solid printing does non ink ejecting occur in the process of printing and perform solid printing and check the result If all pins can eject ink to the end OK If all pins cannot eject ink to the end NG Refill insufficiency is highly possible Clean the exhaust portion once again 4 Repeat step 2 and 3 three times If all pins cannot eject ink to the end NG 15 After replacing the filter ...

Страница 152: ...r replacing the filters If the ink level is low make a new ink pouch available for use 1 Prepare the supplied gloves and optional filter 2 From the menu select Maintenance Exchange Filter and press 3 From Black Yellow Cyan and Magenta select non firing color and press TIPS Pressing causes the platen to start moving Do not put anything around the platen 4 Follow the on screen message and turn off t...

Страница 153: ...ure to install the filter with the stamped side facing the cartridge side tube X0176 11 Remove the waste cloth from under the filter 12 Close the front cover turn on the power NOTE Dispose of any waste resulting from the replacement in accordance with applicable laws and ordinances 13 Perform the Load ink after replacing filter operation by following the on screen instructions TIPS When replacing ...

Страница 154: ...is not found OK If the state of non ink ejection nozzle is not changed NG With reference to 5 1 4 Cleaning of head nozzle clean the nozzles Print out the nozzle check pattern once again and if the print quality is not regained clean the head with reference to 7 2 2 Head cleaning Print out the nozzle check pattern once again and if the print quality is not regained clean the head with reference to ...

Страница 155: ...are a new maintenance solution pouch When the white ink pouch runs low on its remaining volume of white ink the Install White Ink After Cleaning function can no longer get started Furthermore there may be cases where the pouch needs to be replaced with a new one during the installation process of white ink If the remaining volume is 400 g 14 1 oz or less prepare a new white ink pouch White Head Cl...

Страница 156: ... cartridge with a waste cloth non fuzzy cloth Clean the printer on a regular basis X0119 6 Put the maintenance solution pouch in the cartridge Push the tip end of the maintenance solution pouch into the cartridge until it clicks into place Straighten the maintenance solution pouch in such a manner that it will be aligned with the gutter of the lid of the cartridge and mount in position by pulling ...

Страница 157: ...osition inside the printer 9 Repeat the same process to replace the other white ink cartridge with the maintenance solution pouch 10 On the operation panel press Then the white head cleaning will be performed TIPS White head cleaning will take approximately 25 minutes Perform the Install White Ink After Cleaning operation by following the on screen instructions Place the pouch in a straight alignm...

Страница 158: ...nce solution cartridge from the printer CAUTION The bottom of the cartridge may be soiled with ink Clean the printer on a regular basis W12 W34 X0039 3 Open the cartridge s lid IMPORTANT When opening the lid be sure not to touch the portion a Otherwise it could be damaged Place the entire cartridge on a flat surface push the latches on the bottom surface of the cartridge downward and open the lid ...

Страница 159: ...idge 100 times side to side to stir the ink IMPORTANT The white ink cartridge should be held horizontally when shaking it Holding the white ink cartridge upside down or shaking it too roughly could break the ink pouch NOTE Wear the provided gloves when performing this task When the remaining ink level becomes approximately 5 9 in 15 cm shake the cartridge with its cover open and with the edge of t...

Страница 160: ...he ink pouch avoid unevenness or wrinkles on the pouch When opening the lid be sure not to touch the portion a Otherwise it could be damaged NOTE If the remaining ink level is low hold the sagged part of the ink pouch and close the lid a X0182 X0078 X0142 8 Close the lid and put the white ink cartridge in position inside the printer IMPORTANT W12 and W34 cartridges should correctly be placed at th...

Страница 161: ...ny then press on the operation panel After the cleaning is completed the Install White Ink After Cleaning function will get started TIPS The Install White Ink After Cleaning operation will take approximately 15 minutes After the procedures are completed the current screen will go back to the standby mode screen ...

Страница 162: ...ind up failure If ink pouch wind up failure occurs improve the wind up referring to 4 2 1 How to solve ink pouch wind up failure If an ink pouch wind up error code is displayed improve the wind up problem referring to 4 2 2 What to do if an error code is displayed ...

Страница 163: ...e Cause Corrective Action Is the lock intentionally unlocked Do not forcibly unlock the lock When the ink level lowers the lock is automatically unlocked Has the lock plate spring come off Install the lock plate spring with reference to 6 1 34 Disassembly Assembly of ink cartridge If the lock plate spring is missing replace the cartridge Is the ink pouch being reused Do not reuse the ink pouch The...

Страница 164: ... detection plate spring come off the ink level detection plate Install the ink level detection plate spring to the ink level detection plate with reference to 6 1 34 Disassembly Assembly of ink cartridge If the ink level detection plate spring is missing replace the cartridge Is the wound up ink pouch dragged against the cartridge cap The ink pouch wound up portion is thickened due to ink flowing ...

Страница 165: ...tems to be checked Description Remedy Document Is the ink pouch wound up If ink pouch wind up failure occurs the remaining level cannot be correctly detected Solve the ink pouch wind up failure See 4 2 1 How to solve ink pouch wind up failure Is the cartridge ink level detection plate operating If ink level detection plate operation failure occurs the remaining level cannot be correctly detected C...

Страница 166: ...elect Maintenance Maintenance Part Clean Replace and press IMPORTANT If any other error or message is displayed on the operation panel or warning message window follow the message to solve the problem then perform the cleaning TIPS Pressing causes the platen to start moving Do not put anything around the platen 3 Follow the on screen message and turn off the power IMPORTANT Please complete the tas...

Страница 167: ...front cover 6 Turn on the power NOTE Dispose of any waste resulting from the cleaning in accordance with applicable laws and ordinances TIPS Then the head cleaning will be performed to prevent any ink from drying up Because the cleaning cup will be reused rinse it in clean cleaning solution and store it in a safe place Front cover Exhaust cap Wiper Exhaust cap Wiper On the white side On the color ...

Страница 168: ...m cleaning of the wiper part on the white side Refer to Cleaning wiper Perform cleaning of the exhaust cap part on the white side Refer to Cleaning exhaust cap Perform cleaning of the color side Nozzle guard Cleaning Perform cleaning of the nozzle guard part and the resin part on the color side Refer to Cleaning the nozzle guard Wiper Cleaning Exhaust cap Cleaning Perform cleaning of the wiper par...

Страница 169: ...ay damage the print heads Do not return the cleaning solution which has been put in the cleaning cup to the cleaning solution bottle NOTE For a proper work operation be sure to wear the printer provided gloves X0051 3 Wipe clean the sides of the nozzle guard with the clean stick R IMPORTANT Be sure not to touch the nozzle surface as well as the level surface and sidling surface of the nozzle guard...

Страница 170: ...tate Post cleaning state TIPS There may remain white ink in the black resin part but it doesn t matter if the severity is small as shown in the photo Wipe away the white ink spreading out of the nozzle guard and nozzle surface 5 Rinse the clean stick R in the cleaning cup to use it for cleaning of the wiper to be performed next IMPORTANT Be sure to use the clean stick R separately for white ink an...

Страница 171: ...lean stick R used for cleaning the nozzle guard should be rinsed in the cleaning cup before the next use Be sure to use the clean stick R separately for color ink and white ink 2 Use the clean side of clean stick R to wipe clean the back of the wiper X0195 3 Rinse the clean stick R in the cleaning cup to use it for cleaning of the exhaust cap to be performed next IMPORTANT Be sure to use the clean...

Страница 172: ...Use the clean stick R to soak up the ink accumulated in the exhaust cap and remove it IMPORTANT If there is any ink clot in the exhaust cap move the clean stick R in the direction as illustrated below If the stick is moved toward yourself any of the exhaust suction ports may be clogged with ink clot X0196 3 Rinse the clean stick R in the cleaning cup to use it for cleaning of the suction cap to be...

Страница 173: ...ar Maintenance X0203 Cleaning conditions Pre cleaning state Post cleaning state On the white side On the color side Exhaust cap rubber part Exhaust cap rubber part Exhaust cap rubber part Exhaust cap rubber part ...

Страница 174: ...se the clean stick R separately for color ink and white ink X0197 2 When an ink clot comes to the surface pinch it with tweezers and remove it IMPORTANT Be sure not to pinch the rubber seal If it is damaged its sealing property will be degraded which in turn may lead to non ejection of ink jet droplets from the print heads 3 Replace the clean stick R with a new one rinse the cleaning cup and clean...

Страница 175: ...5 10 Regular Maintenance X0204 Cleaning conditions Pre cleaning state Post cleaning state ...

Страница 176: ...he menu select Maintenance Maintenance Part Clean Replace and press IMPORTANT If any other error or message is displayed on the operation panel or warning message window follow the message to solve the problem then perform the cleaning TIPS Pressing causes the platen to start moving Do not put anything around the platen 3 Follow the on screen message and turn off the power IMPORTANT Please complet...

Страница 177: ...unit X0148 6 Put a proper amount of cleaning solution into the cleaning cup 7 Moisten a clean stick R with the cleaning solution IMPORTANT Do not return the cleaning solution which has been put in the cleaning cup to the cleaning solution bottle NOTE For a proper work operation be sure to wear the printer provided gloves X0051 Latch Latch Encoder cover Screw Cleaning cup Cleaning solution Clean st...

Страница 178: ... TIPS Moisten a waste cloth non fuzzy cloth with a small amount of alcohol and use such cloth to wipe clean the internal surface Do not use alcohol on parts other than the carriage guide shaft and the roller guide 11 Apply a proper amount of the grease which is included with the printer onto the carriage guide shaft CAUTION When handling the grease perform the work operation in such a manner that ...

Страница 179: ...laws and ordinances TIPS Then the head cleaning will be performed to prevent any ink from drying up Because the cleaning cup will be reused rinse it in clean cleaning solution and store it in a safe place 15 Adjust the carriage speed TIPS For details refer to 2 5 1 CR Carriage speed adjustment 16 Print out a nozzle check pattern TIPS Refer to 7 2 1 Print out of the nozzle check pattern checking on...

Страница 180: ...other error or message is displayed on the operation panel or warning message window follow the message to solve the problem then perform the cleaning TIPS Pressing causes the platen to start moving Do not put anything around the platen 3 Follow the on screen message and turn off the power IMPORTANT Please complete the task within 30 minutes in order to prevent the print heads from drying up When ...

Страница 181: ... head IMPORTANT Be sure not to touch the nozzle surface TIPS Manually move the carriage to such a position that you can perform the cleaning with ease X0147 8 Clean the carriage plate on the left side of the other print head in the same manner IMPORTANT The used clean stick R should be disposed of and should not be reused 9 Close the front cover 10 Turn on the power NOTE Dispose of any waste resul...

Страница 182: ...ad nozzle it may result in the printer malfunction 2 From the menu select Maintenance Maintenance Part Clean Replace and press IMPORTANT If any other error or message is displayed on the operation panel or warning message window follow the message to solve the problem then perform the cleaning TIPS Pressing causes the platen to start moving Do not put anything around the platen 3 Follow the on scr...

Страница 183: ...Manually move the carriage to such a position that you can perform the cleaning with ease IMPORTANT Be sure not to bring corner edges of the clean stick R into contact with the nozzle surface Avoid roughly rubbing the nozzle surface The used clean stick R should be disposed of and should not be reused X0067 8 Close the front cover turn on the power 9 From the menu select Head Cleaning Powerful Cle...

Страница 184: ...RTANT If any other error or message is displayed on the operation panel or warning message window follow the message to solve the problem then perform the cleaning TIPS Pressing causes the platen to start moving Do not put anything around the platen 3 Follow the on screen message and turn off the power IMPORTANT Please complete the task within 30 minutes in order to prevent the print heads from dr...

Страница 185: ...zzle surface of print head Manually move the carriage to such a position that you can perform the cleaning with ease IMPORTANT Be sure not to bring the clean stick R into contact with the nozzle surface The used clean stick R should be disposed of and should not be reused X0198 8 Close the front cover turn on the power 9 From the menu select Head Cleaning Powerful Cleaning All Print Heads and pres...

Страница 186: ...5 21 Regular Maintenance X0205 Cleaning conditions Pre cleaning state Post cleaning state ...

Страница 187: ...Ink Pause Mode Ink cannot be loaded after filter exchange 1 Select the Output Check from the Advanced menu and select the Carriage Test To Center 2 Clean exhaust cap Refer to 5 1 1 Cleaning the nozzle guard wiper exhaust cap and suction cap for instructions on cleaning the exhaust cap 3 Select Exhaust Cleaning from the advanced menu Color Tube Cleaning White Tube Cleaning Exhaust Cleaning Cap Clea...

Страница 188: ...e is a possibility that the exhaust opening is clogged In this situation clean exhaust opening 6 After cleaning exhaust opening select Output Check from the Advanced menu and select the Carriage Test To Center 7 Confirm discharge of ink into the cap IMPORTANT In case ink within the cap is not discharged there is a possibility that the exhaust opening is clogged In this situation clean exhaust open...

Страница 189: ... Check from the Advanced menu and select the Carriage Test To Center 2 Insert wire with diameter less than 0 03 in 0 8 mm into the opening and remove clogged ink CAUTION Do not force part in more than 0 39 in 10 mm Wire may come in contact with connected tubing and damage the tube ...

Страница 190: ...over of the main unit and remove the three screws of the encoder cover F to detach it 3 Moisten a waste cloth non fuzzy cloth with a small amount of alcohol and use such cloth to wipe clean the encoder strip CAUTION Be sure not to disengage the encoder strip while cleaning Re attach strip upon reference to 6 1 17 Replacement of encoder strip in case the strip is disengaged in the process 2 Print P...

Страница 191: ...over F using the three screws and close top cover of the main unit 6 Turn on the power 7 After turning on the power be sure to perform head cleaning and print the nozzle check pattern to check the head state NOTE Dispose of any waste resulting from the cleaning in accordance with applicable laws and ordinances OK NG ...

Страница 192: ...en closing the front cover otherwise it may result in injury to your fingers Do not drink liquids such as the ink maintenance solution wash liquid pretreatment or waste They may cause diarrhea or vomiting Avoid causing your eyes or skin to make contact with the ink maintenance solution wash liquid pretreatment or waste It may cause inflammation In case of contact with eyes do not rub but immediate...

Страница 193: ...pare the following tool in order to handle printheads and printed circuit boards PCBs Anti static wristbands TIPS Be sure to prepare the necessary measurement equipments and toolings upon reference to relevant chapters Screw tightening torque The tightening torque for tension screws stepped screws countersunk screws hexagon bolts hole bolts and locking screws not provided with specific instruction...

Страница 194: ...ff the power Disengage power cable from main unit Disassembly 1 Remove the two screws fixing the cover PB and detach the cover PB while lifting it 2 Detach the mist fan filter located on either side of the cover UB 3 Remove the five screws fixing the cover UB to detach it CAUTION Be sure not to buckle the two backstops located on the cover UB 3 2 1 ...

Страница 195: ... the main unit top cover then detach cover from main unit 5 Remove the three screws fixing the encoder cover F then detach cover from main unit 6 Remove the four screws fixing the cartridge cover B on the right rear of the main unit to detach it Cartridge cover B 6 6 5 4 ...

Страница 196: ... side of the main unit 8 Remove the two screws fixing the cartridge cover located inside the cover UR 9 Lift up the portion marked below of the cartridge cover to detach it 10 Remove the screw one and two hole bolts fixing the cover UR and detach cover upon lifting its rear portion 10 Cover UR 10 7 Cartridge cover Cover UR 8 ...

Страница 197: ...ove the five screws fixing the cover L to detach cover 12 Remove the screw one and two hole bolts fixing the cover UL and detach cover upon lifting its rear portion IMPORTANT Always remove cover L first then detach cover UL 12 Cover UL 12 11 11 11 ...

Страница 198: ...de of the cover PF 14 Loosen the two screws fixing the rear side of the cover PF to pull out cover 15 Remove the four screws on either side of the cover PC and detach cover 16 Remove the five screws fixing the cover DL to detach cover 16 15 15 Cover PC 14 13 13 Cover PF Cover PF ...

Страница 199: ...ws fixing the cover DR to detach it 18 Remove the four screws fixing the cartridge front cover to detach cover 19 Remove the two screws fixing the cover DBR and slide down to detach it 20 Remove the three screws fixing the cover DBL to detach it 20 20 19 19 18 17 ...

Страница 200: ...assembly 2 Install the cover DBR CAUTION Take care to prevent the cover DBR from interfering with the tube 3 When assembling cover UL be sure to fit the ribs on the cover into the cutouts located on the main unit IMPORTANT Always assemble cover UL first then attach cover L 4 When assembling cover UR be sure to fit the ribs on the cover into the cutouts located on the main unit 5 Attach cover UB CA...

Страница 201: ...n fixing lever to detach platen CAUTION Rotate Platen height adjustment lever so lever is pointed rearward Remove the platen moving it straight upwards by holding both ends of it 4 Remove the four screws fixing the T shirt tray and detach tray while lifting it 5 Remove the four screws on either side of the cover PF 5 5 Cover PF Cover PF 4 Platen height adjustment lever Platen fixing lever Platen ...

Страница 202: ...rear side of the cover PF 7 Pull out the cover PF 8 Remove the two screws fixing the cover PB and detach the cover PB while lifting it 9 Remove the four screws on either side of the cover PC and pull out cover Assembly 1 To perform the assembly take the reverse procedures to disassembly operation 9 9 Cover PB 8 8 6 ...

Страница 203: ...n 2 Remove two screws on the platen arm and detach the belt connecting fittings for the platen belt 3 Loosen the two hole bolts and relax the tension applied to the platen belt using the belt tension adjustment hole bolt 4 Remove the four hole bolts on the belt connecting fittings to detach the platen belt 5 Pull out the platen belt 4 3 Belt tension adjustment hole bolt 2 ...

Страница 204: ...using the belt tension adjustment hole bolt 7 Detach deceleration belt from the pulley 8 Remove the six hole bolts fixing pulley unit to the main unit to detach the pulley unit 9 Remove the three hole bolts and detach platen belt tension adjustment mechanism 9 9 8 6 Deceleration belt Pulley Belt tension adjustment hole bolt ...

Страница 205: ... applied to the belts upon reference to 6 1 5 Tension adjustment for platen and deceleration belts 2 Attach the shaft tension pulley and tension pulley bearing to the platen belt tension adjustment mechanism and re engage the retaining ring IMPORTANT Always replace retaining ring with new part instead of reusing the rings removed Confirm smooth rotation of the tension pulley Shaft Retaining ring T...

Страница 206: ... the belt connecting fittings IMPORTANT Be sure to insert three ridges of the platen belt into each of the openings located on the belt connecting fittings to prevent any of the openings from becoming vacant 4 Press belt fixation metal fittings into the side of the platen arm while assembling OK NG 3 ...

Страница 207: ...mbly Assembly of platen 2 Measure tension applied to platen belt and confirm value is as specified CAUTION Pick on left belt with finger while platen arm is retracted to rearmost position TIPS Be sure to measure belt tension after moving platen arm several times to allow belt to settle 3 Loosen the two hole bolts and adjust the tension applied to the deceleration belt using the belt tension adjust...

Страница 208: ...is as specified 5 Loosen the two hole bolts and adjust the tension applied to the deceleration belt using the belt tension adjustment hole bolt if necessary Assembly 1 To perform the assembly take the reverse procedures to disassembly operation 5 Belt tension adjustment hole bolt Belt tension tester ...

Страница 209: ...2 Loosen the two hole bolts and relax the tension applied to the deceleration belt using the belt tension adjustment hole bolt 3 Detach deceleration belt from the pulley 4 Remove connector one from platen motor 5 Remove the four hole bolts fixing the platen motor and detach motor 2 5 2 5 Connector 2 Deceleration belt Pulley Belt tension adjustment hole bolt ...

Страница 210: ...djustment Assembly 1 To perform the assembly take the reverse procedures to disassembly operation IMPORTANT Adjust tension applied to the deceleration belt upon reference to 6 1 5 Tension adjustment for platen and deceleration belts ...

Страница 211: ...n the two hole bolts and relax the tension applied to the platen belt using the belt tension adjustment hole bolt 4 Remove the four hole bolts on the belt connecting fittings to detach the platen belt 5 Loosen the two hole bolts and relax the tension applied to the deceleration belt using the belt tension adjustment hole bolt 6 Detach deceleration belt from the pulley 5 Deceleration belt Pulley Be...

Страница 212: ...unit to the main unit to detach the pulley unit Assembly 1 To perform the assembly take the reverse procedures to disassembly operation IMPORTANT Adjust tension applied to the platen and deceleration belts upon reference to 6 1 5 Tension adjustment for platen and deceleration belts 7 ...

Страница 213: ...tach two positioning marks to the shaft and support plate 3 Remove two screws on the platen arm and detach the belt connecting fittings for the platen belt 4 Loosen the two hole bolts and relax the tension applied to the platen belt using the belt tension adjustment hole bolt 4 Belt tension adjustment hole bolt 3 Marking positioning marks Support plate Shaft ...

Страница 214: ...nt 5 Loosen the four hole bolts and pull out the two shafts on the front side of the printer IMPORTANT Pull out the shafts by sliding them straight toward the rear 6 Pull out and remove the platen arm from the shafts Platen arm Shafts 5 5 ...

Страница 215: ...shaft and support plate 3 Align the shaft and support plate end faces on the front side 4 Temporarily tighten the two hole bolts while lightly pressing the platen arm toward yourself IMPORTANT Do not tighten the hole bolts at once because doing so may incline the shaft and cause the platen not to smoothly move Instead first temporarily tighten them before finally tighten them 5 Tighten the two hol...

Страница 216: ...6 25 Disassembly Replacement Adjustment 6 Similarly temporarily tighten the two hole bolts on the rear side while lightly pressing the platen arm toward yourself Then finally tighten them 6 ...

Страница 217: ...6 26 Disassembly Replacement Adjustment 6 1 9 Replacement of platen origin sensor Refer to 6 2 22 Replacement of platen origin sensor ...

Страница 218: ...r vertical Y direction to adjust print position Example When position is altered from X Y 0 0 5 5 the print position shifts by 0 1 in 2 5 mm in respective directions to the position indicated with dotted lines within the illustration X Y Input Press OK 0 X Direction Print Position Adjust Input Press OK 0 Y Direction Print Position Adjust Y Direction X Direction Print Position Adjust Print Position...

Страница 219: ...p Long hour continuation of a head without capping may lead to non ejection of ink jet droplets 3 Reset settings for platen bearing collars and spacers to their initial condition 4 Set platen height adjustment lever to position A 5 Move platen to position the center of the component below the print head color side Platen height adjustment lever Platen Print Position Adjust Input Check Output Check...

Страница 220: ...firm height is within 0 to 0 01 in 0 to 0 2mm in relation to the center portion of the platen CAUTION When moving the platen hold the root of the arm Do not move it by holding another portion such as the shoulder bar because doing so may result in incorrect levelness 8 To adjust the height turn adjustment screws from the bottom of the platen with a flathead screwdriver 9 9 Platen bottom surface Ad...

Страница 221: ...sassembly 1 Remove the two screws of the panel side cover and slide the cover in the arrow direction to detach it 2 Disconnect carriage motor harnesses connected to the main circuit board 3 Remove the two screws fixing the cover PB and detach the cover PB while lifting it 4 Detach the mist fan filter located on either side of the cover UB 4 3 1 Panel side cover 2 ...

Страница 222: ... fixing the cover UB to detach it CAUTION Be sure not to buckle the two backstops located on the cover UB 6 Remove the four screws fixing the main unit top cover then detach cover from main unit 7 Remove the three screws of the encoder cover F to detach cover 7 6 5 ...

Страница 223: ...placement Adjustment 8 Remove the screw three and two hole bolts fixing the cover UR and detach cover upon lifting its rear portion 9 Remove the five screws fixing the cover L to detach cover 9 9 9 8 Cover UR 8 8 Cover UR ...

Страница 224: ...ach cover upon lifting its rear portion IMPORTANT Always remove cover L first then detach cover UL 11 Remove the three hole bolts on tension adjustment mechanism and detach tension adjustment mechanism 12 Detach pulley and carriage belt from tension adjustment mechanism Pulley Carriage belt 11 11 10 Cover UL 10 ...

Страница 225: ...penings located on the belt connecting fittings to prevent any of the openings from becoming vacant Thread the carriage belt beneath the encoder circuit board harness Adjust tension applied to the carriage belt with reference to 6 1 13 Carriage belt tension adjustment 3 Install the cover UB CAUTION Be sure not to buckle the two backstops located on the cover UB 4 Adjust the carriage speed after at...

Страница 226: ...Adjustment 6 Select Start after cleaning setup and press TIPS Wait until the carriage stops moving and the sound of pong is heard It takes about 3 minutes to adjust the carriage speed Please Wait Auto Adjusting CR Speed Adjustment ...

Страница 227: ...3 9 921 22 30 Disassembly 1 Remove the cover with reference to 6 1 12 Replacement of carriage belt 2 Measure tension applied to carriage belt and confirm value is as specified TIPS Be sure to measure belt tension after moving carriage several times to allow belt to settle 3 Loosen the two hole bolts to adjust the tension applied to the carriage belt using the belt tension adjustment hole bolt whil...

Страница 228: ...le the printer is in standby mode press on the operation panel to bring the menu screen into view 3 From the menu select Printer Setting CR Speed Adjustment and press 4 Select Start after cleaning setup and press TIPS Wait until the carriage stops moving and the sound of pong is heard It takes about 3 minutes to adjust the carriage speed Please Wait Auto Adjusting CR Speed Adjustment ...

Страница 229: ...wo hole bolts and then the belt tension adjustment hole bolt to relax the tension applied to the carriage belt 3 Loosen the two hole bolts and pull carriage belt out of the belt connecting fittings 4 Loosen the hole bolt to detach clamp 5 Detach carriage motor harness from the clamp and draw harness toward the inside of the main unit 4 5 3 2 Belt tension adjustment hole bolt ...

Страница 230: ...ole bolts to detach bracket 7 Remove the two screws from the bracket and detach the carriage motor flange and bearing from the bracket 8 Remove the locking screw fixing the pulley from the carriage motor and detach the pulley 8 Bearing Flange Carriage motor 6 ...

Страница 231: ...e orientation of the flange during assembly 2 Thread the carriage belt beneath the belt connecting fittings and secure with two hole bolts IMPORTANT Be sure to insert four ridges of the carriage belt into each of the openings located on the belt connecting fittings to prevent any of the openings from becoming vacant Thread the carriage belt beneath the encoder circuit board harness Adjust tension ...

Страница 232: ...he operation panel to bring the menu screen into view 4 From the menu select Printer Setting CR Speed Adjustment and press 5 Select Start after cleaning setup and press TIPS Wait until the carriage stops moving and the sound of pong is heard It takes about 3 minutes to adjust the carriage speed Please Wait Auto Adjusting CR Speed Adjustment ...

Страница 233: ...out capping may lead to non ejection of ink jet droplets Secure space necessary for the removal of the carriage shaft on the left side of the main unit 2 Remove cover upon reference to 6 1 11 Replacement of carriage motor 3 Remove the three hole bolts on belt tension adjustment mechanism and detach tension adjustment mechanism 3 3 Solenoid Test Carriage Test Wiper Test Output Check To Center To Fl...

Страница 234: ...ttings then pull carriage belt out of the fittings 6 Remove two screws fixing the encoder circuit board to detach board from the carriage base 7 Loosen locking screw one and extract carriage shaft CAUTION After extraction of carriage shaft be sure not to allow print head and other components to come in contact with objects 7 Carriage shaft 5 6 Pulley Carriage belt ...

Страница 235: ...s to carriage base making sure one row of balls incorporated within the bushing is maintaining horizontal position CAUTION Assemble so the edge of the carriage base aligns with the edge of the bushings 3 Attach carriage shaft and secure with one locking screw CAUTION Assemble so the edge of the carriage shaft aligns with the edge of the main unit 3 Carriage shaft Ball bushing Edge of ball bushing ...

Страница 236: ...lts IMPORTANT Be sure to insert four ridges of the carriage belt into each of the openings located on the belt connecting fittings to prevent any of the openings from becoming vacant Thread the carriage belt beneath the encoder circuit board harness Adjust tension applied to the carriage belt upon reference to 6 1 11 Replacement of carriage motor 6 Adjust the carriage speed after attaching cover W...

Страница 237: ...Adjustment 8 Select Start after cleaning setup and press TIPS Wait until the carriage stops moving and the sound of pong is heard It takes about 3 minutes to adjust the carriage speed Please Wait Auto Adjusting CR Speed Adjustment ...

Страница 238: ...power off 2 Measure the heights of the maintenance unit and carriage at the portion indicated in the photo below and check that they are at 0 94 in 24 mm 0 1 Check the two portions of both color side and white side Measurement points 0 94 in 24 mm 0 1 Print Position Adjust Input Check Output Check Setting special work mode Exchange Filter Advabced Menu Solenoid Test Carriage Test Wiper Test Output...

Страница 239: ...6 48 Disassembly Replacement Adjustment 3 To adjust the height loosen the pin and turn it with a flathead screwdriver 3 3 ...

Страница 240: ...mbly 1 Remove the three screws of the encoder cover F to detach it 2 Using a pair of pliers detach the spring attached at the right of the encoder strip from the frame 3 Push the nylon rivet on the left of the encoder strip from the reverse side and detach it from the frame 3 Push 2 1 ...

Страница 241: ... to touch the encoder strip as much as possible And check the up and down orientation of the encoder strip The lower half of it is transparent TIPS There may be difficulty in the assembly of the nylon rivet Providing for spares is recommended 2 While putting the encoder strip into the slit attached to the frame try to assemble the nylon rivet Slit ...

Страница 242: ...vent the print heads from drying up Long hour continuation of a head without capping may lead to non ejection of ink jet droplets 2 Open the top cover of the main unit and remove the three screws of the encoder cover F to detach it 3 Loosen the two screws fixing the cover L 2 Print Position Adjust Input Check Output Check Setting special work mode Exchange Filter Advabced Menu Solenoid Test Carria...

Страница 243: ...move the three screws fixing the cover DBL to detach it 6 Detach the color and white flashing boxes 7 Wipe away ink waste under the flashing boxes if left 8 Disconnect the connector from the remaining level sensor located at the rear of the cleaning solution tank 8 6 7 Cover L Cover DBL 5 3 Cover L 3 4 ...

Страница 244: ...he tube with a rubber band or clip so that the cleaning solution may not spill out 10 Detach the waste ink tube located at the bottom of the maintenance unit from the Y joint 11 Disconnect the three connectors CN7 8p CN15 8p CN19 5p connected to the maintenance circuit board from the main unit 11 10 ...

Страница 245: ...r of the maintenance unit so that it is parallel to the carriage frame 13 Remove the six screws shown in the photo below fixing the maintenance unit 14 Lift up the maintenance unit from the bottom slide it in the arrow direction and detach it from the bottom of the main unit 13 ...

Страница 246: ...ssemble it so that the boss located on the front of the main unit does not run on the main maintenance unit 4 As it is impossible to detect the introduction of the cleaning solution on the main unit side be sure to remove the rubber band or clip clogging the tube extending from the cleaning solution tank 5 After turning on the power be sure to perform head cleaning and print the nozzle check patte...

Страница 247: ...the operation panel or warning message window follow the message to solve the problem then perform the cleaning TIPS Pressing causes the platen to start moving Do not put anything around the platen 3 Follow the on screen message and turn off the power IMPORTANT Please complete the task within 30 minutes in order to prevent the print heads from drying up When the task will take more than 30 minutes...

Страница 248: ...ward and put it in place TIPS First insert the shaft from above Then fold it to the left press the area with the PUSH indication until a clicking sound is heard and get the latch into position X0056 8 Close the front cover 9 Turn on the power NOTE Dispose of any waste resulting from the replacement in accordance with applicable laws and ordinances TIPS The head cleaning will be performed to preven...

Страница 249: ...ANT Please complete the task within 30 minutes in order to prevent the print heads from drying up When the task will take more than 30 minutes to complete after attaching the flushing receiver wiper cleaner and wiper close the front cover and turn on the power then select Maintenance Part Clean Replace again to restart the task Then the head cleaning will be performed to prevent any ink from dryin...

Страница 250: ...s will drop off from the hole on the bottom of flushing receiver Press a waste cloth against the bottom surface and lift the flushing receiver vertically to remove it X0057 7 Remove the spring under the wiper from the maintenance unit latch X0149 Flushing receiver Front cover Wiper Spring Latch Waste cloth Waste cloth ...

Страница 251: ...move the wiper from the maintenance unit IMPORTANT There are two protruded parts underneath Thoroughly remove the wiper not to damage these parts X0150 9 Insert a new wiper into the printer from above X0151 Wiper Protrusion Protrusion Wiper Wiper ...

Страница 252: ... above tip it leftward and put it in place TIPS During this process it is recommended to also replace the wiper cleaner with a new one First insert the shaft from above Then fold it to the left press the area with the PUSH indication until a clicking sound is heard and get the latch into position X0056 Wiper cleaner Shaft Shaft Wiper Spring Latch Latch Latch ...

Страница 253: ...enance unit TIPS Direct its orientation with a hole on the bottom to the front 13 Close the front cover 14 Turn on the power NOTE Dispose of any waste resulting from the replacement in accordance with applicable laws and ordinances TIPS Then the head cleaning will be performed to prevent any ink from drying up ...

Страница 254: ...it detach it from the main unit 2 Remove the six screws fixing the maintenance bottom plate to reverse the plate upside down 3 With reference to 6 2 25 Replacement of maintenance motor detach all the six motors with the motor plates attached 4 Detach the tube from the clamp 5 Detach the waste ink tube from the waste ink tube bracket 4 5 2 3 ...

Страница 255: ...ce bottom plate Pull the waste ink tube to detach it from the waste ink tube bracket 6 With reference to 6 2 23 Replacement of maintenance circuit board disconnect all the connectors from the maintenance circuit board 7 Unhook the harness hooked on the clamps of the maintenance circuit board bracket and maintenance bottom plate 6 7 7 ...

Страница 256: ...Remove the four screws fixing the maintenance circuit board bracket to detach the maintenance circuit board with the bracket attached 9 Paying attention to the tube and harness remove the maintenance bottom plate 10 Remove the two screws 10 8 8 ...

Страница 257: ... latches hooking the pump to detach it Assembly 1 To perform the assembly take the reverse procedures to disassembly operation 2 Paying attention to the marks put on the tube attach the pump Tightening torque of the pump screws is 0 5 N m 2 Align the marks 11 ...

Страница 258: ...6 67 Disassembly Replacement Adjustment 6 1 22 Replacement of pump sensors Refer to 6 2 26 Replacement of maintenance sensor circuit board Replacement of pump sensor ...

Страница 259: ...6 68 Disassembly Replacement Adjustment 6 1 23 Replacement of the switching solenoid Refer to 6 2 27 Replacement of maintenance solenoid valve assy ...

Страница 260: ... continuation of a head without capping may lead to non ejection of ink jet droplets 2 Remove the flushing case from the maintenance unit IMPORTANT Ink droplets will drop off from the hole on the bottom of flushing case Press waste cloth against the bottom surface and lift the flushing case vertically to remove Flushing case Print Position Adjust Input Check Output Check Setting special work mode ...

Страница 261: ...case IMPORTANT After this assembly process is completed make sure that no flushing foam extends off the outboard end portions of flushing case If it sticks out of the end portions it may interfere with any nozzles and may result in non ejection of ink jet droplets TIPS Replacement of flushing foams is recommended NOTE Dispose of any waste resulting from the replacement in accordance with applicabl...

Страница 262: ...our continuation of a head without capping may lead to non ejection of ink jet droplets 2 Open the front cover 3 Remove retaining ring and spacer from the maintenance unit TIPS If removal by hand is difficult use tweezers as necessary Wear gloves or take other precautions against stains Retaining ring Spacer Print Position Adjust Input Check Output Check Setting special work mode Exchange Filter A...

Страница 263: ...Disassembly Replacement Adjustment 4 Remove large and small caps from the maintenance unit 5 Remove large and small rubber caps from the maintenance unit Cap rubber large Cap rubber small Cap large Cap small ...

Страница 264: ...amages to the cap rubbers Make sure the rubbers are securely attached Concerning cap rubber small the tabs on the rubber should be securely lodged into the left right holes on the sides of the holder 3 Attach large and small caps onto the maintenance unit CAUTION Front Rear and sides are designated for the large and small caps Top side Rearward Rearward Top side Cap rubber large Tabs on cap rubber...

Страница 265: ...1 After opening the top cover of the main unit remove the three screws of encoder cover F to detach it 2 Loosen the two screws fixing the cover L 3 Remove the three screws fixing the cover L to detach it 4 Remove the three screws fixing the cover DBL to detach it Cover L Cover DBL 4 2 Cover L 2 3 1 ...

Страница 266: ...t spill out 6 Push the stopper of the cleaning solution tank and slide to detach the tank Assembly 1 To perform the assembly take the reverse procedures to disassembly operation 2 As it is impossible to detect the introduction of the cleaning solution on the main unit side be sure to remove the rubber band or clip clogging the tube extending from the cleaning solution tank ...

Страница 267: ...print head TIPS Ink installation should be performed after replacing the filters If the ink level is low make a new ink pouch available for use 1 Prepare the supplied gloves and optional filter 2 From the menu select Maintenance Exchange Filter and press 3 From Black Yellow Cyan and Magenta select non firing color and press TIPS Pressing causes the platen to start moving Do not put anything around...

Страница 268: ...e sure to install the filter with the stamped side facing the cartridge side tube X0176 11 Remove the waste cloth from under the filter 12 Close the front cover turn on the power NOTE Dispose of any waste resulting from the replacement in accordance with applicable laws and ordinances 13 Perform the Load ink after replacing filter operation by following the on screen instructions TIPS When replaci...

Страница 269: ...ion should be performed after replacing the filters If the ink level is low make a new ink pouch available for use 2 Remove the four screws fixing the cartridge cover B on the right rear of the main unit to detach it 3 Take out the cartridge set at the portion whose filter is to be replaced replace the white ink pouch with a capping pouch and then insert the cartridge into the main unit 2 2 Print ...

Страница 270: ...C acro 37 supply assy SB7680 5 Release the lock on the fitting portion The photo here shows W1 CAUTION To prepare for ink leakage place a waste cloth under the placed fitting 6 Attach a fitting the one attached with a new filter on the lock released portion to prevent the ink from leaking Attach the fitting 5 W4 W3 W2 W1 ...

Страница 271: ...on Assembly 1 To perform the assembly take the reverse procedures to disassembly operation 2 Before turning on the power change the capping pouch to the white ink pouch After finishing the assembly turn on the power 3 After turning on the power conduct the ink installation following the on screen instructions 4 To replace other filters please perform the same procedures from Step 1 again INLET mar...

Страница 272: ...haviors including circulation have stopped IMPORTANT Ink installation should be performed after replacing the filters If the ink level is low make a new ink pouch available for use 2 Remove the four screws fixing the cartridge cover B on the right rear of the main unit to detach it 3 Remove two fan filters 3 2 2 Print Position Adjust Input Check Output Check Setting special work mode Exchange Filt...

Страница 273: ...assembly Replacement Adjustment 4 Remove the two screws fixing the cover PB and detach the cover PB while lifting it 5 Remove the five screws fixing the cover UB to detach it 6 Remove a clamp fixing screw 6 5 4 ...

Страница 274: ...and two tube fixing member screws 8 Remove the four snap fits of the clamp parts for the tube CAUTION Tube clip latch may become damaged when excessive force is applied during removal Providing for spares is recommended Latch 7 A small size Phillips head screwdriver is required 7 ...

Страница 275: ...rewdriver to the valve base hole φ6 approx 9 84 in 25 cm long 10 Disconnect the connectors from the circuit board and detach the harness from the cord clamp 11 Disconnect the connector connected to the motor 12 Disconnect the four connectors connected to the sub tank 12 11 10 10 ...

Страница 276: ...13 Loosen the two screws of circulation pump base assy to detach it Also detach the tube hooked on the valve bracket at the same time 14 Mount the circulation pump base assy on the round shaped rod inserted in Step 9 13 Detach the hooked tube ...

Страница 277: ...revent ink leakage The operation of Step 15 through 20 describes the replacement procedures for K but also applies to other colors 16 Loosen the two screws located behind the hole so as to remove the valve bracket later TIPS As the valve bracket is designed to be hooked on the screws loosen the screws part of the way 17 Detach the fitting on the head side Attach a fitting the one attached with a n...

Страница 278: ...ect the solenoid connector connected to the circuit board 20 Detach the sub tank from the valve base IMPORTANT As this unit is kept to be hooked on the screws in Step 16 pull it up once to detach from under the valve base Pull out from under the valve base 19 K Y C M W1 W2 W3 W4 W4 W3 W2 W1 ...

Страница 279: ...ch ink detection plate is flexible be careful in detaching it 22 Remove a screw and detach the sub pouch assy from the valve bracket 23 Remove the two screws to detach the solenoid valve from the valve bracket IMPORTANT Removing different screws may cause ink leakage so be careful not to mistake the screws to be removed for different ones 23 22 21 ...

Страница 280: ...d Assembly 1 To perform the assembly take the reverse procedures to disassembly operation CAUTION The tube comprised of several parts is required to be assembled 2 Insert the needle tube assy into the solenoid valve CAUTION Insert the tube fully up to its base while taking care not to bend it TIPS Apply maintenance solution or cleaning solution to the tube before insertion Insert the tube up to it...

Страница 281: ...N Do not force part in excessively Excessive force may damage part and result in ink leakage 4 If there is a spout spring insert the sub pouch assy into the solenoid valve and install the spout spring To install the spout spring insert it from the bottom and then pull up the latch on the upper side of the spout to push the spout spring in to allow the latch to catch the spout Bottom Press Spout La...

Страница 282: ...torque 0 5 N m 7 Confirm adequacy of sub pouch assembly In case pouch is too full or too empty repeat step 4 of the assembly procedure to correct situation TIPS Pouch should be capable of expanding upon introduction of the ink The pouch within the photo is marked with lattice to facilitate the recognition of the expanding pouch Adequate Too full Too empty Hold down the sub pouch assy so that the r...

Страница 283: ...ink installation be sure to confirm that the ink does not leak at the connection of the ink flow passage 10 After finishing the ink installation release special work mode Periodic behaviors including circulation start Set to normal mode Set to special mode Setting special work mode Yellow Cyan Magenta Black All Print Heads All Whites All Colors Initial Ink Installation Assemble it so that the INLE...

Страница 284: ...ew ink pouch available for use 2 Take out the cartridge set at the portion whose tube is to be replaced replace the white ink pouch with a capping pouch and then insert the cartridge into the main unit TIPS The operation of Step 2 through 4 describes the replacement procedures for W3 but also applies to other tubes 3 Detach the fitting on the head side Attach a fitting the one attached with a new ...

Страница 285: ...TION When detaching the tube from the tube clamp SB5380 avoid bending the tube as much as possible TIPS The operation of Step 5 through 9 describes the replacement procedures for W1 but also applies to other tubes 6 Detach the fitting Attach a fitting the one attached with a new tube to the fitting detached portion to prevent the ink from leaking Attach the fitting Release the lock and lift upward...

Страница 286: ...irculation pump from the pump base 8 Detach the LC filter from the needle fitting Attach a fitting the one attached with a new tube to the fitting detached portion to prevent the ink from leaking 9 Detach the supply tube and circulation tube from the cartridge side W4 W3 W2 W1 7 8 ...

Страница 287: ...uired to be assembled 2 Assemble the circulation pump with its shaft inserted into the hole 3 Replace the filter on the circulation side at the same time as the replacement of the tube 4 Hook the circulation tube on the valve bracket Hook on the bracket W2 W3 W4 Hook on the bracket W1 Attention should be paid to the INLET direction Assemble with the shaft inserted into the hole ...

Страница 288: ...nstallation be sure to confirm that the ink does not leak at the connection of the ink flow passage 6 After finishing the ink installation release special work mode Periodic behaviors including circulation start Set to normal mode Set to special mode Setting special work mode Yellow Cyan Magenta Black All Print Heads All Whites All Colors Initial Ink Installation ...

Страница 289: ...er replacing the print head If the ink level is low make a new ink pouch available for use Replacement procedures for print head on the color side 1 From the menu select Maintenance Head Replacement Color and press TIPS Pressing causes the platen to start moving Do not put anything around the platen 2 Follow the on screen message and turn off the power IMPORTANT Please complete the task within 30 ...

Страница 290: ... print head on the white side When you replace the print head be sure to move the carriage manually to the position of the platen at the center of the printer before starting the replacement If you perform the mounting of the head when the carriage is directly above the maintenance unit it may damage the maintenance unit or the heads NOTE For a proper work operation be sure to wear the printer pro...

Страница 291: ...the lock by pulling a part toward yourself and take out the new print head from its case IMPORTANT When removing the print head be careful not to touch the nozzle surface at the bottom of the head Otherwise it may cause poor printing TIPS Sometimes you may find it hard to remove the print head when you try to open the lock of a part If it is hard use both hands to remove it X0069 Lock Print head C...

Страница 292: ...int head with ink refilled care must be taken not to mistake white for color When placing the print head in position be careful not to move the carriage as much as possible Your hand may be caught in the carriage and injured In addition the tubes may be rolled together possibly damaging them When you mount d push it down from the top Otherwise you may get your finger caught in it and get injured T...

Страница 293: ... board X0074 13 Place the resin cover back onto the carriage board and engage the two latches properly 14 Make the wiring arrangement of flat cable as illustrated in b and secure it in place with the hold down clip for the cable b X0130 Flat cable Resin cover Hold down clip for cable ...

Страница 294: ...l Ink after Replacing Head Color and press Perform the work operation by following the on screen instructions TIPS After the procedures are completed the current screen will go back to the standby mode screen 19 Adjust the carriage speed TIPS For details refer to 2 5 1 CR Carriage speed adjustment 20 Perform the V rating settings configuration TIPS For details refer to 2 5 2 V rating setting 21 Ad...

Страница 295: ... empty level before its expiry date can also be used A capping pouch or a white ink pouch at its empty level should be ready for use TIPS Perform the work operation by following the on screen instructions Pressing causes the platen to start moving Do not put anything around the platen 2 Remove the white ink cartridge from the printer CAUTION The bottom of the cartridge may be soiled with ink Clean...

Страница 296: ... X0119 5 Put the capping pouch in the cartridge Push the tip end of capping pouch into the cartridge until it clicks into place Straighten the capping pouch in such a manner that it will be aligned with the gutter of lid of cartridge and mount in position by pulling it with your hand NOTE If the edge of the ink pouch is bent or undulating significantly make it straight with your hand X0049 Capping...

Страница 297: ... of the cartridge side is raised the winding is complete X0041 a X0201 7 Close the lid and put the capping cartridge in position inside the printer 8 Repeat the same process to replace the other white ink cartridge with the capping pouch 9 Follow the on screen message and turn off the power IMPORTANT Please complete the task within 30 minutes in order to prevent the print heads from drying up 10 O...

Страница 298: ...ripping wipe off the dripping ink Be careful not to confuse it with the tube for the print head on the color side Be sure not to tighten the nut for part a by mistake It could remove the tube and leak the contained ink When you replace the print head be sure to move the carriage manually to the position of the platen at the center of the printer before starting the replacement If you perform the m...

Страница 299: ... 15 Open the hold down clip for cable and remove the flat cable X0135 16 Unlock the print head and remove the print head IMPORTANT When removing the print head be careful not to drip the ink on the carriage plate If the ink is dripping wipe off the dripping ink X0072 Lock Print head Resin cover Flat cable Hold down clip for cable ...

Страница 300: ...rom its case IMPORTANT When removing the print head be careful not to touch the nozzle surface at the bottom of the head Otherwise it may cause poor printing TIPS Sometimes you may find it hard to remove the print head when you try to open the lock of a part If it is hard use both hands to remove it X0069 Case Print head a part ...

Страница 301: ...t head with ink refilled care must be taken not to mistake white for color When placing the print head in position be careful not to move the carriage as much as possible Your hand may be caught in the carriage and injured In addition the tubes may be rolled together possibly damaging them When you mount d push it down from the top Otherwise you may get your finger caught in it and get injured TIP...

Страница 302: ...iage board X0136 20 Make the wiring arrangement of flat cable as shown here and secure it in place with the hold down clip for the cable 21 Place the resin cover back onto the carriage board and engage the two latches properly X0137 Flat cable Resin cover Hold down clip for cable ...

Страница 303: ...ect Maintenance Install Ink after Replacing Head White and press Perform the work operation by following the on screen instructions TIPS When the white ink pouch runs low on its remaining volume of white ink the Install Ink after Replacing Head function can no longer get started Furthermore there may be cases where the pouch needs to be replaced with a new one during the installation process of wh...

Страница 304: ...uch into the cartridge until it clicks into place Straighten the ink pouch in such a manner that it will be aligned with the gutter of the lid of cartridge and mount in position by pulling it with your hand NOTE If the edge of the ink pouch is bent or undulating significantly make it straight with your hand X0049 29 Put the white ink pouch in its correct position and close the lid CAUTION Avoid to...

Страница 305: ...ar the provided gloves when performing this task When the remaining ink level becomes approximately 5 9 in 15 cm shake the cartridge with its cover open and with the edge of the ink pouch slightly winded to make the ink easier to stir X0194 White Ink Cartridge Ink pouch Edge of the rib Remaining ink volume should be approx 5 9 in 15 cm Shake 100 times for approx 50 seconds Swing distance should be...

Страница 306: ... pouch When opening the lid place the entire cartridge on a flat surface push the latches on the bottom surface of the cartridge downward and open the lid When setting the ink pouch avoid unevenness or wrinkles on the pouch When opening the lid be sure not to touch the portion a Otherwise it could be damaged NOTE If the remaining ink level is low hold the sagged part of the ink pouch and close the...

Страница 307: ...he head is replaced with a new one TIPS After the procedures are completed the current screen will go back to the standby mode screen 35 Adjust the carriage speed TIPS For details refer to 2 5 1 CR Carriage speed adjustment 36 Perform the V rating settings configuration TIPS For details refer to 2 5 2 V rating setting 37 Adjust the ejection timing of the print head TIPS For details refer to 2 5 3 ...

Страница 308: ...int heads follow the procedures indicated below 1 Place the print head removed from the carriage onto the nozzle protector attached to the new replacement 2 Attach fittings to the ink supply port on the removed print head 3 Lock the print head in place with the locking mechanism equipped on the nozzle protector and replace lid ...

Страница 309: ...ment Adjustment 4 Cover case with cushioning and place in box to be returned IMPORTANT Include print results of the confirmation flow for the head ink discharging defect leading to the head replacement within the return package ...

Страница 310: ...bly 1 Open the top cover of the main unit and remove the three screws of the encoder cover F to detach it 2 Loosen the two screws fixing the cover L 3 Remove the three screws fixing the cover L to detach it 4 Remove the three screws fixing the cover DBL to detach it Cover L Cover DBL 4 2 Cover L 2 3 1 ...

Страница 311: ...m of the maintenance unit from the Y joint 6 Detach the waste ink tube from the waste ink bottle Assembly 1 To perform the assembly take the reverse procedures to disassembly operation 2 The waste ink tube must be assembled without causing distortion or breakage Attach the tube stopper 2 5 ...

Страница 312: ...ink clot it is possible that the felt is broken when in replacement and the broken felt remains in the device Remove the ink clot before performing the work Disassembly 1 Remove the four screws fixing the cartridge cover B on the right rear of the main unit to detach it 2 Pull out the felts 2 Cartridge cover B 1 1 ...

Страница 313: ...sembly take the reverse procedures to disassembly operation 2 Insert the felt so that its end face enters under the latch of the cartridge base TIPS Below is a photo showing the part alone for explanation 3 Stand up the notch of the felt and insert it into the device 3 2 ...

Страница 314: ... a Otherwise it could be damaged Place the entire cartridge on a flat surface push the latches on the bottom surface of the cartridge downward and open the lid a X0222 2 Remove the ink level detection plate spring CAUTION Take care not to lose the ink level detection plate spring 3 Remove the ink level detection plate 1 while pressing the boss CAUTION Take care not to break the latch of the ink le...

Страница 315: ... cardboards or other thin plates into the left and right gear pressure plates Warp the rear end of the lid to detach the ribs so that they can get over the stepped portions of the stopper Then remove the lid by sliding it in the direction reverse to the normal direction IMPORTANT Avoid applying an excessive force when warping the lid Otherwise it could be damaged Ink level detection plate 2 Boss L...

Страница 316: ... up shaft from the left and right gear pressure plates Then detach the wind up spring from the rear of the cartridge 8 Detach the wind up spring from the wind up shaft Wind up shaft Wind up spring Wind up spring Gear pressure plate Wind up shaft Stepped portions of the stopper Side view Lid Cardboards or the like Warp ...

Страница 317: ...lock plate CAUTION Take care not to lose the lock plate spring 10 Remove the front and rear gear pressure springs 11 Remove the left and right gear pressure plates Gear pressure plate left Gear pressure plate right Gear pressure plate front Gear pressure plate rear Lock plate spring Lock plate ...

Страница 318: ...stall the left and right gear pressure plates to the cartridge ribs 3 Install the lock plate and install the lock plate spring CAUTION Correctly orient the lock plate spring when installing it OK NG Lock plate spring Front Rear Top Bottom Rear Bottom Top Front Top Top Front Front Rear Rear Bottom Bottom Gear pressure plate Gear pressure plate ...

Страница 319: ...gear pressure plates TIPS To install the wind up spring to the cartridge allow the wind up spring to warp so that it would protrude from the square opening to make the wind up spring hooked easier CAUTION Install the wind up shaft so that it is parallel to the cartridge Wind up spring Gear pressure plate Wind up shaft Hook ...

Страница 320: ...on But you can install the lid by simply sliding it CAUTION Install the lid so that its grooves engage with the ribs of the cartridge 6 Install the ink level detection plate spring CAUTION Correctly orient the ink level detection plate spring when installing it Ink level detection plate spring OK NG Ifnotcorrectly installed thehooks aretoofartoeasilyset theinkleveldetection platespring possibly re...

Страница 321: ...ouch the portions other than those to be measured Injuries When detaching or attaching the units and electric components and connecting or disconnecting the connectors be sure to use protective gloves to protect you from being injured by metal parts including heat sink or frame Cautions Before starting the operation check after replacement works be sure to recheck to see if respective parts are pr...

Страница 322: ...ircuit board SB5076 This circuit board serves to control the display of the printer status 3 Panel circuit board SB4746 This circuit board serves to control the input operation 4 LCD unit A63530 This unit serves to display the printer status Maintenance unit The following circuit boards are located at the left inside the main unit 5 Maintenance circuit board SB4700 This circuit board serves to con...

Страница 323: ...he main unit This motor serves to activate the carriage 5 Light emitting section of obstacle detection sensor SB5986 6 Light receiving section of obstacle detection sensor SB5986 These are located on the right and left sides of the platen opening section of the main unit They serve to detect obstacles on the platen 7 Platen origin sensor LG2239 This is located inside the platen driving section Thi...

Страница 324: ...t board is located inside the right of the rear of the main unit This serves to supply necessary power to respective components of the printer 4 Power unit SB5067 This unit is located inside the right of the rear of the main unit This is a power unit for the whole printer system 5 Power transformer SB5983 This device serves to produce standby power when turning off the power 6 AC cord insertion sl...

Страница 325: ... color head wiper 7 C cassette switch SB5988 This is a switch to detect the presence of color head wiper cleaner 8 C suction cap This is a cap to protect the color head from ink drying 9 W flow passage switching valve solenoid SB6232 x 7pcs This is a group of solenoid valves to switch the flow passages of white ink waste and cleaning solution 10 C flow passage switching valve solenoid SB6232 x 7pc...

Страница 326: ...ump motor SB5346 This is a motor to drive the pump to suck purge ink from the white head suction cap 5 W cleaner motor SB5346 This is a motor to drive the white head wiper cleaner 6 W wiper motor SB5346 This is a motor to drive the white head wiper 7 Temperature Humidity sensor LM9291 This is a sensor to measure the ambient temperature and humidity of the maintenance unit 8 Maintenance circuit boa...

Страница 327: ...ct the position of color side cleaner cam 3 C wiper cam sensor SB5196 This sensor serves to detect the position of color side wiper cam 4 W pump cam sensor SB5195 This sensor serves to detect the position of white side pump cam 5 W cleaner camp sensor SB5199 This sensor serves to detect the position of white side cleaner cam 6 W wiper cam sensor SB5197 This sensor serves to detect the position of ...

Страница 328: ...nting for LD801 LD3 36V_PLATEN LD1 31V_COLOR LD5 5V LD800 31V_WHITE LD4 24V LD801 HVDD 5V_WHITE CN27 PNL_USB CN35 USB CN36 ETHER CN37 USB F CN28 FAN CN22 JAM CN23 PRINT_SW CN24 PT_ORG CN19 SP CN18 SOFT_SW CN13 POWER3 CN16 INK_SEN_C CN5 INK_SEN_W CN6 HEAD_PW_C CN4 HEAD_S CN1 HEAD_PW_W CN15 POWER1 CN9 CR_MOT CN11 POWER2 CN12 VOL_CLIP CN14 PT_MOT CN21 MNT CN20 PANEL ...

Страница 329: ...6 138 Disassembly Replacement Adjustment Panel circuit board SB4746 LCD unit A63530 Panel control circuit board SB5076 CN2 PANEL USB CN4 TFT LCD CN5 KEY PCB CN3 POWER FFC PANEL BOTTN ...

Страница 330: ...ain power is switched off with the power switch and when power is cut by opening front cover LD1 ADD5V LD2 31 5V LD3 5V LD4 5V_SW LD5 6 5V 23V LD6 24V LD7 36V LD8 POWER ON F8 F9 PRIMARY FUSE HARNESS NOISE FILTER HARNESS FILTER GND WIRE CN15 COIL_IN CN14 SW_CTL CN13 PW_SW CN4 DC_IN CN3 MAIN_UART CN2 MNT CN1 POWER1 CN5 POWER2 CN6 POWER3 CN18 COVER_SW CN17 COIL_OUT HARNESS AC_POWER ...

Страница 331: ...ance sensor circuit board MAINTE C PUMP SENSOR PCB ASSY SB5194 MAINTE C WCLN SENSOR PCB ASSY SB5198 MAINTE C WIPE SENSOR PCB ASSY SB5196 MAINTE W PUMP SENSOR PCB ASSY SB5195 MAINTE W WCLN SENSOR PCB ASSY SB5199 MAINTE W WIPE SENSOR PCB ASSY SB5197 AC IN AC OUT CN101 AC IN CN602 P0V CN601 36V ...

Страница 332: ...stantly ON LD5 36V_C LD4 36V_W LD3 5V CN4 PUMP_MOT_W CN5 WIPE_MOT_W CN2 PUMP_ORG_W CN3 WIPE_ORG_W CN1 WCLN_ORG_W CN24 WCLN_ORG_C CN23 PUMP_ORG_C CN22 WIPE_ORG_C CN21 PUMP_MOT_C CN20 WIPE_MOT_C CN19 CIRC_MOT CN7 INK_SEN CN11 MNT_SOL_W CN15 MNT CN17 WCLN_MOT_C CN6 MNT_SEN CN8 WCLN_MOT_W CN12 MNT_SOL_C ...

Страница 333: ...stment Carriage circuit board SB4790 Encoder circuit board SB4793 HARNESS ENCODER HARNESS ENCODER RELAY HARNESS HEAD GROUND WIRE FFC HEAD WHITE POWER FFC HEAD SIGNAL FFC HEAD COLOR POWER CN1 WHITE HEAD CONNECTOR CN2 COLOR HEAD CONNECTOR ...

Страница 334: ...B ASSY SB5544 INK SENSOR C PCB ASSY SB5541 INK SENSOR Y PCB ASSY SB5540 INK SENSOR W12 PCB ASSY SB5543 INK SENSOR K PCB ASSY SB5539 INK SENSOR M PCB ASSY SB5542 CN7 Y SENS CN8 M SENS CN11 W34 SENS CN6 SPLY SOL HARNESS M SENSOR HARNESS Y SENSOR CN1 SECURE CN3 K SENS CN4 C SENS CN2 W12 SENS CN5 MNT HARNESS K SENSOR HARNESS C SENSOR ...

Страница 335: ...n the case that the main circuit board is replaced the firmware needs to be readjusted using GTX 4 Service Tool indicated in section 3 3 Disassembly 1 Remove the ink cartridge 2 Unplug the cables from the USB connector and LAN connector located on the front side if plugged 3 Remove the two screws of the panel side cover and slide the cover in the arrow direction to detach it 4 Disconnect the three...

Страница 336: ...3 screw 4 pcs M4 screw 2 pcs fixing the main circuit board 8 Slide the main circuit board rightward until the LAN and USB connector are disconnected from the box 9 Take out the main circuit board carefully so that it may not contact the lower panel cover 7 M3 M4 7 ...

Страница 337: ...ow to connect the FFC Please refer to 6 2 4 1 How to connect or disconnect FFC connector 4 For details of how to connect new connector JST PSI type please refer to 6 2 4 2 How to connect or disconnect new connector JST PSI type 5 Re adjust firmware according to the following procedures upon completing assembly Activate GTX 4 Service Tool and select in the sequence of Parts replacement processing N...

Страница 338: ...release the lock 2 Insert the FFC to the position where the FFC s electrode is hidden behind the connector 3 Insert the lock latches to lock the FFC connector CAUTION Take care to protect the FFC contact point metal surface from greasy dirt and being scratched Take care so that your fingers may not touch the FFC contact point metal surface Insert the latches on both sides of Black resin at the sam...

Страница 339: ...hanism and finger friendly type by low insertion force How to unhook 1 Press the A portion of the lock lever and unhook the latch located on the inside 2 Take out the socket housing from the base attached post How to insert 3 Orient the lock lever direction and insert the lever until it clicks 4 Check that there is no space between the socket and base 5 Gently pull the harness to check that it is ...

Страница 340: ...eadjusted Disassembly 1 With reference to 6 2 4 Replacement of main circuit board detach the panel side cover 2 Pushing the head of the lithium battery in the direction shown in the photo enables to remove the battery Assembly 1 To perform the assembly take the reverse procedures to disassembly operation 2 Re adjust firmware according to the following procedures upon completing assembly Activate G...

Страница 341: ... screws fixing the cover PB and detach the cover PB while lifting it 2 Remove the two screws fixing the cover DBR and slide down to detach it 3 Disconnect the seven connectors extending from the main circuit board and maintenance circuit board 4 Disconnect the connectors from the cover switch and AC inlet 5 Remove the five screws fixing the power circuit board plate assy to detach it Assembly 1 To...

Страница 342: ...transformer If LD5 is ON and lamps LD4 LD8 and LD7 are OFF power source circuit board If LD5 and LD4 are ON and LD8 does not respond to the ON OFF of power switch power source circuit board power switch If lamps LD5 LD4 and LD8 are ON while LD7 is OFF Power unit power source circuit board cover open switch DC power source harness If lamps LD4 LD5 LD7 and LD8 are ON while either of the lamps LD1 LD...

Страница 343: ...the case that the power is turned on press the power switch to turn off the power Unplug the power cord from the main unit and start the work after five or more minutes have passed Disassembly 1 Remove the two screws fixing the cover power unit to detach it 2 Disconnect all the three connectors connected to the power unit 3 Remove the four screws fixing the power unit to detach it 3 2 1 ...

Страница 344: ...ate assembly AC inlet fuse and power source transformer If LD5 is ON and lamps LD4 LD8 and LD7 are OFF power source circuit board If LD5 and LD4 are ON and LD8 does not respond to the ON OFF of power switch power source circuit board power switch If lamps LD5 LD4 and LD8 are ON while LD7 is OFF Power unit power source circuit board cover open switch DC power source harness If lamps LD4 LD5 LD7 and...

Страница 345: ... the main unit and start the work after five or more minutes have passed Disassembly 1 Disconnect all the connectors connected to the power circuit board If it is difficult to proceed with the work detach the cover power unit too 2 Disconnect the connector from the AC input of the power source unit 3 Remove the two screws connected to FG and the ground wires green yellow of the power circuit board...

Страница 346: ...ate assembly AC inlet fuse and power source transformer If LD5 is ON and lamps LD4 LD8 and LD7 are OFF power source circuit board If LD5 and LD4 are ON and LD8 does not respond to the ON OFF of power switch power source circuit board power switch If lamps LD5 LD4 and LD8 are ON while LD7 is OFF Power unit power source circuit board cover open switch DC power source harness If lamps LD4 LD5 LD7 and...

Страница 347: ...ork after five or more minutes have passed Disassembly 1 Remove the two screws fixing the cartridge cover located at the bottom of the right side of the main unit 2 Loosen the two screws fixing the cartridge cover located inside the cover UR 3 Lift up the portion marked below of the cartridge cover to detach it 4 Remove the two screws fixing the cord cover to detach it 4 Cord cover 1 Cartridge cov...

Страница 348: ...he cover DBR 6 Disconnect the relay connector and detach the AC inlet harness from the clamp 7 Remove the screw fixing the protective grounding connector from the AC inlet 8 Remove the two screws fixing the AC inlet to detach it Assembly 1 To perform the assembly take the reverse procedures to disassembly operation 8 7 6 ...

Страница 349: ...nce to 6 2 6 Replacement of power circuit board plate assy detach cover PB and cover DBR 2 Detach the mist fan filter located on either side of the cover UB 3 Remove the five screws fixing the cover UB to detach it 4 Remove the four screws fixing the cartridge cover B on the right rear of the main unit to detach it 5 With reference to 6 2 9 Replacement of AC inlet detach the cartridge cover 6 Remo...

Страница 350: ...ree screws of the encoder cover F to detach it 8 Remove the four screws on either side of the cover PF 9 Open the top cover of the main unit and loosen the two screws fixing the rear side of the cover PF to pull out it 10 Remove the four screws fixing the cover DR to detach it 10 9 8 8 Cover PF 7 ...

Страница 351: ...h the harness 12 Disconnect the six connectors extending from the main circuit board connected to the power circuit board 13 Detach the six harnesses from the two clamps and draw them toward the inside of the main unit 14 Draw the harness detached in step 13 toward the inside of the main unit 12 13 13 13 11 ...

Страница 352: ...6 Detach the harnesses from the clamp and bushing and draw them toward the inside of the main unit 17 Disconnect the relay connector of the mist fan 18 Detach the fan harnesses from all the clamps on the rear side of the main unit take them out from the bushing to draw toward the inside of the main unit 17 17 18 18 15 16 16 16 ...

Страница 353: ...or Disconnecting FFC connector disconnect the three FFCs from the main circuit board 21 Unhook the latch located on the rear of the main circuit board plate and open the core 22 Disconnect the four connectors shown below of the main circuit board 23 Detach the four harnesses from the clamp and draw them toward the inside of the main unit CN22 JAM CN24 PT_ORG CN9 CR_MOT CN14 PT_MOT 22 23 23 23 20 2...

Страница 354: ...embly Replacement Adjustment 24 Remove the four screws fixing the panel main unit assy and detach it from the main unit Assembly 1 To perform the assembly take the reverse procedures to disassembly operation 24 24 ...

Страница 355: ...ce to 6 2 10 Replacement of panel main unit assy remove the cover PB and cover DBR 2 Detach the connector harness of the power circuit board from the cord clamp and loosen the harness treatment 3 Disconnect only CN13 POWER SW among the power circuit board connectors 4 Open the cord clamp on the right inside the main unit and loosen the harness treatment 5 Draw the CN13 POWER SW harness toward the ...

Страница 356: ... 10 Remove the six screws located on the bottom of the panel unit 11 Slide the panel unit toward the front of the main unit and remove the screw fixing the USB ground wire to detach it 12 Turn the panel unit upside down counterclockwise 13 Open the two M clamps of the main circuit board plate and detach the three harnesses FAN MNT POWER1 from the panel unit 13 FAN MNT POWER1 13 12 11 USB ground wi...

Страница 357: ...nit 15 Separate the panel unit from the main unit 16 Open the three M clamps of the main circuit board plate and detach all the three harnesses 17 Remove the two screws of the main circuit board plate to detach it Assembly 1 To perform the assembly take the reverse procedures to disassembly operation 14 17 17 Main circuit board plate 16 ...

Страница 358: ...rence to step 1 to 17 described within Preparation for replacement of electric components inside panel unit remove the panel unit from the main unit 2 Turn the keytop of the print switch counterclockwise and remove it together with the diffuser 3 Detach the print switch harness from the three clamps 4 Release the lock lever stopper of the print switch main unit contact block 5 Shift the lock lever...

Страница 359: ... 6 Remove the lock nut fixing the operation unit of the print switch and detach the operation unit and rubber washer 7 Loosen the terminal screws of the contact block to detach the print switch harness 7 Lock nut Operation unit Rubber washer ...

Страница 360: ...ubber washer through the switch operation unit attach the unit on the start switch plate 6 With the TOP mark of the operation unit placed toward the front tighten the lock nut 7 Loosen the terminal screws of the contact block and connect the yellow and red wires of the print switch harness to its lamp side 8 Reverse the contact block and connect the brown and black wires to its switch side Yellow ...

Страница 361: ...the TOP mark of the operation unit 10 Shift the lock lever to the lock position to fix the contact block 11 Insert the lever stopper into the lock lever 12 Hook the harness on the three clamps of the main circuit board plate 13 After putting on the diffuser attach the keytop Unlock position Lock position Lever stopper 12 ...

Страница 362: ...e panel unit remove the panel unit from the main unit 2 Unhook the power switch harness hooked on the two clamps of the main circuit board plate 3 Pushing the power switch toward the front while pushing the latch of the power switch s body side makes it possible to remove the switch Assembly 1 To perform the assembly take the reverse procedures to disassembly operation 2 ...

Страница 363: ...acement of electric components inside panel unit remove the panel unit from the main unit to detach the main circuit board plate 2 Disconnect the FFC to the panel control circuit board 3 Remove the four screws of the panel circuit board to detach it Assembly 1 To perform the assembly take the reverse procedures to disassembly operation 3 3 2 ...

Страница 364: ...ssembly 1 With reference to 6 2 11 Preparation for replacement of electric components inside panel unit remove the panel unit from the main unit to detach the main circuit board plate 2 Disconnect the FFC and two harnesses from the panel circuit board 3 Unhook the latches of the three resin spacers fixing the circuit board to the extend that the circuit board cannot be completely detached 4 While ...

Страница 365: ... Disconnect the LCD panel s FPC from the FPC connector to detach the panel control circuit board Disconnecting FPC connector Draw the latches on both sides of Black resin at the same time as shown in the photo below to disconnect the FPC 5 FPC ...

Страница 366: ... point metal surface from greasy dirt and being scratched Take care so that your fingers may not touch the FPC contact point metal surface Push the latches on both sides of Black resin at the same time to release the lock At this time make sure that the FFC is properly inserted 2 Re adjust firmware according to the following procedures upon completing assembly Activate GTX 4 Service Tool and selec...

Страница 367: ... plate 3 With reference to 6 2 15 Replacement of panel control circuit board detach the panel control circuit board 4 Peel off the LCD panel sheet from the panel top cover to detach the LCD panel Assembly 1 Affix a form LCD on a new LCD panel 2 Attach the new LCD panel in the LCD attaching portion of the panel top cover 3 Peel off the protective sheet of the liquid crystal surface 4 Affix the LCD ...

Страница 368: ... components inside panel unit remove main circuit board plate 2 Loosen the two screws of the speaker installation plate of the main circuit board plate to detach the speaker Assembly 1 To perform the assembly take the reverse procedures to disassembly operation 2 The speaker SB2399 must be tilted at 45 toward the center line of the mounting screw 45 ...

Страница 369: ...o 6 2 9 Replacement of AC inlet detach cartridge cover and coat cover 3 Disconnect connectors from the cover switch harness of the power source circuit board 4 Draw the cover switch harness toward the inside of the main unit 5 From the bushing incorporated in the bottom left portion of the main unit draw the cover switch harness out of the main unit 6 Draw the cover switch harness out of the gap b...

Страница 370: ... detach cover switch assy from the main unit Assembly 1 Attach clamp to the cover switch harness in the orientation and position indicated within the illustration 2 Fix cover switch assy in the orientation indicated within the illustration using clamp and screw 3 To perform the assembly to the main unit take the reverse procedures to disassembly operation ...

Страница 371: ...it assy remove mist fan cover and cover UB 3 With reference to 6 2 4 Replacement of main circuit board detach the panel side cover 4 With reference to 6 2 4 1 How to connect or disconnect FFC connector Disconnecting FFC connector disconnect the three FFCs from the main circuit board 5 Unhook the latch of the core on the rear of the main circuit board plate and open the core to take out the three F...

Страница 372: ...op of the carriage circuit board 10 Detach the cord holder fixing the relay connector harness leading to the encoder 11 Disconnect the relay connector leading to the encoder 12 Remove the screw fixing the head ground wire to detach it 13 Disconnect the relay connectors extending from the color and white heads 14 Unhook the latches of the two FFC clamps located on the rear of the carriage circuit b...

Страница 373: ...16 Remove the five screws fixing the carriage circuit board to detach it 17 Disconnect the carriage circuit board s FFCs from the two bushings on the right rear inside the main unit to detach the circuit board 18 Disconnect the FFC from the two FFC support units and FFC sleeve to take out the carriage board FFC support FFC sleeve 17 16 15 ...

Страница 374: ... the FFC support with a new one 2 Put marks on the two positions indicating the dimensions below of the carriage board FFC 3 Fold the FFC perpendicularly at the 4 3 in 110 mm marked position 4 Use five screws to mount the carriage circuit board on the carriage circuit board bracket 5 Fix the FFC on the FFC clamp on the carriage circuit board bracket 6 Connect the relay connector leading to the enc...

Страница 375: ...hoto below and fix the FFC sleeve and FFC support on the two FFC clamps on the rear of the carriage circuit board bracket 9 8 in 250 mm Marking 11 Thread FFC through FFC clamp FFC sleeve 9 8 in 250 mm Marking FFC support a a 2 Nub of the FFC support to be located on plating Fix FFC clamp Orient protruding within FFC support to the left of the FFC clamp and fix FFC clamp Thread FFC through rear fro...

Страница 376: ...C as shown in the photo below and fix the FFC sleeve and FFC support on the two FFC clamps on the top rear inside the main unit Threading FFC to the rear end of the two FFC clamps Fold FFC Fix FFC clamp Fold back FFC clamp Thread FFC and fix using FFC clamp ...

Страница 377: ...rear of the main unit 14 Put the FFC through the bushings of the right top rear of the main unit and the right rear inside the main unit sequentially 15 Make the HEAD_PW_W FFC 16P formed as shown in the photo below 16 Make the HEAD_SIGNAL FFC 45P formed as shown in the photo below 0 04 to 0 08 in 1 to 2 mm 1 4 in 35 mm 0 04 to 0 08 in 1 to 2 mm 2 9 in 74 mm 13 14 ...

Страница 378: ...the right inside the main unit 18 Draw the FFC tip to the core on the rear of the main circuit board plate of the panel unit TIPS If the core latch cannot be unhooked insert the FFC sideways 19 Lock the core s latch to connect it to the FFC connector of the main circuit board 19 19 17 ...

Страница 379: ...k after five or more minutes have passed Disassembly 1 Open the top cover of the main unit 2 With reference to step 7 described within 6 2 10 Replacement of panel main unit assy remove encoder cover 3 Detach the two cord holders fixing the harness of the encoder circuit board 4 Disconnect the encoder relay connector TIPS While pressing down the latch at the A portion of the lock lever pull out the...

Страница 380: ...se two screws to temporarily fix the encoder circuit board 2 Align the end of the encoder circuit board to the edge of the carriage base adjust the position of the circuit board so that the encoder strip may not contact the encoder and then securely tighten the screws 3 Connect the encoder relay connector 4 Use the two cord holder to fix the encoder circuit board harness 2 4 3 5 ...

Страница 381: ...k cartridge 3 With reference to 6 2 4 Replacement of main circuit board detach the panel side cover 4 Disconnect the connector connected to the CN22 JAM of the main circuit board 5 Open the M shaped clamp to detach the harness 6 Open the cord clamp on the right inside the main unit and detach the harness 7 Detach the cord holder on the side surface of the carriage guide support on the right inside...

Страница 382: ... 13 Taking care not to damage the encoder strip remove the screw fixing the sensor bracket to detach the sensor emitting section 14 Remove the four screws fixing the sensor to detach it from the sensor bracket Assembly 1 To perform the assembly take the reverse procedures to disassembly operation Operation check after assembly 1 Select the Advanced Menu Input Check 2 Block out the light emitting o...

Страница 383: ...move one screw fixing the sensor holder 3 Detach the photo interrupter from the sensor holder 4 Detach the photo interrupter from the connector 5 Remove the screw fixing the sensor holder 6 Detach the photo interrupter from the sensor holder 7 Detach the photo interrupter from the connector Assembly 1 To perform the assembly take the reverse procedures to disassembly operation 5 Sensor holder Phot...

Страница 384: ... to step 7 described within 6 2 10 Replacement of panel main unit assy remove encoder cover 2 Loosen the two screws fixing the cover L 3 Remove the three screws fixing the cover L to detach it 4 Remove the two tabs of the drip proof cover to open it 5 Disconnect all the connectors of the maintenance circuit board 6 Detach the circuit board from the six resin spacers fixing it Assembly 1 To perform...

Страница 385: ...such as maintenance motor and maintenance sensor detach the maintenance unit from the main unit For details of disassembly and assembly please refer to 6 1 18 Replacement of maintenance unit In the case that the power is turned on press the power switch to turn off the power Unplug the power cord from the main unit and start the work after five or more minutes have passed ...

Страница 386: ...ide maintenance unit detach the maintenance unit from the main unit 2 Reverse the maintenance unit Replacement of pump motor and cleaner motor 1 Disconnect the connector of the motor to be replaced 2 Remove the two screws fixing the motor plate to detach the motor with the motor plate attached 3 Remove the two screws fixing the motor to detach it from the motor plate 2 1 3 ...

Страница 387: ...he motor plate use two screws to attach the motor on the motor plate 2 Taking care so that the motor side gear does not run on the gear of the main maintenance unit insert the shaft hole of the motor plate into the cam shaft 3 Use two screws to fix the motor plate 4 To perform the assembly after mounting the motor take the reverse procedures to disassembly operation ...

Страница 388: ...lacement of wiper motor 1 Disconnect the connector of the motor to be replaced 2 Remove the two screws fixing the wiper cam motor plate to detach the motor 3 Remove the two screws fixing the motor to detach it from the wiper cam motor plate 2 1 3 ...

Страница 389: ...unt the motor on the wiper cam motor plate 2 Taking care so that the motor side gear does not run on the gear of the main maintenance unit insert the shaft of the wiper cam motor plate into the gear 3 Use two screws to fix the wiper cam motor plate 4 To perform the assembly after mounting the motor take the reverse procedures to disassembly operation ...

Страница 390: ...six screws fixing the maintenance bottom plate to reverse the plate upside down 3 With reference to 6 2 25 Replacement of maintenance motor detach all six motors with the motor plates attached 4 Detach the tube from the clamp 5 Detach the waste ink tube from the waste ink tube bracket TIPS Turn the waste ink tube bracket to the left by 90 degree and detach it from the maintenance bottom plate Pull...

Страница 391: ...nt 6 With reference to steps 3 to 5 described within 6 2 26 Replacement of maintenance sensor circuit board detach maintenance circuit board while still attached to the maintenance circuit board bracket 7 Remove the maintenance bottom plate ...

Страница 392: ...ssemble it so that the boss located on the front of the main unit does not run on the main maintenance unit 4 As it is impossible to detect the introduction of the cleaning solution on the main unit side be sure to remove the rubber band or clip clogging the tube extending from the cleaning solution tank 5 After turning on the power be sure to perform head cleaning and print the nozzle check patte...

Страница 393: ...zers and detach the rear side of the sensor circuit board from the latch CAUTION Taking care not to break the latch perform the work 3 Detach the sensor circuit board from the hook fixing its front side Assembly of pump sensor 1 To perform the assembly take the reverse procedures to disassembly operation Connect to Maintenance circuit board CN2 Connect to Maintenance circuit board CN23 1 Tweezers ...

Страница 394: ... the cam notch to the sensor part 2 Loosen the screw fixing the sensor circuit board 3 Detach the sensor circuit board Assembly of wiper cleaner sensor 1 To perform the assembly take the reverse procedures to disassembly operation Connect to Maintenance circuit board CN1 Connect to Maintenance circuit board CN24 2 1 ...

Страница 395: ...the cam notch to the sensor part 2 Loosen the screw fixing the sensor circuit board 3 Detach the sensor circuit board Assembly of wiper sensor 1 To perform the assembly take the reverse procedures to disassembly operation Connect to Maintenance circuit board CN3 Connect to Maintenance circuit board CN22 2 1 ...

Страница 396: ...aste ink solenoid D Color bamboo spear cleaning solenoid E CMY cleaning solenoid F Black cleaning solenoid G Color bamboo spear air solenoid White ink K White bamboo spear waste ink solenoid L W1 to W3 waste ink solenoid M W4 waste ink solenoid N White bamboo spear cleaning solenoid P W1 to W3 cleaning solenoid R W4 cleaning solenoid S White bamboo spear air solenoid S M L K G C B A R P N F E D Id...

Страница 397: ...he maintenance unit and place it on a horizontal platform 3 With reference to 6 2 23 Replacement of maintenance circuit board disconnect all the connectors from the maintenance circuit board 4 Unhook the harness hooked on the clamps of the maintenance circuit board bracket and maintenance bottom plate 5 Remove the four screws fixing the maintenance circuit board bracket to detach the maintenance c...

Страница 398: ...e and detach the tube from the valve nipple Shown in the photo is valve A 7 Disconnect the relay connector of the target solenoid 8 Remove the screw fixing the target solenoid valve to detach the solenoid valve Assembly of solenoid valve A B C K L and M 1 To perform the assembly take the reverse procedures to disassembly operation Put a mark ...

Страница 399: ...et attached 2 Detach the tube once connected to the nipples on the bottom of the A and K valves so as to facilitate the subsequent work 3 After removing the two screws fixing the solenoid holders of solenoid valve A B C K L and M lift up the solenoid valve A B C K L and M with the solenoid holders attached taking care not to apply stress to the tube so as to allow access to the nipple to be replac...

Страница 400: ...e tube from the valve nipple Shown in the photo is solenoid valve R 5 Put the solenoid holders of solenoid valve A B C K L and M once back in place and use screws to fix the holders 6 Reset the whole maintenance unit face up 7 Disconnect the relay connector of the solenoid to be replaced 8 Remove the screw fixing the solenoid cover to detach it Put a mark ...

Страница 401: ...eplacement Adjustment 9 Remove the screw fixing the solenoid valve to be replaced to detach it Assembly of solenoid valve D E F G N P R and S 1 To perform the assembly take the reverse procedures to disassembly operation ...

Страница 402: ...nit and start the work after five or more minutes have passed Disassembly 1 Remove the three screws fixing the cover DBL to detach it 2 Take out the cleaning solution tank 3 Detach the photo interrupter from the connector 4 Unhook the latch of the photo interrupter from the sensor holder to detach the interrupter Assembly 1 To perform the assembly take the reverse procedures to disassembly operati...

Страница 403: ...e minutes have passed Disassembly 1 With reference to step 4 described within 6 2 10 Replacement of panel main unit assy remove cartridge cover B 2 Detach the four sub tank sensor harnesses from the sensor 3 Disconnect all the nine connectors connected to the ink supply circuit board 4 Remove the two screws fixing the ink supply circuit board to detach it Assembly 1 To perform the assembly take th...

Страница 404: ...in 6 2 10 Replacement of panel main unit assy remove cartridge cover B 2 With reference to steps 1 to 3 described within 6 2 9 Replacement of AC inlet detach the cartridge cover on the right side of the main unit 3 Disconnect the connector of the target remaining ink level detection circuit board 4 Detach the harness of the target remaining ink level detection circuit board 5 Remove the two screws...

Страница 405: ...e right rear inside the main unit to detach the tube 2 Disconnect the six connectors of the harness extending from the remaining level detection circuit board 3 Detach the circulation pump motor harness and the harness extending from the remaining level detection circuit board from the clamps 4 Loosen the two screws fixing the ink supply sub assy to detach it 2 2 3 4 Ink supply sub assy 1 ...

Страница 406: ...circuit board bracket and needle and then detach the needle 6 Remove the remaining level detection circuit board bracket 7 Remove the two screws fixing the remaining level detection circuit board to detach it Assembly of remaining ink level detection circuit board M C 1 To perform the assembly take the reverse procedures to disassembly operation 4 5 ...

Страница 407: ...f the target block to detach it 2 Take out the cartridge of the target block replace the white ink pouch with the capping pouch and then insert the ink cartridge into the main unit 3 Detach the joint coupling the needle and filter and put a cap on the joint so that the ink may not spill out Head fitting stopper SB5555 Joint 3 Cap 1 W34 W12 Filter support plate ...

Страница 408: ...d bracket and needle and then detach the needle 5 Remove the remaining level detection circuit board bracket of the target block 6 Remove the two screws fixing the remaining level detection circuit board to detach it Assembly of remaining ink level detection circuit board W12 W34 1 To perform the assembly take the reverse procedures to disassembly operation 6 4 ...

Страница 409: ...more minutes have passed Disassembly 1 With reference to step 4 described within 6 2 10 Replacement of panel main unit assy remove cartridge cover B 2 Remove sheet applied to the sensor section and unhook the latch of the target photo interrupter from the sensor holder to detach the interrupter 3 Detach the photo interrupter from the connector Assembly 1 To perform the assembly take the reverse pr...

Страница 410: ...f panel main unit assy remove cartridge cover B 2 Disconnect the relay connector of the target solenoid 3 Remove the two screws fixing the target solenoid to detach it 4 When replacing the iron core too remove it from the valve packing taking care not to break the packing Assembly 1 To perform the assembly take the reverse procedures to disassembly operation 2 Take care not to mistake the assembly...

Страница 411: ...eplacement of panel main unit assy remove cartridge cover B 2 After opening the cover open the tube clamp located at the following position of the right rear inside the main unit to detach the tube 3 Disconnect the six connectors of the harness extending from the remaining level detection circuit board 4 Detach the circulation pump motor harness and the harness extending from the remaining level d...

Страница 412: ...Adjustment 6 Disconnect the connector of the circulation pump motor 7 Remove the two screws fixing the circulation pump motor to detach it Assembly 1 To perform the assembly take the reverse procedures to disassembly operation 6 7 7 ...

Страница 413: ... 2 10 Replacement of panel main unit assy remove mist fan filter located on both sides of the cover UB along with the cover 3 Disconnect the fan relay connector to be replaced 4 Remove the two screws fixing the fan bracket to be replaced and replace the fan with the bracket attached 5 Remove the four screws fixing the fan motor to detach it Assembly 1 To perform the assembly take the reverse proce...

Страница 414: ...low the on screen message and turn off the power 3 With reference to 6 1 26 Replacement of cleaning solution tank drain the cleaning solution tank 4 Secure cleaning liquid tank ink cartridges and other parts with tape or other means to prevent disengaging during transportation After transportation 1 Turn on the power TIPS Then the head cleaning will be performed to prevent any ink from drying up 2...

Страница 415: ...f any error message is displayed on the screen follow the instructions When storing the printer for more than two weeks cleaning of the nozzle guard wiper and exhaust cap should be performed For details refer to 5 1 1 Cleaning the nozzle guard wiper exhaust cap and suction cap 7 2 1 When Not Using for a Long Period of Time within 2 weeks The printer can be used through normal procedure after the s...

Страница 416: ...ds of the Instruction Manual 5 If a non firing nozzle is found perform head cleaning and run the nozzle check pattern print and verify the result again TIPS For detailed procedures refer to 7 2 2 Head cleaning of the Instruction Manual 7 2 3 When Not Using for a Long Period of Time within 2 weeks with white ink pause mode The printer can be used through normal procedure after the storage period by...

Страница 417: ...below the proper level TIPS For detailed procedures refer to 6 2 2 Confirmation and replenishment of cleaning solution of the Instruction Manual 3 Print out a nozzle check pattern on the color side and verify the result TIPS Refer to 7 2 1 Print out of the nozzle check pattern checking on the print heads of the Instruction Manual For the White ink pause mode print the nozzle check patterns for the...

Страница 418: ...e connection state of the harness connector to connect between the panel circuit board and main circuit board 2 Check the power supply related connection of the panel circuit board and main circuit board respectively Electric components as candidate for replacement Panel USB harness Panel control harness Panel control circuit board and Main circuit board 1000 Cleaning Solution Low Add More The rem...

Страница 419: ...midity warranty for the best print result Turn up the humidity of the surrounding area of the printer 1065 Humidity too High The humidity level is higher than the scope covered by its humidity warranty for the best print result Turn down the humidity of the surrounding area of the printer 1070 Battery To Be Replaced The time for replacement of the lithium battery of the main circuit board approach...

Страница 420: ...ms to be checked 1 Check to see if the fan is locked due to foreign matter contamination such as mist 2 Restart the GTX and check the fan rotation and the presence of the related errors Electric components as candidate for replacement Fan Fan harness and Main circuit board 1401 After replacing the filter perform the ink installation In the process of cleaning the filter or immediately after cleani...

Страница 421: ...nk and complete the operation 1905 Exit Disable White Ink The white ink pause processing is not completed and the head and tube are not filled with white ink Complete the transition to the White Ink Pause mode or the return to the normal state 2000 Cartridge Not Set Black No black ink cartridge exists Insert a black ink cartridge Check to see if the same phenomenon occurs even when using a differe...

Страница 422: ...or and the harness connection 2021 No Ink Magenta The magenta ink pouch is empty Replace the magenta ink pouch with a new one Check the installation state of magenta ink cartridge remaining sensor and the harness connection 2022 No Ink Cyan The cyan ink pouch is empty Replace the cyan ink pouch with a new one Check the installation state of cyan ink cartridge remaining sensor and the harness conne...

Страница 423: ...hed to the cartridge 3 Check to see if the chip attached to the pouch or the base on which to install the chip deviate or come off Or check to see if the chip becomes dirty 4 Check to see if the pouch is refilled with ink 5 Insert any other pouch and check to see if any error occurs 6 Check to see if a clot of ink adheres to the surrounding area of the needle and remove it if any Electric componen...

Страница 424: ...35 Ink Pouch Error White 34 It refers to the failure in the W34 IC chip 2036 Machine Error It refers to the failure in the Main circuit board color IC chip Items to be checked 1 None In the case of immediately after replacing the main circuit board check the contact with the contact portion on the rear side of the main circuit board Electric components as candidate for replacement Main circuit boa...

Страница 425: ...0 Black Check the cartridge It refers to the failure in the K pouch winding Check to see if the pouch is properly wound Check for the movement of the cartridge winding shaft Make the pouch uniformly flatted to set it properly See 4 2 How to solve ink pouch wind up failure 2081 Magenta Check the cartridge It refers to the failure in the M pouch winding 2082 Cyan Check the cartridge It refers to the...

Страница 426: ... on the power the Receiving History menu is selected Press the OK button to release the error Read the section of 6 7 3 Performing the printing from receiving history in the instruction manual to understand the proper use of Receiving History menu 2120 Print Data Auto Delete Enable Under the state where the Auto Job Delete is enabled select the Receiving History menu is selected 2200 Maintenance P...

Страница 427: ... 34 cartridge Check to see if the same phenomenon occurs even when using a different white maintenance solution pouch 2300 special operational mode In the Setting special work mode menu within the Advanced menu the mode remains to be set to the special work mode In the Setting special work mode menu within the Advanced menu release the special work mode 2310 Perform test print for white and color ...

Страница 428: ...he PC The version of the firmware used in the GTX4 main unit and that of the software in the PC printer driver FileViewer etc are not compatible Update both the firmware and PC software to the newest versions 3004 PC Data Error When updating the firmware from the PC side a certain communication error occurs 1 Check to see if there is such device in the peripheral of the GTX that may generate a big...

Страница 429: ...ating the print data in the PC 2 If the print is canceled on the way during the period when the white ink pause mode is being changed to Disable redo the operation from scratch to complete it 3300 Print Button is disabled The Print button is being set to be disabled It is set to disable the relevant GTX print button automatically or respectively from the PC or server controlling the GTX It is requ...

Страница 430: ...ility with non PC host devices Please use highly reliable products of leading manufacturers Electric components as candidate for replacement Main circuit board 4101 USB flash drive Access Error It is an error of access to the USB flash drive 4103 USB flash drive Access Error It is an error of access to the USB flash drive 4104 USB flash drive Access Error It is an error of access to the USB flash ...

Страница 431: ...Reactivate the GTX and perform the restoring from the menu to check to see if such error occurs Electric components as candidate for replacement Panel USB harness Panel control harness Panel control circuit board and Main circuit board 5010 PC Data Error A timeout has occurred in receiving the print data at the time of receiving printing 1 There is a possibility that the receiving printing is cond...

Страница 432: ...o be checked 1 Check to see if there are strong noise generating object s in the surroundings 2 Reactivate the GTX to check to see if such error occurs Electric components as candidate for replacement Maintenance circuit board Maintenance control harness Maintenance communication harness and Main circuit board 5201 Machine Error It is a communication error between the main circuit board and the ma...

Страница 433: ...error 2 There is a possibility that this error occurred collaterally after any other error had occurred Acquire the log file and use the GTX4 Service Tool View the DataLog Check Operation to check to see if another error occurs before or after this error log 5240 Machine Error It is a communication error between the main circuit board and the maintenance circuit board Communication not established...

Страница 434: ... had occurred Acquire the log file and use the GTX4 Service Tool View the DataLog Check Operation to check to see if another error occurs before or after this error log 5302 Machine Error The error in communication with the main circuit board was detected by the maintenance unit color 5303 Machine Error The error in communication with the main circuit board was detected by the maintenance unit col...

Страница 435: ...d to the maintenance cam control occurred in the maintenance unit color 1 After reactivating the GTX wait and see the situation if it operates without any error 2 There is a possibility that this error occurred collaterally after any other error had occurred Acquire the log file and use the GTX4 Service Tool View the DataLog Check Operation to check to see if another error occurs before or after t...

Страница 436: ...erating object s in the surroundings 2 Reactivate the GTX to check to see if such error occurs 3 Check to see if the maintenance cam motor on the color side rotates when such error occurs 4 Check to see if any grease ink cleaning solution etc adhere to the peripheral of the maintenance C pump sensor assy 5 Check to see if any ink cleaning solution etc adhere to the maintenance circuit board Electr...

Страница 437: ...Items to be checked 1 Check to see if there are strong noise generating object s in the surroundings 2 Reactivate the GTX to check to see if such error occurs 3 Check to see if any grease ink cleaning solution etc adhere to the peripheral of the maintenance C cleaner sensor assy 4 Check to see if any ink cleaning solution etc adhere to the maintenance circuit board Electric components as candidate...

Страница 438: ... of the maintenance C wiper sensor assy 4 Check to see if any ink cleaning solution etc adhere to the maintenance circuit board Electric components as candidate for replacement Maintenance C wiper sensor assy and Maintenance circuit board 5343 Machine Error It is a wiper drive error caused by the maintenance unit color 5350 Machine Error It is an internal error related to firmware updating occurre...

Страница 439: ...ter any other error had occurred Acquire the log file and use the GTX4 Service Tool View the DataLog Check Operation to check to see if another error occurs before or after this error log 5357 Machine Error It is an error in the updated data occurred in the maintenance unit color when updating the firmware 1 Check to see if there is such device in the peripheral of the GTX that may generate a big ...

Страница 440: ... maintenance unit color when reading by ink sensor 5373 Machine Error It is a communication error caused by the maintenance unit color when reading by ink sensor 5374 Machine Error It is a communication error caused by the maintenance unit color when reading by ink sensor 5375 Machine Error It is a communication error caused by the maintenance unit color when reading by ink sensor 5376 Machine Err...

Страница 441: ...e unit white 5403 Machine Error The error in communication with the main circuit board was detected by the maintenance unit white 5404 Machine Error The error in communication with the main circuit board was detected by the maintenance unit white 5405 Machine Error The error in communication with the main circuit board was detected by the maintenance unit white 5406 Machine Error The error in comm...

Страница 442: ...d to the maintenance cam control occurred in the maintenance unit white 1 After reactivating the GTX wait and see the situation if it operates without any error 2 There is a possibility that this error occurred collaterally after any other error had occurred Acquire the log file and use the GTX4 Service Tool View the DataLog Check Operation to check to see if another error occurs before or after t...

Страница 443: ...erating object s in the surroundings 2 Reactivate the GTX to check to see if such error occurs 3 Check to see if the maintenance cam motor on the color side rotates when such error occurs 4 Check to see if any grease ink cleaning solution etc adhere to the peripheral of the maintenance C pump sensor assy 5 Check to see if any ink cleaning solution etc adhere to the maintenance circuit board Electr...

Страница 444: ...Items to be checked 1 Check to see if there are strong noise generating object s in the surroundings 2 Reactivate the GTX to check to see if such error occurs 3 Check to see if any grease ink cleaning solution etc adhere to the peripheral of the maintenance C cleaner sensor assy 4 Check to see if any ink cleaning solution etc adhere to the maintenance circuit board Electric components as candidate...

Страница 445: ... of the maintenance C wiper sensor assy 4 Check to see if any ink cleaning solution etc adhere to the maintenance circuit board Electric components as candidate for replacement Maintenance C wiper sensor assy and Maintenance circuit board 5443 Machine Error It is a wiper drive error caused by the maintenance unit white 5450 Machine Error It is an internal error related to firmware updating occurre...

Страница 446: ...ter any other error had occurred Acquire the log file and use the GTX4 Service Tool View the DataLog Check Operation to check to see if another error occurs before or after this error log 5457 Machine Error It is an error in the updated data occurred in the maintenance unit white when updating the firmware 1 Check to see if there is such device in the peripheral of the GTX that may generate a big ...

Страница 447: ...by ink sensor 5476 Machine Error It is a communication error caused by the maintenance unit white when reading by ink sensor Items to be checked 1 Check to see if there are strong noise generating object s in the surroundings 2 Reactivate the GTX to check to see if such error occurs Electric components as candidate for replacement Ink supply circuit board Ink control harness and Maintenance circui...

Страница 448: ...vice Tool View the DataLog Check Operation to check to see if another error occurs before or after this error log 5601 Machine Error It is an error of access to the IC chip 5602 Machine Error It is an error of access to the IC chip 5603 Machine Error It is an error of access to the IC chip 5801 Machine Error It is a communication error between the internal CPUs Items to be checked 1 Check to see i...

Страница 449: ...andidate for replacement Panel circuit board and Panel control circuit board 6032 Machine Error A panel button was pressed when in activation Print button 6033 Machine Error A panel button was pressed when in activation Cancel button 6034 Machine Error A panel button was pressed when in activation Back button 6035 Machine Error A panel button was pressed when in activation OK button 6036 Machine E...

Страница 450: ...r and move the carriage by hand to check to see if the locker is hooked Reactivate the power supply and check to see if any error occurs again Clean the carriage encoder and carriage roller Check to see if any ink cleaning solution etc adhere to the maintenance circuit board Check to see if the carriage locker rotates the maintenance cam to move up and down 6104 Machine Error The carriage does not...

Страница 451: ...nd carriage guide shaft Clean the carriage belt and pulley Clean the encoder strip Adjust the CR speed on the menu again Check the connectors of the head and carriage circuit board Replace the carriage motor Replace the encoder strip Replace the encoder circuit board Replace the carriage circuit board Replace the main circuit board 6107 Machine Error The carriage s reverse driving has been detecte...

Страница 452: ...e to the maintenance circuit board Check to see if the carriage locker rotates the maintenance cam to move up and down Check to see if the carriage sliding becomes heavy Check to see if the flushing foam case or the cap foam and cap surroundings are dismounted and contact the head 6119 Machine Error The watchdog was detected by the carriage Items to be checked 1 Check to see if there are strong no...

Страница 453: ...nu again Check to see if the carriage locker rotates the maintenance cam to move up and down Replace the carriage motor Replace the encoder strip Replace the encoder circuit board Replace the carriage circuit board Replace the main circuit board 6133 Machine Error It is an error of adjustment in carriage speed Reverse Clean the ink mist adhered inside the printer carriage roller roller guide and c...

Страница 454: ...the head connector 2 Clean the carriage surroundings carriage belt pulley and encoder strip 3 After making the color white head connection crossed reactivate the device and replace the head if the error 6230 appears Electric components as candidate for replacement Carriage circuit board and Main circuit board 6240 Machine Error It refers to FFC failure in the color heads Items to be checked 1 Chec...

Страница 455: ...is error occurred collaterally after any other error had occurred Acquire the log file and use the GTX4 Service Tool View the DataLog Check Operation to check to see if another error occurs before or after this error log 7012 Machine Error It is an internal error Time out in waiting for receiving the event 7013 Machine Error It is an internal error Common program error 7015 Machine Error It is an ...

Страница 456: ...9 1 9 Block diagram Control circuitry ...

Страница 457: ...onmental requirements Operation assurance range Environmental range where the printer can be operated Temperature 10 to 35 C 50 to 95 F Humidity 20 to 85 No condensation should occur Printing guaranteed range Environmental range where sufficient printing quality can be secured Temperature 18 to 30 C 64 4 to 86 F Humidity 35 to 85 No condensation should occur Keeping your printer Temperature 0 to 4...

Страница 458: ...AT32 formatted USB memory of which storage capacity is 2 GB to 32 GB in total and a USB memory without security functions such as password lock function Min operating environment CPU with 2 GHz or above RAM with 4 GB or above Display resolution XGA 1024 x 768 or higher Recommended application software for high level image editing CorelDRAW X7 X8 Adobe Photoshop CS6 CC Adobe Illustrator CS6 CC and ...

Страница 459: ...ure 0 to 40 C 32 to 104 F Cautions for storage Store them in a place where they are not exposed to direct sunlight Keep them out of the reach of children Store them away from fire heat and oxidized substance Content 500 cc External dimensions in transport condition 2 piece set 20 4 in width x 5 0 in depth x 3 7 in height 518 mm width x 126 mm depth x 93 mm height 12 piece set 21 2 in width x 10 9 ...

Страница 460: ...ght 480 mm width x 340 mm depth x 345 mm height 10 3 4 Pretreatment Name Pretreatment Use expiration date Expiration date on the outer case supposing storage at normal temperature Storage temperature 0 to 40 C 32 to 104 F Cautions for storage Store them in a place where they are not exposed to direct sunlight Keep them out of the reach of children Store them away from fire heat and oxidized substa...

Страница 461: ...et 16X18 SB6995 Yellow ink pouch 200 cc GCX 4Y20 Adult platen X SB6996 500 cc GCX 4Y50 14 x16 356 x 406 mm White ink pouch 500 cc 2 piece set GCX 4W50 Platen sheet 14X16 SB6667 Cleaning solution 1 9 kg 4 2 lb GCX 4E02 Youth platen X SB6998 Pretreatment 5 kg 11 lb GCX 4P05 10 x12 254 x 305 mm 20 kg 44 lb GCX 4P20 Platen sheet 10X12 SB6999 Maintenance solution pouch 700 cc GCX 4S70 Baby platen X SB7...

Страница 462: ...10 6 Specifications X0171 Pretreatment roller Bottle ASSY Waste ink tank Full maintenance kit Wiper cleaner Clean stick R Fan filter Flushing foam Print head Tweezers Cleaning cup Grease Wiper Filter ...

Страница 463: ...Appendix Setup Manual ...

Страница 464: ...ead this manual before using this product Keep this manual in a safe place for future use Please be sure to read SAFETY INSTRUCTIONS before use Installation 1 Setup of the printer 5 Connection to a PC 17 Adjustment 23 Maintenance list 26 Table of contents ...

Страница 465: ...serious injury CAUTION The instructions which follow this term indicate situations where failure to follow the instructions may result in minor or moderate injury IMPORTANT The instructions which follow this term indicate situations where failure to follow the instructions may result in damage to property NOTE The instructions which follow this term indicate precautions and restrictions for use Sy...

Страница 466: ...re cords Otherwise it may cause fire or electric shocks Printing If a foreign object gets inside the printer immediately turn off the power disconnect the power cord and contact the place of purchase or a qualified technician If you continue to use the printer while there is a foreign object inside it may result in fire or electric shocks or problems with correct operation Do not allow the printer...

Страница 467: ... not place the printer on a shaky table or high shelf or other unstable location Otherwise it may tip over or fall down and cause injury Furthermore the table that supports the printer should be at least 35 4 in 90 cm in width and 23 6 in 60 cm in depth and should be able to bear a weight of 150 kg 330 lb or more Do not set up the printer in a place where it will be affected by vibration Otherwise...

Страница 468: ... technician Maintenance Be careful not to get your fingers caught when closing the front cover otherwise it may result in injury to your fingers When you mount or replace the head be careful not to get your hands or fingers caught Otherwise you may be injured Do not disassemble the ink pouch If the ink gets into your eyes or onto your skin it may cause inflammation In case of contact with eyes do ...

Страница 469: ...nd avoid placing any objects The platen may be hit and damaged NOTE Use the printer in an area which is free from sources of strong electrical noise such as electrical line noise or static electric noise Sources of strong electrical noise may cause problems with correct operation Any fluctuations in the power supply voltage should be within 10 of the rated voltage for the printer Voltage fluctuati...

Страница 470: ...or your work When the label is peeled off or illegible contact the place of purchase 1 4 5 6 7 2 3 X0028 Pretreatment 5 kg 11 lb Waste ink tank Pretreatment 20 kg 44 lb Ink pouch Maintenance solution pouch Grease 9 1 3 3 8 8 8 8 11 10 7 6 5 4 2 Cleaning solution Watch your fingers or you may be injured High temperature warning display ...

Страница 471: ...nd other countries The official name of Windows 7 is Microsoft Windows 7 operating system represented as Windows 7 in this manual The official name of Windows 8 1 is Microsoft Windows 8 1 operating system represented as Windows 8 1 in this manual The official name of Windows 10 is Microsoft Windows 10 operating system represented as Windows 10 in this manual Microsoft Windows 7 Windows 8 1 and Win...

Страница 472: ... by pulling out the holder in the direction of the arrow 3 Pickup the Lithium Battery 1 to the direction of the arrow 1 1 1 Note based on California law USA on the use and handling of Perchlorate This product contains a CR Coin Lithium Battery which contains Perchlorate Material special handling may apply See http www dtsc ca gov hazardouswaste perchlorate ...

Страница 473: ...ower Consumptions Single phase 100 240 V 50 60 Hz 0 8 A Actual value 1 Environmental range where the printer can be operated 2 Environmental range where sufficient printing quality can be secured X0155 12 5 in 31 8 cm 16 7 in 42 3 cm 34 1 in 86 7 cm 1 3 in 33 mm X0001 Exhaust opening 23 6 in 60 cm or more Exhaust 106 3 in 270 cm or more 39 4 in 100 cm or more 39 4 in 100 cm or more 15 8 in 40 cm o...

Страница 474: ...hausted toward the rear side keep 7 9 in 20 cm or more space from the exhaust opening Situate the main body ahead of the table on the left so that the waste ink tube is not placed horizontally See P 6 Waste ink tank The table that supports the printer should be at least 35 4 in 90 cm in width and 23 6 in 60 cm in depth and should be able to bear a weight of 150 kg 330 lb or more The tabletop shoul...

Страница 475: ...aner for cleaning the maintenance unit x 4 k Carriage fixing pin l Tweezers Flushing receiver x 2 Flushing foam x 2 A Waste ink tank S Waste ink tube fixing rubber The rubber is already attached to the waste ink tube of the machine D Print head x 2 F Rear cover installation screw x 2 Screws are already fixed with the machine G Rear cover H Adult platen J Setup Manual this manual X0002 ...

Страница 476: ...ing white ink and using only color inks then prepare a maintenance solution pouch instead of a white ink pouch CAUTION The printer machine weighs 120 kg 265 lb When transporting or installing the printer make sure that it is held by four or more persons as illustrated above Otherwise the machine may fall down causing injury or resulting in failure of the printer X0003 Transporting the printer 3 ...

Страница 477: ...ding to the following procedures Please note that the platen should be mounted after turning on the power Rear cover CAUTION Be careful not to touch the claws of mounting portion on the upper side of the rear cover Otherwise you may be injured X0004 X0005 Removing the protection materials 1 X0014 Mounting the supplied accessories 2 ...

Страница 478: ...ink tube fixing rubber IMPORTANT The waste ink tube contained in the waste ink tank should be cut down to around 1 6 to 2 in 4 to 5 cm remaining just inside the tank Avoid placing the waste ink tube horizontally as much as possible and be sure not to let it bend Otherwise the waste ink may have difficulty flowing through the tube TIPS Install the waste ink tank in the front because it must be empt...

Страница 479: ...n either side IMPORTANT Make sure that no flushing foam extends off the outboard end portions of the flushing receiver If it does it may interfere with the nozzle surface of the head and may result in a problem concerning firing of the print heads Carriage fixing pin TIPS The carriage fixing pin will be needed when the power is turned OFF due to power outage while the printer is running and the re...

Страница 480: ...s Use the cleaner by expiration date written on the label Mount it on the machine immediately after it is unpacked Insert the shaft a and push the area with the PUSH indication until it clicks there is no difference in white and color sides they can be mounted on either side X0120 a X0008 ...

Страница 481: ...age toward the center of the printer to the position above the platen If you perform the mounting of the head when the carriage is directly above the maintenance unit it may damage the maintenance unit or the heads TIPS The gray area a illustrated above may be hard and difficult to remove If it is use both hands to remove it 2 Insert the head firmly to direction a CAUTION When mounting the head be...

Страница 482: ...ce in the direction as indicated in s so that the c area makes contact with the side of the metal plate of the head mount it in a similar way for the white or color side CAUTION When you mount d hold it down from the top Otherwise your finger may be pinched and injured 4 Remove the resin cover d by releasing two claws and as illustrated above connect the flat cable in such a way as not to become e...

Страница 483: ...cover to mount the cover 6 Remove four caps of the head Check that the head and the marker of each tube are matched and connect the tubes one by one from back to front of the machine by rotating the nut until it stops IMPORTANT Do not rotate the nut as illustrated in f It could disconnect the tube and leak the contained ink Be sure to remove the caps attached to the head before connecting M4 4 3 2...

Страница 484: ...es an error and disables printing Install the ink pouches into cartridges by referring to the illustrations on the label located on the ink bay cover of the machine TIPS If you are not using white ink and using only color inks for printing install a maintenance solution pouch instead of a white ink pouch referring to the procedures from step 2 1 Since there is a component within the white ink whic...

Страница 485: ... a flat surface push the latches on the bottom surface of the cartridge downward and open the lid 4 Push the tip of the ink pouch in until it clicks Straighten the ink pouch so that it can fit the grooves of the ink cartridge lid and mount it while pulling it by hand TIPS If the edge of the ink pouch is bent or undulating significantly make it straight with your hand X0017 a X0178 ...

Страница 486: ... may be injured 6 Stick the expiration date seal supplied with the ink pouch on the front side of the ink cartridge and install the cartridge into the printer matching it to the corresponding color slot TIPS If you are using only color inks set a maintenance solution pouch to the position W12 and W34 K Y C M W12 W34 X0018 X0124 c a b ...

Страница 487: ...allation may be displayed on the screen of the printer but it will be no problem so please continue to perform the ink installation according to the procedures described in this manual 1 Press on the operation panel to move the platen to the front 2 Rotate the platen height adjustment lever in direction a and align the scale to position A Mounting the platen 6 X0029 X0030 b a X0019 Turning on the ...

Страница 488: ...the printer and perform the operation while the printer is in Standby mode 1 Maintenance Initial Ink Installation All Print Heads TIPS If you are using only color inks perform the following procedures Maintenance White Ink Pause Mode Enable Then follow the message and perform ink installation 2 Follow the precautions on the screen and press It takes about 50 minutes 3 When the printer returns to S...

Страница 489: ...creen appears the driver is automatically installed through the steps of Skip obtaining driver software from Windows Update Yes TIPS This screen may prompt more than once And this also may require several minutes to complete We recommend you to set Brother GTX 4 or Brother GTX 4 FileOutput as the default printer for your convenience TIPS Although the description of this section is based on operati...

Страница 490: ...m administrator of the setting site The static IP address can also be set on the printer For details refer to the Instruction Manual 1 Perform the procedures of P 17 When connecting via USB 2 Start menu Brother GTX 4 Tools Activate GTX 4 Maintenance 3 Select IP Address Set Next 4 Select the setting method Next When connecting via LAN 2 B ...

Страница 491: ... Mask Default Gateway Next The steps are completed when the message IP address was successfully assigned to the Printer is displayed In the case of auto acquisition 5 Enter the hostname Next The steps are completed when the message IP address was successfully assigned to the Printer is displayed ...

Страница 492: ...ndows 10 Settings Device Devices and Printers 3 Click on Add a printer 4 Windows 7 Click on Add a local printer Windows 8 1 The printer that I want isn t listed Select Add a local printer or network printer with manual settings Next Windows 10 The printer that I want isn t listed Select Add a local printer or network printer with manual settings Next 5 Select Create a new port From Type of port se...

Страница 493: ...ting Confirm network setting IP Address from the menu For details refer to 8 18 Confirm network setting in the Instruction Manual If you are using a DNS server you can use a host name and domain name instead of the IP address In that case enter the host name that has been acquired automatically and set for the printer IP address see P 19 As for the domain name check with your network administrator...

Страница 494: ...staller depending on the bits of Windows you use OK Next 11 Select Replace the current driver Next 12 Enter the Printer name Next 13 When the next screen appears select Do not share this printer Next 14 When necessary select Set as the default printer Finish ...

Страница 495: ...es 2 When the printer stops with a sound and the printer returns to Standby mode the operation is completed 1 Make sure that the platen height adjustment lever a is set at the A position TIPS Use a platen sized 14 in x 16 in 356 mm x 406 mm which is included at the time of your purchase Adjusting the carriage speed 1 Checking the nozzle check pattern 2 X0154 a ...

Страница 496: ...s also acceptable 5 Test Print Nozzle Check White 6 Check the printed results for both nozzle check prints and determine if there is a problem If missing nozzles are found as indicated by the arrows below there is a problem concerning the firing of the print heads TIPS Even if the lines of the white side printed result are light since white ink is fired from more than one nozzle on the same place ...

Страница 497: ...Menu name Things to prepare 1 V rating s settings 1 2 Firing Adjustment Black paper or transparent sheet such as OHP sheet White paper 3 Platen Rolling Adjustment White paper 4 White Color Alignment Pretreated black or dark color T shirt 5 Setting of the time displayed on the nozzle check pattern 1 In V rating s settings set the values written on the print head or the container 4 When the screen g...

Страница 498: ...ment of cleaning solution Daily agitation of the white ink Print out of the nozzle check pattern checking on the print heads When an error warning is displayed Replacement of ink pouch with a new one Cleaning of the nozzle guard wiper exhaust cap and suction cap Replacing the wiper cleaner Replacing the flushing foam Replacing the fan filter When the printer becomes dirty Head cleaning White ink c...

Страница 499: ...jizoyama Noda cho Kariya 448 0803 Japan 2017 2018 Brother Industries Ltd All Rights Reserved Please note that the contents of this manual may differ slightly from the actual product purchased as a result of product improvements This is the original instructions ...

Страница 500: ...htly from the actual product purchased as a result of product improvements http www brother com 1 5 Kitajizoyama Noda cho Kariya 448 0803 Japan 2017 2018 Brother Industries Ltd All Rights Reserved This is the original instructions GTX 422 I8031213F E 2018 03 F 1 ...

Отзывы: