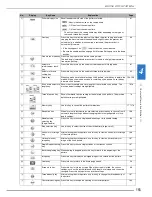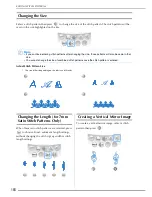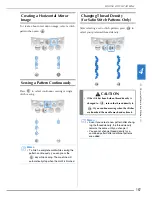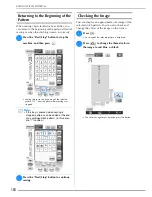
background image

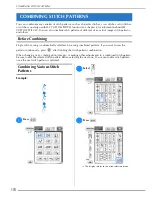
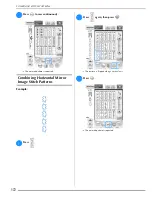
COMBINING STITCH PATTERNS

C

h

ar

ac

te

r/D
ec

o

ra

tiv
e S

titc
he
s

171

4

d

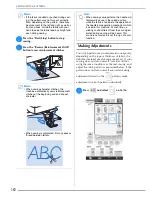
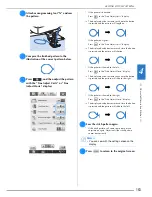
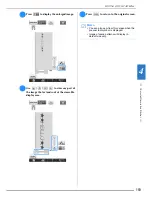
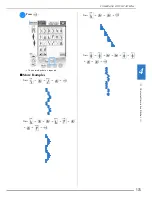
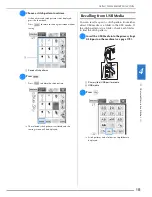
Press .

e

Select .

f

Press 

 to sew the pattern continuously.

g

Press .

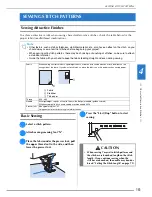
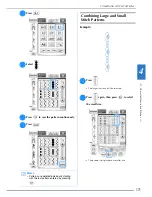
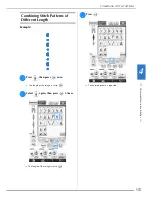
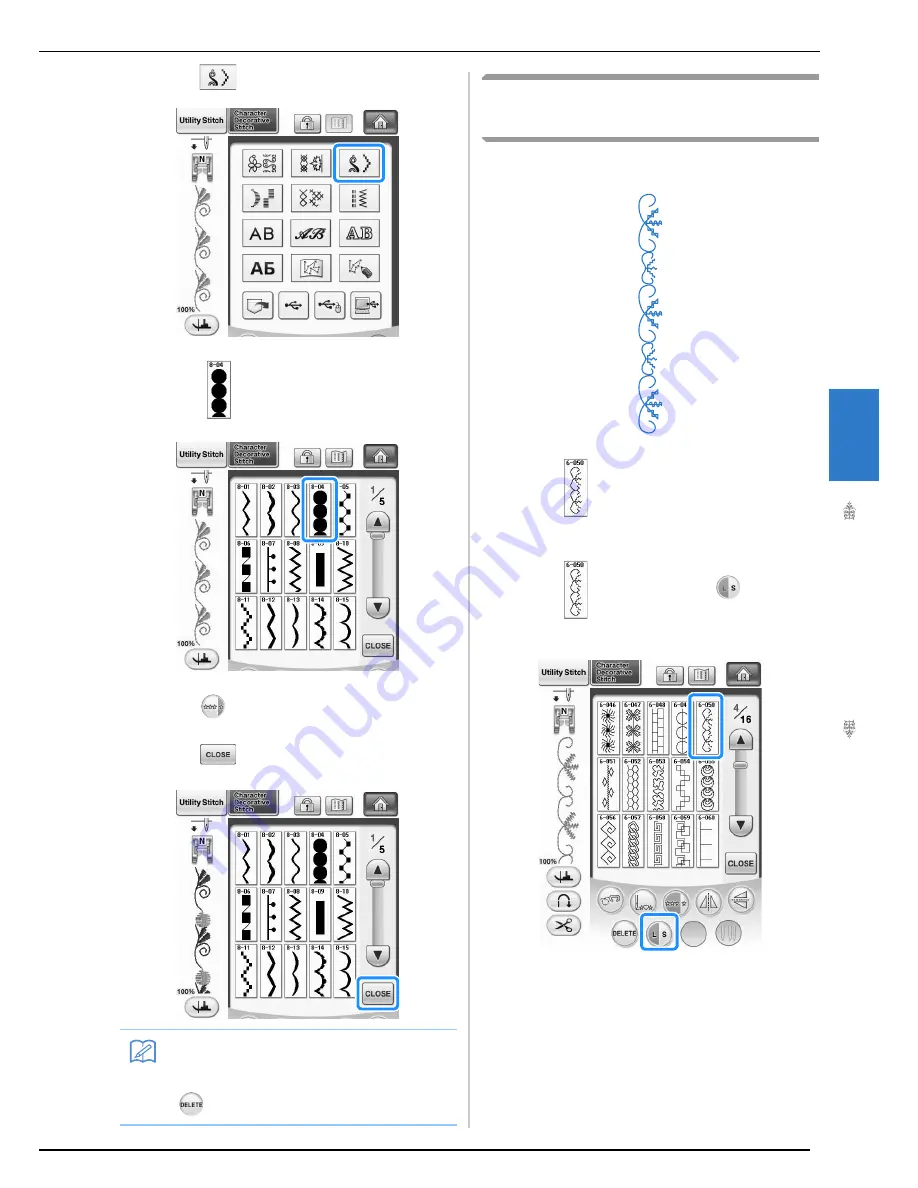
Combining Large and Small 
Stitch Patterns 

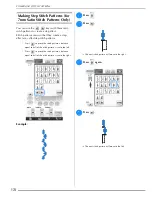
Example:

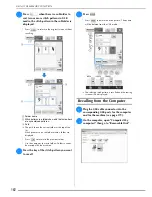
a

Press .

The large size stitch will be selected.

b

Press 

 again, then press 

 to select 

the small size.

The pattern is displayed in a smaller size.

Memo

• Patterns are deleted individually starting 

with the last pattern entered by pressing 

.

Содержание 882-W04

Страница 1: ...Please visit us at http solutions brother com where you can get product support and answers to frequently asked questions FAQs Operation Manual Embroidery and Sewing Machine Product Code 882 W04 W05 ...

Страница 2: ...ose are disclaimed In no event shall Intel or contributors be liable for any direct indirect incidental special exemplary or consequential damages including but not limited to procurement of substitute goods or services loss of use data or profits or business interruption however caused and on any theory of liability whether in contract strict liability or tort including negligence or otherwise ar...

Страница 3: ...orking properly if it has been dropped or damaged or water is spilled on the unit Return the machine to the nearest authorized dealer for examination repair electrical or mechanical adjustment While the machine is stored or in use if you notice anything unusual such as an odor heat discoloration or deformation stop using the machine immediately and unplug the power cord When transporting the sewin...

Страница 4: ...ver be used Always consult the operation manual when replacing or installing any assemblies the presser feet needle or other parts to assure correct installation 8For repair or adjustment If the light unit is damaged it must be replaced by an authorized dealer In the event a malfunction occurs or adjustment is required first follow the troubleshooting table in the back of the operation manual to i...

Страница 5: ...uipment generates uses and can radiate radio frequency energy and if not installed and used in accordance with the instructions may cause harmful interference to radio communications However there is no guarantee that interference will not occur in a particular installation If this equipment does cause harmful interference to radio or television reception which can be determined by turning the equ...

Страница 6: ...de cutter Be sure to observe the precaution Label location CAUTION When using the side cutter sew between low and mid speed and do not touch the knives or operation lever of the side cutter while sewing to avoid equipment damage or injury a Guide plate lower knife b Upper knife c Operation lever ...

Страница 7: ...IMPORTANT SAFETY INSTRUCTIONS 5 ...

Страница 8: ...nged while the desired thread density is maintained With this function the pattern will be enlarged or reduced at a larger ratio than with normal pattern resizing See Changing the Pattern Size While Maintaining the Desired Thread Density Stitch Recalculator on page 270 Expand Your Creativity With Bobbin Work Example with decorative stitches You can create bobbin work which gives a three dimensiona...

Страница 9: ...idery pattern Specify colors and sewing settings as you desire Compose embroidery from children s drawings or of your signature to add to your original artwork This is a function that everyone will enjoy using The included pen tablet makes this function even easier to use Refer to the instruction manual PDF format stored in the My Custom Design CD Easily Perform My Custom Design Operations With th...

Страница 10: ...tive Stitches The variety of stitches widen your creativity Chapter 3 Page 89 Chapter 4 Page 155 Embroidery Maximum 30 cm 20 cm approx 12 8 inches for large embroidery designs Embroidery Edit Designs can be combined rotated or enlarged Chapter 5 Page 185 Chapter 6 Page 263 How to Create Bobbin Work To learn how to create bobbin work My Custom Stitch Create original decorative stitches Chapter 7 Pa...

Страница 11: ...n to Chapter 6 Embroidery Edit for an explanation about the embroidery edit functions In the screens appearing in the step by step instructions the parts referred to in the operations are marked with Compare the screen in the directions with the actual screen and carry out the operation If while using the machine you experience something you do not understand or there is a function you would like ...

Страница 12: ...tic Presser Foot Pressure 85 Needle Position Stitch Placement 86 Locking the Screen 86 Checking the Needle Location in the Screen 87 Chapter 3 Utility Stitches 89 SELECTING UTILITY STITCHES 90 Selecting a Stitch 91 Saving Your Stitch Settings 92 SEWING THE STITCHES 94 Straight Stitches 94 Dart Seam 99 Gathering 99 Flat Fell Seam 100 Pintuck 101 Zigzag Stitches 102 Elastic Zigzag Stitches 104 Overc...

Страница 13: ...Mirror Image 243 Changing the Density Alphabet Character and Frame Patterns Only 244 Changing the Colors of Alphabet Character Patterns 245 Embroidering Linked Characters 245 Uninterrupted Embroidering Using a Single Color 248 USING THE MEMORY FUNCTION 249 Embroidery Data Precautions 249 Saving Embroidery Patterns in the Machine s Memory 251 Saving Embroidery Patterns to USB Media 252 Saving Embro...

Страница 14: ...the machine 338 Cleaning the LCD Screen 338 Cleaning the Machine Casing 338 Cleaning the Race 338 Cleaning the Cutter in the Bobbin Case Area 340 About the Maintenance Message 341 ADJUSTING THE SCREEN 342 Adjusting the Brightness of the Screen Display 342 Touch Panel is Malfunctioning 342 TROUBLESHOOTING 343 ERROR MESSAGES 348 SPECIFICATIONS 356 UPGRADING YOUR MACHINE S SOFTWARE 357 Upgrade Proced...

Страница 15: ...he accessory compartment of the flat bed attachment When sewing cylindrical pieces remove the flat bed attachment page 16 m Thread cutter Pass the threads through the thread cutter to cut them page 59 n Thread guide plate Pass the thread around the thread guide plate when threading upper thread page 57 Right side Rear View a Handle Carry the sewing machine by its handle when transporting the machi...

Страница 16: ...e plate cover to clean the race page 97 219 h Needle plate The needle plate is marked with guides to help sew straight seams page 96 i Needle bar thread guide Pass the upper thread through the needle bar thread guide page 57 j Needle clamp screw Use the needle clamp screw to hold the needle in place page 66 Measurements on the needle plate bobbin cover with mark and needle plate cover The measurem...

Страница 17: ...matically For straight and zigzag stitch patterns that take reverse stitches the machine will sew reverse stitches at low speed only while holding down the Reverse Reinforcement Stitch button the stitches are sewn in the opposite direction c Needle Position button Use this button when changing sewing direction or for detailed sewing in small areas Press this button to raise or lower the needle pos...

Страница 18: ...y case lid to align the notches in the lid with the notches in the bars b Place the lid on top of the case so that the notches in the lid align with the tabs on the case and then slide the bar on each side back to the center of the accessory case a Bars Using the Accessory Trays Two presser foot storage trays are stored in the included accessory case One is for presser feet for utility sewing and ...

Страница 19: ...rying case To open the embroidery unit carrying case raise each lock and move the latches out of position To re hook the latches and securely close the case position the latch on the catch of the unit lid and lower the lock till it snaps a Latches Included Accessories See table on the next page about included accessories Memo Placing bobbin clips on bobbins helps pre vent the thread from unwinding...

Страница 20: ...8 19 20 21 22 23 24 25 26 27 28 29 30 31 32 33 34 35 36 37 38 39 40 41 42 43 44 45 46 47 48 49 50 51 52 Included Accessories 44 47 are contained in the embroidery unit carrying case 75 11 2 needles 90 14 2 needles 90 14 2 needles Ball point needle gold colored 2 0 11 needle 75 11 2 needles ...

Страница 21: ...bin clip 10 XE3060 001 32 Spool felt X57045 051 33 Spool net 2 XA5523 050 34 Embroidery needle plate cover XE5131 001 35 Touch pen stylus XA9940 051 36 Knee lifter SA599 KL1 XE5902 001 37 USB cable XD0745 051 38 Alternate bobbin case no color on the screw XC8167 551 39 Bobbin case gray for bobbin work XE8298 001 40 Straight stitch needle plate XE4908 301 41 Cord guide bobbin cover with single hole...

Страница 22: ...thers 1 Border embroidery frame H 30 cm W 10 cm H 12 inches W 4 inches with Kit 3 upgrade SABF6000D2 NV1UGK3 2 Border embroidery frame set H 18 cm W 10 cm H 7 inches W 4 inches SABF6000D BF2 XE5059 001 3 10 spool stand SA560 TS4 XE5065 101 4 Wide table and free motion grip SATFM6000D TFM 3 XE5062 001 5 Embroidery frame set large H 18 cm W 13 cm H 7 inches W 5 inches SA439 EF75 XC8481 152 6 Embroid...

Страница 23: ...tional accessories and embroidery cards available for your machine 1 2 3 4 5 6 7 8 No Part Name Part Code 1 Telescopic thread guide XE0776 001 2 Spool support XE4637 001 3 Spool pin 2 XA6313 051 4 Screw and washer XC7568 051 5 Spool cap XL 2 XE0779 001 6 Spool holder 2 XA0679 050 7 Spool cap base 2 XE0780 001 8 Spool felt 2 XC7134 051 CAUTION Do not lift the handle of the machine while the spool s...

Страница 24: ...nd then pull the upper cover up to remove it from the machine e Insert the spool stand onto the notches of the machine How to remove a From the back of the machine press in the spool stand latches one on each side and then pull the spool stand up to remove it from the machine b Attach the upper cover to the machine Memo See page 52 about the bobbin winding using the spool stand See page 63 about t...

Страница 25: ...th the sewing machine 1 2 3 4 5 No Part Name Part Code 1 Pen tablet XF0178 001 2 Tablet pen XF0182 001 3 Tablet pen holder XF0185 001 4 Extra pen tips 4 XF0183 001 5 Pen tip clip XF0184 001 WARNING Do not disassemble or modify the tablet pen battery Do not use metallic objects such as tweezers or a metallic pen when changing the battery Do not throw the battery into fire or expose to heat Remove b...

Страница 26: ...h the tablet pen For detailed instructions about operating My Custom Design refer to the Operation Manual PDF format stored on the My Custom Design CD Note When you create the embroidery pattern by tracing the picture using the pen tablet the actual size of the pattern will be bigger than the tracing picture Check the size of the pattern before embroidering then change the size of the pattern if n...

Страница 27: ... Embroidery Patterns 42 Specifying the Size of Pattern Thumbnails 43 Using the Sewing Machine Help Key 44 Using the Operation Guide Function 45 Using the Sewing Guide Function 46 Using the Pattern Explanation Function 47 LOWER THREADING 48 Winding the Bobbin 48 Using the Supplemental Spool Pin 48 Using the Spool Pin 51 Using the Spool Stand 52 Untangling Thread from Beneath the Bobbin Winder Seat ...

Страница 28: ...s turn the main power to OFF first Always grasp the plug to remove it from the outlet Pulling on the cord may damage the cord or lead to fire or electric shock Do not allow the power cord to be cut damaged modified forcefully bent pulled twisted or bundled Do not place heavy objects on the cord Do not subject the cord to heat These things may damage the cord or cause fire or electric shock If the ...

Страница 29: ...ert the plug into a wall outlet a Main power switch b Power supply cord b Turn the main power switch to I to turn on the machine a OFF b ON c Turn the main power switch to O to turn off the machine Memo When the machine is turned on the needle and the feed dogs will make sound when they move this is not a malfunction ...

Страница 30: ...or the included touch pen Do not use a sharp pencil screw driver or other hard or sharp object It is not necessary to press hard on the screen Pressing too hard or using a sharp object may damage the screen No Display Key Name Explanation Page a Sewing key Press this key to sew utility stitches or character or decorative stitch patterns See the Key Functions table 30 b Embroidery key Attach the em...

Страница 31: ...hows the presser foot code Attach the presser foot indicated in this display before sewing d Shows a preview of the selected stitch When shown at 100 the stitch appears in the screen at nearly its actual size e Shows the stitch patterns f Shows additional pages that can be displayed Illustration shows page 1 of 2 All key functions of the LCD are explained in the Key Functions table on the followin...

Страница 32: ...ress the key for the pattern you want to sew Use to change to different stitch groups 91 g Edge sewing key Using the built in camera press this key to measure the width of the area from the edge of the fabric to the stitch and set the camera for edge sewing 148 h Needle mode selection key single double Press this key to select twin needle sewing mode The sewing mode changes between single needle m...

Страница 33: ...ave the machine automatically sew reinforcement stitches at the beginning and end of sewing depending on the pattern the machine may sew reverse stitches and trim the threads after sewing 82 t Automatic reinforcement stitch key Press this key to use the automatic reinforcement stitching reverse stitching setting If you select this setting before sewing the machine will automatically sew reinforcem...

Страница 34: ...Reader USB card writer module Note The processing speed may vary by port selection and quantity of data Do not insert anything other than USB media into the USB media port Otherwise the USB media drive may be damaged Note Two USB media cannot be used with this machine at the same time If two USB media are inserted only the USB media inserted first is detected Use only an embroidery card reader des...

Страница 35: ...he connectors on the USB cable can only be inserted into a port in one direction If it is difficult to insert the connector do not insert it with force Check the orientation of the connector For details on the position of the USB port on the computer or USB hub refer to the instruction manual for the corresponding equipment Note Do not perform operations with the mouse at the same time that you ar...

Страница 36: ... the pointer appears on the screen The blue LED light on the tablet is the main indicator for hardware operation The LED normally stays off and will turn on when you touch the surface of the pen tablet with the tablet pen a Working area of the pen tablet b Blue LED light Note The pen tablet can be connected or disconnected at any time Do not perform any operations with the pen tablet at the same t...

Страница 37: ...r the greater the pressure will be Set the pressure at 3 for normal sewing e Select whether 1 01 Straight stitch Left or 1 03 Straight stitch Middle is the utility stitch that is automatically selected when the machine is turned on f Change the height of the presser foot when sewing is stopped when the pivot setting is selected see page 84 Adjust the presser foot to one of the three heights 3 2 mm...

Страница 38: ...t is turned OFF the machine can be used without thread g Select the length of time until the screen saver appears A setting between OFF 0 and 60 minutes can be set in 1 minute increments h Change the image of the screen saver see page 40 i Select the initial screen that is displayed when the machine is turned on see page 41 j Press ON when using the embroidery data creation software My Custom Desi...

Страница 39: ... to save a settings screen image to USB media see page 39 Embroidery settings a Select from among 14 embroidery frame displays see page 238 b Change the thread color display on the embroidery screen thread number color name see page 237 c When the thread number 123 is selected select from six thread brands see page 237 d Adjust the maximum embroidery speed setting see page 237 e Adjust the upper t...

Страница 40: ...ground for the thumbnail area see page 42 k Adjust the distance between the pattern and the basting stitching see page 299 l Adjust the distance between the appliqué pattern and the outline see page 300 m Use to display the fabric while aligning the embroidery position see page 211 n Press to specify the size of pattern thumbnails see page 43 o Press to save a settings screen image to USB media se...

Страница 41: ... between 00 and 99 Changing the Pointer Shape When a USB Mouse Is Used In the settings screen the shape can be selected for the pointer that appears when a USB mouse is connected Depending upon the background color select the desired shape from the three that are available a Press The Sewing settings screen appears b Press The General settings screen appears c Display 3 8 page 3 of 8 of the Genera...

Страница 42: ... in a list in this screen Select the desired number to specify the image h Select the device that is connected Press when connecting USB media to the primary top USB port Press when connecting USB media to the center USB port Press when connecting a computer using a USB cable and then copy your personal images into Removable Disk which appears on the desktop of the computer A list of your personal...

Страница 43: ... settings screen d Use and to select the setting for the initial screen display Opening Screen When the machine is turned on the home page screen appears after the opening movie screen is touched Home Page When the machine is turned on the home page screen appears Sewing Embroidery Screen When the machine is turned on the Embroidery screen appears if the embroidery unit is attached to the machine ...

Страница 44: ...ails a Press The Sewing settings screen appears b Press The Embroidery settings screen appears c Display 7 8 page 7 of 8 of the Embroidery settings screen d Press a Embroidery pattern background b Pattern thumbnails background e Select the background color from the 66 settings available a Embroidery pattern background b Selected color a Pattern thumbnails background b Selected color f Press to ret...

Страница 45: ...e Sewing settings screen appears b Press The Embroidery settings screen appears c Display 8 8 page 8 of 8 of the Embroidery settings screen d Press or to select the desired thumbnail size Note When thumbnail size setting has been changed the pattern selection screen will not immediately reflect the chosen size To view the patterns with the new thumbnail size return to the category selection screen...

Страница 46: ...s key to see explanation for upper threading winding the bobbin changing the presser foot preparing to embroider a pattern and how to use the machine see page 47 b Press this key to select utility stitches when you are not sure which stitch to use or how to sew the stitch see page 45 c Press this key to see an explanation of the stitch selected see page 46 a b c ...

Страница 47: ...lays information about threading the machine changing presser feet etc Some of the functions are described in the movies Watch these movies for a better understanding of the functions displays information about attaching the embroidery unit preparing fabric for embroidering etc Some of the functions are described in the movies Watch these movies for a better understanding of the functions displays...

Страница 48: ...ge Press to view the previous page f Press to return to the original screen Using the Sewing Guide Function The sewing guide function can be used to select patterns from the Utility Stitch screen Use this function when you are not sure which stitch to use for your application or to get advice about sewing particular stitches For example if you want to sew overcasting but you do not know which stit...

Страница 49: ...then to see an explanation of the stitch selection Example Displaying information about a Press b Press c Press The screen shows information d Press to return to the original screen Note With the pattern explanation function descriptions can be displayed for the patterns available on the Utility Stitch and Character Decorative Stitch screens Descriptions are displayed for each pattern in the Utili...

Страница 50: ...in using the supplemental spool pin a Supplemental spool pin a Turn the main power to ON and open the top cover b Align the groove in the bobbin with the spring on the bobbin winder shaft and set the bobbin on the shaft a Groove in the bobbin b Spring on the shaft CAUTION The included bobbin was designed specifically for this sewing machine If bobbins from other models are used the machine will no...

Страница 51: ...ead is under the pre tension disk a Pre tension disk Make sure that the thread passes under the pre tension disk b Pre tension disk c Pull it in as far as possible Check to make sure thread is securely set between pre tension disks CAUTION If the thread spool and or spool cap are set incorrectly the thread may tangle on the spool pin and cause the needle to break Use the spool cap large medium or ...

Страница 52: ...le around the bobbin and cause the needle to break Memo Sliding the bobbin winding switch to the left switches the machine into bobbin winding mode Note changes to while the bobbin is winding Stay near the machine while winding the bobbin to make sure the bobbin thread is being wound correctly If the bobbin thread is wound incorrectly press immedi ately to stop the bobbin winding The sound of wind...

Страница 53: ...s upward Set the thread spool on the spool pin so that the thread unwinds from the front of the spool a Spool pin b Spool cap c Thread spool d Spool felt d Push the spool cap onto the spool pin as far as possible then return the spool pin to its original position e While holding the thread with both hands pull the thread up from under the thread guide plate a Thread guide plate Memo When removing ...

Страница 54: ...o wind thread on the bobbin while the spool stand is installed pass the thread from the spool through the thread guide on the telescopic thread guide and then wind the bobbin according to steps e through k of Using the Supplemental Spool Pin on page 49 to page 51 Memo See page 21 to assemble the spool stand See page 63 to thread the machine using the spool stand CAUTION When winding thread on the ...

Страница 55: ...the bobbin winding b Cut the thread with scissors near the pre tension disk a Pre tension disk c Push the bobbin winder switch to the right and then raise the bobbin at least 10 cm 4 inches from the shaft d Cut the thread near the bobbin and hold the thread end with your left hand Unwind the thread clockwise near the bobbin winder seat with your right hand as shown below e Wind the bobbin again CA...

Страница 56: ...n lightly with your right hand and then guide the thread with your left hand CAUTION Use a bobbin thread that has been correctly wound Otherwise the needle may break or the thread tension will be incorrect The included bobbin was designed specifically for this sewing machine If bobbins from other models are used the machine will not operate correctly Use only the included bobbin or bobbins of the ...

Страница 57: ...Do not cut the thread with the cutter Do not replace the bobbin cover b While holding the upper thread press the Needle Position button to lower the needle a Needle Position button c Press the Needle Position button to raise the needle d Gently pull the upper thread A loop of the bobbin thread will come out of the hole in the needle plate Note If the thread is not correctly inserted through the te...

Страница 58: ...ull up the bobbin thread pass it under the presser foot and pull it about 100 mm approx 3 4 inches toward the back of the machine making it even with the upper thread a Upper thread b Bobbin thread f Replace the bobbin cover ...

Страница 59: ... leading to injury When using the walking foot the side cutter or accessories not included with this machine attach the accessory to the machine after threading the machine Memo The automatic threading function can be used with sewing machine needle sizes 75 11 through 100 16 Thread such as transparent nylon monofila ment thread and thread with a thickness of 130 20 or thicker cannot be used with ...

Страница 60: ...n up then down through the groove as shown in the illustration CAUTION If the thread spool and or spool cap are set incorrectly the thread may tangle on the spool pin and cause the needle to break Use the spool cap large medium or small that is closest in size to the thread spool If a spool cap smaller than the thread spool is used the thread may become caught in the slit on the end of the spool a...

Страница 61: ...stration a Thread cutter m Press the Automatic Threading button to have the machine automatically thread the needle The thread passes through the eye of the needle Note When using thread that quickly winds off the spool such as metallic thread it may be dif ficult to thread the needle if the thread is cut Therefore instead of using the thread cutter pull out about 80 mm approx 3 inches of thread a...

Страница 62: ...Then pass the thread through the eye of the needle after step i Note Some needles cannot be threaded with the needle threader In this case instead of using the needle threader after passing the thread through the needle bar thread guide marked 6 manually pass the thread through the eye of the needle from the front CAUTION Twin needle part code XE4963 001 is recommended for this machine Contact you...

Страница 63: ...hread unwinds from the front Push the spool cap onto the spool pin as far as possible to secure the thread spool a Spool cap b Spool pin c Thread spool f Hold the thread from the spool with both hands and place the thread in the thread guide Do not place the thread in the pre tension disks a Thread guide g While holding the thread from the spool pull the thread through the lower notch in the threa...

Страница 64: ...ess to select the twin needle mode a Single needle twin needle setting appears l Start sewing Sample of Twin Needle Sewing Note If the key is light gray after selecting the stitch the selected stitch cannot be sewn in the twin needle mode a CAUTION Be sure to set the twin needle mode when using the twin needle Using the twin needle while the machine is in single needle mode could cause the needle ...

Страница 65: ...e spool pin so that the center of the spool is aligned with the hole at the center of the spool felt and then insert the spool cap onto the spool pin a Spool felt When using thread on a cone spool use the spool holder a Spool holder Depending on the size of spool or the amount of thread remaining choose the appropriate sized spool cap large or medium Spool cap small cannot be used with the spool c...

Страница 66: ...ool Note When using 2 spools of thread make sure that both spools are feeding in the same direction Make sure that the spools do not touch each other otherwise the thread will not feed off smoothly the needle may break or the thread may break or become tangled In addition make sure that the spools do not touch the telescopic thread guide at the cen ter Make sure that the thread is not caught under...

Страница 67: ...Presser Foot a Place the new presser foot under the holder aligning the foot pin with the notch in the holder Lower the presser foot lever so that the presser foot pin snaps into the notch in the holder a Notch b Pin CAUTION Always press on the screen before changing the presser foot If is not pressed and the Start Stop button or another button is pressed the machine will start and may cause injur...

Страница 68: ...ever b Needle clamp screw c Fork d Walking foot shank e Presser foot bar d Lower the presser foot lever Insert the screw and tighten the screw securely with the screwdriver Note Thread the needle manually when using the walking foot or only attach the walking foot after threading the needle using the Automatic Threading button When sewing with the walking foot sew at medium to low speeds Memo The ...

Страница 69: ...fore changing the needle If is not pressed and the Start Stop button or another operation button is pressed accidentally the machine will start and injury may result Use only sewing machine needles made for home use Other needles may bend or break and may cause injury Never sew with a bent needle A bent needle will easily break and may cause injury Memo To check the needle correctly place the flat...

Страница 70: ...urely tighten the needle clamp screw a Needle stopper b Hole for setting the needle c Flat side of needle e Press to unlock all keys and buttons CAUTION Be sure to push in the needle until it touches the stopper and securely tighten the needle clamp screw with a screwdriver If the needle is not completely inserted or the needle clamp screw is loose the needle may break or the machine may be damage...

Страница 71: ...ng machine needle 75 11 is inserted in the sewing machine Fabric Thread Needle Combinations The following table provides information concerning the appropriate thread and needle for various fabrics Please refer to this table when selecting a thread and needle for the fabric you wish to use Fabric type Application Thread Size of needle Type Size Medium weight fabrics Broadcloth Cotton thread 60 90 ...

Страница 72: ...CHANGING THE NEEDLE 70 ...

Страница 73: ...tener 76 Sewing Lightweight Fabrics 76 Sewing Stretch Fabrics 77 STITCH SETTINGS 78 Setting the Stitch Width 78 Setting the Stitch Length 79 Setting the Thread Tension 79 Proper Thread Tension 79 Upper Thread is Too Tight 80 Upper Thread is Too Loose 80 USEFUL FUNCTIONS 81 Automatic Reinforcement Stitching 81 Automatic Thread Cutting 82 Using the Knee Lifter 83 Pivoting 84 Automatic Fabric Sensor ...

Страница 74: ...tion Keep your hands away from moving parts while the machine is in operation Do not stretch or pull the fabric during sewing Doing so may lead to injury Do not use bent or broken needles Doing so may lead to injury Do not attempt to sew over basting pins or other objects during sewing Otherwise the needle may break and cause injury If stitches become bunched lengthen the stitch length setting bef...

Страница 75: ...the machine Do not press the Thread Cutter button when there is no fabric set in the machine or during machine operation The thread may tangle possibly resulting in damage Note When cutting thread thicker than 30 nylon monofilament thread or other decorative threads use the thread cutter on the side of the machine Memo This machine is equipped with a bobbin thread sensor that warns you when the bo...

Страница 76: ...at the beginning of sewing when the Start Stop button is pressed Press the Reverse Reinforcement Stitch button to sew reverse stitches or reinforcement stitches automatically at the end of sewing see page 81 a Reverse stitch b Reinforcement stitch If the stitch which you select has a double mark at the top of the key display you can sew reverse stitches by holding the Reverse Reinforcement Stitch ...

Страница 77: ...ng thread toward the back while sewing a 5 mm approx 3 16 inch Sewing Heavyweight Fabrics The sewing machine can sew fabrics up to 6 mm approx 1 4 inch thick If the thickness of a seam causes sewing to occur at an angle help guide the fabric by hand and sew on the downward slope If the Fabric does not Fit under the Presser Foot If the presser foot is in the up position and you are sewing heavyweig...

Страница 78: ... the needle for thick fabrics page 69 a Edge of the hook and loop fastener Sewing Lightweight Fabrics Place thin paper or tear away embroidery stabilizer under thin fabrics to make sewing easier Gently tear off the paper or the stabilizer after sewing a Thin paper Memo Once the trouble spot has been passed the foot will return to its normal position When Automatic Fabric Sensor System Automatic Pr...

Страница 79: ... and then sew without stretching the fabric In addition a better result can be achieved by using thread for knits or a stretch stitch a Basting stitching Memo For best results when sewing stretch fabrics decrease the pressure of the presser foot Using the Machine Setting Mode Key on page 35 ...

Страница 80: ...splay gets bigger Note Settings for some stitches cannot be changed refer to the STITCH SETTING CHART at the end of this manual If you turn off the machine or select another stitch without saving stitch setting changes Saving Your Stitch Settings on page 92 the stitch settings will return to their default settings Memo For an alternate method of changing the stitch width using the speed controller...

Страница 81: ...ny necessary changes Proper Thread Tension The upper thread and the bobbin thread should cross near the center of the fabric Only the upper thread should be visible from the right side of the fabric and only the bobbin thread should be visible from the wrong side of the fabric a Wrong side b Surface c Upper thread d Bobbin thread Memo Press to check changes made to the stitch Press to return the s...

Страница 82: ...read Note If the bobbin thread was incorrectly threaded the upper thread may be too tight In this case refer to Setting the Bobbin page 54 and rethread the bobbin thread Memo When you finish sewing remove the bobbin cover and then make sure that the thread is shown as below If the thread is not shown as below the thread is not inserted through the tension adjusting spring of the bobbin case correc...

Страница 83: ...he machine will automatically sew reverse stitches or reinforcement stitches and then continue sewing d Press the Reverse Reinforcement Stitch button a Reverse stitches or reinforcement stitches The machine will sew reverse stitches or reinforcement stitches and stop Memo Some stitches such as buttonholes and bar tacks require reinforcement stitches at the beginning of sewing If you select one of ...

Страница 84: ... Set the fabric in the start position and start sewing a Reverse stitches or reinforcement stitches The machine will automatically sew reverse stitches or reinforcement stitches and then continue sewing d Press the Reverse Reinforcement Stitching button a Reverse stitches or reinforcement stitches The machine will sew reverse stitches or reinforcement stitches then trim the thread Memo This functi...

Страница 85: ...r slot on the front of the machine Insert the knee lifter bar as far as possible c Use your knee to move the knee lifter bar to the right in order to raise the presser foot Release the knee lifter to lower the presser foot CAUTION Only change position of the knee lifter handle when knee lifter is not on the machine otherwise the knee lifter may damage the mounting slot on front of the machine Note...

Страница 86: ...he presser foot when sewing is stopped can be changed according to the type of fabric being sewn Press to display Pivoting Height on 2 8 of the settings screen Press or to select one of the three heights 3 2 mm 5 0 mm or 7 5 mm To raise the presser foot further increase the setting Normally 3 2 mm is set Note The Needle Position UP DOWN 3 8 of the settings screen must be set in the down position f...

Страница 87: ...d sewing continues Automatic Fabric Sensor System Automatic Presser Foot Pressure The thickness of the fabric is automatically detected and the presser foot pressure is automatically adjusted with an internal sensor while sewing to insure that your fabric is fed smoothly The fabric sensor system works continuously while sewing This function is useful for sewing over thick seams see page 75 or quil...

Страница 88: ...le Position Stitch Placement to ON or OFF c Press to return to the original screen Locking the Screen If the screen is locked before starting to sew the various settings such as the stitch width and stitch length are locked and cannot be changed This prevents screen settings from accidentally being changed or the machine from being stopped while large pieces of fabric or projects are being sewn Th...

Страница 89: ...images can be saved in one USB media in the name C BMP will automatically be replaced with a number between 00 and 99 GRID VIEW Press this key to display a grid CLOSE Press this key to close the screen VIEW ANGLE Each press of switches the built in camera between a front view and an angled top view NEEDLE DROP POSITION Press to show the needle drop position in the screen as Lower the presser foot ...

Страница 90: ...USEFUL FUNCTIONS 88 ...

Страница 91: ...Overcasting Using Presser Foot J 106 Overcasting Using the Side Cutter 107 When Sewing Straight Stitches While Using the Side Cutter 109 Quilting 110 Piecing 113 Quilting 113 Appliqué 114 Quilting with Satin Stitches 115 Free Motion Quilting 116 Echo Quilting Using the Free Motion Echo Quilting Foot E 119 Blind Hem Stitches 122 If the Needle Catches Too Much of the Hem Fold 124 If the Needle does ...

Страница 92: ...n Screens There are 6 categories of Utility Stitches If a page number such as appears there is more than one stitch selection screen for that category Straight Overcasting Decorative Stitches Heirloom Stitches Buttonholes Bar tacks Multi directional Sewing Quilting Stitches ...

Страница 93: ...h you want to sew Using the Mirror Image Key Depending on the type of utility stitch you select you may be able to sew a horizontal mirror image of the stitch If is lit when you select a stitch it will be possible to make a mirror image of the stitch Press to create a horizontal mirror image of the selected stitch The key will display as Memo For details on each stitch refer to the STITCH SETTING ...

Страница 94: ...settings for the zigzag stitch width stitch length thread tension automatic thread cutting automatic reinforcement stitching etc are preset in the machine for each stitch However if you have specific settings that you wish to reuse later for a stitch you can change the settings so that they can be saved for that stitch Five sets of settings can be saved for a single stitch Saving Settings a Select...

Страница 95: ...ere are already 5 sets of settings saved for a stitch the message The pockets are full Delete a pattern will appear Close the message and delete a setting referring to page 93 Memo When a stitch is selected the last settings retrieved are displayed The last settings retrieved are retained even if the machine was turned off or a different stitch was selected Memo To save new settings when there are...

Страница 96: ...pintuck etc Reinforcement stitch is sewn while pressing Reverse Reinforcement Stitch button 3 5 1 8 0 0 7 0 0 1 4 2 5 3 32 0 2 5 0 1 64 3 16 OK J Triple stretch stitch General sewing for reinforcement and decorative topstitching 0 0 0 0 0 7 0 0 1 4 2 5 3 32 1 5 4 0 1 16 3 16 OK J Stem stitch Reinforced stitching sewing and decorative applications 1 0 1 16 1 0 3 0 1 16 1 8 2 5 3 32 1 0 4 0 1 16 3 1...

Страница 97: ... is completed hold the Reverse Reinforcement Stitch button to sew 3 4 reverse stitches or reinforcement stitches at the end of the seam g After sewing press the Thread Cutter button to trim the threads CAUTION Be sure the needle does not strike a basting pin or any other objects during sewing The thread could tangle or the needle could break causing injury Memo When the automatic thread cutting an...

Страница 98: ...osition stitches Aligning the Fabric with a Mark on the Needle Plate or Bobbin Cover with Mark While sewing align the edge of the fabric with the 16 mm approx 5 8 inch mark on the needle plate or bobbin cover with mark depending on the needle position left or middle center needle position stitches only For stitches with a left needle position Stitch width 0 0 mm a Seam b Presser foot c Centimeters...

Страница 99: ...uce puckering on lightweight fabrics The small opening on the foot provides support for the fabric as the needle travels through the fabric a Press the Needle Position button to raise the needle and turn the main power to OFF or press b Remove the needle and the presser foot holder see page 66 through 67 c Remove the flat bed attachment or the embroidery unit if either are attached d Grasp both si...

Страница 100: ...change the needle position using the width display Always secure the needle plate before inserting the bobbin case into its original position CAUTION Selecting other stitches will cause an error message to be displayed Slowly rotate the handwheel toward you counterclockwise before sewing and make sure that the needle is not contacting the straight stitch foot and straight stitch needle plate Memo ...

Страница 101: ...approx 1 15 16 inches and then tie both ends together Do not sew a reverse stitch at the end d Insert the ends of the thread into the dart with a hand sewing needle e Iron the dart to one side so that it is flat Gathering Use on waists of skirts sleeves of shirts etc a Select a straight stitch and attach presser foot J b Set the stitch length to 4 0 mm approx 3 16 inch and the thread tension to ap...

Страница 102: ...remove the basting stitch Flat Fell Seam Use for reinforcing seams and finishing edges neatly a Select and attach presser foot J b Sew the finish line then cut half of the seam allowance from the side on which the flat fell seam will lie When the automatic thread cutting and automatic reinforcement stitching are preset reinforcement stitches will be sewn automatically at the beginning of sewing Pr...

Страница 103: ... the folded parts only a Surface c Select and attach presser foot I d Sew a straight stitch along the fold When the automatic thread cutting and automatic reinforcement stitching are preset reinforcement stitches will be sewn automatically at the beginning of sewing Press the Reverse Reinforcement Stitch button to sew a reinforcement stitch and trim the thread automatically at the end of sewing a ...

Страница 104: ...Appliqué Using a Zigzag Stitch Attach the appliqué material using a temporary spray adhesive or basting and then sew it Sew a zigzag stitch while positioning the right hand side needle drop point just outside the edge of the fabric Stitch Stitch name Presser foot Applications Stitch width mm inch Stitch length mm inch Twin needle Auto Manual Auto Manual Zigzag stitch For overcasting mending Revers...

Страница 105: ...machine see page 54 b Thread the gimp thread through the hole in the cord guide bobbin cover from top to bottom Position the thread in the notch at the back of the cord guide bobbin cover a Notch b Gimp thread c Snap the cord guide bobbin cover into place making sure that the gimp thread can be fed freely Make sure there are no restrictions when feeding the thread d Set the zigzag width from 2 0 2...

Страница 106: ...g the right hand side needle drop point just outside the edge of the fabric Stitch Stitch name Presser foot Applications Stitch width mm inch Stitch length mm inch Twin needle Auto Manual Auto Manual 2 steps elastic zigzag Overcasting medium weight and stretch fabrics tape and elastic 5 0 3 16 1 5 7 0 1 16 1 4 1 0 1 16 0 2 4 0 1 64 1 16 OK J 2 steps elastic zigzag Overcasting medium weight and str...

Страница 107: ... Auto Manual Auto Manual Overcasting stitch Reinforcing of light and medium weight fabrics 3 5 1 8 2 5 5 0 3 32 3 16 2 0 1 16 1 0 4 0 1 16 3 16 NO Overcasting stitch Reinforcing of heavyweight fabric 5 0 3 16 2 5 5 0 3 32 3 16 2 5 3 32 1 0 4 0 1 16 3 16 NO Overcasting stitch Reinforcing of medium heavyweight and easily friable fabrics or decorative stitching 5 0 3 16 3 5 5 0 1 8 3 16 2 5 3 32 1 0 ...

Страница 108: ...16 OK J Overcasting stitch Reinforcing of medium stretch fabric and heavyweight fabric decorative stitching 5 0 3 16 0 0 7 0 0 9 32 2 5 3 32 0 5 4 0 1 32 3 16 OK J Overcasting stitch Reinforcement of stretch fabric or decorative stitching 4 0 3 16 0 0 7 0 0 1 4 4 0 3 16 1 0 4 0 1 16 3 16 OK J Overcasting stitch Stretch knit seam 5 0 3 16 0 0 7 0 0 1 4 4 0 3 16 1 0 4 0 1 16 3 16 NO Single diamond o...

Страница 109: ... cutter or only attach the side cutter after threading the needle using the Automatic Threading button Stitch Stitch name Presser foot Applications Stitch width mm inch Stitch length mm inch Twin needle Auto Manual Auto Manual With side cutter Straight stitch while cutting fabrics 0 0 0 0 0 2 5 0 3 32 2 5 3 32 0 2 5 0 1 64 3 16 NO With side cutter Zigzag stitch while cutting fabrics 3 5 1 8 3 5 5 ...

Страница 110: ...the upper thread Pass it below the presser foot and pull it out in the fabric feed direction a Presser foot b Upper thread g Make a cut of approximately 20 mm approx 3 4 inch in the fabric a 20 mm approx 3 4 inch h Position the fabric so that the right side of the cut is on top of the guide plate and the left side of the cut is underneath the presser foot a Guide plate lower knife b Presser foot c...

Страница 111: ...ate lower knife b Upper knife c Operation lever Note If the width has been adjusted rotate the handwheel toward you counterclockwise Check that the needle does not touch the side cutter If the needle touches the side cutter it might cause the needle to break Memo The fabric will not be cut if the whole fabric is simply spread out underneath the presser foot guide plate Set the fabric as explained ...

Страница 112: ...titch 3 50 0 00 7 00 0 1 4 2 5 3 32 1 0 4 0 1 16 3 16 NO Basting stitch Middle Basting 3 50 0 00 7 00 0 1 4 20 3 4 5 30 3 16 1 3 16 NO Stem stitch Reinforced stitching sewing and decorative applications 1 00 1 16 1 00 3 00 1 16 1 8 2 5 3 32 1 0 4 0 1 16 3 16 NO Quilting appliqué zigzag stitch Zigzag stitch for quilting and sewing on appliqué quilt pieces 3 50 1 8 0 00 7 00 0 1 4 1 6 0 0 4 0 0 3 16...

Страница 113: ...stitching 5 00 3 16 0 00 7 00 0 1 4 1 6 1 16 1 0 4 0 1 16 3 16 NO Rick rack stitch Decorative top stitching 4 00 3 16 0 00 7 00 0 1 4 2 5 3 32 1 0 4 0 1 16 3 16 NO Decorative stitch Decorative stitching and appliqué 6 00 15 64 1 00 7 00 1 16 1 4 1 0 1 16 0 2 4 0 1 64 3 16 NO Decorative stitch Decorative stitching 5 50 7 32 0 00 7 00 0 1 4 1 6 1 16 1 0 4 0 1 16 3 16 NO Hemstitching Heirloom decorat...

Страница 114: ...ible appliqué or attaching binding 1 5 1 16 0 5 5 0 1 64 3 16 1 8 1 16 1 0 4 0 1 16 3 16 NO Quilting stippling Background quilting 7 0 1 4 1 0 7 0 1 16 1 4 1 6 1 16 1 0 4 0 1 16 3 16 NO Stitch Stitch name Presser foot Applications Stitch width mm inch Stitch length mm inch Twin needle Auto Manual Auto Manual Memo When a stitch pattern in the Quilting Stitches category Q 02 through Q 30 is selected...

Страница 115: ...king foot to keep the quilt top batting and backing from sliding The walking foot has a set of feed dogs that move together with the feed dogs in the needle plate during sewing For straight line quilting use the walking foot and the straight stitch needle plate Always select a straight stitch middle needle position when using the straight stitch needle plate a Select or b Attach the walking foot s...

Страница 116: ...then fold over the seam margin using an iron Clip curves when necessary c Turn the appliqué over and attach the stabilizer with basting pins or a basting stitch d Select and attach presser foot J e Use the quilting appliqué stitch to attach the appliqué Sew around the edge while dropping the needle as close to the edge as possible a Appliqué b Needle drop position CAUTION Be careful that the needl...

Страница 117: ... width e Set the width control to ON f Press The display will return to the original screen g Start sewing You can adjust the stitch width during sewing by moving the sewing speed controller Slide the lever to the left and the stitch width becomes narrower Slide it to the right the stitch width becomes wider The size of the width changes equally on both sides of the middle needle position a narrow...

Страница 118: ... With free motion quilting control the feeding speed of the fabric to match the sewing speed If the fabric is moved faster than the sewing speed the needle may break or other damage may result When using free motion quilting foot C be sure to use the straight stitch needle plate and sew with the needle in middle center needle position If the needle is moved to any position other than the middle ce...

Страница 119: ...ser foot holder screw aligned with the notch in the quilting foot a Presser foot holder screw b Notch f Hold the quilting foot in place with your right hand and tighten the presser foot holder screw using the screwdriver with your left hand a Presser foot holder screw g Use both hands to stretch the fabric taut and then move the fabric at a consistent pace in order to sew uniform stitches roughly ...

Страница 120: ... manual Free motion open toe quilting foot O a Press to set the machine to free motion sewing mode The key appears as the quilting foot is raised to the necessary height and then the feed dogs are lowered for free motion sewing Note Free motion open toe quilting foot O can also be used with the straight stitch needle plate We recommend using free motion open toe quilting foot O with free motion se...

Страница 121: ...oot E Sewing quilting lines at equal distances around a motif is called echo quilting The quilting lines which appear as ripples echoing away from the motif are the distinguishing characteristic of this quilting style Use the free motion echo quilting foot E for echo quilting Using the measurement on the presser foot as a guide sew around the motif at a fixed interval We recommend attaching the fo...

Страница 122: ...speed If the fabric is moved faster than the sewing speed the needle may break or other damage may result Memo When starting to sew the internal sensor detects the thickness of the fabric and the quilting foot is raised to the height specified in the machine settings screen Press to display Free Motion Foot Height on 2 8 of the settings screen see page 35 Press or to select the height that the qui...

Страница 123: ...1 3 g Using the measurement on the quilting foot as a guide sew around the motif a 6 4 mm approx 1 4 inch Finished project h Press to cancel the free motion sewing mode Rotate the handwheel toward you counterclockwise to raise the feed dogs ...

Страница 124: ... 0 0 0 3 0 3 0 1 8 1 8 2 0 1 16 1 0 3 5 1 16 1 8 NO Blind hem stitch stretch Blind hem stitching on stretch fabrics 0 0 0 3 0 3 0 1 8 1 8 2 0 1 16 1 0 3 5 1 16 1 8 NO Memo When the size of cylindrical pieces is too small to slide onto the arm or the length is too short the fabric will not feed and desired results may not be achieved a Wrong side of fabric b Right side of Fabric c Edge of fabric d ...

Страница 125: ...the stitch width until the needle slightly catches the fold of the hem a Needle drop point When you change the needle drop point raise the needle and then change the stitch width a Stitch width a Wrong side of fabric b Right side of fabric c Edge of fabric d Desired edge of hem e Basting point f Basting Thick fabric Normal fabric Seen from the side 5 1 1 1 1 1 2 6 3 4 Memo Blind hem stitches canno...

Страница 126: ...fabric b Right side of fabric If the Needle does not Catch the Hem Fold The needle is too far to the right Press to increase the stitch width so that the needle slightly catches the fold of the hem Thick fabric Normal fabric a Wrong side of fabric b Right side of fabric l Sew with the fold of the hem against the presser foot guide m Remove the basting stitching and reverse the fabric a Wrong side ...

Страница 127: ...liqué Sharp Curves Stop the machine with the needle in the fabric outside the appliqué Raise the presser foot and turn the fabric a little bit at a time while sewing for an attractive finish to the seam Appliqué Corners Stop the machine with the needle in the right position of the outside or inside corner of the appliqué Raise the presser foot and pivot the fabric to align the fabric edge Lower th...

Страница 128: ...e fabric in half along the bias d Attach presser foot J Set the needle drop point slightly off the edge of the fabric and start sewing a Needle drop position e Unfold the fabric and iron the tucks to one side Memo For details on each stitch refer to the STITCH SETTING CHART at the end of this manual Memo If the upper thread tension is too weak the shelltuck stitches will not scallop Memo Use a thi...

Страница 129: ...p of a pressed seam allowance a Select a straight stitch and attach presser foot J b With the right sides facing each other sew two pieces of fabric together and then press open the seam allowance a Straight stitch b Seam margins c 6 5 mm approx 1 4 inch d Wrong side c Select a stitch for top stitching d Place the fabric right side up in the machine and center the presser foot over the seam when s...

Страница 130: ...o obtain the desired amount of gather and then smooth the gathers by ironing them f Select or g Sew the spaces between the straight seams h Pull out the straight stitch threads Fagoting When there is a space between two fabrics with thread sewn over the space to join the fabrics together it is called fagoting Use this stitch when sewing blouses or children s clothes a Baste two pieces of fabric on...

Страница 131: ... bobbin thread to create the necessary gather d Place the tape over the gather and hold it in place with basting pins a Tape e Select or f Sew over the tape or elastic Memo Use a thick thread Memo Be sure that neither automatic reinforcement nor automatic thread cutting is selected Memo Before sewing the straight stitch rotate the handwheel toward you counterclockwise and pull up the bobbin thread...

Страница 132: ...area Pull out 5 or 6 threads to leave a 3 mm approx 1 8 inch area open Memo Use a light to medium weight homespun fab ric with a little stiffness CAUTION The Automatic Threading button cannot be used Thread the wing needle by hand from front to back Using the Automatic Threading button may result in damage to the machine A more attractive finish can be obtained if you use a 130 705H Wing needle wh...

Страница 133: ...pprox 3 16 inch area which are not yet open Pull out four threads leave five threads and then pull out four threads The width of five threads is approximately 4 mm approx 3 16 inch or less a Approx 4 mm approx 3 16 inch or less b Four threads pull out c Five threads leave b Select c Sew the decorative stitch in the center of the five threads created above Memo For details on each stitch refer to t...

Страница 134: ...0 1 64 1 16 NO Narrow squared buttonhole Buttonholes for light to medium weight fabrics 5 0 3 16 3 0 5 0 1 8 3 16 0 4 1 64 0 2 1 0 1 64 1 16 NO Wide squared buttonhole Buttonholes with extra space for larger decorative buttons 5 5 7 32 3 5 5 5 1 8 7 32 0 4 1 64 0 2 1 0 1 64 1 16 NO Squared buttonhole Heavy duty buttonholes with vertical bar tacks 5 0 3 16 3 0 5 0 1 8 3 16 0 4 1 64 0 2 1 0 1 64 1 1...

Страница 135: ...holder plate on the presser foot and insert the button that will be put through the buttonhole Then tighten the button holder plate around the button a Button holder plate d Align the presser foot with the mark on the fabric and lower the presser foot a Mark on the fabric b Marks on the presser foot Memo The maximum buttonhole length is about 28 mm approx 1 1 16 inches diameter thickness of the bu...

Страница 136: ... sure that there is no gap behind the part of the foot marked A If the buttonhole foot is not slid back as far as possible the buttonhole will not be sewn at the correct size Memo If automatic thread cutting is turned on before you start sewing both threads are automatically cut after the reinforcement stitches are sewn If the fabric does not feed for example because it is too thick increase the s...

Страница 137: ...foot scale to set the size of the buttonhole One mark on the presser foot scale equals 5 mm approx 3 16 inch Add the button diameter and thickness together and then set the plate at the calculated value a Presser foot scale b Button holder plate c Completed measurement of diameter thickness d 5 mm approx 3 16 inch Memo Set the width of the satin stitches to the width of the gimp thread and set the...

Страница 138: ...the stitch settings make sure that all stitch settings are changed to match Stitch Stitch name Presser foot Applications Stitch width mm inch Stitch length mm inch Twin needle Auto Manual Auto Manual 4 steps buttonhole 1 Left side of 4 steps buttonhole 5 0 7 32 1 5 7 0 1 16 1 4 0 4 1 64 0 2 1 0 1 64 1 16 NO 4 steps buttonhole 2 Bar tack of 4 steps buttonhole 5 0 7 32 1 5 7 0 1 16 1 4 0 4 1 64 0 2 ...

Страница 139: ...tomatically stop after sewing the bar tack f Select stitch to sew the right side of the buttonhole and press the Start Stop button to begin sewing g Sew the right side of the buttonhole and press the Start Stop button again Sew the right side of the buttonhole the same length as the left h Select stitch to sew the bar tack and then press the Start Stop button The machine will automatically sew off...

Страница 140: ... of the darning a Presser foot scale b Completed length measurement c Width 7 mm approx 1 4 inch d 5 mm approx 3 16 inch Stitch Stitch name Presser foot Applications Stitch width mm inch Stitch length mm inch Twin needle Auto Manual Auto Manual Darning Darning medium weight fabric 7 0 1 4 2 5 7 0 3 32 1 4 2 0 1 16 0 4 2 5 1 64 1 16 NO Darning Darning heavyweight fabric 7 0 1 4 2 5 7 0 3 32 1 4 2 0...

Страница 141: ...button to start the machine Once sewing is completed the machine automatically sews reinforcement stitches and then stops Note Pass the thread underneath the presser foot Set the presser foot so that there is no gap behind the section marked with an A the shaded area in the illustration below If there is a gap the size of the darning will not be correct Memo If automatic thread cutting is turned o...

Страница 142: ...plications Stitch width mm inch Stitch length mm inch Twin needle Auto Manual Auto Manual Bar tack Reinforcement at opening of pocket etc 2 0 1 16 1 0 3 0 1 16 1 8 0 4 1 64 0 3 1 0 1 64 1 16 NO Memo Bar tacks can be between 5 mm approx 3 16 inch and 28 mm approx 1 1 16 inches Bar tacks are usually between 5 mm approx 3 16 inch and 10 mm approx 3 8 inch Note Pass the thread underneath the presser f...

Страница 143: ...stitches and stop automatically Bar Tacks on Thick Fabrics Place a piece of folded fabric or cardboard beside the fabric being sewn to level the buttonhole foot and allow for easier and even feeding a Presser foot b Thick paper c Fabric Memo If automatic thread cutting is turned on before you start sewing both threads are automatically cut after the reinforcement stitches are sewn If the fabric do...

Страница 144: ...d and start sewing The machine stops automatically when sewing is finished f From the wrong side of the fabric pull the end of the bobbin thread to pull the upper thread through to the wrong side of the fabric Tie the two thread ends together and cut the threads g After the button is attached select another stitch and rotate the handwheel toward you counterclockwise to raise the feed dogs Stitch S...

Страница 145: ... shank lever toward you before sewing a Shank lever b Pull the two ends of the upper thread between the button and the fabric wind them around the shank and then tie them firmly together c Tie the ends of the bobbin thread from the beginning and end of sewing together on the wrong side of the fabric d Cut off any excess thread Note When sewing is completed be sure to select the other stitch and ro...

Страница 146: ... drop position d Lower the presser foot and start sewing When sewing is finished the machine sews reinforcement stitches and stops automatically e Use the eyelet punch to make a hole in the center of the stitching Stitch Stitch name Presser foot Applications Stitch width mm inch Stitch length mm inch Twin needle Auto Manual Auto Manual Eyelet For making eyelets holes on belts etc 7 0 1 4 7 0 6 0 5...

Страница 147: ... point and sew seam 1 as shown a Start Point d Select and sew seam 2 as shown The fabric will move sideways guide the fabric by hand to keep sewing straight e Select and sew seam 3 as shown The fabric feeds forward while stitching backward f Select and sew seam 4 as shown The seam will be connected to the starting point of seam 1 Memo Insert the tubular piece of fabric onto the free arm and then s...

Страница 148: ...er and attach the zipper foot a Right b Left c Needle drop position e Topstitch 7 to 10 mm approx 1 4 to 3 8 inch from the seamed edge of the fabric then remove the basting Memo For details on each stitch refer to the STITCH SETTING CHART at the end of this manual Note Make sure you sew using the middle needle position CAUTION When using zipper foot I make sure the straight stitch middle needle po...

Страница 149: ...e presser foot a Right b Left c Needle drop position f Set the presser foot in the 3 mm approx 1 8 inch margin g Starting from the end of the zipper opening sew to a point about 50 mm approx 2 inches from the edge of the fabric then stop the machine h Pull down the zipper slider then continue sewing to the edge of the fabric a 50 mm approx 2 inches b 3 mm approx 1 8 inch Note Make sure you sew usi...

Страница 150: ... foot a Right b Left c Needle drop position k Set the fabric so that the left edge of the presser foot touches the edge of the zipper teeth l Sew reverse stitches at the top of the zipper then continue sewing m Stop sewing about 50 mm approx 2 inches from the edge of the fabric leave the needle in the fabric and remove the basting stitches n Open the zipper and sew the rest of the seam a Basting s...

Страница 151: ... If the fabric has a complicated pattern is sheer or is glossy such as a vinyl material the built in camera may not be able to detect it correctly For best results iron the fold when folding the edge of the fabric for edge sewing When Width Control on page 1 8 of the settings screen is set to ON or when Nee dle Position Stitch Placement on page 3 8 is set to ON the built in camera cannot be used w...

Страница 152: ...achine settings screen the brightness of the light changes to 5 f When the message shown below appears check that the vertical stitch alignment foot V is attached and that the edge sewing sheet is positioned and then press Then the edge sewing window appears Note If the metal needle plate is visible between the feed dogs and the edge sewing sheet the fabric may be incorrectly detected by the built...

Страница 153: ...lue with a black starting point or black with a red starting point a Key for changing the color of the fabric edge indicator line b Fabric edge indicator line Note Before pressing install the vertical stitch alignment foot V and position the edge sewing sheet otherwise the built in camera cannot detect the fabric If is pressed before the edge sewing sheet is positioned the message shown in step f ...

Страница 154: ... again starting with step a When the Fabric Edge Indicator Line Is Not Aligned With the Edge of the Fabric The fabric edge indicator line that appears is not aligned with the edge of the fabric The fabric at the beginning of sewing is not straight Try to straighten the edge of the fabric at the beginning of sewing so it is parallel with the edge of the presser foot a Note If a straight part of fab...

Страница 155: ...ge of the fabric to the seam is set a Note Distances between 1 5 mm about 1 16 inch and 38 5 mm about 1 1 2 inches can be measured The distance is displayed in the screen in 0 5 mm about 1 64 inch increments The distance is displayed in millimeters However depending on the measurement setting it can also be displayed in inches If _ mm appears as the distance and no inch measurement is displayed th...

Страница 156: ...age appears edge sewing with the seam wizard function is canceled Note While sewing do not place anything including your hands within 2 mm about 1 16 inch from the edge of the fabric otherwise the edge of the fabric cannot be detected correctly When guiding the fabric with your hands place them outside of the object free area and more than 2 mm about 1 16 inch from the edge of the fabric a Approxi...

Страница 157: ...g to the Beginning of the Pattern 168 Checking the Image 168 COMBINING STITCH PATTERNS 170 Before Combining 170 Combining Various Stitch Patterns 170 Combining Large and Small Stitch Patterns 171 Combining Horizontal Mirror Image Stitch Patterns 172 Combining Stitch Patterns of Different Length 173 Making Step Stitch Patterns for 7mm Satin Stitch Patterns Only 174 More Examples 175 USING THE MEMOR...

Страница 158: ...et characters gothic font h Alphabet characters handwriting font i Alphabet characters outline j Cyrillic font k Press this key to create your own stitches with the MY CUSTOM STITCH function see page 328 l Patterns stored in MY CUSTOM STITCH see page 335 m Patterns saved in the machine s memory see page 180 n Patterns saved in USB media see page 181 o Patterns saved on the computer see page 182 No...

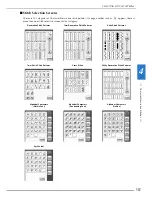
Страница 159: ...page number such as appears there is more than one stitch selection screen for that category Decorative Stitch Patterns 7mm Decorative Stitch Patterns Satin Stitch Patterns 7mm Satin Stitch Patterns Cross Stitch Utility Decorative Stitch Patterns Alphabet Characters Gothic Font Alphabet Characters Handwriting Font Alphabet Characters Outline Cyrillic font ...

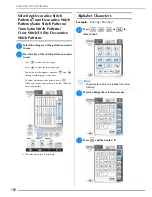
Страница 160: ...ant to sew Press to view the next page Press to view the previous page Touch the bar that appears between and to leap multiple pages at one time To select a different stitch pattern press When the current stitch pattern is erased select the new stitch pattern The selected pattern is displayed Alphabet Characters Example Entering Blue Sky a Press or to select a font b Press to change the selection ...

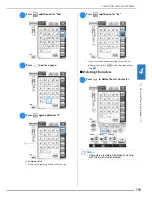
Страница 161: ...d enter S a Jumping stitch Remove the jumping stitches after sewing g Press and then enter ky If you want to continue entering characters in a different font press and then repeat from step a Deleting Characters a Press to delete the last character a Memo Characters are deleted individually starting with the last character entered ...

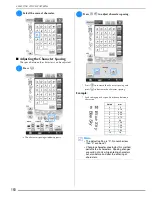
Страница 162: ...cter spacing and press to decrease the character spacing Example Each setting equals a specific distance between characters Value mm 0 0 1 0 18 2 0 36 3 0 54 4 0 72 5 0 9 6 1 08 7 1 26 8 1 44 9 1 62 10 1 8 Memo The default setting is 0 No number less than 0 can be set Changing character spacing by this method pertains to all characters Spacing changes are valid not only while entering characters b...

Страница 163: ...may be shrinking or bunching of stitches so be sure to attach a stabilizer material Guide the fabric with your hand to keep the fabric feeding straight and even during sewing Fabric When sewing on stretch fabrics lightweight fabrics or fabrics with coarse weaves attach stabilizer on the wrong side of the fabric If you do not wish to do so place the fabric on a thin paper such as tracing paper a Fa...

Страница 164: ...If the fabric is pulled or pushed during sew ing the pattern may not turn out correctly Also depending on the pattern there may be movement to the left and right as well as front and back Guide the fabric with your hand to keep the fabric feeding straight and even during sewing Memo When sewing character stitches the machine automatically sews reinforcement stitches at the beginning and end of eac...

Страница 165: ...lay The displayed value decreases each time the button is pressed and the pattern will shorten If the pattern is skewed to the left Press in the Fine Adjust Horiz display The displayed value increases each time the button is pressed and the pattern will slide to the right If the pattern is skewed to the right Press in the Fine Adjust Horiz display The displayed value decreases each time the button...

Страница 166: ...tions Make patterns larger or smaller make mirror images etc Note Some editing functions cannot be used with certain stitch patterns Only the functions for the displayed keys are available when a pattern is selected g h f e d c b i j k l m n o p q s a r g h f e d c b i t k l m n o p q s a r g h f e d c b i u k l m n o p q s a r ...

Страница 167: ...ult settings are highlighted 78 79 h Thread tension key Shows the thread tension setting for the selected stitch pattern The machine default settings are highlighted 79 i Memory key Use this key to save stitch pattern combinations 177 178 j Elongation key When 7mm satin stitch patterns are selected press this key to choose from 5 automatic length settings without changing the stitch zigzag width o...

Страница 168: ...m Satin Stitch Patterns Only When 7mm satin stitch patterns are selected press to choose from 5 automatic length settings without changing the stitch zigzag width or stitch length settings Creating a Vertical Mirror Image To create a vertical mirror image select a stitch pattern then press Memo If you continue entering stitch patterns after changing the size those patterns will also be sewn in tha...

Страница 169: ... thread density Memo To finish a complete motif while sewing the pattern continuously you can press the key while sewing The machine will automatically stop when the motif is finished CAUTION If the stitches bunch when thread density is changed to return the thread density to If you continue sewing when the stitches are bunched the needle may bend or break Memo Even if you select a new pattern aft...

Страница 170: ... point where sewing was stopped b Press the Start Stop button to continue sewing Checking the Image You can display an approximate size image of the selected stitch pattern You can also check and change the colors of the image on the screen a Press An image of the selected pattern is displayed b Press to change the thread color in the image to red blue or black The color changes every time you pre...

Страница 171: ... the enlarged image d Use to view any part of the image that extends out of the viewable display area e Press to return to the original screen Memo You can also sew from this screen when the presser foot symbol is displayed Image of some patterns will display in default size only ...

Страница 172: ...thers Before Combining Single stitch sewing is automatically selected for sewing combined patterns If you want to sew the pattern continuously press after finishing the stitch pattern combination When changing sizes creating mirror images or making other adjustments to a combined stitch pattern be sure to edit the selected stitch pattern before selecting the next one You cannot edit a stitch patte...

Страница 173: ...ern continuously g Press Combining Large and Small Stitch Patterns Example a Press The large size stitch will be selected b Press again then press to select the small size The pattern is displayed in a smaller size Memo Patterns are deleted individually starting with the last pattern entered by pressing ...

Страница 174: ...Press to sew continuously The entered pattern is repeated Combining Horizontal Mirror Image Stitch Patterns Example a Press b Press again then press The pattern is flipped along a vertical axis c Press The entered pattern is repeated ...

Страница 175: ...rative Stitches 173 4 Combining Stitch Patterns of Different Length Example a Press then press once The length of the image is set to b Select again then press 3 times The length of the image is set to c Press The entered pattern is repeated ...

Страница 176: ...t they create a step effect are called step stitch patterns Press to move the stitch pattern a distance equal to half of the stitch pattern s size to the left Press to move the stitch pattern a distance equal to half of the stitch pattern s size to the right Example a Press b Press The next stitch pattern will move to the right c Press again d Press The next stitch pattern will move to the left ...

Страница 177: ...COMBINING STITCH PATTERNS Character Decorative Stitches 175 4 e Press The entered pattern is repeated More Examples Press Press Press Press ...

Страница 178: ...a Multi Media Card MMC XD Picture Card To create file folders use a computer Computers and Operating Systems with the Following Specifications can be Used Compatible models IBM PC with a USB port as standard equipment IBM PC compatible computer equipped with a USB port as standard equipment Compatible operating systems Microsoft Windows XP Windows Vista Windows 7 Precautions on Using the Computer ...

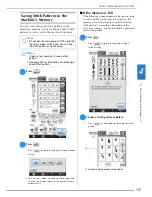
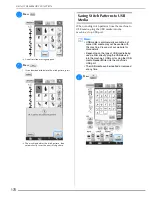
Страница 179: ...n appears while you are trying to save a pattern on the machine s memory the memory is too full to hold the currently selected stitch pattern To save the stitch pattern in the machine s memory you have to delete a previously saved stitch pattern a Press Press to return to the original screen without saving b Choose a stitch pattern to delete Press if you decide not to delete the stitch pattern a P...

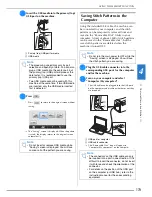
Страница 180: ...titch patterns from the machine to USB media plug the USB media into the machine s top USB port a Press Memo USB media is commercially available but some USB media may not be usable with this machine Please visit our website for more details Depending on the type of USB media being used either directly plug the USB device into the machine s USB port or plug the USB media Reader Writer into the mac...

Страница 181: ...e computer and machine whether or not they are turned on a USB port for computer b USB cable connector The Removable Disk icon will appear in Computer My computer on the computer Note The processing speed may vary by port selection and quantity of data You can also plug a USB media into the center port but the primary top USB port will process the data faster It is recommended to use the primary t...

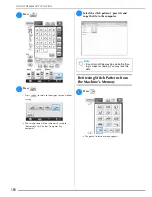
Страница 182: ...be temporarily saved to Removable Disk under Computer My computer e Select the stitch pattern s pmx file and copy the file to the computer Retrieving Stitch Patterns from the Machine s Memory a Press The pocket selection screen appears Note Do not turn off the machine while the Sav ing screen is showing You may lose the data ...

Страница 183: ...attern The selected stitch pattern is retrieved and the sewing screen will be displayed Recalling from USB Media You can recall a specific stitch pattern from either direct USB media or a folder in the USB media If the stitch pattern is in a folder check each folder to find the stitch pattern a Insert the USB Media into the primary top USB port on the machine see page 178 a Primary top USB port fo...

Страница 184: ... subfolder within a folder are displayed Press to return to the previous folder Use the computer to create folders Folders cannot be created with the machine d Press the key of the stitch pattern you want to recall e Press Press to delete the stitch pattern The pattern will be deleted from the USB media The selected stitch pattern is recalled and the sewing screen will be displayed Recalling from ...

Страница 185: ...pattern will be deleted from the Removable Disk folder in your computer The selected stitch pattern is recalled and the sewing screen will be displayed Note While data is being written do not discon nect the USB cable Do not create folders within Removable Disk Since folders are not displayed stitch pattern data within folders cannot be recalled Note The pattern recalled from the computer is only ...

Страница 186: ...USING THE MEMORY FUNCTION 184 ...

Страница 187: ...g USB Media 225 Using a USB Cable 226 Printing the Background and Embroidery Position Sheet 226 Sewing Embroidery Patterns 227 ADJUSTMENTS DURING THE EMBROIDERY PROCESS 229 If the Bobbin Runs Out of Thread 229 If the Thread Breaks During Sewing 230 Restarting from the Beginning 231 Resuming Embroidery After Turning Off the Power 231 MAKING EMBROIDERY ADJUSTMENTS 233 Adjusting Thread Tension 233 Co...

Страница 188: ...lace 48 5 Fabric preparation Attach a stabilizer material to the fabric and hoop it in the embroidery frame 200 6 Pattern selection Turn the main power to ON and select an embroidery pattern 190 7 Embroidery frame attachment Attach the embroidery frame to the embroidery unit 206 8 Checking the layout Check and adjust the size and position of the embroidery 208 9 Embroidery thread setup Set up embr...

Страница 189: ...er e Use the included screwdriver to loosen the screw of the presser foot holder then remove the presser foot holder a Screwdriver b Presser foot holder c Presser foot holder screw Remove the presser foot holder f Position embroidery foot W on the presser foot bar so that the arm of embroidery foot W is behind the needle holder and the wiper is behind the needle a Arm b Needle holder c Presser foo...

Страница 190: ...the machine with the embroidery unit attached The embroidery unit could fall off and cause injury Keep your hands and foreign objects away from the embroidery carriage and frame when the machine is embroidering Otherwise injury may result To avoid distorting your embroidery design do not touch the embroidery carriage and frame when the machine is embroidering Note You can also sew utility decorati...

Страница 191: ...down the release button and pull the embroidery unit away from the machine a Release button CAUTION Always remove the embroidery frame before pressing Otherwise the frame may strike the embroidery foot and possibly cause injury The embroidery unit will not fit in the storage case if this step is not done Note Be sure to turn off the machine before removing the embroidery unit otherwise damage to t...

Страница 192: ... has finished the initialization and the carriage has moved to the start position the pattern type selection screen will display If another screen is displayed press then to display the screen below a Embroidery patterns b Brother Exclusives c Greek alphabet patterns d Floral alphabet patterns e Utility embroidery patterns f Frame patterns g Alphabet characters h Patterns saved in the machine s me...

Страница 193: ... 7 categories of patterns in this machine If a page number such as appears there is more than one pattern selection screen for that category Embroidery patterns Greek alphabet patterns Floral alphabet patterns Utility embroidery patterns Frame patterns Alphabet characters ...

Страница 194: ...SELECTING PATTERNS 192 Brother Exclusives Vintage designs Monogram designs New European designs Japanese designs Quilt designs ...

Страница 195: ...embroider Press to view the next page Press to view the previous page The selected pattern is displayed c Press to create a mirror image of the pattern as needed If a mistake has been made when selecting the pattern press the key of the pattern you want to embroider and the new selection appears d Press The sewing screen is displayed e Proceed to VIEWING THE SEWING SCREEN on page 198 to embroider ...

Страница 196: ...aracter and then press to change the size The size changes each time you press the key from large to medium to small If you make a mistake press to erase the mistake If the pattern is too small to see clearly you can use the key to check it e Press and enter lue Memo If you continue adding characters after changing the size the new characters will be entered in the new size You cannot change the s...

Страница 197: ...SELECTING PATTERNS Embroidery 195 5 f Press to enter a space g Press again and enter S h Press and then enter ky i Press The sewing screen is displayed ...

Страница 198: ... Frame shapes b Frame patterns Various frame patterns are displayed at the bottom part of the screen c Press the key of the frame pattern you want to embroider If you make a mistake selecting the pattern press the key of the pattern you want to embroider The selected pattern is displayed on the screen d Press The sewing screen is displayed e Proceed to VIEWING THE SEWING SCREEN on page 198 to embr...

Страница 199: ...machine a Primary top USB port b Embroidery card Reader USB card writer module b Insert the card completely into the card Reader USB card writer module Insert the embroidery card so that the end with a printed arrow is facing up c Press the key of the USB port that the embroidery card Reader USB card writer module is plugged into The patterns on the embroidery card are displayed on the selection s...

Страница 200: ... pattern not including time for changing and automatically trimming the thread h Shows the number of colors in the selected pattern and the number of the color currently being sewn i Shows the part of the embroidery that will be sewn with the first thread color j Shows the order for thread color changes and the embroidering time for each thread color The displayed time is the approximate time that...

Страница 201: ...key Press this key to create a horizontal mirror image of the pattern 243 t Multi color key Press this key to change the color of each letter when sewing alphabet character patterns 245 u Memory key Press this key to save a pattern in the machine s memory USB media or a computer 251 253 v Return key Press this key to return to the pattern type selection screen w Cut Tension key Press this key to s...

Страница 202: ...kness of less than 3 mm approx 1 8 inch Using fabrics thicker than 3 mm approx 1 8 inch may cause the needle to break When using layers with thicker batting etc you can sew more attractive embroidery by adjusting the embroidery presser foot height in the embroidery settings screen see below In the case of thick terry cloth towels we recommend that you place a piece of water soluble stabilizer on t...

Страница 203: ...e of stabilizer b Fabric wrong side Memo When embroidering on thin fabrics such as organdy or lawn or on napped fabrics such as towel or corduroy use water soluble sta bilizer sold separately for best results The water soluble stabilizer material will dissolve completely in water giving the project a more attractive finish ...

Страница 204: ... Medium Small Embroidery field 30 cm 20 cm approx 12 inches 8 inches Embroidery field 20 cm 20 cm approx 8 inches 8 inches Embroidery field 10 cm 10 cm approx 4 inches 4 inches Embroidery field 2 cm 6 cm approx 1 inch 2 1 2 inches Use when embroidering connected or combined characters or patterns or when embroidering large patterns Use when embroidering patterns between 10 cm 10 cm approx 4 inches...

Страница 205: ...nt screw and then remove the slack in the fabric by pulling on the edges and corners Do not loosen the screw d Gently stretch the fabric taut and tighten the frame adjustment screw to keep the fabric from loosening after stretching After stretching the fabric make sure the fabric is taut Make sure the inside and outside frames are even before you start embroidering a Outer frame b Inner frame c Fa...

Страница 206: ... want to embroider a Embroidery pattern b Mark b Place the embroidery sheet on the inner frame Align the guide lines on the embroidery sheet with the mark you made on the fabric a Inner frame b Guide line c Gently stretch the fabric so there are no folds or wrinkles and press the inner frame into the outer frame a Inner frame b Outer frame d Remove the embroidery sheet Memo You can use the include...

Страница 207: ...adhere the small piece of fabric to the larger piece in the frame If you do not wish to use a temporary spray adhesive attach the stabilizer with a basting stitch a Fabric b Stabilizer Embroidering Edges or Corners Use a temporary spray adhesive to adhere the small piece of fabric to the larger piece in the frame If you do not wish to use a temporary spray adhesive attach the stabilizer with a bas...

Страница 208: ...oidery frame holder a Embroidery frame holder b Embroidery frame guide c Slide the embroidery frame into the holder making sure to align the embroidery frame s with the holder s a Arrow mark d Lower the frame securing lever to be level with the frame to secure the embroidery frame in the embroidery frame holder a Frame securing lever Note Wind and insert the bobbin before attaching the embroidery ...

Страница 209: ...ATTACHING THE EMBROIDERY FRAME Embroidery 207 5 Removing the Embroidery Frame a Raise the frame securing lever b Pull the embroidery frame toward you ...

Страница 210: ...ering position This is useful for patterns which need to be embroidered in a particular position as shown below a Use a chalk pencil to draw a cross at the desired embroidering location a Chalk pencil mark Display the grid lines or cross grid lines in the pattern display area to check the pattern orientation Refer to Changing the Embroidery Frame Display on page 238 b Hoop the fabric Note When hoo...

Страница 211: ...een e Press to set the starting point to the center of the pattern f Press g Press the Presser Foot Lifter button to lower the presser foot h Press i Press the positioning keys to move the embroidery frame until the cross shaped chalk mark drawn on the fabric is displayed in the camera view window a Positioning keys a ...

Страница 212: ...nt of the pattern l Press the positioning keys to move the embroidery frame until the center point of the pattern in the camera view window is aligned with the chalk mark drawn on the fabric m Press to return to the previous screen n Press the Start Stop button to begin embroidering See Sewing Embroidery Patterns on page 219 Memo Press to enlarge the camera view By enlarging the camera view you ca...

Страница 213: ...dery frame moves so the fabric can be scanned Note When embroidery frame small H 2 cm W 6 cm H 1 inch W 2 1 2 inches is installed the built in camera cannot be used to align the embroidering position Install medium embroidery frame or larger For details on using thicker fabric such as quilting refer to Positioning the Pattern on Thick Fabric page 213 Note Check page 8 8 of Settings screen to make ...

Страница 214: ...oidery Patterns on page 219 When embroidery is finished the fabric displayed in the background disappears Whether the fabric disappears or remains displayed can be specified from page 8 8 of the Settings screen a Set to ON to leave the fabric displayed in the background b When set to OFF the background will disappear c Press to remove the background image completely Memo If necessary press to disp...

Страница 215: ...e with step f on page 212 to align the pattern with the desired embroidery position Using the Built In Camera to Align the Embroidering Position The embroidering position can easily be aligned using the machine s built in camera and the included embroidery positioning sticker a Affix the embroidery positioning sticker to the location in the fabric to be embroidered Place the embroidery positioning...

Страница 216: ...ery field for the frame that is used a Embroidery field b Embroidery pattern c Embroidery positioning sticker Depending on the type of fabric that is used a part of the embroidery positioning sticker may remain attached when it is peeled off Before using the embroidery positioning sticker check that it can be cleanly removed from a scrap piece of the fabric to be used Note Scanning cannot start fr...

Страница 217: ...ess To remove the embroidery positioning sticker more easily press so that the embroidery frame moves slightly forward and away from under the needle After the embroidery positioning sticker is removed press g Press the Start Stop button to begin embroidering See Sewing Embroidery Patterns on page 219 Note Attach embroidery foot W before pressing The embroidery foot W lowers and check the fabric t...

Страница 218: ...e following screen is displayed b From press the key for the position that you want to check a Selected position The needle will move to the selected position on the pattern c Press Memo To see the entire embroidering area press The embroidery frame moves and shows the embroidery area CAUTION Make sure the needle is up when the embroidery frame is moving If the needle is down it could break and re...

Страница 219: ...idered appears b Press to select the frame used in the preview Frames displayed in light gray cannot be selected Press to enlarge the image of the pattern The pattern can be sewn as it appears in the following display c Press to return to the original screen Memo You can begin sewing from this screen by pressing the Start Stop button ...

Страница 220: ...obbin case no color on the screw is set with tighter tension for embroidery with different weights of bobbin threads and a variety of embroidery techniques This bobbin case is identified with a dark colored mark on the inside of the bobbin cavity The screw on this case can be adjusted if necessary See page 338 for how to remove the bobbin case CAUTION When embroidering on large garments especially...

Страница 221: ...ace your fingernail in the groove and lift the plate out Sewing Embroidery Patterns Example a Embroidery color order b Cursor a Thread the machine with thread for the first color pass the thread through the hole in embroidery foot W pull out some thread to give it some slack and then lightly hold the end of the thread in your left hand CAUTION Push the embroidery needle plate cover as far as possi...

Страница 222: ... for embroidering the remaining colors When the last color is sewn Finished sewing will appear on the display Press and the display will return to the original screen Memo If there is thread left over from the beginning of sewing it may be sewn over as you con tinue embroidering the pattern making it very difficult to deal with the thread after the pattern is finished Trim the threads at the begin...

Страница 223: ...qué material The machine will sew around the outline of the appliqué pieces and will then stop c Remove the appliqué material from the embroidery frame and then cut carefully along the stitching After cutting remove all of the stitching thread carefully Carefully cut out the pattern on the outline you just sewed Do not cut inside the stitching line as the appliqué fabric will not be caught by the ...

Страница 224: ...qué material is a lightweight fabric you may want to use a fusible web on the back to stabilize the fabric and for appliqué placement Fuse appliqué in place with an iron Do not remove fabric from the frame to iron the appliqué material Memo Some patterns may not show all three appli qué steps Sometimes the APPLIQUE step will be shown as a color Memo Some glue may get onto the presser foot needle a...

Страница 225: ...e 225 Step3 When using iron on paper With a printer print the background onto iron on paper and print the embroidery position sheet on plain paper Then iron the background image onto fabric When using printable fabric With a printer print the background onto printable fabric and print the embroidery position sheet on plain paper See Printing the Background and Embroidery Position Sheet on page 226...

Страница 226: ...ss the key of the pattern you want to embroider An image of the pattern combined with the background appears Checking Only the Embroidery Pattern Press Only the embroidery pattern not the background image of the selected embroidery pattern is displayed To return to the image of the pattern combined with the background press Memo Refer to the Quick Reference Guide for the detail of patterns which e...

Страница 227: ...kground image only and one file for aligning embroidery into position are copied PDF format onto the USB media d Remove the USB media where the image data is saved from the machine and then copy the image data from the USB media to the computer Note Print the background and embroidery position sheet in their original dimensions If an image is printed in a different size the sizes of the embroidery...

Страница 228: ...s printed differs depending on whether iron on paper or printable fabric is used To view the PDF file Adobe Reader is needed If it is not installed on your computer you can download it from the Adobe Systems website http www adobe com a Open the PDF file to be printed click File Print and then set Page Scaling to None 100 b Print the background image When printing onto iron on paper print the file...

Страница 229: ...ng a Cellophane tape Note Before printing onto iron on paper or printable fabric we recommend performing a test print to check the print settings For details on printing on iron on transfer sheets or printable fabric refer to the instructions for the iron on transfer sheets and printable fabric Some printers will automatically print an image flipped if an iron on transfer sheet is selected as the ...

Страница 230: ...through f of Using the Built In Camera to Align the Embroidering Position on page 213 f Remove the positioning sheet and press the Start Stop button to begin embroidering Note Before embroidering check that the embroidery position sheet is perfectly aligned with the background CAUTION Before pressing the Start Stop button to begin embroidering remove the positioning sheet taped to the fabric in st...

Страница 231: ...he frame securing lever and remove the embroidery frame Be careful not to apply strong force to the fabric at this time Otherwise the fabric may loosen in the frame c Insert a wound bobbin into the machine see page 54 for Setting the bobbin d Press The carriage will return to its original position e Attach the embroidery frame f To return to the spot in the pattern where you stopped sewing follow ...

Страница 232: ... camera view window appears f Press or to move the needle back the correct number of stitches before the spot where the thread broke If you cannot move back to the spot where the thread broke press to select the color and move to the beginning position of that color then use or to move ahead to slightly before where the thread broke Press to enlarge the image in the screen Press to remove from the...

Страница 233: ...ed when embroidery is stopped The next time the machine is turned on you have the option to continue or delete the pattern a Current stitch number when embroidery was stopped a Turn the main power to ON b Follow the instructions shown on the screen and remove the embroidery frame The following message will appear Memo Even if the power goes out in the middle of embroidery the machine returns to th...

Страница 234: ...dery frame and press The previous sewing screen displayed before the machine was turned off appears d Continue embroidering a Stitch number when embroidery is resumed Memo If you want to start a new embroidery pat tern press so the pattern selection screen appears a ...

Страница 235: ...read is too tight resulting in the bobbin thread being visible from the right side of the fabric a Right side b Wrong side a Press b Press to weaken the upper thread tension The tension number will decrease c Press Note If the thread tension setting is made extremely weak the machine may stop dur ing sewing This is not the sign of a malfunc tion Increase the thread tension slightly and begin sewin...

Страница 236: ...s are required to accommodate different bobbin threads See Sewing Attractive Finishes on page 218 To adjust the bobbin tension for embroidery function using the alternate bobbin case with no color on the screw turn the slotted screw with a small screwdriver a Do not turn a phillips screw b Adjust with a screwdriver small Correct Tension Upper thread slightly appears on the wrong side of fabric a R...

Страница 237: ...nction will cut the thread at the end of sewing each color This function is initially turned on To turn this function off press key and then This function can be turned on or off during embroidering This setting returns to its default when the machine is turned off a Press b Press to turn off the automatic thread cutting function The key will display as When one color thread is sewn the machine wi...

Страница 238: ...he thread This function can be turned on or off during embroidering Select a setting from 5 mm to 50 mm in 5 mm increments Your customized setting remains after turning the machine off and on Press or to select the length of jump stitch For example Press to select 25 mm 1 inch and the machine will not trim a jump stitch of 25 mm or less before moving to the next stitching Note When this function i...

Страница 239: ...f the thread colors or the embroidery thread number Memo SPM is the number of stitches sewn in one minute Decrease the sewing speed when embroi dering on thin thick or heavy fabrics The sewing speed can be changed while embroidery is being sewn The maximum sewing speed setting does not change until a new setting is selected The setting specified before the main power is set to OFF remains selected...

Страница 240: ...try or area cotton like polyester thread is sold e Press Changing the Embroidery Frame Display a Press b Press c In the Embroidery Frame Display use to change the embroidery frame display mode There are 14 choices EMBROIDERY POLYESTER THREAD COUNTRY COTTON THREAD MADEIRA POLYESTER THREAD MADEIRA RAYON THREAD SULKY THREAD ROBISON ANTON POLYESTER THREAD 123 ...

Страница 241: ...t frame embroidering area 20 cm 20 cm 8 inches 8 inches d Embroidery area for optional large embroidery frame 18 cm 13 cm 7 inches 5 inches e Embroidering area for optional border embroidery frame 18 cm 10 cm 7 inches 4 inches f Medium frame embroidering area 10 cm 10 cm 4 inches 4 inches g Small frame embroidering area 2 cm 6 cm 1 inch 2 1 2 inches h Grid lines d Press ...

Страница 242: ...drag the pattern The pattern can also be dragged by selecting it directly in the screen with your finger or the touch pen Aligning the Pattern and the Needle Example Aligning the lower left side of a pattern and the needle CAUTION When you have revised the pattern check the display of available embroidery frames and use an appropriate frame If you use an embroidery frame not displayed as available...

Страница 243: ...f the pattern the embroidery frame moves so that the needle is positioned correctly d Press e Use to align the needle and the mark on the fabric and begin embroidering the pattern Changing the Size of the Pattern a Press b Select the direction in which to change the size Press to enlarge the pattern proportionately Press to shrink the pattern proportionately Press to stretch the pattern horizontal...

Страница 244: ...ern 90 degrees to the right Press to rotate the pattern 10 degrees to the left Press to rotate the pattern 10 degrees to the right Press to rotate the pattern 1 degree to the left Press to rotate the pattern 1 degree to the right Memo Some patterns or characters can be enlarged more than others Some patterns or characters can be enlarged to a greater degree if they are rotated 90 degrees You can c...

Страница 245: ...ontal Mirror Image Press so it appears as to create a horizontal mirror image of the selected pattern Press again to return the pattern to normal 0 Memo You can rotate the pattern by rotating the mouse wheel Rotate the mouse wheel away from you to rotate the pattern 10 degrees to the left Rotate the mouse wheel toward you to rotate the pattern 10 degrees to the right a ...

Страница 246: ...an be changed A setting between 80 and 120 in 5 increments can be specified a Press b Change the density Press to make the pattern less dense Press to make the pattern more dense a Normal b Fine stitches closer together c Coarse stitches farther apart The pattern density changes each time you press a button c Press to return to the pattern selection screen ...

Страница 247: ...it appears as Press the key again to return to the original setting b After a character is sewn change the thread color and then sew the next character Embroidering Linked Characters Follow the procedure described below to embroider linked characters in a single row when the entire pattern extends beyond the embroidery frame Example Linking DEF to the characters ABC a Select the character patterns...

Страница 248: ...r left corner of the pattern The embroidery frame moves so that the needle is positioned correctly d Press e Press Note To cancel the starting point setting and return the starting point to the center of the pattern press Use to select a different starting point for embroidering ...

Страница 249: ...ery frame and then attach the embroidery frame again so that the remaining characters DEF can be embroidered a End of the embroidering i As in step a select the character patterns for DEF j Press k Press The needle is positioned in the lower left corner of the pattern The embroidery frame moves so that the needle is positioned correctly l Press m Use to align the needle with the end of embroiderin...

Страница 250: ...r steps and then continue till the pattern is completed Press for the multicolor steps to become shaded and the selected pattern will embroider in a single color instead of changing the thread while embroidering Press again to return to the pattern s original settings The thread color displayed on the screen will be grayed out Memo Even if uninterrupted embroidering has been set the automatic thre...

Страница 251: ...actFlash Memory Stick Smart Media Multi Media Card MMC XD Picture Card CAUTION When using embroidery data other than our original patterns the thread or needle may break when sewing with a stitch density that is too fine or when sewing three or more overlapping stitches In that case use one of our original data design systems to edit the embroidery data Note The processing speed may vary by port s...

Страница 252: ... within the 300 mm H 200 mm W approx 12 inches H 8 inches W design field size pes files saved with the number of stitches or the number of colors exceeding the specified limits cannot be displayed The combined design can not exceed a maximum number of 500 000 stitches or a maximum number of 125 color changes Above numbers are approximate depending on the overall size of the design Use one of our d...

Страница 253: ...en is displayed When the pattern is saved the display returns to the original screen automatically If the Memory is Full If the screen below displays either the maximum number of patterns have been saved or the pattern you want to save takes a lot of memory and the machine cannot save it If you delete a previously saved pattern you can save the current pattern a Press Press to return to the origin...

Страница 254: ...he Saving screen is displayed You will lose the pattern you are saving b a Memo If there is enough memory available after deleting the pattern the pattern you want to save will be saved automatically If there is not enough memory available after deleting the pattern repeat the steps above to delete another pattern from the machine s memory It takes a few seconds to save a pattern See page 254 for ...

Страница 255: ...er or not they are turned on a USB port for computer b USB cable connector The Removable Disk icon will appear in Computer My computer on the computer Note The processing speed may vary by port selection and quantity of data The primary top USB port processes the data faster than the center port It is recommended to use the primary top USB port Two USB media cannot be used with this machine at the...

Страница 256: ...attern will be temporarily saved to Removable Disk under Computer My computer e Select the pattern s phc file in Removable Disk and copy the file to the computer Retrieving Patterns from the Machine s Memory a Press The machine displays the patterns currently in the memory b Press the key of the pattern you want to retrieve Press to return to the original screen ...

Страница 257: ...oidery patterns and a folder in a top folder are displayed c Press when there is a subfolder to sort two or more stitch patterns to USB media the embroidery pattern in the subfolder is displayed Press to return to the original screen without recalling a Folder name b Embroidery patterns in USB media c Path The path to shows the current folder at the top of the list Embroidery patterns and subfolde...

Страница 258: ...onding USB ports for the computer and for the machine see page 253 b On the computer open Computer My computer then go to Removable Disk c Move copy the pattern data to Removable Disk Pattern data in Removable Disk is written to the machine d Press The patterns in the computer are displayed on the selection screen Note While data is being written do not discon nect the USB cable Do not create fold...

Страница 259: ...USING THE MEMORY FUNCTION Embroidery 257 5 e Press the key of the pattern you want to recall Press to return to the original screen f Press The sewing screen is displayed ...

Страница 260: ...stitch and one pattern with a satin stitch a Select a straight stitch frame pattern Embroider the pattern onto the appliqué material then cut neatly around the outside of the shape b Embroider the same pattern from step a onto the base fabric c Apply a thin layer of fabric glue or a temporary spray adhesive to the rear of the appliqué created in step a Attach the appliqué to the base fabric matchi...

Страница 261: ...ou do not have to change the fabric in the embroidery frame using this method Embroider one pattern with a straight stitch and one pattern with a satin stitch a Select a straight stitch frame pattern and embroider the pattern onto the base fabric b Place the appliqué fabric over the pattern embroidered in step a Be sure that the appliqué fabric completely covers the seam Note If you change the siz...

Страница 262: ... f Reattach the embroidery frame to the embroidery unit and embroider the satin stitch pattern to create an appliqué Note Do not remove the fabric from the embroi dery frame to cut it Also do not pull strongly on the fabric Otherwise the fabric may loosen in the frame Note Do not change the size or position of the pattern If you change the size or position of the pat terns when selecting them make...

Страница 263: ...ibes how to read the split embroidery pattern shown below from USB media and embroider it a Connect to the machine the media containing the created split embroidery pattern and then select the split embroidery pattern to be embroidered For details on recalling patterns refer to Selecting Patterns from Embroidery Cards on page 197 Recalling from USB Media on page 255 or Recalling from the Computer ...

Страница 264: ...on to embroider the pattern section f When embroidering is finished the following screen appears Press A screen appears so that a section of the split embroidery pattern can be selected g Repeat steps b through f to embroider the remaining sections of the pattern Memo The pattern can be rotated 90 to either the left or right when is pressed ...

Страница 265: ... 277 Changing the Thread Color 277 Creating a Custom Thread Table 278 Adding a Color to the Custom Thread Table from the List 280 Saving the Custom Thread Table to USB media 280 Recalling the Custom Thread Table data from USB media 281 Choosing a Color from the Custom Thread Table 282 Find New Color Schemes With the Color Shuffling Function 283 Designing Repeated Patterns 285 Sewing Repeated Patte...

Страница 266: ...parately sold embroidery cards and many other patterns Move Patterns Within the 30 cm 20 cm approx 12 inches 8 inches wide embroidery area you can change the position of patterns and check the position on the LCD Rotate Patterns You can rotate patterns one degree ten degrees or ninety degrees at a time Enlarge or Reduce Patterns You can make patterns larger or smaller This function is not availabl...

Страница 267: ...abet characters h Patterns saved in the machine s memory see page 254 i Patterns saved in USB media see page 255 j Patterns saved on the computer see page 256 k Press this key to position the embroidery unit for storage Memo See page 191 for more information on each category s selection screen Note You can also sew Utility Stitches or Character Decorative Stitches with the embroidery unit attached...

Страница 268: ...c Press The pattern selected for editing is outlined in red on the embroidery edit display d Proceed to EDITING PATTERNS on page 268 to edit the pattern Selecting Alphabet Character Patterns When you select character patterns from the embroidery edit screen you can edit the appearance of the pattern at the same time a Press b Select the font then enter the characters Example A B C D See page 194 f...

Страница 269: ...f the arc Press to make the arc flatter Press to make the arc rounder e Press to return to the original screen f After you finish your selections press The embroidery edit screen will appear g Proceed to EDITING PATTERNS on page 268 to edit the pattern Memo When selecting and change to and You can increase or decrease the incline ...

Страница 270: ...tern currently selected c Shows the distance from the center of the frame d Shows the color sequence and times of each step of the pattern currently selected e Shows the degree of rotation for the pattern Memo If a key display is light gray you cannot use that function with the selected pattern a c b d e a e d b c ...

Страница 271: ...Press this key to add another pattern to the editing pattern 294 h Delete key Press this key to delete the selected pattern the pattern outlined by the red box 272 i Pattern select key When a combined pattern is selected use these keys to select a part of the pattern to edit 297 j Sewing key Press this key to call up the sewing screen 294 k Array key Press this key to change the configuration of a...

Страница 272: ...e pattern to be resized and then press c Press d Press to enter Stitch Recalculator mode Note Be sure to sew trial embroidery using same fabric and threads as project in order to check the sewing results Note This function cannot be used with alphabet character patterns frame patterns or border patterns However a border pattern can be edited after this function has been used Patterns with a large ...

Страница 273: ...ng between 80 and 120 in 5 increments can be specified Press to make the pattern less dense Press to make the pattern more dense Note Depending on the pattern embroidering may not be possible at the appropriate thread density Before sewing on your project be sure to sew trial embroidery on a piece of scrap fabric that is the same as the fabric used in the project using the same needle and embroide...

Страница 274: ...tern from the screen Displaying Patterns in the Screen Magnified by 200 a Press changes to and the pattern is magnified by 200 b Check the displayed pattern Use to scroll through the display in any direction c To display the pattern back to the normal size 100 press ...

Страница 275: ... Configuration of Alphabet Character Patterns a Press b Press the key of the layout you want to embroider See page 267 for more information about layout types The display will show the selected layout c Press Changing Alphabet Character Spacing a Press ...

Страница 276: ...eturn to the original screen Reducing Character Spacing The spacing between characters can be reduced to 50 of the narrowest character in the group Note It is not recommended to edit data and transfer to other or older version machines Same features do not apply in other machines so problems may occur Character spacing can be reduced only when characters are arranged normally on a straight line ...

Страница 277: ...he character spacing or to separately edit the patterns after all characters have been entered a Press b Press The key appears as c Use to select where the pattern is to be separated and then press to separate it For this example the pattern will be separated between T and a Note A separated character pattern cannot be combined again ...

Страница 278: ...racter spacing e Press Changing the Color of Each Alphabet Character in a Pattern a Press so you can assign a thread color to each character b Change the thread to sew each character in a different color Press to change the colors in the sewing order a Color for each character a ...

Страница 279: ...he sewing order and selecting a new color from the thread colors in the machine a In the pattern editing screen press The thread color palette screen displays b Press or to put the color you want to change at the top of the sewing order a 64 Embroidery threads table c Press to choose a new color from the color palette To return to the original color press If multiple colors have been changed this ...

Страница 280: ...color on the custom thread table You can choose colors from the custom thread from the custom thread table by directly touching the screen with the touch pen You can scroll through 100 colors at a time using and on the custom thread table a Custom thread table b Press to recall the custom thread table data See page 281 Memo To select a color from the Custom Thread Table Choosing a Color from the C...

Страница 281: ...ead color number The selected thread color is set in the custom thread table f Repeat the previous steps until all desired thread colors are specified To delete a specified color from the palette press To delete all the specified color from the palette press a Note If is not pressed the thread color number will not be changed Note You can save the created custom thread table data Refer to Saving t...

Страница 282: ...fied color from the palette press To delete all the specified color from the palette press f Press to return to the original screen Saving the Custom Thread Table to USB media You can save a custom thread table data file to USB media a Press and then press b Set your desired colors in the custom thread table according to the procedure in Creating a Custom Thread Table on page 278 b a Note Custom t...

Страница 283: ...ata from USB media a Insert the USB media containing the custom thread table data into the primary top USB port a Primary top USB port for media b USB media b Press and then press Note Two USB media cannot be used with this machine at the same time If two USB media are inserted only the USB media inserted first is detected Note Do not insert or remove USB media while Saving screen is displayed You...

Страница 284: ...n the screen Choosing a Color from the Custom Thread Table You can select a color from the up to 300 thread colors you have set in the custom thread table a Press The thread color palette screen displays b Press or to put the color you want to change at the top of the sewing order Note Do not insert or remove USB media while Saving screen is displayed You will lose some or all of the data you are ...

Страница 285: ...r palette screen appears b Press You can select the color shuffling function either from thread table 64 colors or custom thread table 300 colors The thread table 64 colors is the preset color table and the custom thread table 300 colors is the color table that you can set as you like By setting the embroidery thread colors of the brand you have you can create your embroidery pattern with your own...

Страница 286: ...m samples Press to display the new schemes a Press to review the previous schemes Note Selection for the desired number of colors must stay within the range for the number of thread changes for the pattern you selected If an error message appears in this step refer to page 349 a b Note Maximum 10 pages of schemes can be reviewed After 10 pages of schemes the oldest page is deleted every time you p...

Страница 287: ... the selected page prior to pressing Press or to display the other color schemes The embroidery edit screen will appear Designing Repeated Patterns Sewing Repeated Patterns Using the border function you can create stitches using repeated patterns You can also adjust the spacing of the patterns within a repeated pattern stitch a Select a pattern and then press b Press ...

Страница 288: ...g on the direction selected d Use to repeat the pattern on top and to repeat the pattern at the bottom To delete the top pattern press To delete the bottom pattern press e Adjust the spacing of the repeated pattern To widen spacing press To tighten spacing press a Press to change a repeated pattern back to one single pattern f Complete repeated patterns by repeating steps c through e a c e b d e M...

Страница 289: ...be cut Press to cut horizontally Press to cut vertically The pattern direction indicator will change depending on the direction selected Memo When there are two or more patterns all patterns will be grouped together as one pattern in the red frame When changing the direction in which the pattern will be repeated all of the patterns in the red frame will automatically be grouped as one repeating un...

Страница 290: ...EDITING PATTERNS 288 b Use and to select the cut line The cut line will move c Press The repeated pattern will be divided into separate elements d Press e Use and to select the element to repeat ...

Страница 291: ...er manually Note Once you have cut a repeated pattern into separate elements you cannot return to the original repeated pattern Each element can be edited separately in the edit screen See Selecting combined embroidery patterns on page 297 Memo In combined stitch patterns that contain two or more border patterns or other patterns combined with border patterns the sewing order of only the border pa...

Страница 292: ...al thread When sewing a series of patterns use the point of this arrow for positioning the following designs to be sewn a Press b Press c Press to select the thread mark to be sewn d Press Memo When repeatedly sewing individual patterns thread marks can be sewn around the perimeter of the pattern only Memo When there are two or more elements use and or and to select a pattern that you want to assi...

Страница 293: ... begin embroidering When embroidering is finished the thread mark is sewn with the last thread color d Remove the embroidery frame e Rehoop the fabric in the embroidery frame Memo The optional border frame allows you to easily rehoop the fabric without removing the embroidery frame from the machine Note Adjust the position of the fabric so that the embroidering area for the next pattern is within ...

Страница 294: ...h Touch i Press the Presser Foot Lifter button to lower the presser foot j Press k Press l Press the positioning keys to move the embroidery frame until the thread mark on the fabric is aligned on the starting point in the camera view window a Grid lines b Thread mark on the fabric c Positioning keys Press to check the embroidering position a c b ...

Страница 295: ...tern Memo Press to enlarge the camera view By enlarging the camera view you can make a close adjustment for the needle drop position moving the embroidery frame little by little Note When embroidering the repeated pattern you cannot rotate the pattern in the camera view window If the pattern is rotated in the camera view window you cannot sew the pattern properly aligned even if the thread mark an...

Страница 296: ...RNS 294 After Editing a Press To combine the pattern with other patterns select see page 295 See page 218 for more information about sewing patterns Memo If you want to return to the edit screen after pressing press ...

Страница 297: ...Embroidery Edit 295 6 COMBINING PATTERNS Editing Combined Patterns Example Combining alphabet characters with an embroidery pattern and editing a Press to select an embroidery pattern b Use to view 2 7 then select c Press ...

Страница 298: ...creen f Select and enter Spring After selecting press to change the character case then enter the remaining characters The characters you enter will be displayed in the center of the display g Press h Use to move the characters With a USB mouse your finger or the touch pen drag the characters to move them ...

Страница 299: ...cting combined embroidery pat terns If multiple patterns have been combined use to select the pattern to be edited If a USB mouse is connected the pattern can be selected by clicking it Move the mouse to position the pointer over the desired pattern and then click the left mouse button In addition patterns can be selected by directly touching the screen with your finger or touch pen Memo Use to se...

Страница 300: ...oidery order will be as follows a Embroider by following the color order on the right side of the display After the flowers are embroidered the cursor will move to the Spring part of the pattern b Embroider When Spring is embroidered the display returns to the sewing screen Note Follow the directions in Sewing Embroidery Patterns on page 219 ...

Страница 301: ...line of the pattern This is useful for embroidering fabric that cannot have stabilizer material affixed with an iron or adhesive By stitching stabilizer material to the fabric shrinkage of the stitching or misaligned pattern can be minimized a Press and then display 7 8 of the settings screen b Use and to specify the distance from the pattern to the basting stitching Note It is recommended to fini...

Страница 302: ... will be used to create an appliqué piece Note When is pressed the pattern is moved to the center After selecting the basting setting move the pattern to the desired position Memo To cancel the setting press If no pattern is selected the key appears gray and cannot be selected Note Felt or denim fabrics are recommended to make the appliqué piece Depending on the pattern and fabric used lighter wei...

Страница 303: ...e selecting the appliqué setting If the pattern is edited after selecting the appliqué setting the appliqué stitching and pattern may become misaligned Since an outline is added the pattern for an appliqué piece when the appliqué setting is selected will be larger than the original pat tern First adjust the size and position of the pattern as shown below a Embroidering area b Approx 1 cm c Pattern...

Страница 304: ... and cannot be selected Memo Three steps are added to the sewing order appliqué cutting line position of pattern placement on the garment and appliqué stitching a Cutting line for appliqué b Position of pattern placement on garment c Appliqué stitching Note An appliqué piece cannot be created if the pattern is too large or too complicated or a combined pattern is separated Even if the selected pat...

Страница 305: ...igns with the placement line Memo We recommend using thread for the cutting line that is closest to the color of the fabric Note Depending on the pattern density and fabric used there may be shrinking of the pattern or the appliqué may be misaligned with the placement line We recommend cutting slightly outside of the cutting line When using patterns that are vertically and horizontally symmetrical...

Страница 306: ...the appliqué piece and then iron it if necessary Using a Frame Pattern for the Out line Using a frame pattern the desired shape can be added as the outline of the appliqué a Perform the operations described in steps a through d of Creating an Appliqué Piece on page 300 b Select the desired frame shape and pattern and add it to the appliqué pattern Memo The outline is sewn using satin stitching Som...

Страница 307: ...size of the appliqué pattern d Press and then press e Press to select the appliqué piece setting f Press g Use to select the frame pattern and then press and The frame pattern is deleted h Press i Continue with step g of Creating an Appliqué Piece on page 300 to complete the appliqué piece ...

Страница 308: ...y patterns See page 249 for more information about the MEMORY FUNCTION PRINT AND STITCH COMBINING EMBROIDERY PATTERNS AND PRINTED DESIGNS Completed embroidery patterns combined with printed designs are built into this machine Beautiful three dimensional embroidered designs can be created by ironing a background onto fabric or printing it onto printable fabric then sewing complementary embroidery o...

Страница 309: ...d 312 CREATING BOBBIN WORK SEWING 314 Positioning the Fabric and Sewing 314 Finishing the thread ends 316 Bobbin Work Free Motion Sewing 317 CREATING BOBBIN WORK EMBROIDERY 318 Selecting the Pattern 318 Start Embroidering 320 ADJUSTING THE THREAD TENSION 322 Adjusting the upper thread tension 322 Adjusting the tension of the bobbin thread 322 TROUBLESHOOTING 323 The thread was accidentally cut aut...

Страница 310: ...is too thick to be threaded through the machine s needle The decorative thread or ribbon will stitch out on the underneath side of fabric while sewing with the fabric wrong side facing up Bobbin work embroidery is sewn using the bobbin work patterns included with this product in addition to some of the utility stitches 1 Utility stitches 2 Decorative stitches 3 Free motion sewing ...

Страница 311: ...lyester light weight thread 50wt or above that is the same color as the lower thread Needle Use a needle appropriate for the upper thread and fabric being used Refer to Fabric Thread Needle Combinations on page 69 and Embroidery Step by Step on page 186 Presser foot Utility stitches or decorative stitches Monogramming foot N Free motion sewing Free motion quilting foot C Free motion open toe quilt...

Страница 312: ...e Bobbin Thread In order to create bobbin work the bobbin case must be replaced with the one for bobbin work Before creating bobbin work clean the bobbin case and the race a Raise the needle and presser foot and then turn off the machine b Remove the flat bed attachment or embroidery unit c Grasp both sides of the needle plate cover and then slide it toward you to remove it a Needle plate cover d ...

Страница 313: ...eparing the Bobbin Thread on page 310 for removing and cleaning the bobbin case gray and then reinstall the standard bobbin case black CAUTION Be sure to use the bobbin case gray when creating bobbin work Using any other bobbin case may result in the thread becoming tangled or damage to the machine Make sure that the bobbin case is correctly installed If the bobbin case is incorrectly installed th...

Страница 314: ...d so the thread unwinds from the right side and hold the end of the thread with your right hand k Pull out about 8 cm approx 3 inches of bobbin thread l Lightly hold the end of the upper thread while turning the handwheel toward you counterclockwise until the mark on the handwheel aligns with the center top of machine CAUTION When winding the bobbin make sure the thread is not frayed Sewing with f...

Страница 315: ...Cleaning the Race on page 338 a Bobbin cover b Bobbin cover with tabs q Install the flat bed attachment or embroidery unit This completes the upper and lower threading CAUTION When creating bobbin work use the bobbin cover with tabs otherwise the thread may become tangled or the needle may break Note When installing the needle plate cover do not allow it to pinch the thread Note When installing th...

Страница 316: ...s project in order to check the sewing results The bobbin thread may become tangled due to the type of pattern and thread that are being used Since this may cause the needle to break immediately stop sewing if this occurs Turn off the machine and cut out the tangled thread with scissors Then clean the race and bobbin case as described in Preparing the Bobbin Thread on page 310 Memo For best result...

Страница 317: ...op of the bobbin thread comes out through the hole in the fabric l Raise the presser foot lever and then use tweezers to pull up the bobbin thread and bring the end of the thread to the top of the fabric m Align the upper thread and bobbin thread and then pass them under the presser foot toward the rear of the machine n While gently holding threads at the rear of the machine turn the handwheel to ...

Страница 318: ...side of fabric c If the desired results could not be achieved adjust the tension of the bobbin thread and of the upper thread and then try sewing the stitching again For more details refer to ADJUSTING THE THREAD TENSION on page 322 Note Before sewing check that there is enough thread in the bobbin Note Do not sew reinforcement reverse stitches at the end of the stitching otherwise the threads may...

Страница 319: ...h your decorative thread will be on the underneath side of your fabric and the stabilizer will be on the top of the wrong side of your fabric For bobbin work free motion sewing use the instructions for CREATING BOBBIN WORK SEWING on page 314 For information about using the free motion quilting foot C free motion open toe quilting foot O or free motion echo quilting foot E refer to Free Motion Quil...

Страница 320: ...hat had been selected the automatic thread cutting function is turned off When a bobbin work embroidery pattern is selected the embroidery sewing speed is automatically set at 350 spm Note Prepare the machine for bobbin work as described in PREPARING FOR BOBBIN WORK on page 309 Note For an estimated length of bobbin thread required for each pattern refer to the Quick Reference Guide included with ...

Страница 321: ...ng function is turned off Afterward if a pattern other than one for bobbin work is selected the automatic thread cutting function is returned to the setting that was selected before the embroidery pattern for bobbin work was chosen Note Since bobbin work is sewn from the wrong side of the fabric the pattern shown in the screen appears as a mirror image of the final sewn embroidery If necessary fli...

Страница 322: ...rame moves to the beginning of stitching c Press d Press The screen changes and all keys and operation buttons are locked e Using the presser foot lever raise the presser foot f To bring the bobbin thread above the fabric rotate the handwheel counterclockwise while holding the upper thread g As shown below pull the upper thread to pull the bobbin thread up through the fabric a Upper thread b Bobbi...

Страница 323: ...ing needle pull the bobbin thread to the top wrong side of the fabric and then tie the upper thread and the bobbin thread together o Remove the fabric from the embroidery frame and check the finished embroidery p If the desired results could not be achieved adjust the tension of the bobbin thread and of the upper thread and then try sewing the pattern again For more details refer to ADJUSTING THE ...

Страница 324: ...river To increase the tension of the bobbin thread turn the slotted head screw 30 to 45 clockwise To decrease the tension of the bobbin thread turn the slotted head screw 30 to 45 counterclockwise Note Turning the screw on the bobbin case gray may push up the spring plate as shown below If this occurs gently press down the spring plate with a screwdriver so it is lower than the top surface of the ...

Страница 325: ...ing thread out to the left side of presser foot Press the Thread Cutter button again The pattern is misaligned Refer to ADJUSTING THE THREAD TENSION and increase the upper thread tension If the pattern is still misaligned reduce the tension of the bobbin thread Example Decorative Stitch a Correct tension b The upper thread tension is too loose or the bobbin thread tension is too tight The bobbin t...

Страница 326: ...TROUBLESHOOTING 324 ...

Страница 327: ...NTERING STITCH DATA 328 Key Functions 328 Moving a Point 331 Moving Part or All of the Design 331 Inserting New Points 332 USING STORED CUSTOM STITCHES 334 Storing Custom Stitches in Your List 334 If the Memory is Full 334 Retrieving Stored Stitches 335 ...

Страница 328: ... the grid and connect all the points with a line d Determine the x and y coordinates of each of the marked points Memo Stitches that you create with MY CUSTOM STITCH can be a maximum of 7 mm approx 9 32 inch wide and 37 mm approx 1 1 3 inches long Stitches can be designed more easily with MY CUSTOM STITCH if you first draw the stitch on the included grid sheet Memo Simplify the design so that it c...

Страница 329: ... 13 12 13 10 12 8 12 7 12 6 10 5 10 10 13 14 14 12 11 10 9 8 6 6 3 2 0 2 Stitch 31 32 33 34 35 36 37 38 39 40 41 42 43 44 45 16 19 23 22 17 22 23 19 42 1 0 0 6 10 6 0 0 0 Stitch 1 2 3 4 5 6 7 8 9 10 11 12 13 14 15 0 3 5 8 12 17 20 24 27 29 31 32 30 27 24 0 5 8 11 13 14 14 13 12 11 9 6 3 1 0 Stitch 16 17 18 19 20 21 22 23 24 25 26 27 28 29 30 21 18 16 15 15 16 18 21 25 28 33 37 41 43 44 0 1 3 5 8 1...

Страница 330: ... stitch 330 334 h MY CUSTOM STITCH memory key Press this key to store the stitch being created 334 i Block move key Press this key to group points together and move them together 331 j Insert key Press this key to insert new points on the stitch design 332 k Set key Press this key to set a point on the stitch design 329 331 l Arrow keys Use these keys to move over the display area 329 333 m Point ...

Страница 331: ...the stitch being created a Currently selected point Total number of points b Coordinates of d Press to add the point indicated by To insert coordinates with the touch pen move the tip of the pen to a desired point Once you release the pen from the screen a point will be entered into the graph at those coordinates The number of the currently selected points along with the total number of points wil...

Страница 332: ...uous line Press to delete a selected point entered Press to sew a test run of the stitch Press to return to the original screen Press to view an image of the stitch Memo If you have entered points that are too close together the fabric may not feed properly Edit the stitch data to leave a larger space between points If the stitch design is to be repeated and linked make sure that linking stitches ...

Страница 333: ...int press You can also move by using the touch pen b Use to move the point Moving Part or All of the Design a Press or to move to the first point of the section that you want to move To move to the first point press To move to the last point press You can also move by using the touch pen b Press The selected point and all points that were entered after it are selected ...

Страница 334: ...ction d Press The section will be moved Inserting New Points a Press or to move to a place on the design where you want to add a new point To move to the first point press To move to the last point press You can also move by using the touch pen b Press ...

Страница 335: ...ENTERING STITCH DATA 333 MY CUSTOM STITCH 8 A new point is entered and moves to it c Use to move the point ...

Страница 336: ...ce available in the memory To be able to store the stitch pattern in the machine s memory a previously stored stitch pattern must be deleted Memo Storing a stitch pattern takes a few seconds For details on retrieving a stored stitch pat tern see page 335 Note Do not turn off the machine while the Sav ing message is displayed otherwise the stitch pattern data being saved may be lost Note To save cu...

Страница 337: ...etrieving Stored Stitches a Press A list of stored stitch patterns is displayed b Select the stitch pattern Press to return to the previous screen without retrieving c Press To delete the stored stitch pattern press To edit the stored stitch pattern press ...

Страница 338: ...USING STORED CUSTOM STITCHES 336 ...

Страница 339: ...he Cutter in the Bobbin Case Area 340 About the Maintenance Message 341 ADJUSTING THE SCREEN 342 Adjusting the Brightness of the Screen Display 342 Touch Panel is Malfunctioning 342 TROUBLESHOOTING 343 ERROR MESSAGES 348 Alarm Sounds 355 SPECIFICATIONS 356 UPGRADING YOUR MACHINE S SOFTWARE 357 Upgrade Procedure Using USB Media 357 Upgrade Procedure Using Computer 358 STITCH SETTING CHART 359 INDEX...

Страница 340: ...screen is dirty gently wipe it with the included LCD cleaning cloth or a soft dry cloth Do not use organic solvents or detergents Cleaning the Machine Casing If the surface of the machine is dirty lightly soak a cloth in a neutral detergent squeeze it out firmly and then wipe the surface Then wipe again with a dry cloth Cleaning the Race If dust or bits of dirt collect in the race or bobbin case t...

Страница 341: ... needle plate cover is removed f Grasp the bobbin case and then pull it out a Bobbin case g Use the cleaning brush or a vacuum cleaner to remove any lint and dust from the race and bobbin thread sensor and the surrounding area a Cleaning brush b Race c Bobbin thread sensor h Insert the bobbin case so that the S mark on the bobbin case aligns with the z mark on the machine Align the S and z marks a...

Страница 342: ...ewdriver included with the machine to unscrew and remove the needle plate c Use the cleaning brush or a vacuum cleaner to remove any lint and dust from the cutter in the bobbin case area a Cutter CAUTION Never use a bobbin case that is scratched otherwise the upper thread may become tangled the needle may break or sewing performance may suffer For a new bobbin case part code XE5342 101 green marki...

Страница 343: ...ake your machine to an authorized dealer or nearest authorized service center for a regular maintenance check Although this message will disappear and the machine will continue to function once you press the message will display several more times until the appropriate maintenance is performed Please take the time to arrange the maintenance your machine requires once this message appears Such step...

Страница 344: ...es not respond correctly when you touch a key the machine does not perform the operation or performs a different operation follow the steps below to make the proper adjustments a Holding your finger on the screen turn the main power switch to OFF and back to ON The touch panel adjustment screen is displayed b Using the included touch pen lightly touch the center of each in order from 1 to 5 c Turn...

Страница 345: ...read the machine 57 Bobbin is set incorrectly Reset the bobbin If needle plate was removed reinstall needle plate and tighten screws prior to installing bobbin case 54 Using improper needle or thread for the selected fabric Check the Fabric Thread Needle Combination chart 69 Presser foot holder is not attached correctly Reattach the presser foot holder correctly 66 Thread tension is set incorrectl...

Страница 346: ...ll the needle correctly 67 Needle clamp screw is not tightened Tighten the needle clamp screw 68 Needle is turned or bent Replace the needle 67 Using improper needle or thread for the selected fabric Check the Fabric Thread Needle Combination chart 69 Wrong presser foot was used Use the recommended presser foot STITCH SETTING CHART Upper thread tension is too strong Adjust the thread tension setti...

Страница 347: ...pool cap then reattach the spool cap 57 Wrong presser foot Use the correct presser foot STITCH SETTING CHART High pitched sound while sewing Dust or lint is caught in the feed dogs Remove the dust or lint 338 Pieces of thread are caught in the race Clean the race 338 Upper threading is incorrect Check the steps for threading the machine and rethread the machine 57 There are scratches on the race R...

Страница 348: ... turn out Be careful when removing or reattaching the embroidery frame during sewing 229 Stabilizer is incorrectly attached for example it is smaller than the embroidery frame Attach the stabilizer correctly 200 Loops appear on the surface of the fabric when embroidering The thread tension is incorrectly set Adjust the thread tension 233 235 The tension of the upper thread is incorrectly set for t...

Страница 349: ...rn selected the machine may feed the fabric even if the needle is raised This is due to the needle bar release mechanism At these times the machine will make a sound different from what is made during normal sewing This is not the sign of a malfunction If the power is disconnected during sewing Turn the main power to OFF and unplug the machine If you restart the machine follow the instructions for...

Страница 350: ...sons related to thread delivery This message is displayed when the embroidery unit is initializing This message is displayed when you try to sew with a stitch other than a middle needle position stitch while the single hole needle plate is installed This message is displayed when the needle plate is removed with the machine on or when the machine is turned on and embroidery or embroidery edit mode...

Страница 351: ...ect the edge of the fabric using the built in camera press raise the presser foot and then perform the operation again see page 148 This message is displayed when the built in camera cannot detect the edge of the fabric If this message appeared after sewing has reached 1 to 2 cm about 3 8 to 3 4 inch from the edge of the fabric refer to step m in Edge Sewing on page 154 If this message appeared du...

Страница 352: ...when there are too many characters and the curved character configuration is impossible This message is displayed when the machine is in embroidery mode and the character pattern combination is too large to fit in the embroidery frame This message is displayed when the machine is in embroidery mode and the combined character pattern is too large for the embroidery frame You can rotate the pattern ...

Страница 353: ...ry frame small is attached while aligning the embroidery position using the built in camera This message is displayed when is pressed when changing thread colors This message appears if the machine is turned off while sewing then turned on again Press to return the machine to the condition pattern position and number of stitches when it was turned off Follow the procedure described in If the Threa...

Страница 354: ...he embroidery position sticker and then try aligning the position again See page 208 This message is displayed when the upper thread is broken or not threaded correctly and the Start Stop button or the Reverse Reinforcement Stitch button is pressed This message is displayed when the Presser Foot Lifter button is pushed while the presser foot lever is raised the needle is lowered This message is di...

Страница 355: ...y that the data for the selected pattern is corrupted This message is displayed when the buttonhole lever is down a stitch other than a buttonhole is selected and the Start Stop button or the Reverse Reinforcement Stitch button is pushed This message is displayed when the embroidery unit is attached and the power is turned on with the needle in the down position This message is displayed when the ...

Страница 356: ...played when a button such as the Start Stop button is pushed while the presser foot is raised This message is displayed if some malfunction occurs This message is displayed when you try to use incompatible USB media For a list of compatible USB media visit http solutions brother com This message is displayed when it seems that the upper thread has not been threaded correctly This message is displa...

Страница 357: ... is incompatible with this machine Check the list of compatible file formats see page 40 This message is displayed when the image is deleted This message is displayed when you press in the screen other than the Utility Stitch or press in the screen other than the Utility Stitch or Character Decorative Stitch Memo To cancel the operation beep or to change the volume press display screen 3 8 and the...

Страница 358: ...ox Box 2 of 3 Dimensions of box Approx 68 5 cm W 15 2 cm H 39 4 cm D approx 26 31 32 inches W 6 inches H 15 33 64 inches D Weight of box for shipping Approx 5 kg approx 11 lb Embroidery Unit Box 3 of 3 Dimensions of embroidery unit Approx 51 0 cm W 13 9 cm H 46 2 cm D approx 20 5 64 inches W 5 15 32 inch H 18 3 16 inches D Dimensions of machine with embroidery unit attached Approx 81 6 cm W 33 2 c...

Страница 359: ... c Insert the USB media into the primary top USB port on the machine The media device should only contain the upgrade file a Primary top USB port for media b USB media d Press The upgrade file is loaded Note When using USB media to upgrade the software check that no data other than the upgrade file is saved on the USB media being used before starting to upgrade Note The access lamp will begin blin...

Страница 360: ...cable connector into the corresponding USB ports for the computer and for the machine Removable Disk will appear in Computer My computer d Copy the upgrade file to Removable Disk The following message will appear e When the message disappears press The upgrade file is loaded f Unplug the USB cable and turn the machine off and on again Note If an error occurs a red text error message will appear Wh...

Страница 361: ...nforcement stitch is sewn while pressing Reverse Reinforcement Stitch button 3 5 1 8 0 0 7 0 0 1 4 2 5 3 32 0 2 5 0 1 64 3 16 OK J Triple stretch stitch General sewing for reinforcement and decorative topstitching 0 0 0 0 0 7 0 0 1 4 2 5 3 32 1 5 4 0 1 16 3 16 OK J Stem stitch Reinforced stitching sewing and decorative applications 1 0 1 16 1 0 3 0 1 16 1 8 2 5 3 32 1 0 4 0 1 16 3 16 OK J Decorati...

Страница 362: ...16 0 0 7 0 0 1 4 4 0 3 16 1 0 4 0 1 16 3 16 OK J Overcasting stitch Stretch knit seam 5 0 3 16 0 0 7 0 0 1 4 4 0 3 16 1 0 4 0 1 16 3 16 NO Single diamond overcast Reinforcement and seaming stretch fabric 6 0 15 64 1 0 7 0 1 16 1 4 3 0 1 8 1 0 4 0 1 16 3 16 OK J Single diamond overcast Reinforcement of stretch fabric 6 0 15 64 1 0 7 0 1 16 1 4 1 8 1 16 1 0 4 0 1 16 3 16 OK J With side cutter Straig...

Страница 363: ...16 0 0 7 0 0 1 4 2 5 3 32 0 2 4 0 1 64 1 16 OK J Satin scallop stitch Decorating collar of blouse edge of handkerchief 5 0 3 16 2 5 7 0 3 32 1 4 0 5 1 32 0 1 1 0 1 64 1 16 OK J Scallop stitch Decorating collar of blouse edge of handkerchief 7 0 1 4 0 0 7 0 0 1 4 1 4 1 16 1 0 4 0 1 16 3 16 NO Patchwork join stitch Patchwork stitches decorative stitching 4 0 1 16 0 0 7 0 0 1 4 1 2 1 16 0 2 4 0 1 64 ...

Страница 364: ...riple straight at center 3 5 1 8 1 0 7 0 1 16 1 4 2 5 3 32 1 5 4 0 1 16 3 16 OK J Hemstitching zigzag Decorative hems top stitching 6 0 15 64 1 5 7 0 1 16 1 4 3 0 1 8 1 0 4 0 1 16 3 16 OK J Hemstitching Decorative hems lace attaching pin stitch 3 5 1 8 1 5 7 0 1 16 1 4 2 5 3 32 1 6 4 0 1 16 3 16 NO Hemstitching Decorative hems 3 0 1 8 1 5 7 0 1 16 1 4 3 5 1 8 1 6 4 0 1 16 3 16 NO Hemstitching Deco...

Страница 365: ... Hemstitching Decorative hems smocking 6 0 15 64 1 5 7 0 1 16 1 4 1 6 1 16 1 0 4 0 1 16 3 16 NO Hemstitching Decorative hems smocking 5 0 3 16 1 5 7 0 1 16 1 4 1 6 1 16 1 0 4 0 1 16 3 16 NO Hemstitching Decorative hems smocking 5 0 3 16 1 5 7 0 1 16 1 4 1 6 1 16 1 0 4 0 1 16 3 16 NO Hemstitching Decorative hems 5 0 3 16 1 5 7 0 1 16 1 4 1 6 1 16 1 0 4 0 1 16 3 16 NO Ladder stitch Decorative hems F...

Страница 366: ...ght or thick fabrics for larger flat buttons 7 0 1 4 3 0 7 0 1 8 1 4 0 5 1 32 0 3 1 0 1 64 1 16 NO Tapered keyhole buttonhole Buttonholes in medium to heavy weight fabrics for larger flat buttons 7 0 1 4 3 0 7 0 1 8 1 4 0 5 1 32 0 3 1 0 1 64 1 16 NO Keyhole buttonhole Buttonholes with vertical bar tack for reinforcement in heavyweight or thick fabrics 7 0 1 4 3 0 7 0 1 8 1 4 0 5 1 32 0 3 1 0 1 64 ...

Страница 367: ...ners NO Forward Straight For attaching appliqué on tubular pieces of fabric and mitering corners NO Diagonally right down Straight For attaching appliqué on tubular pieces of fabric and mitering corners NO Sideways to left Zigzag For attaching appliqué on tubular pieces of fabric NO Sideways to right Zigzag For attaching appliqué on tubular pieces of fabric NO Forward Zigzag For attaching appliqué...

Страница 368: ...16 NO Quilting appliqué stitch Quilting stitch for invisible appliqué or attaching binding 2 00 0 50 5 00 1 64 3 16 2 0 1 0 4 0 1 16 3 16 NO Shell tuck edge Shell tuck edge finish on fabrics 4 00 3 16 0 00 7 00 0 1 4 2 5 3 32 0 2 4 0 1 64 1 16 NO Blanket stitch Appliqués decorative blanket stitch 3 50 1 8 2 50 7 00 3 32 1 4 2 5 3 32 1 6 4 0 1 16 3 16 NO Quilting stippling Background quilting 7 00 ...

Страница 369: ...rative stitch Decorative stitching 5 50 3 16 0 00 7 00 0 1 4 1 6 1 16 1 0 4 0 1 16 3 16 NO Hemstitching Heirloom decorative hems 5 00 3 16 1 50 7 00 1 16 1 4 2 0 1 16 1 5 4 0 1 16 3 16 NO Hemstitching Decorative hems and bridging stitch 6 00 15 64 1 50 7 00 1 16 1 4 2 0 1 16 1 5 4 0 1 16 3 16 NO Single diamond overcast Reinforcement and seaming stretch fabric 6 00 15 64 1 00 7 00 1 16 1 4 3 0 1 8 ...

Страница 370: ...0 editing 164 key functions 164 retrieving 180 181 saving 177 178 179 selecting 156 sewing 161 stitch selection screens 157 Cleaning LCD screen 338 machine casing 338 race 338 Color shuffling function 283 Combining Patterns character decorative stitches 170 embroidery edit 295 Cord guide bobbin cover 103 Crazy quilt 103 Custom Thread Table 278 282 Cut Tension key 233 D Darning 138 Dart seam 99 Den...

Страница 371: ...tches 30 Knee lifter 13 83 L LCD screen 13 28 cleaning 338 light 36 locking 86 Lower threading pulling up the bobbin thread 55 setting the bobbin 54 winding the bobbin 48 M Machine operation mode key 343 Main power switch 13 26 Mirror image key 91 167 243 Multi color key 245 276 Multi directional sewing 145 My Custom Design 7 MY CUSTOM STITCH designing 326 entering data 328 key functions 328 retri...

Страница 372: ...Specifications 356 Spool cap 13 Spool net 64 Spool pin 13 Spool stand 52 63 Stabilizer 200 Start Stop button 15 Starting point key 241 Step stitch patterns 174 Stitch recalculator 270 Stitch setting chart 359 Straight stitch foot 97 Straight stitch needle plate 97 Straight stitches 94 Supplemental spool pin 13 48 61 T Tape attaching 104 Tape or elastic attaching 129 Test key 330 334 Thread fabric ...

Страница 373: ......

Страница 374: ......

Страница 375: ......

Страница 376: ...English 882 W04 W05 XF0228 0011 Printed in Taiwan ...

Отзывы: