MT2136
4-11
OPEN LOOP SYSTEM - SINGLE BELT
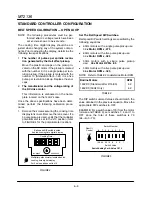
To enter the calibration mode:
1. Press the ON/OFF key until
OFF
is displayed.
2. Press CLEAR 1 2 3 4 5 6 ENTER to enter the
Access mode. The display reads
ACCESS
.
3. Press CLEAR TIME TIME TIME ENTER to acĆ
cess the Belt Speed Calibration mode. The disĆ
play flashes
INIT
.
Belt speed calibration:
1. The display reads
BELT SIZE-?.
Enter 36 for
the length of the conveyor belt. Press the
PROG/ENTER key.
2. The display reads
STEP-1.
The controller is in
Step 1 of the calibration procedure: maximum
belt speed. The motor control is automatically
set to its maximum output. Place an object on
the belt and note the time from entrance to exit.
NOTE: Be certain to measure either the leadĆ
ing edge in and out or the trailing edge
in and out. Do not use the leading edge
in and the trailing edge out.
A.) The display reads
STEP-1TIME-?.
Enter
the time measured in STEP-1. Min: 0
Max: 59:59 (min:sec). Press the PROG/
ENTER key.
B.) The display reads
STEP-1DIST-?.
Enter
36 for the belt length. Press the PROG/ENĆ
TER key.
3. The display reads
STEP-2.
The controller is in
Step 2 of the calibration procedure: minimum
belt speed. The motor control is automatically
set to its minimum output.
The belt will travel very slowly during this part
of the calibration procedure. To minimize the
time spent on STEP-2, measure off 10" on the
conveyor support. Place an object on the belt
and note the travel time for the 10" measured
distance.
A.) The display reads
STEP-2 TIME-?.
Enter
the measured travel time for STEP-2. Min:
0 Max: 59:59 (min:sec). Press the PROG/
ENTER key.
B.) The display reads
STEP-2 DIST-?.
Enter
10". Press the PROG/ENTER key.
4. The display reads
MIN-TM ENTRY?
(the fastĆ
est belt speed). Limits of this value are deterĆ
mined by the Step-1 and Step-2 calibration
values. Use 200 (2 min). Press the PROG/ENĆ
TER key.
5. The display reads
MAX-TM ENTRY? (
slowest
belt speed). Limits of this value are determined
by the Step 1 and Step 2 calibration values.
Use 1600 (16 min). Press the PROG/ENTER
key.
6. The display flashes
DONE
and
SAVE.
Press
the PROG/ENTER key to permanently store
the calibration values in nonĆvolatile memory
(NOVRAM).
NOTE: During these adjustments, pressing the
clear button will abort all entries and reĆ
quire reprogramming of belt time mode.
When exiting the Belt Speed Calibration
Mode, enter a time. Otherwise the time deĆ
faults to zero, the oven will not heat, and the
belt will not move.
Содержание MT2136 Series
Страница 4: ...INTRODUCTION CHAPTER 1 ...
Страница 15: ...MT2136 1 11 35 30 35 29 39 28 38 33 34 31 37 36 26 27 32 EXTERIOR COMPONENTS FIGURE 3 ...
Страница 17: ...MT2136 1 13 CE GAS BURNER COMPONENTS Control Box not Shown 16 17 FIGURE 5 ...
Страница 18: ...INTRODUCTION 1 14 CONTROL PLATE ASSEMBLY 18 25 16 26 21 19 20 24 23 22 EXCLUSIVE TO CE 40 41 42 43 FIGURE 6 ...
Страница 19: ...MT2136 1 15 This page intentionally left blank ...
Страница 20: ...ASSEMBLY CHAPTER 2 ...
Страница 23: ...MT2136 2 3 This page intentionally left blank ...
Страница 24: ...OPERATION CHAPTER 3 ...
Страница 49: ...MT2136 3 25 16 17 18 19 20 21 12 13 13 13 4 7 15 3 2 1 14 8 9 10 6 11 5 5 FIGURE 4 ...
Страница 50: ...OPERATION 3 26 16 17 20 19 18 15 3 12 13 13 13 4 14 7 1 2 8 9 10 6 11 5 5 FIGURE 5 ...
Страница 51: ...MT2136 3 27 22 23 24 25 26 21 19 18 18 18 4 7 1 3 2 20 5 5 11 12 13 14 15 16 8 17 6 9 10 FIGURE 6 ...
Страница 52: ...OPERATION 3 28 25 26 27 29 28 2 24 23 22 21 21 21 3 1 7 20 4 16 17 18 19 14 15 8 10 6 11 12 13 9 5 5 FIGURE 7 ...
Страница 53: ...MT2136 3 29 1 17 3 2 4 16 16 16 15 21 5 13 14 14 10 18 19 6 7 8 20 9 12 11 FIGURE 8 ...
Страница 54: ...OPERATION 3 30 1 18 16 16 16 16 17 15 22 5 3 2 4 13 10 19 20 6 7 8 21 9 12 11 14 14 FIGURE 9 ...
Страница 55: ...MT2136 3 31 1 21 21 21 17 16 22 18 20 19 14 3 2 4 11 6 13 12 15 10 7 8 9 5 FIGURE 10 ...
Страница 56: ...OPERATION 3 32 1 8 8 8 8 6 7 16 15 17 18 3 2 4 11 5 9 9 12 13 14 FIGURE 11 ...
Страница 57: ...MT2136 3 33 1 6 9 8 19 22 21 7 16 17 2 3 4 18 5 10 14 20 12 11 13 15 25 25 25 24 FIGURE 12 ...
Страница 58: ...OPERATION 3 34 1 FIGURE 13 ...
Страница 60: ...CALIBRATION AND ADJUSTMENT CHAPTER 4 ...
Страница 77: ...MT2136 4 17 This page intentionally left blank ...
Страница 78: ...TROUBLESHOOTING CHAPTER 5 ...
Страница 86: ...TECHNICAL APPENDIX CHAPTER 6 ...


