


65
•
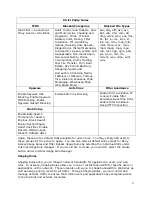
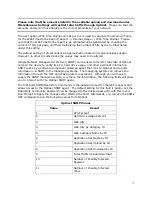
Value—this will list the corresponding measures from the Type field. For example,
under the application of HTTP, the Type is listed Destination and Port; hence, the
Value is listed as 80 as this is the Destination and Port number for HTTP traffic.
Other entries listed here will be the XLi values, File Type values, MIME values, and all
other associated values for Types.
•
Target—this will list what actions will be taken with the corresponding application.
For example, if the target is set to Pass Thru the application will be allowed. Other
options available are Deny (block traffic), None (no action taken), Web Filter
(content filtering, web logging, spyware scanning, and virus scanning) and Web
Logging (only logs web request URLs).
To review the different options for each application, you will need to create a custom TFRS.
Let’s continue with the example of the custom TFRS created in the previous section. In the
top right-hand corner, select the link for the TFRS of IM Only. This will then list all TFRS
available. Chose Web Deny IM + SSL Block.
Notice how the individual applications are now clickable. By creating a custom TFRS and
application set, you can adjust each application and change settings such as Protocol, Type,
and Value. Remember that we need to change the target of the custom TFRS to deny SSL
traffic. You can do this by changing the Target field under the SSL applications.
Click on the drop-down search box and select Value as the search criteria. Enter in the
value of SSL and hit the Enter key. The Application Signatures Manager will post the
associated applications for SSL traffic. Select the application of SSL CONNECT L7. This will
show the Add/Edit Application Detail page.
The Add/Edit Application Detail field allows you to change the Name of the application as
well as other options, i.e., the Description, Application Set, Traffic Flow Rule Set, Type,
Value, Protocol, and Target. Again, changing options can cause serious errors if you are
unsure of the settings. More often than not you will only need to change the Application
Set, Traffic Flow Rule Set, and Value. In general only use Destination Port, Source Port, and
Source and Destination Port for the Type field. Finally, for Protocol you will probably only
need to use TCP and UDP, and Target with Pass Thru or Deny.
To block all SSL connections, you will change the targets from Pass Thru to Deny. Once you
save the changes, this will block all SSL connections. You will need to do this for all other
application that use SSL, (search for HTTPS applications as well).
Once you have set all SSL applications to Deny, you only need to apply the custom TFRS.
This is done by creating an Internet Usage Rule and applying it to a group under the Policy
Manager. Please review the sections Internet Usage Rules and Policy Manager for more
information.
Before leaving the Application Signature Manager, we can continue with the example of
separating an application from an application set. Again, click on Manage -> Applications -
> Applications. Make sure the custom TFRS is selected as the Traffic Flow Rule Sets in the
top right-hand corner.
Now, let’s search for the application that we’re going to separate. Select Name as the
Search criteria and enter in the name of the application. In our example we will search for
SMTP traffic. This will post all applications that use SMTP as a signature. Because we have
created a custom TFRS and application set, we can select the applications to separate or
modify them. In this example, we will separate SMTP from the application set of E-mail,


