


- 12 -
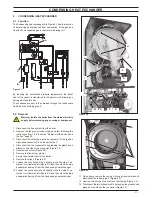
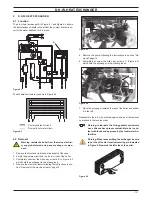
CoNDENSING HEAT ExCHANGER
14 Remove the Condensing heat exchanger by levering it and
sliding it forwards.
15 Reassemble the Condensing heat exchanger carrying out
the removal operations in reverse order.
Ensure to tighten the nuts H - figure 5.2 firmly.
5.3 Cleaning
If there are deposits of dirt on the coil of the Condensing heat
exchanger, clean with a bristle paintbrush and remove the dust
with a hoover.
Warning: After cleaning or replacement as detailed
above, if it deemed necessary to undertake a com-
bustion analysis as detailed in chapter 11.3 section
11.
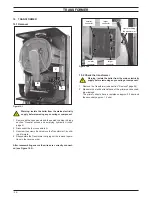
figure 5.4
S
Caution:
After any periodical servicing or disturbance the combustion
chamber silicon seal S Figure 5.4 must be fully inspected and
replaced at the discretion of the service engineer.
After any disturbance to the chamber door seal the appliance
must undergo a full analytical combustion performance check.