background image

CHK

ADJ

-  75  -

ELECTRICAL SYSTEM/HEADLAMP ADJUSTMENT

ADJUSTMENT

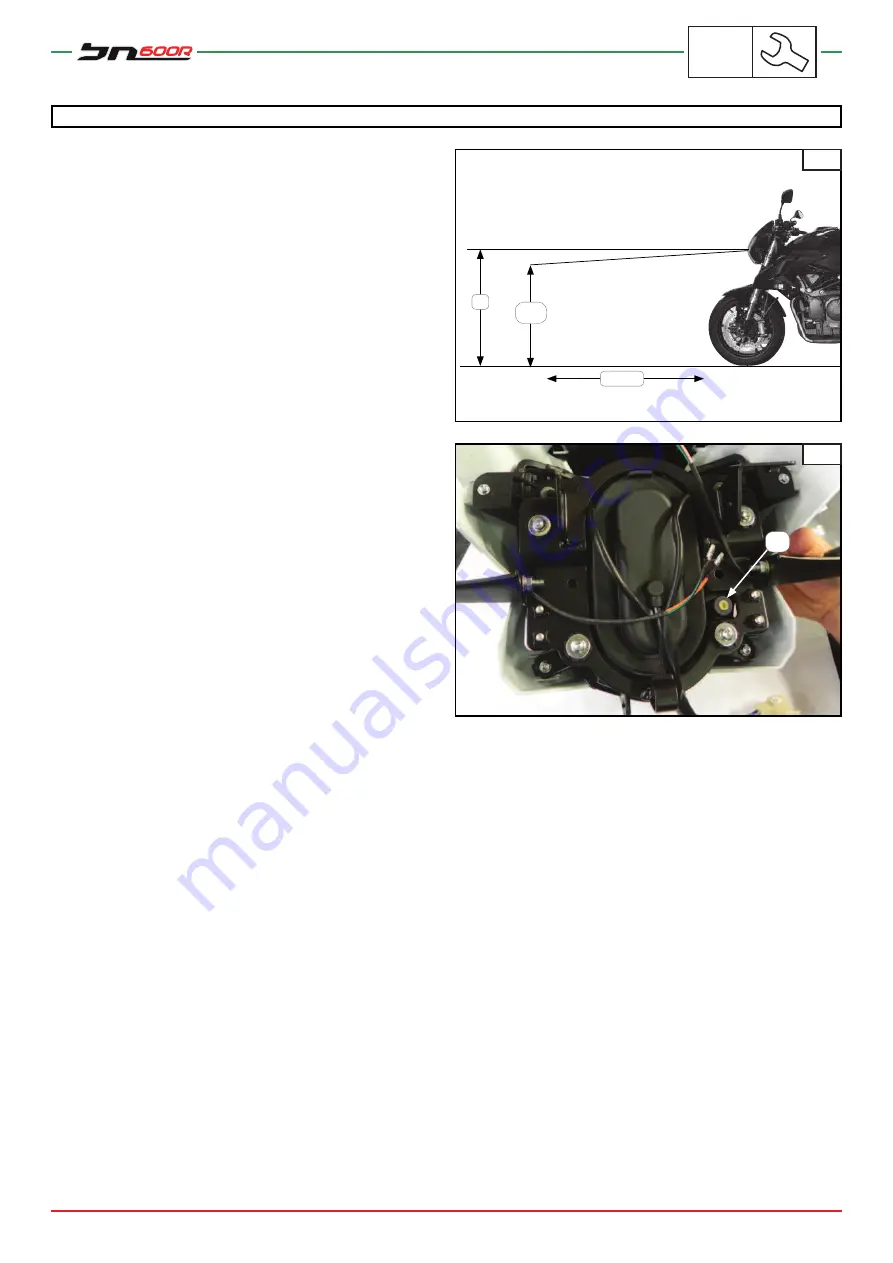
To adjust the beam from the headlight correctly:

• 

Place the vehicle about 10 metres away from a vertical wall 

on a perfectly fl at surface. Fig. A.

• 

Sit on the bike in the rider's position.

• 

Make sure that the upper limit of the beam as shining on the 
wall, is lower than 1/10 of the horizontal axis of the head-
lamp.

• 

If the beam does not fall within these limits, make the ad-
justments to set it to the correct position,

Adjust:

• 

The headlamp beam using the adjustment screw "A" in the 
bottom right of the light, at the back. Fig. B

Turn the screw anticlockwise to raise the beam.
Turn the screw clockwise to lower the beam.

B

A

A

10 m

h

9:10

Содержание 2014 BN600

Страница 1: ...SERVICE STATION MANUAL code Pure Passion since 1911 ...

Страница 2: ...ure to follow the instructions after this symbol may lead to serious injury or even death for the rider people in the vicinity or people inspecting or repairing this bike Important Notice means that specific precautions are required to avoid causing damage to the bike A Note provides key information that will make the procedure either easier or clearer id inders to follow the instructions after thi...

Страница 3: ...er exploded drawings are provided at the start of each section dealing with the removal or disassembly of parts 3 The sequence of operations is listed on the exploded drawing and numbered progressively Each number refers to a step in the disassembly process 4 Parts needed lubricating or replacing are marked by symbols See the SYMBOLS section 5 The exploded drawing is accompanied by a table with in...

Страница 4: ...iodic Adjustments Frame Engine Cooling system Wear limits Backlash Special tool Tightening torque E Lubrication points G Grease application YVORI SIL AC Sealant paste NEW Part replacement Thread locker application Y SY Backl ackl SYMBOLS Engine Engine Cooling system Cooling system acklash acklash in ing syst gine ne SYMB MBOL MBOL SYMB klash ...

Страница 5: ...CHAPTER 1 CHAPTER 2 CHAPTER 3 CHAPTER 4 CHAPTER 5 CHAPTER 6 P specti ec CH HA ections and Periodic Adjustments tions and Periodic Adjustmen Fr Engine Engine C CH HA CHAP P CHA us us us us ame s an s an ic A and Pe an C ons on ts d Period d Peri ons ons C CH H A A A HA A A HA AP En En En En Engi Engi CH En Engine gine C C C Frame Fr C C Engine ne ne ...

Страница 6: ...GEN INFO 5 GEN INFO General Information CHAPTER 1 ...

Страница 7: ...SPLAY 9 IMPORTANT INFORMATION 10 PREPARATIONS FOR REMOVAL AND DISASSEMBLY OPERATIONS 10 REPLACEMENT PARTS 10 GASKETS O RINGS SEALS AND BEARINGS 11 SAFETY WASHERS SAFETY PLATES COTTERS AND THREAD BLOCKERS 11 ELASTIC RETAINING RINGS 12 CONNECTION CHECKS 12 SPECIAL ENGINE EQUIPMENT 14 SPECIAL EQUIPMENT 14 SPECIAL TOOLS FRAME 17 CHAPTER 1 ...

Страница 8: ...EN INFO 2 1 3 7 MOTORCYCLE IDENTIFICATION The identification data are 1 Serial number of the frame on the steering head 2 Engine serial number on the bottom base 3 Approval details on frame IDENTIFICATION ...

Страница 9: ...trical circuit of the light by turning the key to ON Once the engine is running the light should switch off if the light does not switch on at the start when the key is turned to ON or if the light stays on have the electric circuit checked by an authorised Benelli service cen tre 1C High beam light blue This switches on when the high beam is switched on 1D Indicator light green This switches on w...

Страница 10: ...RVE FUEL GAUGE The digital fuel gauge shows the capacity of the fuel tank As the fuel level drops the lines on the gauge will become closer and closer to the E reserve area As soon as the final line starts to flash there is an autonomy of about 2 litres of fuel 8 TOTAL PARTIAL KILOMETRE COUNTER The total kilometre counter shows the total distance covered in kilometres The partial kilometre counter T...

Страница 11: ... parts whose surfaces will be coupled during the normal wear and tear of work Coupled pieces must always be re used or replaced in groups During the disassembly operation clean all parts and place them in a bowl using the same order as for dis assembly This will make reassembly operations easier and allows for the correct installation of all parts Keep all parts away from any source of heat REPLAC...

Страница 12: ...facing outwards and visible To fit the oil seal lubri cate the lips with a fine layer of engine oil Always apply plenty of oil to bearings when fitting them a Oil seal b Bearing IMPORTANT NOTICE Never use compressed air to dry bearings allowing them to turn as this will damage the surfaces SAFETY WASHERS SAFETY PLATES COTTERS AND THREAD BLOCKERS After removing replace all of the safety washers A and ...

Страница 13: ...d on the other side to the thrust C that it receives D Shaft CONNECTION CHECKS Make sure that there are no marks rust moisture etc on wiring couplers or connectors 1 Disconnect the wire the coupler the connector 2 Check the wire the coupler the connector If there are traces of moisture Use a fan to dry If there is any rust marks Connect and disconnect the parts several times 3 Check all connection...

Страница 14: ...connections are firmly installed 5 Check continuity with a pocket tester NOTE If there is no continuity clean the terminals To control the wiring follow the steps from 1 through to 3 For a quick fix we recommend using a specific product for contacts which can be found on sale in spare parts stores 4 5 ...

Страница 15: ...ves to insert the valve oil seal in situ 1 Clutch removal tool This serves to block the clutch drum and loosen the nut 1 Gudgeon pin removal tool This tool serves to take out the gudgeon pin 1 Valve stem seal removal tool This tool serves to take out the oil seal from valves 1 Ring clamp tool This tool serves to fit retaining rings on the piston and to insert this into the cylinder 1 Gear selector ...

Страница 16: ...oner 1 Oil seal insertion tool This tool is used to fit the oil seal on the engine casing near the gear 1 Tool to remove fit the clutch bell hous ing ring nut This tool is used to remove and fit the notched ring nut that holds the clutch bell housing 1 Valve spring compressor tool This tool is used to remove springs from valves 1 Valve removal adaptor This tool is used to remove valves 1 Measuring ga...

Страница 17: ...CIAL EQUIPMENT SPECIAL ENGINE EQUIPMENT Tool Code Name Tool Function Image 1 Measuring gauge This tool is used to measure thickness 1 Flywheel tightening tool This tool serves to remove the flywheel on the engine shaft ...

Страница 18: ... Tool Code Name Tool Function Image 1 Tightening tool for steering head lock nut This assembled tool is used to tighten the lock nut securing the steering head 1 Front wheel steering arm tightening tool This tool is used to tighten the front wheel pin ...

Страница 19: ...SPEC 18 SPEC Specifications CHAPTER 2 ...

Страница 20: ...SPECIFICATIONS 20 TECHNICAL DETAILS 21 ENGINE SPECIFICATIONS 21 FRAME SPECIFICATIONS 26 ELECTRICAL SPECIFICATIONS 30 GENERAL TIGHTNESS SPECIFICATIONS 34 TIGHTNESS TORQUES AND RELEVANT PRELOADS FOR STANDARD CONNECTIONS 35 TIGHTENING TORQUES 35 ...

Страница 21: ...th A 2160 mm Overall width B 800 mm Overall height C 1180 mm Distance between centres 1480 mm WEIGHT STANDARD Kerb weight with oil and fuel tank full 220 kg Empty with no oil and empty tank 208 kg Maximum permissible load capacity with rider and load 410 kg A B C D ...

Страница 22: ...ower 60 kW 11500rpm 82CV Max net torque 52 N m 10500rpm FUEL STANDARD Recommended fuel Lead free RON95 ENGINE OIL STANDARD Lubrication system forced wet sump Total amount 3 2 l Amount without oil filter cartridge replace ment 3 2 l Amount with oil filter cartridge replace ment 3 2 l Recommended oil API SJ 15W50 synthetic Jaso MACCMC g4 OIL FILTER STANDARD Oil filter type Paper OIL PUMP STANDARD Oil p...

Страница 23: ...ft support diameter Ø23 0 0 021 mm Clearance between support and camshaft follower 0 03 0 064 Cam lobe dimensions intake side B A Measurement A 32 495 mm Measurement B 25 mm Cam lobe dimensions exhaust side B A Measurement A 32 495 mm Measurement B 25 mm Maximum camshaft eccentricity 0 02 mm FUEL STANDARD Recommended fuel Lead free RON95 CHAIN DISTRIBUTION STANDARD Model number of links 120 Automa...

Страница 24: ...st 1 75 1 95 mm Valve stem diameter Intake 3 965 3 98 mm Exhaust 3 965 3 98 mm Clearance between valve stem and valve guide Intake 0 05 0 075 mm Exhaust 0 04 0 065 mm Valve stem eccentricity 0 05 mm VALVE SPRINGS STANDARD Intake exhaust effective length External 38 8 mm Internal 41 6 mm Intake exhaust installed length valve closed External 152 8 N m 15 58 Kgf m Internal 143 N m 15 58 Kgf m Intake ...

Страница 25: ...and B A Band type elastic Dimensions A X B 2 3 x 0 8 mm Oil scraper ring B A Dimensions A X B 2 3 x 1 93 mm PISTON ROD STANDARD Bearing colour codes A Red B Blue C Yellow Rod weight code K1 Black K2 Green K3 White K4 Brown K5 Orange ENGINE SHAFT STANDARD B C B B A Width A 269 5 mm Maximum eccentricity B 22 6 0 01 mm Side clearance at connecting rod big end C 0 1 0 25 Main bearing colour code A Red...

Страница 26: ... mm Spring quantity 4 TRANSMISSION STANDARD Transmission type Straight tooth gear Primary reduction ratio 44 82 Secondary reduction system Transmission ratio Chain ratio 14 46 1st 13 37 2nd 19 37 3rd 18 28 4th 24 32 5th 21 25 6th 24 26 GEAR CONTROL MECHANISM STANDARD Type of gear control mechanism sequential with desmodronic drive and prese lector Maximum warp on gear shift guide bar Straightness ...

Страница 27: ... type 6 spoke alloy type Rim Size 17 M C x MT3 50 DOT D Rim Material Aluminium Wheel travel 120 mm REAR WHEEL STANDARD Wheel type 6 spoke alloy type Rim Size 17 M C x MT5 50 Dot D Rim Material Aluminium Wheel travel 122 mm FRONT TYRE STANDARD Tyre type tubeless Size 120 70 ZR17 M C 58W Model brand N A Tyre pressure cold 2 4 Bar REAR TYRE STANDARD Tyre type tubeless Size 180 55 ZR17 M C 73W Model b...

Страница 28: ...x deformation 0 1 mm 0 004 in Worn brake pad thickness 4 mm 0 15 in Pump cylinder ID 16 mm 0 62 in Caliper cylinder ID 34 and 30 mm 1 33 and 1 18 in REAR BRAKE STANDARD LIMIT Brake type Single disc brake Activation With the right foot Recommended fluid DOT 4 Brake discs Diameter x thickness 260 x 5 mm Minimum thickness 4 5 mm 0 17 in Max deformation 0 15 mm 0 006 in Worn brake pad thickness 4 mm Pu...

Страница 29: ...Flexibility K1 8 6 Nm 0 96 Kgf m Spring stroke K1 0 120 mm 0 4 72 in Fork oil Recommended oil SAE 7 5 Marzocchi 19 Amount for each stem 770 cc Level from the top of the outside pipe with the pipe com pletely compressed without the fork spring 95 mm STEERING STANDARD Steering bearing type Ball bearings Angle from end of stroke to end of stroke lh 30 Angle from end of stroke to end of stroke rh 30 ...

Страница 30: ...mm Installed length 167 1 5 mm Flexibility K1 16 Nm Spring stroke K1 42 1 mm Spring pre load gas air standard pressure 1200 kPa 12 bar Spring pre load adjustment positions Minimum 0 Standard 0 Maximum 10 mm 0 39 in Bounce damping adjustment positions Minimum 0 Standard 17 Maximum 30 from the completely returned position DRIVE CHAIN STANDARD Model brand REGINA 137 ORPB Link number 118 Drive chain l...

Страница 31: ... Model brand 5 101211 502 1 DENSO Nominal output 13 5 V 48 A at 5000 rpm Voltage regulator inside the alternator semiconductor FieldControl Voltage setting 14 5 0 3 V 5000 rpm 10 A 25 C STARTING RELAY STANDARD Model brand N A Amps 100 A Coil resistance 4 4 O at 20 C BATTERY STANDARD Model brand YTX9 BS Battery capacity voltage 12 V 14 A Relative density 1 310 HEADLIGHT STANDARD Headlight type Halo...

Страница 32: ...light LED x 1 Turn indicator lights LED x 1 Engine failure alarm light LED x 1 ELECTRIC START SYSTEM STANDARD Model brand 5 128 330 Power output 0 7 kw HORN STANDARD Horn type low Model brand N D Max amps 3 A Performance 105 118 db A FLASHER RELAY STANDARD Relay type elettro lasher Model brand 355 E10 Turn indicators flashing frequency 80 160 cycles min Watt 10W x4 OIL PRESSURE SENSOR STANDARD Mode...

Страница 33: ...l pump fuse 15 A Blue THROTTLE VALVE SENSOR STANDARD Model brand 6PX 008476 11 Resistance 4 0 KO 20 FUEL PUMP STANDARD Model N A Max amps N A Level sensor inside Min Max resistance 285 O empty 12 O full SAFETY SWITCHES STANDARD Stand switch CE75A Idle switch 20 00 057 MONT EL Tilt YE69A DENSO AIRBOX AIR TEMPERATURE SEN SOR STANDARD Model brand 15TT001 JCI Resistance 23 75 O 20 C 16 7 O 30 C THROTT...

Страница 34: ...DA STANDARD Model brand N A INJECTOR STANDARD Model brand N A RELAY UNIT STANDARD Model brand CM1 NAIS IGNITION SYSTEM STANDARD Start system type DELPHI MT05 Ignition timing 5 before TDC from 900 to 1800 r min Tone wheel sensor Pick Up O1VR002 JCI Model brand DELPHI STEPPER STANDARD Model brand N A Stepper type two phases RADIATOR FAN STANDARD Model brand N A ...

Страница 35: ...elements in order to avoid the risk of warping cross tighten the parts in successive stages until the required torque is achieved Unless otherwise stated tightness torques refer to parts with clean dry threads Parts must be at ambient temperature A B B NUT GENERAL TIGHTNESS TORQUES N m Kgf m 4mm 2 3 0 23 5mm 4 5 0 45 6mm 10 1 01 8mm 25 2 54 10mm 45 4 58 12mm 80 8 15 14mm 130 13 25 16mm 200 20 39 1...

Страница 36: ...ES Nm AXIAL PRELOAD Nm TIGHTNESS TORQUES N m AXIAL PRELOAD Nm TIGHTNESS TORQUES N m AXIAL PRELOAD Nm M4 X 0 7 3 3 870 4 2 5 420 5 2 6 710 M5 X 0 8 6 6 350 7 5 7 930 9 9 520 M6 X 1 10 8 860 13 11 520 16 14 180 M8 X 1 25 22 14 900 30 20 330 40 27 100 M8 X 1 25 17 280 36 24 890 45 31 110 M10 X 1 5 45 24 680 65 35 640 80 43 870 M10 X 1 25 50 27 870 70 39 013 85 47 380 M12 X 1 75 80 37 640 110 51 750 1...

Страница 37: ...CHK ADJ 36 CHK ADJ Inspections and Periodic Adjustments CHAPTER 3 ...

Страница 38: ...T 54 FRONT BRAKE ADJUSTMENT 55 FRAME BRAKE FLUID CHECK 56 CHECK THE LEVEL OF THE REAR BRAKE FLUID TOP UP 56 CHECK THE LEVEL OF THE REAR BRAKE FLUID TOP UP 57 FRAME BRAKE PAD CHECK 58 FRONT AND REAR BRAKE PAD CONTROL 58 FRAME BRAKE SYSTEM HOSE CHECK 59 BRAKE HOSE CHECK 59 FRAME TRANSMISSION CHAIN ADJUSTMENT 60 ADJUSTMENT 60 LUBRICATION 61 FRAME STEERING HEAD CHECK AND ADJUSTMENT 62 CHECK ADJUSTMENT...

Страница 39: ...MENT 75 ELECTRICAL SYSTEM REAR LAMP REPLACEMENT 76 REPLACEMENT 76 ELECTRICAL SYSTEM LICENCE PLATE LAMP REPLACEMENT 76 REPLACEMENT 76 ELECTRICAL SYSTEM REAR INDICATOR REPLACEMENT 77 REPLACEMENT 77 ELECTRICAL SYSTEM FRONT INDICATOR REPLACEMENT 78 REPLACEMENT 78 ...

Страница 40: ...CHK ADJ 39 NOTES ...

Страница 41: ... motorbike upright without using the rear stand NOTE Annual checks need to be carried out every year unless maintenance is carried out on the base of servicing at set distance intervals or in the case of the UK mileage At 36 000 km repeat maintenance services as begun at 12 000 km For intervals for those items marked we recommend contacting a Benelli dealer given that it is necessary to have speci...

Страница 42: ...ension Make sure that the rear wheel is correctly aligned Clean and lubricate I I I I I I Every 500 km and after every wash or if the motorcycle has been used in the rain 9 Crown Check Lubricate I I I I I I Replace every time the chain is replaced 10 Pinion Re taining washer Check Replacement I I I I I I Replace every time the chain is replaced 11 Circuit hoses fuel Check for faults leaks I I R I ...

Страница 43: ...cle 26 Steering bearings Check Replacement T T Every 18000 km lubricate with lithium soap based grease 27 Wheel bear ings front back Check Replacement I I Every 24000 km 24900 mi 28 Fork bear ings Check Replacement I I I R Every 24000 km 14904 mi 29 Swing arm Check operation and make sure there is no excessive clearance Lubricate I I I I 30 Front sus pension Check operation and make sure there are...

Страница 44: ...I I I I I I I 45 Electronic injection fuel con sumption Set the minimum run ning speed for engine and synchroni sation I I I I I I I 46 Fuel CO Check Adjustment I I I I I I I Every 12000 km 7452 mi 47 Cyclist part fastening Make sure all nuts bolts and screws are correctly tightened T T T T T T 48 Oil sump screws Replacement T T T T T 49 Lid screws clutch Replacement T T T T T 50 Catalytic convert...

Страница 45: ...G 11 11 11 11 5 6 7 4 10 9 2 3 1 5 6 8 1 9 10 1 1 1 1 1 1 Position Description Quantity 1 SCREW ST4 8X25 8 2 AIR BOX COVER 1 3 GASKET 1 4 AIR FILTER 1 5 SCREW M5X19 2 6 WASHER 2 7 PLATE 1 8 PLATE 1 9 AIR TEMPERATURE SENSOR 2 10 RUBBER TIP 2 11 SCREW CLIP 4 ...

Страница 46: ...ceed to wash 1 Wash the filter element with specific solvents for this pur pose 2 Air dry 3 Apply a specific oil to the whole surface of the filter element NOTE Before fitting the filter element into the air box be sure to drain off any excess oil and make sure that it is no longer dripping Installation 1 During the installation stage follow the steps for removing the filter as described above only this ...

Страница 47: ...on Quantity 1 PAIR OF REAR VIEW MIRRORS 1 2 ACCELERATION CONTROL 1 3 BOTTOM ACCELERATION CONTROL 1 4 TOP ACCELERATION CONTROL 1 5 RIGHT SWITCH 1 6 GRIP END 2 7 HANDLEBAR 1 8 LEFT SWITCH 1 9 LH GRIP 1 10 CLUTCH CONTROL 1 11 CLUTCH CABLE 1 12 THROTTLE OPENING CABLE 1 13 THROTTLE CLOSING CABLE 1 14 REAR VIEW MIRROR RIGHT 1 15 REAR VIEW MIRROR LEFT 1 16 SCREW M6X35 2 17 ELASTIC WASHER 2 18 WASHER 2 19...

Страница 48: ...is working normal ly and that it is possible to reach the maximum open position and automatic closure position in all steering positions If necessary adjust Fig A Accelerator cable clear ance A Size Accelerator cable 3 5 mm Adjust accelerator cable clearance Handlebar side 1 Loosen the nut support D 2 Turn the adjustment nut C clockwise or anticlockwise to set the accelerator cable clearance as sp...

Страница 49: ...side 1 Loosen the ring nut C 2 Turn the adjustment device B clockwise or anticlockwise to set the clutch cable clearance as specified Fig B Clutch cable clearance Clearance Clockwise Increases clearance Anticlockwise Reduces clearance 3 Tighten the ring nut C NOTE If it is not possible to achieve the specified clearance for the clutch cable from the handlebar side use the adjustment nut on the engin...

Страница 50: ...ies to both rear view mirrors Installation 1 Tighten the mirror 15 on the lever body 32 2 Tighten the nut B as far as it will go 3 Adjust the mirror position by turning it to the required posi tion 4 Tighten the support nut C NOTE Perform the same procedure on the right hand mirror B C ...

Страница 51: ...CE Given that engine oil also lubricates the clutch if it is not the right type or if it contains additives it could cause the clutch to slip Therefore we recommend not adding any chemical additives or using oils of other types than the one listed in the technical specifications for the engine Engine oil whether new or spent can be dangerous If ingested engine oil may be poisonous to people or pets...

Страница 52: ...ase NOTE Replace the oil filter cartridge if necessary Replace the seal on the magnetic cap Install the new seal the magnetic cap Tighten the magnetic cap with the following torque T R Torque 24 N m Fill the crankcase with the recommended engine oil in the amount specified Install the oil cap B Fig B Start the engine leave it to warm up for a few minutes before switching it off NOTE Always make sure...

Страница 53: ... cylinders Remove The two screws 6 The two brackets 8 The four rubber pads 2 and four OR gaskets 3 Fig A Disconnect The connectors X from the coils 29 Fig A Slide out The coil 29 The spark plug 30 underneath it Fig B NOTE The numbers marked with are part of the table of replace ment parts in Chapter 5 Engine Removing the timing belt cover paragraph A 8 6 2 3 29 X 3 8 7 6 4 5 2 29 30 B CHECKING THE...

Страница 54: ...tall The coil 6 The bracket 8 Tighten to the correct torque T R Torque 8 N m 3 8 7 6 4 5 2 29 30 D SOILED SPARK PLUG OVERHEATED SPARK PLUG Cause Solutions Cause Solutions Over rich mix of air fuel Carburettor incorrectly calibrated Electrical system fault Imperfect coil connection Specific riding conditions Prolonged periods at minimum Long sections at low speed Spark plug too cold The fuel carbure...

Страница 55: ...tance is further from the handlebar Position 4 The distance is nearer to the handlebars WARNING If the brake lever is soft or spongy to the touch this may be a symptom of air in the brake system Before using the motorbike it is necessary to bleed out the air by emptying out the brake circuit Air in the brake circuit will considerably reduce the per formance of the system and may even lead to a los...

Страница 56: ...aving a gap of about 5 10 mm between the stop head and eccentric pin Fig B Tighten the lock nut A Insert the spring C WARNING If the brake lever is soft or spongy to the touch this may be a symptom of air in the brake system Before using the motorbike it is necessary to bleed out the air by emptying out the brake circuit Air in the brake circuit will considerably reduce the per formance of the sys...

Страница 57: ... clean up any break fluid spills immediately Apply the vacuum device B to the bleeding screw C Top up the fluid as far as the level in the peep hole on the pump Fig C Pump the brake fluid until the brake lever moves Once the top up process is complete fit the cap and tighten the two fastening screws to the cover WARNING Only use the prescribed brake fluid Other brake fluids may be the cause of deteriora...

Страница 58: ...ew Fig C so as to lift the brake calliper This will completely bleed the circuit removing all air bubbles Apply the vacuum device D to the bleeding screw and loosen the screw Top up the fluid as far as the level in the peephole on the pump Pump the brake fluid until the brake lever moves Once the top up process is complete lower the calliper and tighten the two fastening screws to the following torq...

Страница 59: ...brake Check The front brake pads Fig A The rear brake pads Fig A Wear limit for the front and rear brake pads If the wear limit has been reached replace the brake pads in block Pads Wear limit A Front 1 mm Rear 1 mm NOTE To replace the pads please see the Frame chapter in the section Front brake pad removal and installation A A ...

Страница 60: ...ll brake hoses and brake hose clamps Check The front and rear brake hose If there are any cracks signs of wear or damage replace Check The hose clamp for the front brake A Fig A If loose tighten the clamp screw Check The hose clamp B for the rear brake Fig A If loose tight en the clamp screw B A B ...

Страница 61: ... belt slack ening 10 15 mm Adjust the slackness of the transmission chain Fig B If the chain tension is not correct adjust it as follows Loosen the wheel pin nut on the left side of the swinging arm To tension the transmission chain turn the tension adjust ment screw on each side of the swinging arm anti clock wise To loosen the transmission chain turn the tension adjust ment bolt on the left side...

Страница 62: ...ings inserted between a side plate and the other Never use steam jets or jets of highly pressurized water aggres sive solvents or brushes with overly stiff bristles as they could damage the O rings We recommend using only those products recommended for cleaning transmission chains Dry the chain and lubricate it carefully using engine oil or another lubricant specifically for chains with O ring Do n...

Страница 63: ... paragraph Loosen The screws securing the upper steering plate A Fig B Remove The upper steering plate B Fig B Adjust The steering head Remove the ring nut from the steering pin D Fig C Loosen the steering ring nut E and tighten it to the speci fied value using the relevant wrench Tightening tool for steering head lock nut Code T R Torque 16 N m Tighten the ring nut D with the specific tool to the f...

Страница 64: ... movement is not smooth repair A A B Check Make sure that the steering head is not loose and that there are no sticking points by turning the front fork to the end of travel in both directions If there are any sticking points remove the bottom steering base and check the top and bottom bearings Install The upper steering plate B Fig B The screws securing the upper steering plate A Fig B Check agai...

Страница 65: ...he spring s preload and therefore make the sus pension softer turn the adjustment ring nut A in direction C At the end of the adjustment tighten the return ring nut D IMPORTANT NOTICE To avoid damaging the mechanism do not try turning over the maximum or minimum setting Position Distance Min 0 mm Max 10 mm Adjustment Adjustment of the hydraulic brake action in extension Fig B It is possible to adj...

Страница 66: ...THE BIKE UNDER ANY CIRCUMSTANC ES Position Wear limit A Net weight with oil and full fuel tank See general specifications Maximum load See general specifications COLD TYRE PRES SURE FRONT REAR Up to 90 kg load 2 4 bar 2 4 bar 90 kg maximum load 2 4 bar 2 6 bar Including baggage rider passenger and accessories WARNING It is dangerous to ride with worn treads If the tread reaches wear limits replace t...

Страница 67: ...es Wash with plenty of running water for 15 minutes and seek immediate medical attention INGESTION Drink large amounts of water or milk then milk of magnesi um beaten egg or vegetable oil Seek immediate medical attention IMPORTANT NOTICE This battery is sealed Never remove the sealed caps under any circumstances as this will damage the balance between the cells and affect battery performance Charg...

Страница 68: ... the battery terminal To reduce the possibility of sparks connect the battery charger to the power supply only after connecting the cables to the battery Before removing the clips from the battery terminals re member to switch off the charger Make sure that the clips on the battery charger cables are completely in contact with the battery terminals and that there are no short circuits A corroded t...

Страница 69: ...0 minutes or so after the charge is com plete before measuring the open circuit voltage Tensione a circuito aperto V Controllare la tensione a circuito aperto 0 10 20 30 40 50 60 10 11 12 13 14 15 16 17 18 ricarica F Check voltage at open circuit Voltage at open circuit V recharge ...

Страница 70: ...e la ricarica Verificare che la corrente sia più elevata del valore standard della corrente di ricarica riportato sulla batteria Regolare la tensione in modo tale che la corrente sia al livello di carica standard Impostare il tempo in base al tempo di ricarica adatto per la tensione a circuito aperto Vedere le istruzioni incluse alla batteria NO NO SI SI A Caricabatterie Amperometro Measure the vo...

Страница 71: ...ore standard della corrente di ricarica riportato sulla batteria Caricare la batteria finché la tensione di carica non arriva a 15 V Misurare la tensione a circuito aperto dopo aver lasciato la batteria per più di 30 minuti inutilizzata 12 8 V o superiore La ricarica è completa 12 7 V o inferiore Ricarica necessaria Inferiore a 12 0 V Sostituire la batteria NO SI A V Voltometro Caricabatterie Ampe...

Страница 72: ...hecking or replacing fuses Remove the passenger seat using the wrench provided and remove the rider s seat with the release knob A Fig A Open the fuse box B Fig B Check the fuse Connect a pocket tester to the fuse and check continuity NOTE Set the tester selector to Ω x 1 If the pocket tester reads replace the fuse Replace Burnt fuses Turn the main switch to OFF Fit a new fuse with the correct amp...

Страница 73: ... KEY TO FUSES Refer to Fig C A Fuel Pump 15A blue B Fan 15A blue C CD2 power unit 15A blue D CD1 power unit 15A blue E Services 40 A red F Headlamps 15A blue G Spare fuse 40A red H Spare fuse 15A blue I Spare fuse 15A blue B B C A B C F E D I H G ...

Страница 74: ...tures inside the light we recommend not touching it until it has cooled Remove The two screws A fastening the front lamp to the plate Fig A Lower the headlight and remove the protective cap B Fig B Disconnect the lamp Install Insert the new lamp Connect Connect the new lamp to the connectors Fit the cap Raise the headlamp and fasten the two screws removed previously A A B B ...

Страница 75: ...rew B fastening the headlamp to the hinge of the lamp support C Fig D Disconnect the connector to the headlamp D and the four cables connecting the two indicators E Install To install the headlamp follow the same steps for its remov al this time in reverse order Secure the fastening screws A with Loctite and with the following torque T R Torque 10 N m C A D B C D E ...

Страница 76: ...n Make sure that the upper limit of the beam as shining on the wall is lower than 1 10 of the horizontal axis of the head lamp If the beam does not fall within these limits make the ad justments to set it to the correct position Adjust The headlamp beam using the adjustment screw A in the bottom right of the light at the back Fig B Turn the screw anticlockwise to raise the beam Turn the screw cloc...

Страница 77: ...cap protecting the connector Disconnect the connector Replace Remove the rear light and replace with a new one Install To install the rear light follow the same steps for its remov al this time in reverse order A B A C D B E ELECTRICAL SYSTEM LICENCE PLATE LAMP REPLACEMENT REPLACEMENT Remove The screw A Fig C The rubber lamp holder B Fig C The park light Install To install the licence plate light ...

Страница 78: ...e the protective cap Disconnect the electrical connections A of the indicators orange green and illustrated in Fig D Remove the clips fastening the cables on the licence plate holder Remove the support nuts for the rear indicators B Fig E Remove the indicators and replace with new ones Install To install the new indicators follow the same steps for their removal this time in reverse order D A E B ...

Страница 79: ...g the front lamp to the plate Fig F Lower the lamp Fig G Disconnect the electrical connections B of the indicators orange and green black Fig H Remove the support nuts for the indicators C Fig H Remove the indicators and replace with new ones Install To install the new indicators follow the same steps for their removal this time in reverse order F A G H B C ...

Страница 80: ...CHAS 79 Frame CHAPTER 4 CHAS ...

Страница 81: ...TION 101 REAR BRAKE PUMP INSTALLATION 103 FRONT BRAKE CALLIPER TIGHTNESS 105 REAR BRAKE CALLIPER 106 CHECK THE FRONT AND REAR CALLIPERS 107 FRONT BRAKE CALLIPER INSTALLATION 108 REAR BRAKE CALLIPER INSTALLATION 110 FRONT FORK 112 FRONT FORK STEM REMOVAL 112 FRONT FORK STEM DISASSEMBLY 114 FRONT FORK STEM INSPECTION 117 FRONT FORK STEM ASSEMBLY 118 FRONT FORK STEM FITTING 121 HANDLEBAR 122 HANDLEBA...

Страница 82: ...153 EXHAUST INSTALLATION 153 EXHAUST ASSEMBLY REMOVAL 155 FAIRING 156 EXHAUST PIPE PROTECTION INSTALLATION 156 EXHAUST PIPE PROTECTION REMOVAL 156 FRONT MUD GUARD INSTALLATION 157 FRONT MUD GUARD REMOVAL 158 REAR MUD GUARD INSTALLATION 159 REAR MUD GUARD REMOVAL 160 TANK CAP FITTING 161 TANK FITTING 163 TANK REMOVAL 163 TANK COVER FITTING 164 TANK COVER REMOVAL 165 FAIRING FITTING 166 FAIRING REMO...

Страница 83: ...nt wheel is raised Remove the fastening screws A from both brake callipers Fig A Detach the left front calliper NOTE Repeat the above procedure for the right brake calliper NOTE Do not pull the front brake lever while removing the callipers Loosen the setscrews B Fig B Remove the front wheel pin C Fig C front wheel The left shim D Fig C A B B C C D ...

Страница 84: ...S REMOVAL INSTALLATION OF BRAKE DISCS 5 3 4 1 1 1 2 1 1 1 2 6 7 Position Description Quantity 1 COUNTERSUNK HEX HEAD SCREW M8X16 8 8 ZB 12 2 FRONT BRAKE DISC 2 3 LEFT SHIM 1 4 FRONT WHEEL RIM 1 5 VALVE 1 6 FRONT WHEEL PIN 1 7 ADHESIVE 2 ...

Страница 85: ...Insert the front brake disc 2 on the edge of the rim 4 Insert the 6 fastening screws 1 after putting a drop of thre ad locker medium type on the end of the thread NOTE Repeat the above procedure for the front right brake disc The procedure below applies to both brake discs Tighten the bolts on the brake disc in successive steps and proceeding in a crossover fashion Fig A Tighten the 6 screws with ...

Страница 86: ...suring the bending of the front brake disc turn the handlebar right and then left to make sure that the front wheel stops Remove the brake calliper Keep the gauge at a right angle to the surface of the brake disc Measure the bending 1 5 mm 0 05 in under the edge of the brake disc Fig A Adjust The deformation of the brake disc Remove the brake disc Turn the brake disc moving it one hole per bolt Fi...

Страница 87: ... AND BRAKE DISCS WHEEL AXLE CHECK Check Wheel axle Roll the wheel axle A on a flat surface Fig A If there is any warping replace WARNING Do not try to straighten the wheel axle if it is warped Check Tyre Front wheel If there is any warping replace Measure The radial eccentricity of the wheel B Fig B The side eccentricity of the wheel C Fig B If the specified limit is exceeded replace Eccentricity Li...

Страница 88: ...bearings A using a general bearing extrac tor Fig B Fit the new wheel bearing following the removal steps in rever se order IMPORTANT NOTICE During the bearing insertion do not touch the inner seat B or the ball bearings of the wheel C Contact must only occur with the outer seat of bearing D Fig C NOTE Use a wrench that is adapted to the diameter of the outer edge E of the wheel bearing Fig C A B ...

Страница 89: ...crews B and tighten by hand compress the fork two three times so as to settle the wheel pin 6 Fig B Tighten the two screws B with the following torque T R Torque 8 N m Fit the right brake calliper inserting the fastening screws A after greasing them with the special copper grease Fig C Tighten the two screws A with the following torque T R Torque 45 N m NOTE Repeat the above procedure for the left...

Страница 90: ... Position Description Quantity 1 NUT M24 1 2 ELASTIC RING 1 3 BEARING 1 4 SHIM 1 5 REAR WHEEL RIM BLACK 1 6 SCREW 6 7 NUT 5 8 SPROCKET 1 9 CHAIN 137ZRPK 118 LINKS 1 10 SPROCKET SUPPORT FLANGE 2 11 SCREW M10X41 5 12 FLEXIBLE COUPLING 5 13 BUSHING 1 14 REAR WHEEL PIN 1 15 VALVE 1 16 BUSHING 1 17 REAR BRAKE DISC 1 18 ADHESIVE 2 ...

Страница 91: ...iper Completely slacken the transmission chain tension Move the wheel forwards and free the transmission chain from the sprocket Fig B Remove The nut 1 and pin 14 NOTE During this stage take care as the following parts will also be separated chain tensioner B adjustments Fig B sprocket side and brake disc side and the brake calliper support plate C Fig A Remove The bushing 16 brake disc side FigC ...

Страница 92: ...7 Fig A Sprocket removal Once the rear wheel has been removed take out the spro cket 8 Fig B Take out the 5 fastening nuts 7 and separate the sprocket from the flange 10 Separate the flange 10 from the screws 11 and the flexi ble couplings 12 Check Sprocket support flange If there is any cracking damage replace Flexible couplings If there is any damage or wear replace 17 6 6 6 A 8 10 11 11 11 11 11 12...

Страница 93: ...arping replace WARNING Do not try to straighten the wheel axle if it is warped Check Tyre Front wheel If there is any warping replace Measure The radial eccentricity of the wheel B Fig B The side eccentricity of the wheel C Fig B If the specified limit is exceeded replace Eccentricity Limit Radial B 0 05 mm Side C 0 05 mm A A B B C ...

Страница 94: ...om the wheel A with a generic bearing extractor Fig B Fit the new wheel bearing following the removal steps in rever se order IMPORTANT NOTICE During the bearing insertion do not touch the inner seat B or the ball bearings of the wheel C Contact must only occur with the outer seat of bearing D Fig C NOTE Use a wrench that is adapted to the diameter of the outer edge E of the wheel bearing Fig C A ...

Страница 95: ...en to the following torque T R Torque 45 N m NOTE Tighten the self locking nuts in several stages proceeding with a crossover sequence A 1 2 3 4 8 10 11 11 11 11 11 12 12 7 7 7 7 7 B REAR WHEEL AND BRAKE DISC BRAKE DISC ASSEMBLY Brake disc assembly Once the rear wheel has been removed take out the brake disc as described in the previous paragraph Clean the sprocket flange with a clean rag especiall...

Страница 96: ... Fit The rear wheel Lubricate and install The pin 14 Tighten the nut 1 to the following torque FigC T R Torque 80 N m Fit The brake callipers and respective fastening screws to the following torque T R Torque 25 N m NOTE Apply copper grease the fastening screws of the brake calliper before tightening Make sure that there is enough space between the brake pads before fitting the calliper to the rele...

Страница 97: ...e worn pad Fig B Measure The wear limit for the brake pads If outside specifications replace the brake pads as a block Pads Wear limits Front 1 mm Fitting Proceed to install following the steps for removal in reverse order Check The brake fluid level B Fig C If below the minimum notch top up with the recommended bra ke fluid until it is at the correct level Check Brake lever operation If the brake le...

Страница 98: ...g X Fig A Take out The brake pads D and shims E Fig B Measure The wear limit for the brake pads If outside specifications replace the brake pads as a block Pads Wear limits Rear 1 mm Fitting Proceed to install following the steps for removal in reverse order Check The brake fluid level B Fig C If below the minimum notch top up with the recommended bra ke fluid until it is at the correct level Check B...

Страница 99: ... 1 RADIAL PAD PAIR 8 2 FRONT BRAKE HOSE 1 3 RIGHT BRAKE CALLIPER RADIAL 1 4 LEFT FRONT CALLIPER RADIAL 1 5 GASKET 7 6 SPECIAL SCREW 1 7 RUBBER TIP 1 8 SCREW 2 9 SPECIAL SCREW 1 10 SCREW 1 11 FRONT BRAKE PUMP 1 12 SELF LOCKING NUT 1 13 SCREW M6X12 1 14 WASHER 1 15 FRONT BRAKE LEVER 1 16 MICROSWITCH 1 17 BRACKET 1 18 FRONT BRAKE HOSE 1 19 SPECIAL SCREW 1 ...

Страница 100: ... the relevant gaskets 5 Take out the front brake hose 2 Remove the X connection of the front brake microswitch 16 Fig A Remove the microswitch 16 by unscrewing the screw 13 and the washer 14 Remove the nut 12 and the fastening screw 10 Take out the front brake disc lever 15 Unscrew the screws 8 fastening the bracket 17 Take out the pump IMPORTANT NOTICE during the disassembly stage do not allow an...

Страница 101: ...AR BRAKES REAR BRAKE PUMP REMOVAL 5 4 8 7 1 7 2 3 7 7 6 Position Description Quantity 1 REAR BRAKE HOSE 1 2 SCREW 2 3 SPECIAL SCREW 1 4 REAR BRAKE CALLIPER 1 5 REAR PAD PAIR 1 6 REAR BRAKE PUMP 1 7 GASKET 4 8 REAR IDROSTOP 1 ...

Страница 102: ...the rear brake hose 1 Remove the fastening screws x from the brake pump Fig A Remove the nut and the fastening screw y Fig B and free the ball joint Z from the brake control lever Take out the brake pump 6 IMPORTANT NOTICE During the disassembly stage do not allow any brake fluid re maining in the circuit to drip onto the vehicle surfaces FRONT AND REAR BRAKES REAR BRAKE PUMP REMOVAL X B Y Z ...

Страница 103: ...ity 1 RADIAL PAD PAIR 8 2 FRONT BRAKE HOSE 1 3 RIGHT BRAKE CALLIPER RADIAL 1 4 LEFT FRONT CALLIPER RADIAL 1 5 GASKET 7 6 SPECIAL SCREW 1 7 RUBBER TIP 1 8 SCREW 2 9 SPECIAL SCREW 1 10 SCREW 1 11 FRONT BRAKE PUMP 1 12 SELF LOCKING NUT 1 13 SCREW M6X12 1 14 WASHER 1 15 FRONT BRAKE LEVER 1 16 MICROSWITCH 1 17 BRACKET 1 18 FRONT BRAKE HOSE 1 19 SPECIAL SCREW 1 ...

Страница 104: ...ee the safety of the bike it is essential for the path of the brake hose to be correct Assemble the front brake lever 15 by tightening the nut 12 and the fastening screw 10 to the following torque T R Torque 7 N m Fit the bracket 17 to the handlebar and tighten the two fastening screws 8 first the top and then the bottom to the following torque T R Torque 8 N m NOTE Install the brake pump support w...

Страница 105: ...BRAKES REAR BRAKE PUMP INSTALLATION 5 4 8 7 1 7 2 3 7 7 6 Position Description Quantity 1 REAR BRAKE HOSE 1 2 SCREW 2 3 SPECIAL SCREW 1 4 REAR BRAKE CALLIPER 1 5 REAR PAD PAIR 1 6 REAR BRAKE PUMP 1 7 GASKET 4 8 REAR IDROSTOP 1 ...

Страница 106: ...he nut and fastening screw y Fig B to the following torque T R Torque 10 N m Tighten the fastening screws x on the brake pump 6 Fig A to the following torque T R Torque 10 N m Connect the idrostop 8 and the relevant gaskets 7 to the rear brake hose 1 and the brake pump Tighten the idrostop to the following torque T R Torque 26 N m WARNING To guarantee the safety of the bike it is essential for the...

Страница 107: ...ng screws A on the front fork Fig B Detach The brake calliper pistons B 2 Ø 34 mm and 2 Ø 30 mm Fig C The piston gaskets on the brake calliper E first the smallest oil seals gaskets then the sealing rings larger gaskets Secure the pistons on the brake calliper with a block of wood Fig D Blow compressed air into the brake hose coupling to force out the pistons on the left of the brake calliper Fig D...

Страница 108: ...liper support plate Detach The pistons on the brake calliper B Fig B Insulation C The piston gaskets on the brake calliper D first the smallest oil seals gaskets then the sealing rings larger gaskets Secure the pistons on the brake calliper with a block of wood Fig C Blow compressed air into the brake hose coupling to force out the pistons on the left of the brake calliper Fig C WARNING Never try t...

Страница 109: ...ke calliper body If there are any cracks damage replace the whole brake calliper Brake fluid delivery passages brake calliper body In the event of obstruction clean with a jet of compressed air Insulation If there is any rust lines signs of wear replace the brake calliper insulation IMPORTANT NOTICE Every time the brake calliper is removed replace the piston gaskets Check The rear brake calliper br...

Страница 110: ...ront brake hoses 18 Fig C Copper washers 5 Special screws 6 NOTE Tighten the special screws restoring the torque twice after loosening them to the following torque T R Torque 26 N m WARNING To guarantee the safety of the bike it is essential for the path of the brake hose to be correct Fill The brake fluid container WARNING Only use the prescribed fluid The use of other types of brake fluid may cause...

Страница 111: ...faces and plastic parts Always clean up any brake fluid spills immediately Bleed The brake circuit Check Check the level of the brake fluid A Fig A If below the minimum notch top up with the recommended brake fluid Check Brake lever operation If the brake lever is soft or spongy to the touch bleed the brake circuit A A ...

Страница 112: ...ose Copper washers B Fig B Special screw A Fig B NOTE Tighten the special screws restoring the torque twice after loosening them to the following torque T R Torque 26 N m WARNING To guarantee the safety of the bike it is essential for the path of the brake hose to be correct Fill The brake pump tank WARNING Only use the prescribed fluid The use of other types of brake fluid may cause damage to the r...

Страница 113: ...faces and plastic parts Always clean up any brake fluid spills immediately Bleed The brake circuit Check Check the level of the brake fluid A Fig A If below the minimum notch top up with the recommended brake fluid Check Brake lever operation If the brake lever is soft or spongy to the touch bleed the brake circuit A A ...

Страница 114: ...1 2 LEFT RADIAL STEM ASSEMBLY 1 3 COUNTERSUNK HEX HEAD SCREW M8X25 ZB 2 4 SPECIAL SCREW 1 5 COUNTERSUNK HEX HEAD SCREW M8X25 ZB 4 6 HANDLEBAR BRACKET 1 7 STEERING BASE 1 8 OIL SEAL 1 9 STEERING HEAD 1 10 STEERING PIN RING NUT 1 11 STEERING RING NUT 1 12 DUST SEAL 2 13 BEARING 2 14 GUIDE BUSHING 1 15 SCREW 2 16 SCREW M6X8 2 17 SCREW 6 18 STEERING BASE CAP 1 19 CABLE GLAND 1 ...

Страница 115: ... on a suitable support so that the front wheel is raised Remove The front brake calliper see procedure Front wheel see procedure Front mudguard see procedure Loosen The setscrews 3 from the top steering plate 9 Fig A The setscrews 17 from the bottom steering plate 7 Fig B IMPORTANT NOTICE Before loosening the setscrews on the top and bottom brackets fit a support for the front fork stem 12 10 11 13...

Страница 116: ...A Completely unscrew the cap assembly 1 from the support tube using a 4 mm pin and hook wrench B Lower the fork sleeve 10 IMPORTANT NOTICE The fork spring is compressed Push down The fork spring 5 Fig B The preload shim so as to be able to insert a 17 mm wrench in the nut 4 Hold the cap assembly 1 in place with a 4 mm pin and hook wrench and use a 17 mm wrench to loosen the nut 4 Unscrew and remov...

Страница 117: ...he rod towards a suitably sized container so as to allow the oil it contains to flow out Fig D NOTE To help drain the rod it is necessary to pump a few times by pushing the pump rod forwards and backwards 15 Fig D IMPORTANT NOTICE This operation is only necessary after draining the oil from inside the rod Lock the wheel shoe A in a clamp Fig E Remove The screw 18 fastening the pump unit 15 The wash...

Страница 118: ...rk sleeve 10 Fig H NOTE To separate these two elements it is necessary to pull them apart with a little force Oil seal 12 Retaining ring 11 The bottom guide bushing 8 Manually remove The top guide bushing 6 NOTE If this operation becomes difficult it is possible to use a flathead screwdriver in the slot in the bushing to make it easier The bottom guide bushing 8 Retaining ring 11 Oil seal 12 Dust se...

Страница 119: ...he full length B of the spring 5 If outside specifications replace Detail The full length of the spring Spring 295 mm Check Damper shaft 15 Fig C If there is any damage or wear replace If there are any obstructions free all oil passages with compres sed air IMPORTANT NOTICE The pump unit contains elements that are very sensitive to foreign bodies While disassembling and refitting the front fork stem...

Страница 120: ...Dust seal clip 13 Oil seal 12 Retaining ring 11 The bottom guide bushing 8 IMPORTANT NOTICE Take note of the direction in which the oil filter is facing 12 as it needs to be inserted with the hollow part facing the retaining ring 11 Remove the adhesive tape applied at the end of the fork stem together with any traces of adhesive remaining Insert by hand Top guide bushing 6 Fig C NOTE If this operat...

Страница 121: ...the fork stem Fig E Then place the following in the seat The dust seal 14 by pressing down manually Fig F Insert The assembled pump unit 15 into the fork sleeve 10 Fig G Fit the fork in a clamp by the wheel foot Fig H Lower the fork sleeve over the stem Insert The washer 17 The screw 18 fastening the pump unit Use an 8 mm Allen key to tighten to the following torque T R Torque 50 N m E F G 13 14 1...

Страница 122: ... every stage Insert the following into the fork sleeve Spring tip 2 Fork spring 5 Top spring guide bushing 6 Shim 7 Bottom spring guide bushing 8 Spring tip 9 IMPORTANT NOTICE In the same direction as spring insertion The narrowest section must be facing upwards Screw the following fully Closing cap 1 Fig M Push down The spring 5 Fig N The preload shim Insert a 17 mm wrench in the nut 4 Hold the c...

Страница 123: ...ing base 7 and the end of the steering rod excluding the dust seal shim Assembly position X 204 5 mm Tighten The stop screws B on the bottom steering plate to the fol lowing torque T R Torque 8 N m NOTE Tighten in three steps Insert the top steering plate inserting shims Y into the ope nings so as to make it easier to insert Fig C Tighten The stop screws 3 on the top steering plate 9 Fig C to the ...

Страница 124: ...OR CONTROL 1 3 BOTTOM ACCELERATOR CONTROL 1 4 TOP ACCELERATOR CONTROL 1 5 RIGHT SWITCH 1 6 GRIP END 2 7 HANDLEBAR 1 8 LEFT SWITCH 1 9 LH GRIP 1 10 CLUTCH CONTROL 1 11 CLUTCH CABLE 1 12 ACCELERATOR OPENING CABLE 1 13 ACCELERATOR CLOSURE CABLE 1 14 REAR VIEW MIRROR RIGHT 1 15 REAR VIEW MIRROR LEFT 1 16 SCREW M6X35 2 17 ELASTIC WASHER 2 18 WASHER 2 19 GRIP CAP 2 HANDLEBAR HANDLEBAR REMOVAL ...

Страница 125: ... to make it possible to insert a jet of air Fig A NOTE Direct a jet of compressed air between the left of the handlebar and the relevant grip so that it can be slid off the handlebar gra dually Take out the left switch 8 Detach the clutch cable 11 Remove the rear view mirror 15 with the adjustment nuts Remove the clevis 32 by unscrewing the two fastening screws 31 then remove the support 33 Repeat...

Страница 126: ...e is any warping cracking damage replace WARNING Do not try to straighten the handlebar if bent since it will become weaker and could be dangerous 7 D C HANDLEBAR HANDLEBAR REMOVAL Take out the handlebar loosening the four fastening screws A of the handlebar clevis B Fig C A B ...

Страница 127: ...ebar and the brake pump clevis Assemble The handlebar grip Apply a fine layer of rubber based adhesive on the end of the handlebar Slip the grip over the end of the handlebar grip Remove all traces of excess rubber based adhesive with a clean rag IMPORTANT NOTICE Do not touch the handlebar grip until the rubber based adhesive has dried completely Assemble The handlebar During the handlebar assembly...

Страница 128: ... OF THE TOP AND BOTTOM STEERING BASE 12 13 12 13 11 10 4 5 9 A Park the bike on a level surface IMPORTANT NOTICE Prop the bike on suitable supports so that it cannot fall Remove The stop screws 3 on the top steering plate Fig A 3 3 ...

Страница 129: ... cap 4 with the special tool Fig B steering head wrench Code Loosen The steering pin ring nut The steering ring nut with the wrench for steering ring nut Fig C Tool to tighten the steering sleeve lock nut Code WARNING Firmly support the bottom steering base so that it cannot fall C ...

Страница 130: ...g rod and a hammer B Fig B Separate the bearing track C from the bottom bearing with a chisel D and a hammer Fig B Fit a new rubber gasket and new bearing tracks IMPORTANT NOTICE If the bearing track is not correctly fitted this could damage the steering head tube NOTE The bearings and tracks need to be replaced as a group Every time the steering sleeve is removed a new rubber ga sket must be fitted...

Страница 131: ...t with the special tool to the following torque T R Torque 60 N m Fit The front fork stems as described previously Fit The cap 4 Fig B with the special tool to the following torque T R Torque 60 N m steering head wrench Code The screws 3 securing the top steering column Fig B to the following torque T R Torque 22 N m Check The steering sleeve Fig C Gently oscillate the front fork holding it by the...

Страница 132: ...on Description Quantity 1 TOP CHAIN SLIDE 1 2 SCREW 8 3 BOTTOM CHAIN SLIDE 1 4 CHAIN COVER 1 5 SCREW M6X8 2 6 SCREW M6X25 2 7 GUIDE BUSHING 2 8 REAR MUD GUARD 1 9 WASHER 1 10 BRACKET 1 11 PLATE 1 12 SHIM 2 13 O RING 2 14 BUSHING 1 15 NUT 1 16 SCREW M10X70 1 17 REAR SHOCK ABSORBER 1 18 SCREW M10X60 1 19 WASHER 2 20 BUSHING 1 21 CABLE GLAND 1 22 BUSHING 2 ...

Страница 133: ... REAR SHOCK ABSORBER CHECK Check Fig B Rear shock absorber rod If there is any warping damage replace the rear shock absorber assembly Rear shock absorber If there is any gas oil leak replace the rear shock absorber as sembly Spring If there is any damage wear replace the rear shock absorber assembly Bushing If there is any damage or wear replace Dust seal If there is any damage or wear replace Sc...

Страница 134: ...R FITTING Fit the screw 18 FigC and its respective washer 19 and tighten to the following torque T R Torque 60 N m the screw 16 FigC and its respective washer 19 and tighten to the washer 15 and the following torque T R Torque 60 N m C 18 19 D 15 16 ...

Страница 135: ...ide plate and another To clean the transmission chain do not use high pressure jets of water or air do not use steam petrol aggressive solvents such as petroleum benzine or brushes with overly stiff bristles Using high pressure items could force dirt into the cavities inside the transmission chain while solvents could cause the O rings to deteriorate The O rings could also be damaged by the use of...

Страница 136: ...ckets all together If the teeth are bent replace the transmission chain sprockets all together 1 Correct 2 Transmission chain roller 3 Transmission chain sprockets NOTE Never fit a new chain with worn sprockets Both the chain and sprockets need to be in good condition or the new chain will become quickly worn TRANSMISSION CHAIN AND SWINGING ARM TRANSMISSION CHAIN INSPECTION A 4 1 2 3 ...

Страница 137: ...r link side plate of the master link or the O rings Insert The master link A Fig B O Rings B Fig B side plate C Fig B IMPORTANT NOTICE Insert the master link from inside the transmission chain then fit the side plate with the ID mark facing out Tighten Use the tool for fitting the side plate B Fig C to press the side plate against the master link Clinch Use the special tool to clinch the pins in the...

Страница 138: ...on Description Quantity 1 SPECIAL SCREW 2 2 BUSHING 2 3 BEARING 4 4 PIN 2 5 INTERNAL SHIM 1 6 SHIM 1 7 SCREW M8X92 6 8 BUSHING 2 9 NUT M8 7 10 HALF SWINGER ARM RIGHT 1 11 HALF SWINGER ARM LEFT 1 12 SPECIAL PLATE 1 13 SCREW M5X10 2 14 NUT M8 2 15 SCREW M8 2 16 RIGHT CHAIN REGISTER 1 17 LEFT CHAIN REGISTER 1 18 SCREW M8X75 1 19 SEALING RING 2 20 SPEED SENSOR 1 ...

Страница 139: ...ert the pins 4 Tighten the special screws 1 on both sides Fig C to the following torque T R Torque 80 N m Fit The bushing 14 on the front right half frame 20 suppor ting the shock absorber in the relevant seat on the swinging arm Fig D Fit Rear shock absorber Rear wheel NOTE The numbers marked are shown in the replacement parts table in the Rear shock absorber chapter Rear shock absor ber removal ...

Страница 140: ...4 26 33 12 24 36 37 Position Description Quantity 1 FRAME 1 2 NUT 8 3 PAD 1 4 TEF SCREW M6X14 8 8 ZB 10 5 SCREW M6X16 2 6 SCREW 4 7 BOTTOM COVER 1 8 RUBBER TIP 2 9 FRONT RIGHT HALF FRAME 1 10 SCREW M10X45 3 11 WASHER 2 12 FRONT LEFT HALF FRAME 1 13 SCREW M10X75 3 14 NUT M10 4 15 BUSHING 2 16 SCREW 1 17 BUSHING 1 18 SCREW M10X50 2 19 BUSHING 4 20 SCREW M10X65 2 21 SCREW M10X30 2 22 SCREW M10X35 1 ...

Страница 141: ...ATION DAMPING PAD 1 FRAME FRAME FITTING IMPORTANT NOTICE Place the engine on a suitable support so that all frame parts can be fitted without any danger to the operator of accidentally falling engine or parts Fit The two front half frames right 9 and left 12 Fig A ap plying the screws 13 21 and 20 on both sides Apply The bottom frame bracket 26 and tighten the fastening screws 22 on both sides Fig ...

Страница 142: ...f frames right and left applying the shims and screws 34 and 18 on both sides Fig D Tighten The four frame engine back anchor screws The bottom crosspiece screws The side head fastening screws The trellis side fastening screws T R Torque 45 N m Take out The pin X Fig C FRAME FRAME FITTING C X D ...

Страница 143: ...BER BUSHING 2 9 BUSHING 1 10 REAR FRAME 1 11 THERMAL PROTECTION 2 12 THERMAL PROTECTION 1 13 FAIRING CLOSURE 1 14 LEFT INSULATING PLATE 1 15 PLATE 1 16 SCREW 2 17 RIGHT INSULATING PLATE 1 18 BRACKET 1 19 SCREW M6X16 2 20 SCREW 2 21 RUBBER TIP 2 22 RUBBER TIP 2 7 6 11 16 15 25 28 30 29 22 21 21 20 20 3 11 17 18 16 26 14 19 19 22 10 2 2 2 23 12 24 27 13 1 8 31 9 8 4 4 5 2 ...

Страница 144: ... FRAME FITTING Fit The rear frame 10 applying the fastening screws 1 and 4 without tightening to the right and then the screws 23 and 4 to the left Fig A The battery support 6 and the column 7 Fig B The column 3 taking care to insert the scraper washer x between the frame structure and the front right half frame Fig C Tighten The previously applied screws to the following torque T R Torque 25 N m ...

Страница 145: ...X12 2 4 SCREW M6X25 2 5 NUT 2 6 LICENCE PLATE HOLDER SUPPORT 1 7 PLATE 1 8 LICENCE PLATE HOLDER 1 9 REFLECTOR 1 10 BAND 1 11 PAD 2 12 SCREW TBEI M5X16 8 8 ZB 2 13 RUBBER TIP 2 14 BUSHING 2 15 SPECIAL SCREW 2 16 COUNTERSUNK HEX HEAD SCREW M6X16 8 8 ZB 2 17 SNAP ON CLIP M6 2 13 13 14 14 15 15 4 4 3 16 17 16 17 9 1 6 12 7 8 10 11 11 3 5 2 5 12 ...

Страница 146: ...ews 15 complete with bushing 14 and rubber tip 13 through the two exhaust pipe shells to the silencer Fig A Tigthen the screws 16 to the exhaust pipe shells Fig B Connect Indicator and licence plate light wiring A 15 6 B 16 FRAME LICENCE PLATE HOLDER REMOVAL Removal carry out the installation steps in reverse order ...

Страница 147: ...7 10 9 12 Position Description Quantity 1 SIDE STAND 1 2 SPECIAL SCREW 1 3 SCREW M6X8 1 4 STAND SUPPORT PLATE SIDE 1 5 SCREW M10X35 1 6 INTERNAL SCREW 1 7 EXTERNAL SCREW 1 8 NUT M12 1 9 WASHER 1 10 SIDE STAND SENSOR 1 11 SCREW 2 12 BELLEVILLE WASHER 1 ...

Страница 148: ...screws X 5 Fig A NOTE Apply thread locker to each of the screws Tighten the two screws with the following torque T R Torque 45 N m Apply The inner 6 and outer 7 screws Connect the connector of the side stand sensor 10 to the system A X CYCLING STAND REMOVAL Removal carry out the installation steps in reverse order ...

Страница 149: ...T SUPPORT PLATE LH 1 2 ELASTIC RING 2 3 PLATE 2 4 BALL 2 5 SPRING 2 6 LH REAR FOOTREST 1 7 SCREW M4X10 2 8 LH FOOTREST RUBBER STOP 1 9 PIN FOR ZB FOOTREST 2 10 LH RUBBER FOOTREST COVER 1 11 COUNTERSUNK HEX HEAD SCREW M8X25 ZB 4 12 RH FOOTREST RUBBER STOP 1 13 RH RUBBER FOOTREST COVER 1 14 RH REAR FOOTREST 1 15 REAR FOOTREST SUPPORT PLATE RH 1 ...

Страница 150: ...er to each of the screws Tighten the two screws 11 with the following torque T R Torque 25 N m NOTE If the rubber footrest cover 13 is worn replace A CYCLING REAR FOOTREST INSTALLATION 1 15 Removal carry out the installation steps in reverse order CYCLING REAR FOOTREST REMOVAL ...

Страница 151: ...NG 1 4 LH FRONT FOOTREST SUPPORT PLATE 1 5 ELASTIC RING 1 6 COUNTERSUNK HEX HEAD SCREW M8X25 ZB 2 7 ELASTIC WASHER 1 8 BUSHING 1 9 SCREW 1 10 SCREW M6X20 1 11 GEAR PEDAL 1 12 SCREW M6X42 1 13 NUT M6 1 14 BALL JOINT 1 15 NUT 1 16 GEAR LEVER 1 17 NUT 1 18 BALL JOINT 1 19 BUSHING 1 20 SCREW 1 21 GEAR LEVER 1 22 LEFT RUBBER FOOTREST COVER 1 23 LH FOOTREST RUBBER STOP 1 24 SCREW M4X10 1 ...

Страница 152: ...it The gear control lever 21 on the textured gear of the engine NOTE Apply special grease to the screw 20 fastening the gear lever 21 Tighten the screw 20 to the following torque T R Torque 8 N m Adjust The gear control arm 16 and 210 mm distance between the ball joints 18 and 14 Fig A NOTE According to the rider s sensitivity it is also possible to change this as needed A 6 4 21 CYCLING LEFT FRON...

Страница 153: ...ELASTIC WASHER 1 4 ELASTIC RING 1 5 ECCENTRIC 1 6 BALL JOINT 1 7 NUT 3 8 NUT 1 9 THREADED PIN 1 10 SPRING 1 11 THREADED PIN 1 12 WASHER 1 13 SCREW M4X10 1 14 RH FOOTREST RUBBER STOP 1 15 RIGHT RUBBER FOOTREST COVER 1 16 RH FRONT FOOTREST SUPPORT PLATE 1 17 RH FRONT FOOTREST 1 18 PIN 1 19 SPRING 1 20 SCREW 2 21 SCREW 2 22 BRAKE PEDAL 1 23 SCREW M6X25 1 24 STOP HEX 1 ...

Страница 154: ...ce it Fit The brake pedal 22 on the footrest support plate inser ting the first bushing 2 after greasing then the screw 1 tightening to the following torque T R Torque 35 N m NOTE Fit The ball joint 6 fitting the fastening screw and nut 7 and tightening to the following torque T R Torque 10 N m Assemble The spring 10 to the threaded pin eccentric assembly 9 5 on the threaded pin 11 A 21 16 CYCLING R...

Страница 155: ...14 9 7 32 8 20 7 3 20 Position Description Quantity 1 EXHAUST GASKET 4 2 NUT M8 8 3 EXHAUST MANIFOLD 1 4 GRAPHITE GASKET 2 5 SCREW M8X45 2 6 SCREW M8X20 1 7 MANIFOLD FITTING EXHAUST 1 8 SILENCER 1 9 WASHER 4 10 WASHER 2 11 SCREW M10X22 2 12 SCREW M6X25 2 13 RUBBER TIP 2 14 BRACKET 1 15 TOP BUSHING 2 16 NUT 2 17 LAMBDA PROBE 4 18 ELASTIC WASHER 1 19 WASHER 1 20 SCREW CLIP 2 ...

Страница 156: ... M6 6 31 SCREW M6 19 2 4 32 COMPLETE EXAHSUT PIPE ASSEMBLY 1 Fit The Lambda probes 17 in the exhaust manifold 3 Fig A and tighten to the following torque T R Torque 1 5 N m The exhaust gasket 1 on the four exhaust outlets of the engine Fig B NOTE Apply copper grease to the stud threads Fig B Screw the nuts 2 onto the studs without tightening NOTE Do this for all studs Assemble The graphite gasket ...

Страница 157: ...ng screws 12 and the relevant nuts 16 Fig E Assemble The exhaust manifold fitting 7 inserting it between the silencer and the exhaust manifold so that the two graphite gaskets 4 are aligned Fig F Tighten The nuts 2 previously screwed onto the engine block studs to the following torque T R Torque 20 N m Tighten The clips 20 to the respective manifolds and lastly the screw 6 to the bracket B Fig G D ...

Страница 158: ...e support Fig B Fit The two exhaust pipe end pieces right 27 and left 24 Fig C Tighten the six screws 26 Tighten the exhaust pipe protection screws NOTE The two end pieces are not mirrored and therefore careful as sembly is required Each terminals has its direction marked with an L left or R right section Fit The two thermal bulkheads A left and right B securing with the relevant screws Fig D A 22...

Страница 159: ... 16 12 12 12 12 12 12 Position Description Quantity 1 FRONT MUD GUARD 1 2 SCREW 4 3 SCREW 6 4 BRACKET 2 5 NYLON WASHER 4 6 T BUSHING 2 7 NUT M5 2 8 BOTTOM MUD GUARD 2 9 RIGHT BRACKET 1 10 LEFT BRACKET 1 11 SCREW M5X12 1 12 WASHER 6 13 ELASTIC WASHER 1 14 WASHER 1 15 SNAP ON CLIP M5 1 16 TUBE CLAMP 1 ...

Страница 160: ... two front forks feet Fit The front mud guard 1 with the respective fastening screws 2 on both sides Fig B NOTE Once the mud guard is assembled connect the hose from the front brake to the tube sleeve A Fig C A B C 3 4 3 4 1 2 A Removal carry out the installation steps in reverse order FAIRING FRONT MUD GUARD REMOVAL ...

Страница 161: ...scription Quantity 1 BOTTOM CHAIN SLIDE 1 2 SCREW 8 3 TOP CHAIN SLIDE 1 4 CHAIN COVER 1 5 SCREW M6X8 2 6 SCREW M6X25 2 7 GUIDE BUSHING 2 8 REAR MUD GUARD 1 9 WASHER 1 10 BRACKET 1 11 PLATE 1 12 SHIM 2 13 O RING 2 14 BUSHING 1 15 NUT 1 16 SCREW M10X70 1 17 REAR SHOCK ABSORBER 1 18 SCREW M10X60 1 19 WASHER 2 20 BUSHING 1 21 CABLE GLAND 1 22 BUSHING 2 ...

Страница 162: ... steps in reverse order FAIRING TOP CHAIN SLIDE AND CHAIN COVER FITTING Assemble The chain cover 4 on the left half swinging arm with the respective fastening screws 5 Fig A Assemble The chain cover 4 on the left half swinging arm with the respective fastening screws 5 Fig A Assemble The top chain slide 3 on the left half swinging arm with the respective fastening screws 2 Fig B NOTE Apply thread ...

Страница 163: ...3 14 2 1 2 16 16 19 Position Description Quantity 1 SCREW 4 2 SCREW 3 3 OPENING 1 4 RUBBER GASKET 1 5 FUEL TANK 1 6 SCREW M6X70 1 7 PLATE 1 8 BUSHING 2 9 RUBBER TIP 2 10 WASHER 2 11 SCREW 2 12 SPRING 1 13 PIPE 1 14 FUEL TANK LEVEL PROBE 1 15 O RING 1 16 SCREW 10 17 FUEL PUMP 1 18 FUEL FILTER 1 19 HOSES 1 ...

Страница 164: ...fety screw 1 and lock the opening Tighten the lock in the opening 3 using the three longer fastening screws 2 Fig A NOTE The screws 1 fitted to the outside of the lock are only fitted for visual effect FAIRING TANK CAP FITTING A 2 FAIRING TANK CAP REMOVAL Removal carry out the installation steps in reverse order ...

Страница 165: ...first Fig C The level gauge in the tank A The supply inlet C to the pump and tank and the breather pipe D Fig D Apply The clip E to the breather pipe to keep it away from the rest of the engine Fig E B C 6 A B D C D E E TANK REMOVAL Removal Once the plastic parts have been removed follow the instal lation steps in reverse order ...

Страница 166: ...ition Description Quantity 1 FUEL TANK CAP 1 2 LEFT PANEL 1 3 BOTTOM LEFT PANEL 1 4 FRONT TANK PAD 1 5 SCREW ST4 2X13 2 6 WASHER 2 7 RUBBER TIP 2 8 STEERING BLOCK COVER 1 9 LOCK CAP 1 10 BRACKET 1 11 SCREW 7 12 SNAP ON CLIP M6 5 13 RIGHT PANEL 1 14 RIGHT BOTTOM PANEL 1 15 SCREW ST4 2 13 10 16 SCREW M6 19 2 2 17 BENELLI EMBLEM 2 18 SCREW 4 ...

Страница 167: ...h the bottom left panel 3 Secure The tank cap screwing the screw X to the front of the tank cap the two screws 11 to the rear and the special screw Y to the centre Fig C the bottom right panel 14 with the screws 11 Fig C Apply The lock cap 9 to the steering block cover 8 Fig D Secure The steering block cover 8 with the three fastening screws 11 Fig D A 12 B 4 C 11 14 11 Y D 9 8 11 TANK COVER REMOV...

Страница 168: ...ity 1 SCREW 4 2 RH EXTERNAL TOP FAIRING 1 3 FAIR RH EXTERNAL BOTTOM 1 4 TANK CAP FUEL RIGHT 1 5 RIGHT BRACKET 1 6 RH COVER 1 7 LH COVER 1 8 LEFT BRACKET 1 9 TANK CAP FUEL LEFT 1 10 FAIR LH EXTERNAL BOTTOM 1 11 LH EXTERNAL TOP FAIRING 1 12 SCREW M6X14 2 13 SNAP ON CLIP M6 2 14 SCREW ST4 2 13 18 15 ADHESIVE LH BN600i BW 1 16 ADHESIVE RH BN600i BW 1 ...

Страница 169: ... top left external fairing 11 with the bottom left external fairing 10 and apply the left cover 7 Secure The right and left fairing with the respective fastening screws 1 Fig A A 1 FAIRING REMOVAL Removal Take out the steering block cover 8 first unscrewing the three fastening screws 11 Fig B Remove the other parts in reverse order to installation B 8 11 ...

Страница 170: ...ST4 2X9 5 2 5 SNAP ON CLIP M5 5 6 SCREW M5X10 5 7 FAIRING CLOSURE 1 8 SCREW ST4 2X12 2 9 BENELLI ø 40 DECAL 1 Pre assemble The right side 1 and the left side 3 to the cowl 2 Secure the assembled dome to the front light group with the five screws A and thread blocker A A COWL REMOVAL Removal carry out the installation steps in reverse order ...

Страница 171: ...ption Quantity 1 HEADLAMP 1 2 SCREW 1 3 HEADLAMP SUPPORT 1 4 SCREW M6X60 1 5 WASHER 1 6 NUT 1 7 SHIM 1 8 BUSHING 2 9 SCREW 2 10 LAMP 2 11 BUSHING 4 12 VIBRATION DAMPING RUBBER 4 13 SCREW M6X20 4 14 DIRECTION INDICATORS FRONT LH 1 15 WASHER 2 16 LH PLATE 1 17 DIRECTION INDICATORS FRONT RH 1 18 BUSHING 3 19 SCREW M6X25 3 20 SNAP ON CLIP 2 21 VIBRATION DAMPING RUBBER 3 22 REAR LIGHT 1 23 DIRECTION IN...

Страница 172: ...mble The cowl to the assembled headlamp Secure The cowl to the frame with the screw 4 of the headlamp support 3 Fig A Connect the wiring to the indicators and headlamp Lift the full headlamp NOTE Take care not to crush the wiring while lifting the headlamp Secure The full headlamp with the fastening screw A on both sides Fig B A 4 B A FULL REAR LIGHT REMOVAL Removal carry out the installation step...

Страница 173: ...OM PANEL 1 4 RIGHT TAILPIECE WHITE 1 5 CENTRAL TAILPIECE WHITE 1 6 LEFT TAILPIECE WHITE 1 7 SCREW M8X25 4 8 SNAP ON CLIP M6 2 9 SCREW TBEI M6X14 8 8 ZB 4 10 SCREW M6 15 2 4 11 NYLON WASHER 2 12 SCREW ST4 2X9 5 6 13 BATTERY COVER 1 14 SPECIAL SCREW 2 15 BUSHING 2 16 VIBRATION DAMPING RUBBER 2 17 SCREW ST4 2X13 4 18 SNAP ON CLIP 6 19 RH TAILPIECE THERMAL PROTECTION 1 20 LH TAILPIECE THERMAL PROTECTI...

Страница 174: ...TTING Assembly Assemble the left tailpiece 6 and the right piece 4 with the fastening screws 10 at the bottom and 14 and the interme diate part of the frame Fit the handles 25 and 26 with the four fastening screws 7 applying thread blocker to the ends of the screws Tighten the top screws 17 on the tailpieces Apply the snap on clips 18 and assemble the central tailpie ce 5 securing it with the two ...

Страница 175: ... 174 ENG ENG Engine CHAPTER 5 ...

Страница 176: ...SPRING FITTING 191 CYLINDER CHECK 192 HEAD FITTING 192 PISTONS 193 PISTON PIN REMOVAL 194 PIN CHECK 194 PIN ASSEMBLY 195 PISTON CHECK 195 ELASTIC CLIP CONTROL 196 CLIP FITTING 197 PISTON FITTING 197 CRANK GEAR 198 CHECK OF CONNECTING ROD AND CONNECTING ROD HALF BEARINGS 198 CONNECTING ROD AND CONNECTING ROD HALF BEARING INSTALLATION 198 MAIN HALF BEARING AND DRIVE SHAFT INSTALLATION 200 DRIVE SHAF...

Страница 177: ... ASSEMBLY 220 OIL FILTER REMOVAL INSTALLATION 220 STARTING 221 STARTER MOTOR REMOVAL INSTALLATION 222 FLYWHEEL REMOVAL 223 FLYWHEEL FITTING 224 PHASE SENSOR INSTALLATION ADJUSTMENT 226 SUPPLY 227 THROTTLE VALVE REMOVAL 228 THROTTLE VALVE FITTING 229 ...

Страница 178: ...UBBER TIP 4 3 O RING 4 4 SCREW 6 5 RUBBER TIP 6 6 SCREW M6X16 2 7 WASHER M 6 2 8 BRACKET 2 9 PLUG 1 10 DISTRIBUTION GEAR COVER 1 11 DIAPHRAGM 1 12 DIAPHRAGM 1 13 SCREW M6X14 5 14 DISTRIBUTION GEAR COVER GASKET 1 15 PLUG 2 16 TOP CHAIN SLIDES 1 17 DISTRIBUTION CHAIN 1 18 DISTRIBUTION GEAR 1 19 DISTRIBUTION GEAR 1 ...

Страница 179: ...below 1 Remove the bracket 8 by loosening the screw 6 and washer 7 Fig A 2 Take out the 4 coils 29 Fig B 3 Remove the 4 spark plugs 30 using the relevant tool Fig C 4 Take out the 6 screws 4 and relevant rubber tips 5 Fig D NOTE We recommend replacing the rubber tips 5 during the reas sembly stage as they are subject to wear As far as concerns tightening torque to reassemble the timing gear with t...

Страница 180: ... screw A recovering the spring and washer followed by the two tightening screws 26 Fig G NOTE Operation to perform with the engine in TDC During the refitting stages take care to ensure that the gasket 23 Fig H is not worn or damaged and if this is not the case replace it Bring the tensioner to the retracted position before inserting it in its housing To secure the tensioner to the cylinder body it...

Страница 181: ...he underframes indicating the assembly direction B C REMOVAL OF CAMSHAFT OUTLET SIDE Remove the 2 fastening screws 20 of the distribution gears 18 Fig C Proceed to take out 10 fastening screws from the underframes supporting the outlet camsDischarge haft Fig C Take out the outlet camshaft NOTE To prevent the distribution chain 17 from falling into the crank case secure it with some wire NOTE Durin...

Страница 182: ...cement Specifications Table Camshaft Eccentricity limit Camshaft outlet side 0 02 mm Camshaft inlet side 0 06 mm Measure the clearance between the bearing journals camshaft and underframe If the measurements taken Fig G are not within the specifica tions proceed with full head and underframe replacement Specifications Table Camshaft Clearance between bearing journals and camshaft Camshaft outlet side...

Страница 183: ... shaft lobes to be placed inwards Fig B and the two reference notches X of the distribution gear to be in line as in the figure NOTE When assembling the underframes it is necessary to add special grease to prevent the shafts from turning dry when the engine is first started Fig C Place the underframes according to the sequence previously shown in the removal stage and tighten the fastening screws Fi...

Страница 184: ...for the shaft lobes to be placed inwards Fig B and the two reference notches X of the distribution gear to be in line as in the figure NOTE When assembling the underframes it is necessary to add spe cial grease Fig C to prevent the shafts from turning dry when the engine is first started Place the underframes according to the sequence previously shown in the removal stage and tighten the fastening s...

Страница 185: ... the chain is replaced it is also necessary to replace the slides B A 27 24 C 24 17 CHAIN SLIDE ASSEMBLY To assemble the chain slides follow the steps for removal in reverse order NOTE When closing the cover of the chain tensioner housing Fig D take care with the seal If the seal is damaged it must be replaced NOTE Take care when assembling screws on the chain tensioner hou sing since the screw sh...

Страница 186: ...ndition Fig B Engine tuning tool Code NOTE During this operation the chain and distribution gears need to be lubricated with engine oil A 17 B X X VALVE CLEARANCE ADJUSTMENT A Once the distribution cover has been removed see previous section use a thickness gauge to check the clearance between the cam and hydraulic cup as shown in Fig A If the measurement is outside specifications replace the calib...

Страница 187: ...VE PAD MM 1 600 16 5 VALVE PAD MM 1 625 16 5 VALVE PAD MM 1 650 16 5 VALVE PAD MM 1 675 16 5 VALVE PAD MM 1 700 16 5 VALVE PAD MM 1 725 16 5 VALVE PAD MM 1 750 16 5 VALVE PAD MM 1 775 16 5 VALVE PAD MM 1 800 16 5 VALVE PAD MM 1 825 16 5 VALVE PAD MM 1 850 16 5 VALVE PAD MM 1 875 16 5 VALVE PAD MM 1 900 16 5 VALVE PAD MM 1 925 16 5 VALVE PAD MM 1 950 16 ...

Страница 188: ...250 16 5 VALVE PAD MM 2 275 16 6 SCREW M6X60 2 7 RETAINING WASHER 1 8 SCREW M6X12 1 9 SCREW M8X36 5 8 10 CYLINDER 1 11 GRUB SCREW 1 12 HEAD GASKET 1 13 THERMOSTAT 1 14 THERMOSTAT CUP 1 15 SCREW M6X25 2 16 WATER TEMPERATURE SENSOR 1 17 COUPLING 1 18 O RING 4 19 SUCTION PIPE 4 20 INTERNAL SPRING 8 21 SCREW M6X20 8 22 SCREW CLIP 4 23 VALVE RUBBER TIP 32 24 TOP SHIELDED BULB 16 25 EXTERNAL VALVE SPRIN...

Страница 189: ...hat there are no lines or damage and if so replace them Check the outer diameter with a micrometer to make sure there is no warping Fig B NOTE Each time tappets or pads are removed grease the parts care fully with Sintoflon grease NOTE At the end of the parts check always check the valve clearance see previous paragraph A 1 B 5 HEAD REMOVAL To remove the head after taking out the parts listed above...

Страница 190: ...or Code NOTE While taking out the two half shells 23 locking the valve using a magnet to retrieve them A A 23 VALVE OIL SEAL REMOVAL INSERTION REMOVAL Once the valve has been removed it is possible to remove the oil seal A Fig B using the special tool Tool for valve oil seal removal Code INSERTION Insert the oil seal A using the special tool Fig C Tool for valve oil seal insertion Code B A C ...

Страница 191: ...e seat A on the valve head with a straight edge rule Fig A The seat surface must not be concave if necessary replace the valve Check the clearance between the stem and valve guide Valve Stem guide clearance Inlet 0 05 0 075 mm Discharge 0 04 0 065 mm NOTE In case of sizes not listed in the table replace the valve guide Check the eccentricity of the valve stem Fig B using the table below If outside...

Страница 192: ...idth of the valve seat NOTE Where the valve seat and valve face are in contact with one another the Prussian blue liquid will have been removed Lap the valve contact surfaces the valve seat Fig D NOTE After replacing the head or the valve and the relevant guide it is necessary to lap the seat and contact surfaces of the valve Apply a rough lapping paste to the valve contact surfaces C Fig D IMPORT...

Страница 193: ...side specification replace VALVE AND VALVE SPRING FITTING Use a special combined tool to remove the valves 27 28 and springs 29 25 Fig B Valve spring compressor tool Code Valve disassembly adaptor Code NOTE Take care when inserting the two half shells 23 to lock the valve to make sure it is inserted correctly Make sure to fit each valve in the original position NOTE During assembly of valve flaps and...

Страница 194: ... the following torque T R Torque 12 N m X 6 HEAD TIMING GEAR C 12 11 CYLINDER CHECK The following procedure applies the whole cylinder group Check the walls of the cylinder Fig A If there are any vertical lines replace the cylinder and the piston all together and the relevant clips The cooling cavity of the cylinder in case of build up remo ve scale deposits Measure Cylinder stroke Fig B Take diff...

Страница 195: ...TAINING RING 8 3 PISTON 4 4 PISTON PIN 4 5 4 4 6 SCREW M7 8 7 NUT M7 8 8 HALF BEARING YELLOW 8 8 HALF BEARING BLUE 8 8 HALF BEARING GREEN 8 9 SCREW 1 10 FULL DRIVE SHAFT 1 11 DISTRIBUTION CHAIN PINION 1 12 DRIVE SHAFT 1 13 SPLINE 1 14 FLYWHEEL KEY 1 15 WASHER 1 16 FULL DRIVE SHAFT 1 ...

Страница 196: ...de NOTE Never use hammers to remove the pins A PIN CHECK The following removal procedure applies to all pins 4 Check piston pin If there is blue discolouration or grooves replace the piston pin and check the lubrication system Measure The outer diameter of the piston Fig B If outside the specifications replace the piston pin Measure the inner bore diameter of the piston pin If outside specifications...

Страница 197: ...ASS P P A Ø65 0 025 0 03 B Ø65 0 02 0 025 If outside specifications replace the cylinder and the relevant clips all together IMPORTANT NOTICE The piston is marked by a letter stating its class The cylinder piston coupling needs to be between identical classes D E B PISTONS PIN ASSEMBLY The following refitting procedure applies to all piston pins 4 Before lubricating insert the pin 4 into the piston ...

Страница 198: ...carbon deposits from the piston clips and grooves Measure The side clearance between a piston clip and another using a thickness gauge Fig B If outside specifications replace the piston and the relevant clips all together Clip Piston clip side clearance Top clips 0 04 0 08 mm Clips 0 05 0 09 mm Measure The thickness of the top clip The thickness of the second clip See Fig C Clip Piston clip thickne...

Страница 199: ...D After placing the shim insert the side rings E Fig B NOTE The shim and side rings have no top or bottom side meaning they can be inserted in any way IMPORTANT NOTICE When installing the shim D make sure that the ends are not overlapping in the slot Fig C D PV D A 3 2 1 D E E B Scorretto Corretto C PISTON FITTING D Piston fitting Once the piston is assembled see dedicated paragraph To insert the p...

Страница 200: ...he following torque T R Torque 25 N m It is necessary to measure the internal dimension of the connecting rod foot to check for any anomalies using the special gauge Fig B Part Reference size Steering head Ø33 mm 0 016 0 Steering foot Ø16mm 0 034 0 016 Before assembling the bushings 8 on the steering head mea sure them with a specific micrometer See Fig C A 8 5 B C D Fit The connecting rod half bea...

Страница 201: ...head half bearings must be fitted back in their original positions Fig E According to the bushing type make the envisaged couplings see table STEERING HEAD HALF BEARING STD COLOUR THICKNESS A Green 1 503 1 506 mm B Blue 1 506 1 509 mm C Yellow 1 500 1 503 mm Ø std seat A green Ø 33mm 0 008 0 Ø std seat A blue Ø 33mm 0 008 0 016 Ø std seat C yellow Ø 30mm 0 034 0 041 According to the class shown on ...

Страница 202: ...14 16 23 5 15 15 15 34 9 22 9 31 17 1 21 22 35 10 36 36 37 38 39 Position Description Quantity 1 BOTTOM CASING 1 1 CASING GREY 1 2 RIVET 1 3 SPECIAL SCREW 1 4 SPECIAL SCREW 3 5 BALL 1 6 ROLLER BEARING YELLOW 10 6 ROLLER BEARING RED 10 6 ROLLER BEARING GREEN 10 6 ROLLER BEARING BLUE 10 7 COVER 1 8 SCREW M6X12 1 9 SCREW M6X45 7 10 WASHER 3 11 SCREW M6X20 2 12 WATER FITTING 1 13 O RING 1 14 CENTERING...

Страница 203: ... 23 SCREW M8X115 3 24 WASHER 12 25 SCREW M10X100 1 26 SCREW M8X85 6 27 SCREW M8X75 1 28 SCREW M8X45 1 29 SCREW M8X55 2 30 SCREW M10X60 1 31 BUSHING 1 32 SCREW M8X50 1 33 WASHER 5 34 SCREW M6X60 1 35 OIL PRESSURE VALVE 1 36 SCREW M5X16 2 37 IDLE SENSOR 1 38 O RING 1 39 GASKET 1 40 SCREW M6X12 1 CRANK GEAR MAIN HALF BEARING AND DRIVE SHAFT INSTALLATION ...

Страница 204: ...pport and the half bearing and to prevent damage to the engine the half bearings must be fitted back in their original positions Main half bearings are marked with different colours and letters as shown in the table MAIN HALF BEARINGS STD COLOUR THICKNESS A Green 1 503 1 506 mm B Blue 1 506 1 509 mm C Yellow 1 500 1 503 mm Ø std seat A green Ø 35 007 Ø 35 014 mm Ø std seat A blue Ø 35 014 Ø 35 021 ...

Страница 205: ...he main bearings Fig E Internal diameter A Size Coupling housing 1 A1 31 99 32 009 mm Coupling housing 2 A2 31 99 32 009 mm Coupling housing 3 A3 31 99 32 009 mm Coupling housing 4 A4 31 99 32 009 mm Once the bottom half casing is removed proceed to lubri cate the main half bearings 6 of the top half casing using copper grease Fig F NOTE While fitting the drive shaft the pistons must be pre assembl...

Страница 206: ... rust lines signs of wear replace the drive shaft A A B B DRIVE SHAFT INSTALLATION Once the drive shaft has been inserted proceed to assemble the steering heads Fig B Tighten the nuts to the following torque Torque 25 N m NOTE Lubricate the steering head pins with copper grease Measure Once all the steering heads have been measured use a thickness gauge to measure the distance between the drive sh...

Страница 207: ...USHING 1 3 WASHER 1 4 CLUTCH BELL 1 5 CLUTCH DRUM 1 6 DRIVEN CLUTCH DISC 8 7 STEEL CLUTCH DISC 7 8 BELLEVILLE WASHER 1 9 GASKET 1 10 PRESSURE PLATE 1 11 CLUTCH SPRING 4 12 FLANGE 1 13 SCREW M6X25 4 14 BEARING 1 15 COMPLETE CLUTCH 1 16 BUSHING 2 17 GASKET 1 18 GUIDE BUSHING 1 ...

Страница 208: ...e flange 12 and the 4 springs 11 Use the specific tool to remove the fastening nut 52 and the wear washer 53 as in Fig C Tool to remove fit the clutch bell ring nut Code Clutch disassembly wrench Code Take out the pressure plate 10 the clutch bell 4 the drum 5 and the guide bushing 2 Refer to the Gear chapter CLUTCH Position Description Quantity 19 CLUTCH CONTROL SHAFT 1 20 SPRING 1 21 WASHER 1 22 OI...

Страница 209: ... A STEEL DISC CHECK B The following procedure applies to all steel discs Check Steel discs If there is any damage wear replace the steel discs all together Measure Steel disc warpage Fig B If not within specifications replace the steel discs together Disc Twist limit Disc 1 6 0 0 05 mm NOTE Carry out the check placing the disc on a reference surface and take the measurements using a thickness gauge...

Страница 210: ...ode NOTE Rescrew the fastening ring nut XX using a pin punch Fig E 8 Clutch spring 11 9 Flange 12 10 Fastening screws 13 Flange NOTE The fastening screws 13 need to be greased with lithium grea se and tightened to the following torque T R Torque 12 N m 11 Insert the bearing 14 12 Reassemble the guide bush 18 and the clutch control shaft 19 13 Insert the seal 17 14 Position the clutch cover inserti...

Страница 211: ...AFT 1 2 SHIM 1 3 STOP SPRING 1 4 BUSHING 1 5 GEAR STOP DEVICE 1 6 SCRAPING 2 7 ELASTIC RING 1 8 COMPLETE GEAR STOP DEVICE 1 9 SPRING 1 10 PLUG 1 11 SPRING 1 12 DESMODROMIC 1 13 PIN 1 14 BEARING 1 15 PLATE 1 16 SCREW M6X14 2 17 GEAR DRUM 1 18 WASHER 1 19 SCREW M6X15 1 ...

Страница 212: ...Z39 1 37 SCRAPING 3 38 ELASTIC RING 3 39 DRIVEN GEARS 6TH Z27 1 40 BROACHED BUSHING 2 41 DRIVEN GEARS 4TH Z30 1 42 NOTCHED WASHER 1 43 NOTCHED WASHER 1 44 DRIVEN GEARS 3RD Z32 1 45 DRIVEN GEARS 5TH Z28 1 46 SCRAPING 1 47 BROACHED BUSHING 1 48 DRIVEN GEARS 1ST Z39 1 49 WASHER 1 50 COMPLETE SECONDARY SHAFT 1 51 BEARING 2 52 NOTCHED NUT 1 53 WASHER 1 54 OIL PUMP PINION 1 55 SHIM 1 56 STOPPER 1 57 MAI...

Страница 213: ...smodronic extremities 12 Housing port desmodronic size 26 0 0 021 mm If outside specifications replace the bottom casing Check The groove in the desmodromic shaft A Fig B In the presence of damage lines signs of wear replace the who le desmodromic shaft Desmodromic shaft segment B Fig B If there is any damage wear replace the desmodromic shaft assembly Assembly Insert the desmodronic 12 inside the ...

Страница 214: ...embly tool Code Tighten the drum via the washer 19 and screw 18 in Fig D to the following torque T R Torque 12 N m NOTE To tighten the drum use an aluminium tool to keep the desmo dromic still Fig E Insert the plate 5 to hold the bearing 14 tightening the screws 16 Fig F to the following torque T R Torque 12 N m D 17 E F 15 ...

Страница 215: ...he tooth on the gear fork cam B If there is warping damage lines traces of wear replace the gear fork Measure the thickness of the gear fork using a slide gauge Part Size Gear fork 5 85 0 05 mm Check The gear fork pin 21 Roll the gear fork guide pin over a flat surface Fig H If there is any warping replace NOTE Do not try to straighten the fork guide if it is warped ...

Страница 216: ...equence with all of the parts of which it is comprised see the exploded drawing at the beginning of this chapter Place the complete main shaft 68 and the secondary shaft 50 in their respective seats taking care to match up the grooves on the two bearings 32 with the bearing retainers fitted previously Fig M NOTE Before assembling the two half casings top and bottom it is necessary to apply sealant ...

Страница 217: ...to the following torque NOTE Before securing the screws they must be greased with copper grease Q yy yy XX ZZ XX R XX GEAR DISASSEMBLY Disassembly To disassemble follow the assembly procedure in the previous section in reverse order Check Make sure that the end of the gear retainer spring 3 does not come away from the selector plate 1 and that when idle the two ends of the spring and strike pin is...

Страница 218: ...NOTE Before assembly check the sensor continuity see specific section Tighten the two fastening screws 36 of the sensor to the following torque T R Torque 12 N m NOTE The numbers marked are shown in the replacement parts table in the Chapter 5 Crank gear chapter main half bearings and engine shaft fitting section A GEAR ASSEMBLY 11 10 36 ...

Страница 219: ...REW 1 2 OIL FILTER 1 3 DISTRIBUTOR 1 4 GASKET 1 5 SCREW M14 1 6 O RING 1 7 GUIDE BUSHING 2 8 OIL PUMP COVER 1 9 GUIDE BUSHING 2 10 SCREW 1 11 WASHER 1 12 PIN 1 13 OUTER ROTOR 1 14 INNER ROTOR 1 15 OIL PUMP 1 16 OIL PUMP SHAFT 1 17 SCREW M6 35 3 18 OIL PUMP CHAIN 1 ...

Страница 220: ...place NOTE If there is any sediment or residue clean the filtering area care fully with solvent LUBRICATION SYSTEM Position Description Quantity 19 PUMP GEARS 1 20 WASHER 1 21 SCREW M5X10 1 22 OIL PRESSURE VALVE 1 23 INLET FILTER 1 24 INLET FILTER FITTING 1 25 COMPLETE OIL PUMP 1 26 OIL PUMP GASKET 1 A B C B OIL SUMP AND INLET FILTER INSTALLATION Fitting Proceed using the opposite order to removal ...

Страница 221: ...crewing the assembly screws 10 separating the pump cover 8 from the pump body 15 Take out the parts from the inside Check The pump body 15 If there are any lines damage wear replace Pump gear 19 If there is any damage or wear to the gears replace PRESSURE RELIEF VALVE INSTALLATION Check Before fitting the valve make sure that all of its component parts are free from anomalies Fig A If there is any ...

Страница 222: ...ng torque T R Torque 7 N m A Removal NOTE Before removing the oil filter it is necessary to remove the oil from the engine 1 Place a collection container under the engine Fig A 2 Use the specific tool to turn the oil filter 2 and remove it Oil filter removal assembly tool Code Fitting NOTE Before fitting a new oil filter apply a fine layer of engine oil to the contact surfaces of the filter to lubricate i...

Страница 223: ...NG Position Description Quantity 1 STARTER MOTOR 1 2 O RING 1 3 SCREW M6X40 2 4 IGNITION SHAFT 1 5 DOUBLE GEAR 1 6 START GEAR 1 7 SCREW M6X32 3 8 MAGNET FLYWHEEL 1 9 COMPLETE FREEWHEEL 1 10 FLYWHEEL 1 11 SCREW M6X16 6 ...

Страница 224: ...r with effort replace the part O RING gasket 2 If there is any damage spotting traces of wear replace the O ring gasket Fitting NOTE Lubricate the O ring and take care not to damage it 1 Proceed using the opposite order to removal Tighten the two screws 3 to the following torque T R Torque 12 N m Use Loctite thread locker to secure STARTER MOTOR REMOVAL INSTALLATION STARTING 3 ...

Страница 225: ...e the specific tools to take out the flywheel 10 Fig B tool to take out flywheel Code NOTE The numbers marked are shown in the replacement parts table in the Starting chapter Phase sensor installation adjustment section IMPORTANT NOTICE During the removal of the flywheel remove the flywheel drive shaft locking key x Fig B 5 Take out the double gear 5 shaft 4 and starter gear 6 Fig C Removal Removal of ...

Страница 226: ...re shown in the replacement parts table in the Pistons chapter Piston removal section 5 Tighten the fastening screw 13 fastening the plate sup port 12 6 Tighten the 3 fastening screws 7 7 Apply the gasket 11 If there is any tearing trace of wear replace the gasket 8 Use the specific tools to fit the cover 10 tool to remove the flywheel cover Code 9 Tighten the 9 fastening screws 1 to the following to...

Страница 227: ...X25 14 2 PINION COVER 1 3 MAGNETIC CAP 1 4 O RING 1 5 MAGNETIC CAP 1 6 CAP 1 7 SCREW M6X12 1 8 PHASE SENSOR 1 18 RETAINING WASHER 1 10 LEFT CASING 1 11 GASKET 1 12 PLATE 1 13 SCREW M6X10 1 14 BUSHING 4 15 GASKET 1 16 COVER 1 17 SCREW M6X22 6 18 SCREW M6X30 16 ...

Страница 228: ... its housing in the left casing 10 Fig A 3 Tighten the fastening screw 7 to the following torque B T R Torque 12 N m Measure The distance A between the phase sensor 8 and the pick up on the magnet flywheel Fig C NOTE Use a thickness gauge to take this measurement IMPORTANT NOTICE During measurement apply or remove scraper shims to reach the required distance A Thickness Measure Scraper thickness x ...

Страница 229: ...INJECTOR 4 3 INJECTOR SUPPORT 2 4 SCREW M5X16 2 5 SCREW M5 10 4 6 SCREW M4X10 2 7 O RING 2 8 POTENTIOMETER 1 9 SCREW 10 PLATE 11 THROTTLE VALVE 1 12 NUT M5 2 13 STEPPER MOTOR 1 14 DISTRIBUTOR 1 15 PLATE 2 16 CLIP 8 17 MINIMUM AIR PIPE 4 1 18 MINIMUM AIR PIPE 3 1 ...

Страница 230: ...ear replace the relevant gaskets 18 If there are any anomalies traces of wear replace NOTE The numbers marked are part of the replacement parts table in the chapter Head timing belt chapter valve flap and calibra ted pad removal section Adjustment NOTE Make this adjustment with the engine running Connect The tubes of the vacuum gauge to the 4 fittings A Fig C Start The engine to get it to a temperat...

Страница 231: ...lve 3 with valve 4 using the screw C Fig D NOTE Once the four valves are all aligned it is possible to perfect this correction using the individual by pass screws B Fig C C D 1 2 3 4 THROTTLE VALVE FITTING Fitting Proceed using the opposite order to removal 1 Tighten the 8 screws 21 Fig A to the following torque T R Torque 6 N m Use Loctite thread locker to secure ...

Страница 232: ...COOL 231 COOL Cooling system CHAPTER 6 ...

Страница 233: ...EM WATER PUMP 233 WATER PUMP REMOVAL FITTING 234 THERMOSTAT 235 THERMOSTAT REMOVAL FITTING 235 MANIFOLD 236 MANIFOLD REMOVAL FITTING 236 HEAT EXCHANGER 237 HEAT EXCHANGER REMOVAL FITTING 237 RADIATOR 238 RADIATOR REMOVAL FITTING 238 ...

Страница 234: ...1 2 RETAINING RING 1 3 OIL SEAL 1 4 WATER PUMP COVER 1 5 O RING 1 6 BEARING 2 7 ELASTIC RING 1 8 WATER PUMP SHAFT 1 9 SCREW M6X40 2 10 COMPLETE WATER PUMP 1 11 L FITTING 1 12 SCREW M6X20 2 13 WASHER 1 14 WATER PUMP BODY 1 15 RETAINING RING 1 16 BUSHING 1 17 SEEGER RING 1 ...

Страница 235: ...t is possible to see dripping from the hole shown in Fig C NOTE The numbers marked are shown in the replacement parts table in the Cooling circuit chapter radiator removal section Fitting 1 Once each part has been checked proceed to assemble the pump lubricating the pump shaft 8 bushing 16 and bearings 6 with engine oil and following the procedure for removal described above this time in reverse o...

Страница 236: ...C The thermostat valve will open to at least 7 mm Key to Fig C 1 Thermometer 2 Container 3 Water 4 Thermostat Thermostat opening closure graphic Fig D A Completely closed B Completely open IMPORTANT NOTICE If there are any doubts as to thermostat precision it is better to replace it A faulty thermostat can cause serious overheating or overcooling Fitting 1 Fit the thermostat with bypass hole A Fig...

Страница 237: ...er fitting 12 complete with gasket 39 2 Apply thread locker to the 2 screws 11 and tighten to the following torque T R Torque 12 N m Use Loctite thread locker to secure NOTE Add coolant once these steps have been completed NOTE The numbers marked are shown in the replacement parts table in the Chapter 5 Crank gear chapter crankshaft half bearings and engine shaft fitting section A 11 12 39 MANIFOLD ...

Страница 238: ...butor for any build up or breakages If there is any damage breakage replace Fitting 1 Assemble the screw 5 and gasket 4 to the distributor 3 2 Tighten the screw 5 to the following torque T R Torque 60 N m NOTE The numbers marked are shown in the replacement parts table in Chapter 5 Lubrication circuit 3 Connect the connection pipes 10 and 13 of the distribu tor 3 tightening the clips 9 Fig A NOTE ...

Страница 239: ...Position Description Quantity 1 SCREW 2 2 BUSHING 2 3 RUBBER TIP 4 4 WATER RADIATOR 1 5 SCREW 4 6 LH RADIATOR GUARD 1 7 RH RADIATOR GUARD 1 8 WATER DELIVERY OPENING 1 9 CLIP 2 10 HOSE 1 11 RADIATOR BULB 1 12 SCREW M6X30 2 13 RIGHT BRACKET 1 14 LEFT BRACKET 1 15 NUT 2 16 BUSHING 2 17 SNAP ON CLIP M6 2 18 SCREW M6X12 2 19 FAN 1 RADIATOR ...

Страница 240: ...15 16 15 17 18 15 9 9 8 9 23 23 Position Description Quantity 1 SUCTION PIPE 1 2 WATER TANK CAP 1 3 PIPE 1 4 TEF SCREW M6X14 8 8 ZB 2 5 WATER TANK 1 6 CLIP 4 7 PIPE 1 8 PIPE 1 9 CLIP 4 10 HOSE 1 11 CLIP 2 12 HOSE 1 13 HOSE 1 14 T FITTING 1 15 CLIP 5 16 HOSE 1 17 HOSE 1 18 HOSE 1 19 SCREW CLIP 2 PIPES ...

Страница 241: ... 12 fastening the radiator to the frame Fig B e and the fastening screw 12 on the opposite side Fig C 3 Remove the clamp fastening the hose 10 Fig D NOTE The numbers marked are shown in the replacement parts table in Chapter 6 COOLING CIRCUIT radiator removal fitting paragraph RADIATOR Check the radiator fins In the event of obstruction clean Use a jet of compressed air to the rear section of the ra...

Страница 242: ...ews of the radiator 1 12 to the following torque T R Torque 10 N m 3 The clips clik 10 must be replaced each time they are open 4 Once the parts are assembled connect the electrical parts of the radiator bulb and fan and proceed to fill the circuit Fig E NOTE While filling the circuit pinch the hose as the fluid is being deliv ered to remove any air bubbles RADIATOR RADIATOR REMOVAL FITTING E ...

Страница 243: ...TION MANUAL 2013 Benelli Q J s r l First Edition DECEMBER 2013 All rights reserved Reprints or unauthorised use without the written permission of Benelli Q J s r l are expressly prohibited Pure Passion since 1911 ...

Отзывы: