background image

EN  

Installation and operating manual

DRYPOINT

®

 AC 410 – 495 | DRYPOINT

®

 AC 410 – 495 MS 

39

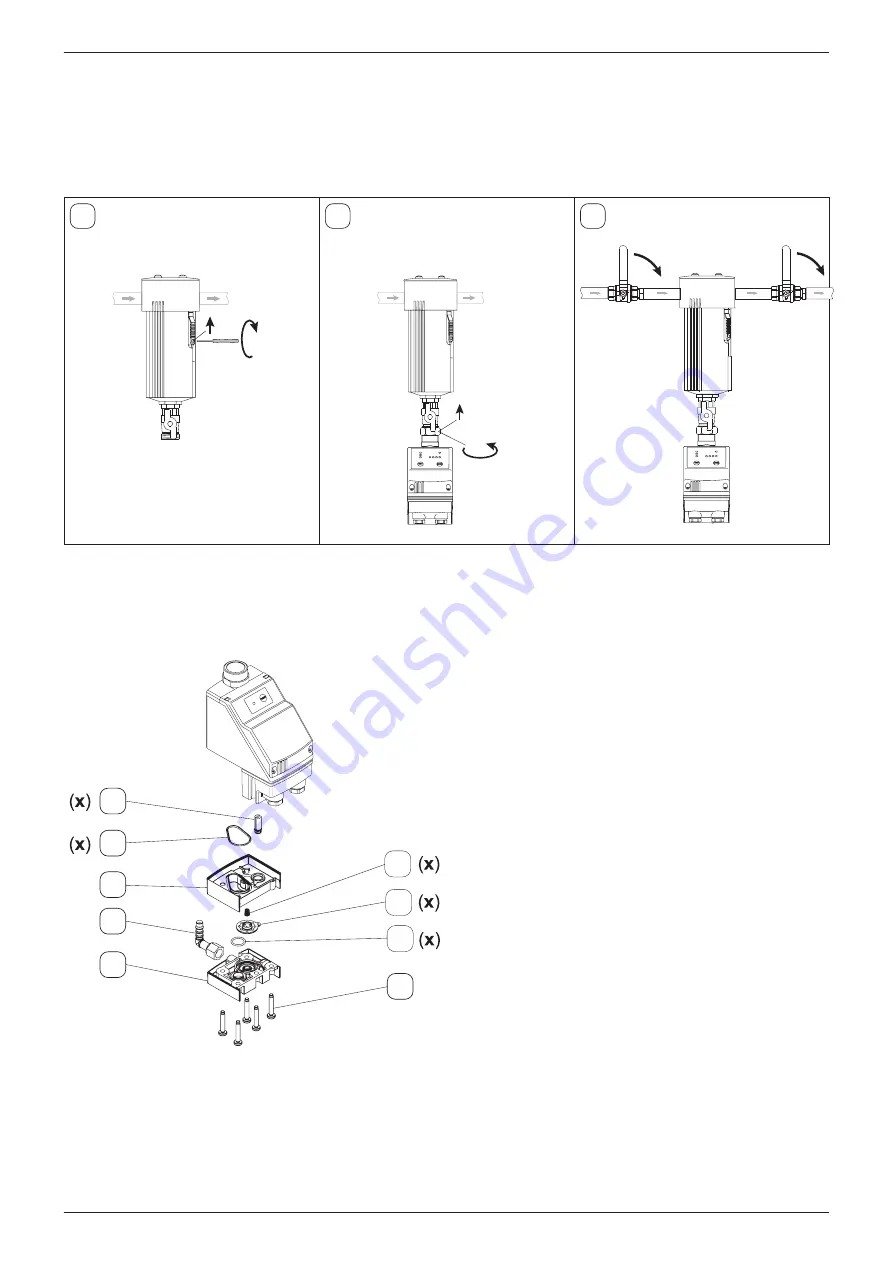
9.  Lock the slider and tighten the screw.

10. Mount the BEKOMAT

®

.

11. Slowly pressurise the filter by carefully opening the shut-off valves.


Note down the next filter element change date in the maintenance schedule and on the supplied adhesive label. 

Apply the label to the filter housing body in a position where it is clearly visible. Check your stock and order new 

elements, if necessary.

9

10

11

2

1

1

2

1

2

7.4.  Maintenance of BEKOMAT

®

 20 FM condensate drain

Preparation:

•  Depressurise the BEKOMAT

®

!

•  De-energize the BEKOMAT

®

!

28

29

30

1

12

9

13
14

15

Maintenance recommendation: 

•  Unscrew the elbow connector (14).

• 

Open the inlet side fitting of the 

BEKOMAT

®

.

•  Loosen the 5 TORX screws (1) and 

remove the parts (9, 12 - 15 and 28 - 30).

•  Caution: Do not remove the core guide 

pipe.

•  Clean the parts.

•  Replace the wearing parts (x).

•  Reassemble and install the BEKOMAT

®

.

Содержание DRYPOINT AC 410

Страница 1: ...DRYPOINT AC 410 495 DRYPOINT AC 410 495 MS EN English 06 057 Cold regenerated adsorption dryer with dew point control Installation and operating manual ...

Страница 2: ...Installation and operating manual EN 2 DRYPOINT AC 410 495 DRYPOINT AC 410 495 MS ...

Страница 3: ...filter with condensate drain 15 2 3 1 2 Afterfilter 15 2 3 2 Function of DRYPOINT AC 410 495 16 2 3 2 1 Adsorption 16 2 3 2 2 Regeneration 16 2 3 2 3 Pressure build up 17 2 3 2 4 Switching over of plant 17 2 3 2 5 Intermittent operation 17 2 3 3 Control and display elements 17 2 3 4 Display standard version 17 2 3 4 1 Service messages standard version 17 2 3 4 2 Acknowledging service messages stan...

Страница 4: ...n tasks 36 7 1 4 Service intervals 36 7 1 5 Service tasks 36 7 2 Maintenance schedule 37 7 3 Replacing filter elements 37 7 4 Maintenance of BEKOMAT 20 FM condensate drain 39 7 5 Maintenance of 2 2 way solenoid valve 40 7 5 1 Installation 40 7 5 2 Electrical connection 40 7 5 3 NC function 41 7 5 4 Troubleshooting 41 7 5 4 1 Replacing solenoid 41 7 5 4 2 Replacing diaphragm 41 7 5 4 3 Replacing ma...

Страница 5: ...rotection Wear safety goggles About the plant Observe installation and operating instructions on type plate 1 2 Signal words according to ISO 3864 and ANSI Z 535 DANGER Imminent danger Consequences of non compliance serious or even fatal injury WARNING Potential danger Consequences of non compliance possible serious or fatal injury CAUTION Imminent danger Consequences of non compliance injury and ...

Страница 6: ...surising the system check all plant components and repair them if necessary Open valves slowly to prevent pressure blows during operation The feed pipes must be permanently installed Drain pipe short properly secured pressure hose attached to pressure resistant pipe Make sure that no persons can be injured or objects damaged by condensate or escaping compressed gas Prevent transmission of vibratio...

Страница 7: ... The plant operator must take suitable measures to ensure that the temperature of the incoming gas does not exceed the maximum permissible operating temperature of the plant If the plant is pressurised to operating pressure the operator must ensure that the maximum permissible operating temperature is not inadvertently exceeded by ambient conditions at the site of installation DANGER Fire safety A...

Страница 8: ...t operation might result in serious injury and or damage to property Never open the manual pressure relief ball valves while the plant is in operation WARNING Blow off noises during pressure release When compressed gas is released it expands which can be result in a loud noise Therefore always wear hearing protection 1 3 2 Risk of injury from electric energy DANGER Electric power Incorrect connect...

Страница 9: ...he German Hazardous Substances Ordinance All adsorbents must be stored in a room that is only accessible to trained and instructed personnel WARNING Health risk from adsorbents Risk of injury to eyes and injury from ingestion In the case of contact with the eyes rinse thoroughly with plenty of water Always consult a doctor After ingestion immediately consult a doctor Spilled adsorbent must be remo...

Страница 10: ... If guards need to be removed let the plant cool down before carrying out any further work Before restarting the plant mount and secure the guards and insulation DANGER Improper replacement of components Incorrect replacement of components can cause serious or even fatal injury We strongly recommend having damaged or wearing parts replaced by a customer service technician of the manufacturer After...

Страница 11: ...allations The adsorption dryer must be protected against vibration caused by other units If necessary the operator must take suitable measures to prevent the propagation of vibration WARNING Uneven load distribution There is a high risk of serious injury when the plant is being transported with lifting gear The angle between the perpendicular and the ropes must at all times be greater than 45 Othe...

Страница 12: ...t in leakage or serious malfunction of the plant Lift the plant only by the lashing points provided using suitable lifting gear The DRYPOINT 410 495 adsorption dryers are shipped in a cardboard box and on a profiled timber frame Despite our best efforts regarding packaging etc the plant might be damaged during transport Upon receipt please remove all packaging material and inspect the plant for vi...

Страница 13: ...components it is the operator s responsibility to ensure that these materials are suitable for the intended use The pressure and the temperature of the medium must conform to the specifications on the type plate and in this installation and operating manual The plant is not designed to withstand loads from traffic wind or earthquakes In the event of such a load take suitable measures to protect th...

Страница 14: ... terms and conditions of the manufacturer 1 5 2 Duties of the plant operator The plant operator must ensure that the plant is commissioned by personnel who are familiar with the relevant safety instructions and trained in the operation of the plant The instructions include in particular 1 5 2 1 Safety Accident prevent regulations General and plant specific safety instructions Safety devices of the...

Страница 15: ... 50 60 Hz 40 W min 5 C max 50 C min 4 C max 50 C xxx DP AC xxxx 1 xxx 2 N A 3 N A I IP54 min 4 bar max 16 bar NOTE Handling of type plate Do not remove or cover the type plate and protect it against damage 2 3 Product overview and description 2 3 1 Operating principle of adsorption dryer 2 3 1 1 Prefilter with condensate drain The medium to be dried is pre filtered by a high performance submicro f...

Страница 16: ...alve 9 and the lower flow distributor 2 into the vessel of one of the adsorbers 1 and then flows from the bottom to the top of one adsorber At the top of the adsorber the dried medium flows through the upper flow distributor 2 and the upper shuttle valve 9 into the afterfilter 4 In the afterfilter fine dust particles and any abrasion residue of the adsorbent are removed by the dust filter and the ...

Страница 17: ...indicated on the standard control unit by an LED In the version with dew point control it is indicated in plain text This operating mode is only available if the plant is installed directly downstream of the compressor and there is a storage tank downstream of the plant that is large enough to allow for the completion of the regeneration process in the adsorption dryer without a need to start the ...

Страница 18: ...te Service indication in running mode The service LED flashes and the respective adsorber LEDs are continuously lit indicating the current operating state Switching to service mode Press and hold for 3 seconds the service LED is continuously lit for 3 seconds and then switched off Note In service mode the adsorber LEDs donot indicate the operating state Service indication in service mode Service A...

Страница 19: ...messages standard version Example Service A active Acknowledgement Press and hold the button for 3 seconds when the button is released the service LED flashes briefly 3x Left adsorber LEDs are off No button pressed Service mode is terminated automatically after 5 seconds Go to service messages Service B not active ...

Страница 20: ...vice mode is terminated automatically Purpose of function Service B might be carried out at the same time as service A even if service B is not yet due In this case service messages that have not yet been activated must be acknowledged in order to set the operating hours counter to 0 Note Upon a start up and after acknowledging or resetting an active not active service in service mode the adsorber...

Страница 21: ...minimum 3 seconds to access the memory Deutschland Germany is displayed Press the MODE button to change to Great Britain Press and hold the SET button for minimum 3 seconds to close the memory Great Britain is displayed If no button is pressed for the next 10 seconds the service mode times out and the new settings are not saved To leave the service level press and hold the MODE and the SET buttons...

Страница 22: ...xxxxxx hrs Stand By xxx xx xx hrs xxx xx xx hrs Oper Time Ads xxxxxx hrs xxxxxx hrs Adsorbent operating time Action Off Line Plant switches to off line mode Only displayed if this function has been triggered intermittent operation Service messages Service A replace replace Maximum service life of wearing parts reached text switches between message and default display Service B replace replace Maxi...

Страница 23: ... Pressure xx bar 1 16 bar adjustable Temperature xx C 25 55 C adjustable in steps of 5 C Switchover Dewp 48 C Switchover temperature 0 to 100 C adjustable factory set to 48 C Dewp Alarm 0 C 20 to 80 C and OFF adjustable factory set to 0 C Mode Dewp Control Dewpoint in Safe Time Control Select dew point or time control Upon dew point alarm Service A Change Change Acknowledgement of service A confir...

Страница 24: ...ponents Plant components of DRYPOINT AC 410 495 1 2 3 4 5 6 7 8 9 5 1 Adsorber 6 Upper shuttle valve 2 Control unit 7 Dew point transmitter with option dew point control 3 Prefilter CLEARPOINT type S 8 Afterfilter CLEARPOINT type RF 4 Condensate drain 9 Lower shuttle valve 5 Silencer 10 Solenoid valve ...

Страница 25: ...0 650 650 750 750 850 850 C mm 1 600 2 025 1 905 1 905 1 890 2 220 2 180 2 200 2 315 2 330 D mm 600 600 750 750 800 800 1 050 1 050 1 180 1 180 E mm 365 365 400 465 530 520 635 625 730 730 F mm 900 1 100 1 100 1 170 1 185 1 320 1 350 1 350 1 480 1 500 G mm 560 560 710 710 760 760 1 010 1 010 1 140 1 140 H mm 500 500 650 650 700 700 950 950 1 080 1 080 I mm 350 350 500 500 550 550 650 650 750 750 W...

Страница 26: ...rated current relay solenoid valves 8 A ohmic load Contact rated voltage relay alarm 125 V Contact rated current relay alarm 1 A ohmic load Protection class IP 54 Overvoltage category 2 Purity of compressed air at adsorption dryer outlet Residual water content DRYPOINT AC 410 495 0 11 mg m3 DRYPOINT AC 410 495 MS 0 0027 mg m3 Adsorbent in pressure vessels DRYPOINT AC 410 495 Aluminium oxide DRYPOI...

Страница 27: ...erwise the permissible load on the system might be exceeded If necessary the plant operator must carry out tests or make modifications to the on site installations The adsorption dryer must be protected against vibration caused by other units If necessary the operator must take suitable measures to prevent the propagation of vibration NOTE Responsibility for proper installation The operator is res...

Страница 28: ...direction markings Ensure that there is no risk that the air flows through the plant in the opposite direction to the design flow direction exception intermittent operation Do not attempt to start the plant against a large volume of air that is under atmospheric or even lower pressure see also 2 6 Technical data To prevent this we recommend installing an automatic start up system optional equipmen...

Страница 29: ...Compressed air quality The maximum permissible residual oil content in the compressed air upstream of the plant is 3 mg m3 If the residual oil content is higher than this value install an additional prefilter If oil free compressed air is required install an oil vapour absorber downstream of the plant To achieve sterile compressed air install a high performance sterile filter downstream of the pla...

Страница 30: ... connected to the power mains with the supplied power cable with safety plug or by means of an external power cable The plant must be supplied with 230 115 VAC 50 60 Hz or with 24 VDC and protected by a 1 6 A fuse If the system is powered through an external cable install a mains disconnect device external switch close to the plant A wire cross section of 3x0 75mm2 AC or 2x0 75mm2 DC is required f...

Страница 31: ...inal 1 2 3 Mains 115 VAC 230 VAC 24 VDC X1 L1 N PE Output 115 VAC 230 VAC 24 VDC X2 L1 N PE Regeneration valve container 1 X3 L1 N PE Regeneration valve container 2 X4 L1 N PE Adsorption valve container 1 X5 L1 N PE Adsorption valve container 2 X6 L1 N PE Stand by valve X7 L1 N PE Alarm output changeover floating X8 NC Common NO Supply voltage 12 VDC Alarm 1 inlet drain X11 GND Alarm UFM T 12 V In...

Страница 32: ...onal safety is maximised The relevant control parameters can be configured directly in the control This ensures that the plant is optimised for the actual requirements and site conditions A general error signal can for example be sent through a floating contact to a process control system In addition the control is equipped with an input port as standard so that signals can be exchanged with the c...

Страница 33: ... system These settings are always applied if there are no special customer requirements e g pressure due point must be 60 C In dew point control mode the adsorption dryer continues adsorbing moisture in one of the two adsorber vessels until the pressure dew point at the dry air outlet reaches the value set for switching point B When switching point B 43 C is reached the system continues operation ...

Страница 34: ...tent operation The compressor runtime is determined as the total runtime from the start of the pressure build up phase At the end of the adsorption phase the system determines whether the runtime was longer or shorter than the set factor e g 1 minute If the runtime is shorter the control system automatically closes the regeneration valves and sets the system to STAND BY mode When the compressor re...

Страница 35: ...continuously from now on 6 Operation WARNING Risk of personal injury during plant operation During plant operation the following mechanical risks exist Sudden pressure relief in components such as the silencers loud blow out noise during pressure release When working with or on the plant always wear hearing protection 6 1 Operating mode When the plant is in operation you can select the desired ope...

Страница 36: ...2 Inspection of the prefilter and afterfilter elements and replacement of the filter elements 3 Inspection and cleaning of the condensate discharge 4 Inspection and testing of all filters clean and lubricate if necessary 5 Inspection of the silencers replace if necessary 6 Inspection of all electrical components and indicators 7 Inspection of the adsorbent and replacement according to service inte...

Страница 37: ...ths 12 months 24 months 3 years 5 years Inspection Check clean Condensate drain at prefilter Silencers Shuttle valves Solenoid valve Check Adsorbers adsorbent X Service kit for service A X Service kit for service A X Calibration of dew point transmitter Dew point control X 7 3 Replacing filter elements 1 Close all shut off valves in the gas inlet and outlet lines 2 Depressurise the BEKOMAT by pres...

Страница 38: ...that the housing is fully depressurised After all pressure has been released open the slider 5 Unscrew the bottom part of the housing 6 Remove the spent filter element 4 5 6 1 2 1 2 7 Insert the new filter element Caution The upper end cap must be installed according to the angle in the element seat 8 Mount the bottom part of the housing 7 8 1 2 ...

Страница 39: ...er housing body in a position where it is clearly visible Check your stock and order new elements if necessary 9 10 11 2 1 1 2 1 2 7 4 Maintenance of BEKOMAT 20 FM condensate drain Preparation Depressurise the BEKOMAT De energize the BEKOMAT 28 29 30 1 12 9 13 14 15 Maintenance recommendation Unscrew the elbow connector 14 Open the inlet side fitting of the BEKOMAT Loosen the 5 TORX screws 1 and r...

Страница 40: ...er The solenoid can be installed in any position We recommend however installing it vertically facing upwards as this reduces the risk of wear and contamination Inspect the solenoid valve for visible damage Before installing the valve clean the piping system Dirt can cause malfunctions Do not remove the protective caps at the connections until just before installation into the piping system To sea...

Страница 41: ...age just in front of the solenoid Fuse loose or tripped Check fuse Solenoid defective no flow Replace coil Operating pressure too high Check max operating pressure and reduce if necessary Crack in diaphragm Replace diaphragm Valve dirty Clean control bores Magnet armature blocked Clean magnet armature and sleeve Valve seat not tight Clean valve if the seat area is heavily contaminated replace diap...

Страница 42: ...ning torque for screw element 20 Nm 10 7 5 4 4 Replacing manual assisted actuation device Depressurise the valve and shut down the power supply Disengage the spring bracket and remove the solenoid If the O ring on the magnet sleeve has become brittle replace it Remove the size 22 screw element Remove the magnet sleeve together with the screw element and the spring bracket Remove the O ring from th...

Страница 43: ...nt 2 Depressurise the plant 3 Disconnect the entire upper or lower piping from the adsorption dryer To do this open the three union nuts of the fittings 1 1 1 CAUTION Performance of maintenance work Incorrectly performed maintenance tasks can cause damage to the equipment Please note that the valve core of the upper shuttle valve features a bore If this bore is blocked regeneration and pressure bu...

Страница 44: ...ng the above steps in reverse order Ensure that the valve cage 2 and the adjusting washer 4 are properly positioned Use new flat gaskets 5 to seal the device 1 2 3 4 5 6 7 1 Valve housing 2 Valve cage 3 Valve core 4 Adjusting washer 5 Flat gasket 6 Washer 7 Allen head screw 5 Connect the complete upper or lower piping to the adsorption dryer To do this tighten the union nuts of the fittings at the...

Страница 45: ...yer wear a dust mask recommended protection class P2 or FFP2 NOTE Maintenance interval Interval after 26 250 operating hours or maximum 3 years 1 Shut down the plant 2 Depressurise the plant 3 Disconnect the complete upper or lower piping of the adsorption dryer To do this open the union nuts of the fittings at the containers and the shuttle valve housing 4 Keep a suitable number of collecting con...

Страница 46: ...694 4035695 Prefilter 4002851 4006097 4006097 4002853 4002854 4002855 4022589 4006450 4002858 4002858 Afterfilter 4004844 4006098 4006098 4004846 4004847 4004848 4032870 4006451 4006451 4006451 O ring filter element PDP control 4035705 2 2 way solenoid valve 4035696 4035697 4035698 Pressure gauge 4035699 Shuttle valve on request Wearing parts kit for upper lower shuttle valve 4035700 4035701 40357...

Страница 47: ...he plant correctly powered and does the supply voltage correspond to that specified on the type plate Are all electrical components inside the plant powered Are all pneumatically actuated components supplied with control air and does the control air pressure correspond to that specified on the type plate minimum pressure Has the plant been correctly commissioned and started see also 5 Start up Are...

Страница 48: ...see 9 1 Depressurising plant Flow distributor in adsorber blocked Contact customer service department During absorption the pressure gauge indicates a pressure that is too low and the plant releases air during the pressure build up phase Solenoid valve 5 is not tight or fails to close properly Check solenoid valve replace valve if necessary Shuttle valve 9 is not tight or fails to switch properly ...

Страница 49: ...button is pressed Insufficient feed line incline cross section too small Excessively high condensate volume Sensor tube very dirty Install feed line at an incline Install venting line Clean sensor tube Device constantly blows off air Control air line blocked Wear seals valve core diaphragm Clean entire valve unit Replace wearing parts Clean sensor tube 9 Shutting down plant For plants that are run...

Страница 50: ...age 35 3 Press and hold the TEST button of the BEKOMAT until all condensate is discharged and the plant is completely depressurised 10 Dismantling and disposal NOTE Safe disposal of plant components All plant components materials and substance must be disposed of safely and in accordance with the applicable statutory waste disposal regulations Dismantle the components and dispose of the various ma...

Страница 51: ...EN Installation and operating manual DRYPOINT AC 410 495 DRYPOINT AC 410 495 MS 51 11 Declaration of Conformity ...

Страница 52: ...Installation and operating manual EN 52 DRYPOINT AC 410 495 DRYPOINT AC 410 495 MS ...

Страница 53: ...re Equipment Directive 97 23 EU valid until 19 07 2016 Applied conformity assessment procedure Category I Module A Applied rules and standards AD2000 DIN EN ISO12100 2010 Fluid group according to Art 9 Group 2 Assembly consisting of the following pressure bearing components Model Designation Permissible operating pressure Category Module CE marking according to Serial number 465 Filter housing pre...

Страница 54: ...014 68 EU see type plate 465 485 495 Pipe system bolted pressed fittings 16 bar Art 3 para 3 None None 465 485 495 Various fittings 16 bar Art 3 para 3 None None 465 485 495 Adsorber container 1 16 bar Simple pressure vessel according to 2009 105 EC 2009 105 EC see type plate 465 485 495 Adsorber container 2 16 bar Simple pressure vessel according to 2009 105 EC 2009 105 EC see type plate Types AC...

Страница 55: ...EN Installation and operating manual DRYPOINT AC 410 495 DRYPOINT AC 410 495 MS 55 ...

Страница 56: ...rpina 37 42 nave 6 E 08758 Cervelló Phone 34 93 632 76 68 info es beko technologies es 中華人民共和國香港特別行政區 Hong Kong SAR of China BEKO TECHNOLOGIES LIMITED Unit 1010 Miramar Tower 132 Nathan Rd Tsim Sha Tsui Kowloon Hong Kong Phone 852 5578 6681 Hong Kong Phone 86 147 1537 0081 China tim chan beko technologies com India BEKO COMPRESSED AIR TECHNOLOGIES Pvt Ltd Plot No 43 1 CIEEP Gandhi Nagar Balanagar ...

Отзывы: