4
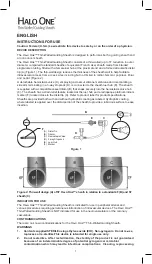
sheath and flush with the sterile heparinized saline solution (Figure 4). Close the stopcock to
maintain the air tightness following flushing.
3. Prior to use the reverse loaded dilator must be removed from the distal end of the sheath.
If not already completed at step 2, the air in the dilator lumen should be removed. To
facilitate purging, select a syringe or inflation device with a 10 ml or larger capacity and fill
approximately half of it with sterile saline solution. Prepare the lumen by connecting the
syringe or inflation device containing the solution into the luer connector of the dilator hub
and flushing with the sterile heparinized saline solution (Figure 7).
4. Insert the provided vessel dilator through the hemostatic valve and click the dilator hub into
place in the valve housing (Figures 5 and 6).
5. In order to activate the hydrophilic coating, where labeled, it is recommended to wet the
Halo One™
Thin-Walled Guiding Sheath with sterile saline solution immediately prior to its
insertion in the body.
Use of the
Halo One™
Thin-Walled Guiding Sheath
6. Identify the insertion site, including but not limited to radial, femoral, popliteal, tibial,
or pedal access sites and prepare the site using proper aseptic technique and local
anesthesia as required.
7. At the operator’s discretion, make a small skin incision at the puncture site with a surgical
scalpel. Recommended for scar tissue at the access site.
8. Backload the distal tip of the
Halo One™
Thin-Walled Guiding Sheath dilator over the pre-
positioned guidewire and advance the tip to the introduction site.
9. Advance the dilator and the sheath through the skin and into the vessel. Grasp the sheath and
dilator assembly close to the skin while advancing to avoid buckling, employ a rotating motion
while advancing as required. (Note: If using a hydrophilic guidewire, ensure that it is kept
hydrated with sterile heparinized saline, at all times.)
10. Carefully advance the dilator and the sheath over the wire to the site required within vessel.
The radiopaque marker identifies the sheath tip location under fluoroscopy.
11. Disconnect the dilator hub from the valve by bending to the side to unsnap from the valve
cap (Figure 8). Remove the dilator slowly while holding the sheath in place and ensuring the
guidewire remains in place (Figure 9) as required.
12. Load the procedural device over the pre-positioned guidewire.
13. Advance the procedural device carefully into the centre of the valve diaphragm and through
the sheath to the treatment site (Figure 10) while maintaining the sheath position.
14. Position the procedural device relative to the lesion to be treated (Figure 11) ensuring the
active mechanism portion of the procedural device is not within the sheath.
15. Following use ensure the procedural device is fully deactivated before carefully withdrawing
the procedural device through the sheath while maintaining the sheath position.
16. After the procedure is completed insert the dilator over the wire into the sheath
17. Slowly withdraw the sheath and dilator as a unit and then remove the guide wire.
18. Apply hemostasis at the access site according to standard practice.
19. Dispose of the single-use device.
Warning: After use, this product may be a potential biohazard. Handle and dispose of in
accordance with acceptable medical practices and applicable local, state and federal laws
and regulations.
Limited Product Warranty
ClearStream Technologies Ltd (“ClearStream”) warrants to the original purchaser that this product
will be free from defects in material and workmanship for a period of one (1) year from the date of
purchase. If this product proves to be so defective, purchaser may return same to ClearStream
for repair, replacement, refund or credit at ClearStream’s option. All returns must be authorized in
advance in accordance with ClearStream’s Returned Goods Policy found in its then current Price
List. The liability of ClearStream under this limited product warranty does not extend to any abuse,
misuse, improper storage, alteration, further manufacture, packaging or processing of this product
or its repair by anyone other than an authorized ClearStream representative.
THIS LIMITED PRODUCT WARRANTY IS IN LIEU OF ALL OTHER WARRANTIES, EXPRESS
OR IMPLIED, INCLUDING, WITHOUT LIMITATION ANY WARRANTY OF MERCHANTABILITY
OR FITNESS FOR A PARTICULAR PURPOSE.
THE LIABILITY AND REMEDY STATED IN THIS LIMITED PRODUCT WARRANTY WILL BE
THE SOLE LIABILITY OF ClearStream AND REMEDY AVAILABLE TO PURCHASER FOR THIS
PRODUCT, WHETHER IN CONTRACT, TORT (INCLUDING NEGLIGENCE) OR OTHERWISE,
AND ClearStream WILL NOT BE LIABLE TO PURCHASERS FOR ANY INDIRECT, SPECIAL,
INCIDENTAL OR CONSEQUENTIAL DAMAGES ARISING OUT OF ITS HANDLING OR USE.
Some states/countries do not allow an exclusion of implied warranties, incidental or consequential
damages. You may be entitled to additional remedies under the laws of your state/country.

