Application of
Disassembly
3 - 84
Embroidery unit
Application o
f
Disassembly
Application of Disassembly
3
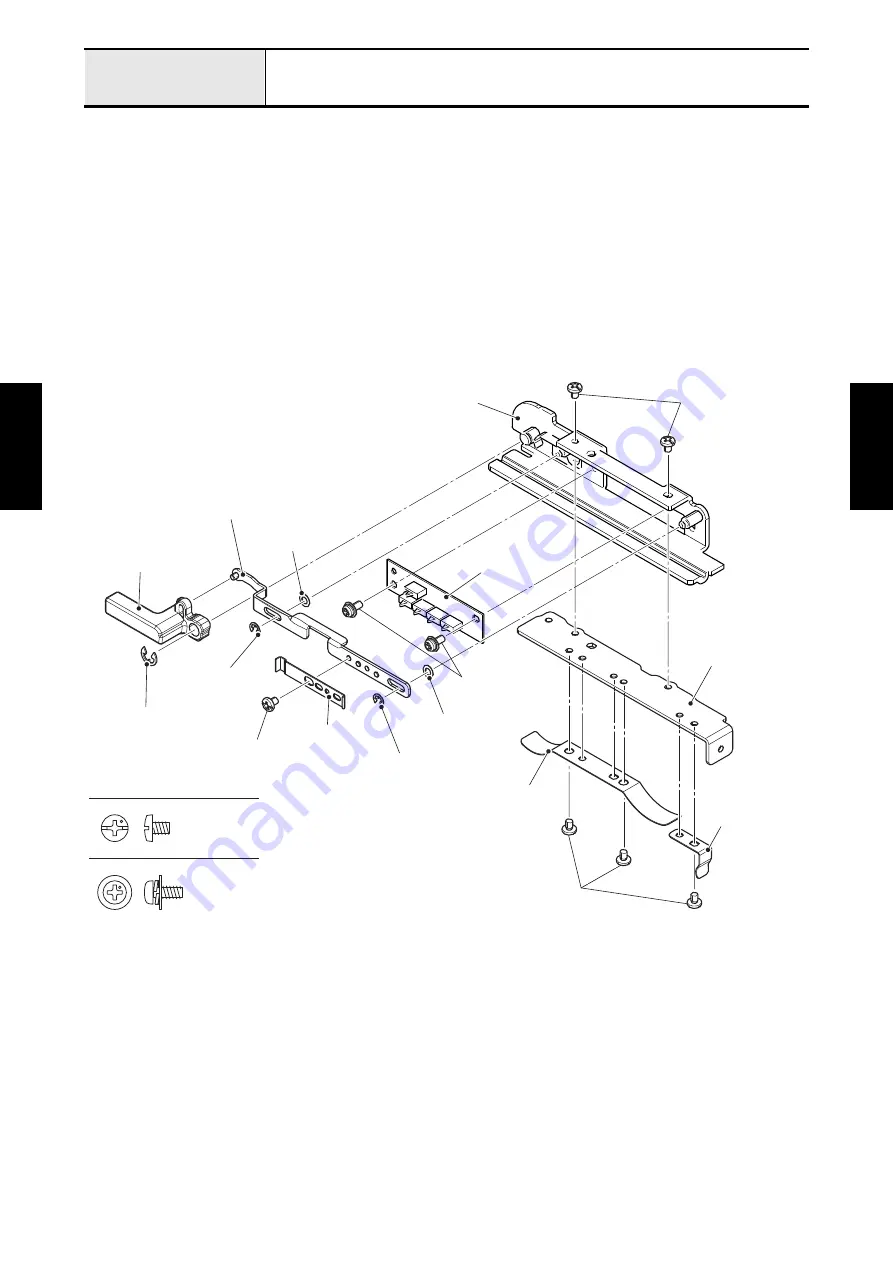
Disassembly of E hoop stay plate assy
1. Remove the two screws (screw, bind M3x4) to remove the E hoop pressure plate from the E hoop stay
plate assy. Remove the two screws (screw, bind M3x4) to remove the E hoop pressure spring A from
the E hoop pressure plate. Remove the screw (screw, bind M3x4) to remove the E hoop pressure
spring C from the E hoop pressure plate.
2. Remove the screw (screw, bind M3x4) to remove the hoop lock SW push plate from the lock SW plate
sub assy.
3. Remove the retaining ring E4, and remove the E hoop lock lever from the E hoop stay plate assy.
4. Remove the two retaining rings E2.5, then remove the lock SW plate sub assy and two polyester sliders
from the E hoop stay plate assy.
5. Remove the two screws (screw, pan (S/P washer) M3x7) to remove the frame sensor PCB assy from
the E hoop stay plate assy.
Screw, Bind M3X4
Screw, Pan (S/P washer) M3X7
Screw, bind M3x4
E hoop stay plate assy
Frame sensor
PCB assy
Polyester slider
Lock SW plate sub assy
E hoop lock lever
Retaining ring E4
Screw, bind M3x4
Screw, pan
(S/P washer) M3x7
E hoop pressure plate
E hoop pressure
spring C
E hoop pressure spring A
Screw, bind M3x4
Retaining ring E2.5
Polyester slider
Retaining ring E2.5
Hoop lock SW
push plate
Содержание BLDY
Страница 1: ...MODEL BLDY BLDY2 Home Sewing Machine SERVICE MANUAL Sep 2014 Jun 2016 Published Revised CONFIDENTIAL...
Страница 2: ......
Страница 3: ...LIST of UPDATE RECORD Date Added Models Contents Changed 4 13 Added 4 52 to 55 May 2015 Jun 2016 BLDY2...
Страница 275: ...Application of Assembly 3 177 Feed module Application of Assembly Application of Assembly Feed module location diagram...


