background image

31

How to Work

Caution

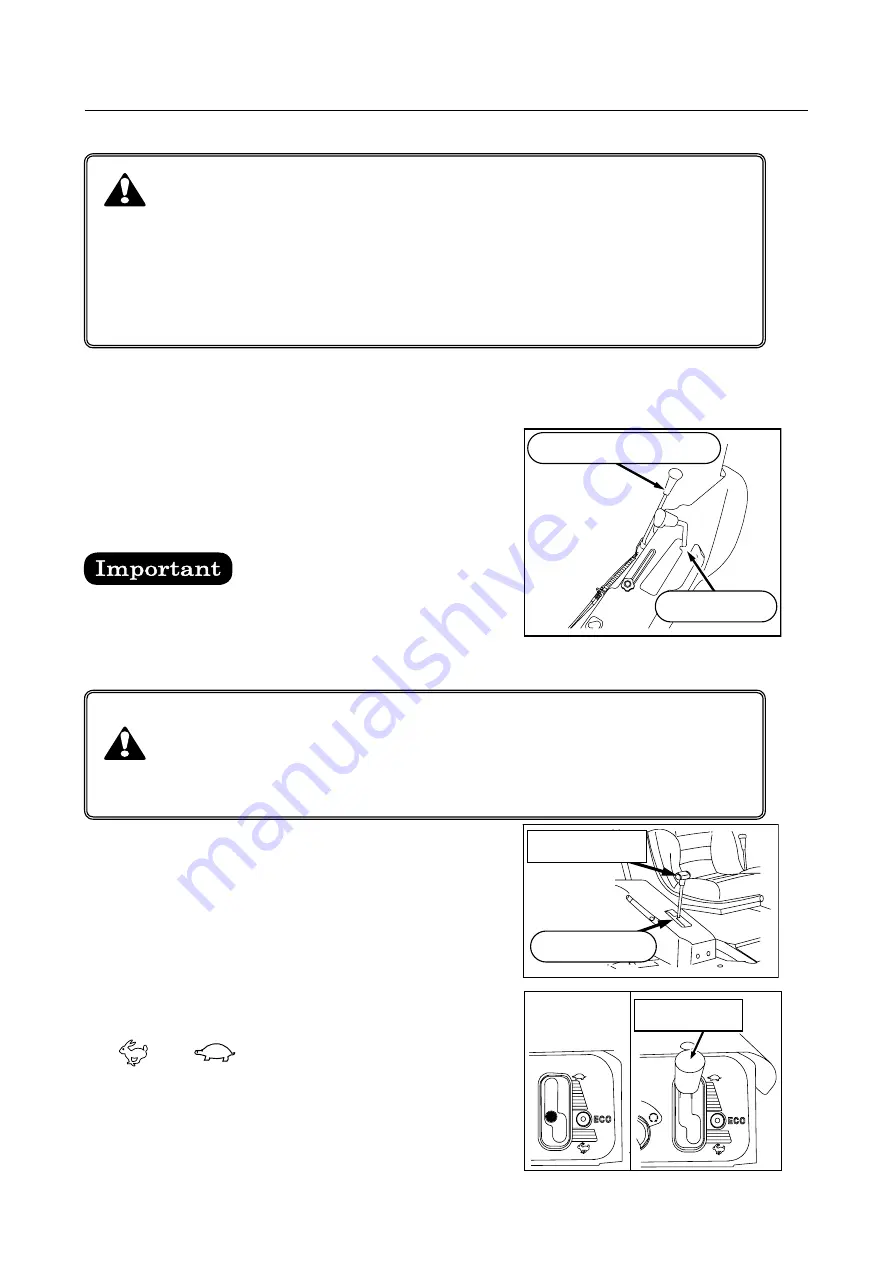
To start the engine, confirm the safety around you. Ride 

   on the machine, and put the cutting-blade clutch lever 
   to “Off” position. Put the cutting-height adjustment lever 
   to “Engine Start” position. Put the HST lever to “Neutral” 
   position, and then start the engine while depressing the  
   brake pedal. 

Sudden taking off is dangerous. Take off slowly.

4.  Shift the cutting-blade clutch lever to the “Off” 

position and shift the cutting-height adjustment 
lever to the “Start Engine” position.

5.  Release the foot from the HST pedal. 
6.  Shift the HST lever to the “Neutral” position.

7.   Shift the throttle lever to a position between 

“       “and “        “ .

Unless the cutting-height 

   adjustment lever is in the “Start 
  Engine” position, the safety 
  switch will activate, so the 
  engine will not start.

Danger

Sudden taking off may cause collision or falling down. When 

     starting the engine, make sure that the HST lever is in “Neutral” 

     position.


Cutting-blade cuutch lever

Start engine


HST Pedal

Neutral position


Throttle Lever

Содержание AR950

Страница 1: ...ATEX Ride on Bush Cutter ATEX Ride on Bush Cutter OperationManual OperationManual A R 9 5 0 F A R 9 5 0 F A R 9 5 0 A R 9 5 0...

Страница 2: ...ng or working on your Ride on Bush Cutter confirm that the protective covers are installed 5 Be sure to stop the engine and apply the brake before cleaning inspecting adjusting or refueling the machin...

Страница 3: ...his operation manual or operation without caution to be required normally or modifying Ride on Bush Cutter It is impossible to predict all possible dangers you may encounter during the handling of you...

Страница 4: ...for the purpose of improvement of the Ride on Bush Cutter Your Ride on Bush Cutter may differ from the illustrations provided in this Operation Manual Also note that some illustrations have been simpl...

Страница 5: ...d to its chassis and read the portions applicable to the particular model Position of identification plate Specifications Model Specifications of installed engine Cutting width Driving system AR950F T...

Страница 6: ...OR SERIOUS INJURY Warning This symbol together with the words Warning indicates a potentially hazardous situation that if not avoided may result in DEATH OR SERIOUS INJURY Caution This symbol together...

Страница 7: ...Use 27 Preparation before Use 28 29 Operating Procedures 30 48 Inspection Maintenance 49 61 How to Inspect Maintain and Adjust Each Part 62 82 Main Specifications 89 Wiring Diagram 90 Consumable Part...

Страница 8: ...er Loose clothes may be dragged into the rotating parts while improper shoes may slip creating a very dangerous situation Also wear a helmet and appropriate protective gears 2 Anyone under the influen...

Страница 9: ...not installed will create a very dangerous situation as the dangerous parts will remain exposed 3 Be sure to stop the engine before refueling or adding charging lubricant Keeping a lit cigarette in yo...

Страница 10: ...ng danger and damage on the machine so avoid sudden start and stop 2 When starting the engine indoors open the windows and doors to get sufficient ventilation Poor ventilation may cause exhaust gas po...

Страница 11: ...n In particular the change of the center gravity in bumpy area may cause the machine to fall down or create a very dangerous situation Be sure to drive on slope at low speed 4 When traveling on slope...

Страница 12: ...you and exercise due caution 7 Avoid sudden take off sudden accelaration sudden turning arround or sudden braking and operate the machine safely Be sure to confirm safety around you before taking off...

Страница 13: ...non slip surface When loading unloading the machine move straight at very low speed with the knife blade of the machine aligned in the longitudinal direction Don t change direction on the foot boards...

Страница 14: ...the working machine may be injured or otherwise exposed to a very dangerous situation 3 Don t let your hand or body touch any of the rotating parts hot parts engine muffler etc and other dangerous pa...

Страница 15: ...very dangerous situation 5 Never work at night or in any environment where visibility of the surroundings is low because the machine may crash fall down etc and cause death or create a very dangerous...

Страница 16: ...e and apply the parking brake Failure to do so may result in an unexpected accident 3 Be sure to put back to their original positions the protection covers you have removed for the purpose of inspecti...

Страница 17: ...it until the hot parts cool down completely If a cover is put on while any part of the machine is still hot it may cause a fire 3 If the machine will be stored for a long period of time drain fuel fro...

Страница 18: ...ignite and explode which create a very dangerous situation 3 The battery fluid electrolyte is diluted with sulfuric acid As it is a deleterious substance keep the battery fluid away from your body or...

Страница 19: ...the information on the labels remain legible at all time To replace a part on which a warning label is attached order the warning label together with the part from the dealer from which you purchased...

Страница 20: ...13 Points on Use Positions of Warning Labels 1728 903 003 0 1705 904 002 1 1705 902 007 0 1705 902 006 0 0674 916 034 0 0675 912 031 0...

Страница 21: ...sing injury Don t open the engine cover on slope 1705 902 006 0 The HST fan is operating Don t bring your hands and feet close by while the engine is running 0674 916 034 0 The blade is turning Don t...

Страница 22: ...on part while the machine is operation as it may cause injury Bush and stones scatter during work Keep people away from the machine When reversing confirm safety around you and keep people away from t...

Страница 23: ...e battery is used continuously with the fluid level remaining below the lower limit the battery may explode If the fluid level exceeds the upper limit battery fluid may leak Make sure battery fluid re...

Страница 24: ...to decelerate Turn this lever towards the rabbit mark to accelerate THROTTLE LEVER 0675 912 013 0 Cutting height adjustment lever This lever is used to adjust cutting blade height When the lever is m...

Страница 25: ...nd serial number of your Ride on Bush Cutter Model Name and Serial Number Supply Period for Spare Parts In principle spare parts for this product will be supplied for 10 years after the product has be...

Страница 26: ...nt Lever HST Lever Cutting blade Cover HST Pedal Front Axle AR950F Oil Warning Lamp Light Switch Choke Ignition Switch Throttle Lever Engine Cover Hour Meter Differential Lock Lever Cutting blade Cove...

Страница 27: ...anual for information on starting and stopping the engine Throttle Lever The throttle lever is used to raise lower the engine speed The maximum horsepower power is available at the maximum engine spee...

Страница 28: ...right of the machine Travel on slope at low speed AR950 Do not travel over the angle 15 AR950F Do not travel over the angle 25 Because the display of inclination meter is guidelines be sure to measure...

Страница 29: ...el is slipping Shifting the lever to the On position locks the differential while shifting it to Off position unlocks the differential When traveling in a normal condition be sure to keep the lever in...

Страница 30: ...ng blade to stop the cutting blade The cut ting blade clutch lever cannot be shifted to the On position while the cutting height adjustment lever is in the Start Engine position Cutting blade Cover Th...

Страница 31: ...hen opening the engine cover be sure to do it on flat ground without being blowed by strong wind Open the engine cover for easy access to the engine for cleaning inspection and maintenance 1 Tilt the...

Страница 32: ...erse order to close the engine cover Be sure to tighten the knob bolt HST Lever Tilt the lever forward to move forward or tilt it back ward to move rearward The traveling speed can be adjusted steples...

Страница 33: ...p the engine right away and refill engine oil While the engine stops the warning lamp flashes when the engine switch is in the On position If the warning lamp does not flash then there is defective el...

Страница 34: ...sure that there are chipping nor cracks on the blade before use To prevent breakdown it is important that you always keep the good condition of the machine For this reason you should conduct the star...

Страница 35: ...he levers and pedals properly 3 Tilt the seat forward and securely tighten the knob bolts 2 pcs under the seat to lock the seat base Adjusting the Steering Wheel Height The height of the steering whee...

Страница 36: ...ngine and muffler cool down before refilling fuel Don t refill fuel excessively If fuel is refilled excessively it may overflow and cause fire If fuel overflows wipe it off immediately Don t use poor...

Страница 37: ...ithout ventilation exhaust gas will damage the health of people 1 When checking quantity of fuel lift the rear side of step cover under the handle then remove the step cover Open the fuel cock in the...

Страница 38: ...ver to the Off position and shift the cutting height adjustment lever to the Start Engine position 5 Release the foot from the HST pedal 6 Shift the HST lever to the Neutral position 7 Shift the throt...

Страница 39: ...ctrical current so avoid using it continuously for 5 seconds or more If the engine does not start within 5 seconds return the ignition key to the position and wait for at least 10 seconds and then try...

Страница 40: ...the engine If the machine is left after the engine stopped in this manner the battery will be consumed and eventually die 1 Shift the throttle lever to the position 2 Turn the ignition key to the posi...

Страница 41: ...ning Don t touch the rotating parts belt pulleys etc while the machine is in operation otherwise the rotating parts may cause injury Caution This machine has the seating capacity of one person A perso...

Страница 42: ...rd Tilt the HST lever forward Move in reverse Tilt the HST lever backward Warning Don t operate the HST lever and HST pedal at the same time Wrong operation may cause the machine to crash or fall down...

Страница 43: ...nderneath the tyres In case of emergency depressing the parking brake pedal brings the machine sudden brake at the same time the HST lever returns to the Neutral position In a normal condition stop th...

Страница 44: ...the ignition key to the position to stop the engine and then remove the ignition key from the engine switch 5 Depress the parking pedal and pull the park ing brake lever to lock the lever How to Work...

Страница 45: ...engine after making sure of cooling down completely The driving system features on demand four wheel drive by the hydraulic control This machine has the method of switching the two wheel drive or fou...

Страница 46: ...which may lead to a breakdown 1 After keeping the machine stationary shift the differential lock lever to the On position 2 Move the machine slowly 3 Once the machine gets out of the mud stop the mac...

Страница 47: ...objects before commencing work and pay attention to safety during work While cutting bush put a signboard saying that bush cutting work is underway Stretch guard ropes or otherwise keep people especia...

Страница 48: ...d free from stones and other foreign objects and cut bush slowly and straight by overlapping the cutting line straight When cutting bush around a tree pillar or any other obstacles should be kept on t...

Страница 49: ...lt the lever toward the seat to Unlock the lever If the lever is operated by force while the lever is still Locked the machine may break down Use the ECO drive mode if it is not the heavy duty work Re...

Страница 50: ...h as possible before working Then adjust the cutting height at higher cutting height than usual for the safety The blade may be broken and the stones may scatter Caution When the front wheel falls int...

Страница 51: ...ch lever in the Off position Put the cutting height adjustment lever in the Start Engine position Put the throttle lever in the position Keep the engine idle for the cool down period and then stop the...

Страница 52: ...bush using the most fuel efficient rpm range of the installed Engine In the ECO drive mode fuel consumption is approx 20 less than that at its maximum engine speed Use ECO drive mode when load to eng...

Страница 53: ...the steps below to move the machine Danger Don t try to move the machine by pushing it on slope The machine may move due to its deadweight which creates a very dangerous situation The hydraulic circui...

Страница 54: ...g on the size of the water hose If the water hose is loose use hose bands etc to securely connect the hose 3 Supply water through the water hose How to Wash the cutting blade Cover Danger Do not wash...

Страница 55: ...ver to the Off position and return the cutting height adjustment lever to the Start Engine position Then shift the throttle lever to and stop the engine 9 Stop supplying the water and disconnect the w...

Страница 56: ...tenance Loca tions require special knowledge or the specified tools or instruments If you cannot inspect any of listed items by yourself request the Dealer from which you pruchased your Ride on Bush C...

Страница 57: ...nspection may be skipped The compressive pressure shall be normal Ask the dealer from which you purchased your machine to conduct this inspection Engine mount Check the engine base if there are cracks...

Страница 58: ...steering wheel to the left and right while traveling to check if there is play and make sure that it works reliably The steering wheel shall have no play and it shall work reliably Tires wheels Check...

Страница 59: ...cks Check the knife blade mounting bolts and nuts for looseness There shall be no looseness List of Periodic Inspection and Maintenance Locations Item Recommended product When to add change Capacity R...

Страница 60: ...nd caught your body Inspecting Changing and Refilling Engine Oil Danger 1 Put the seat down forward and remove the knob bolts located underneath and rear left corner of the seat 2 Return the seat to t...

Страница 61: ...gine oil and if oil quantity is low refill the engine oil slowly until the Full position indicated on the oil level gauge 6 Inspect the dirt of engine oil and if oil is significantly dirty change engi...

Страница 62: ...le to discharge oil 3 After oil has been drained away put back the bolt and tighten it securely 4 Remove the oil filler cap and refill the specified oil slowly until the FULL position indicated on the...

Страница 63: ...filler cap and refill the specified oil slowly until the FULL position on the oil level gauge and then securely tighten the oil filler cap Refer to p 54 of this manual 7 Run the engine for approx 3 m...

Страница 64: ...l check bolt and install the oil filler cap As a rough guide firstly change transmission oil after 50 hours from initial start of engine and then every 500 hours thereafter How to Inspect Oil filler c...

Страница 65: ...efill the specified oil until the oil level reaches approx 10 mm from the bottom of the HST oil tank As a rough guide firstly change HST oil after 50 hours from initial start of engine and then every...

Страница 66: ...ir vent plug and the drain plug on the HST and front axle 4 Remove the band on top and bottom of the oil filter then replace the oil filter Pay attention not to loose the seal washer on the plug How t...

Страница 67: ...and warm up the engine 8 While the engine rotates at idling speed apply the HST pedal lever about 10 times forward and backward slightly 9 Raise the engine speed then apply the HST pedal lever forward...

Страница 68: ...to seize or rust and stop turning or operating smoothly Be sure to apply a grease on grease nipples periodically stop turning or operating smoothly Grease nipples are located as the following picture...

Страница 69: ...on or parts to wear abnormally How to Clean the Air Cleaner and Intake Screen Danger 1 Open the engine cover Refer to p 24 and 25 of this manual 2 Inspect clean and replace the air cleaner and intake...

Страница 70: ...pot Then clean the inside of the fuel filter pot and the filter using kerosene or other solvent of low flash point and blow and dry the fuel filter pot and filter 3 Assemble the parts back in their or...

Страница 71: ...is worn replace the front and rear tyres at the same time AR950F Adjusting the Tension of the Traveling V belt If the V belt slips while traveling adjust the V belt according to the procedure below 1...

Страница 72: ...s manual 5 Remove the cutting blade V belt and then remove the traveling V belt by lifting it up from the transmission pulley groove 6 Install a new traveling V belt and then install the cutting blade...

Страница 73: ...of 125 mm cutting height 3 When cutting height clutch lever is On position adjust nut A or B so that the length of the cutting blade tension spring inside the hook is 114 mm at a center gap of 0 7 mm...

Страница 74: ...blade V belt Refer to p 66 of this manual 5 Adjust the cutting height adjustment lever to the position of 35 mm cutting height 6 Shift the cutting blade clutch lever to the On position and adjust the...

Страница 75: ...turn even when the cutting blade clutch lever is put in the Off position Such incident may lead to an unexpected accident Danger The cutting blade should stop within 5 seconds after shifting the cutt...

Страница 76: ...chine becomes 71 mm at a center gap of 0 9 mm There might be a situation where the brake does not work Be sure to check the parking brake pedal before commencing work If you find that there is much pl...

Страница 77: ...mounting bolts M6 while applying a force to the arrowed direction 5 Install the cable brake and adjust the brake Refer to p 69 of this manual If the parking brake remains ineffective after adjusting...

Страница 78: ...sure that the shift is located between HST lever and Arm HST as shown in the figure on the right If the machine moves slightly forward or backward on flat ground even when the HST lever pedal is in th...

Страница 79: ...switch The safety switch is used to make impossible to start engine or to stop the engine automatically in case of wrong operation Make sure to inspect each safety switch before commencing work Make s...

Страница 80: ...for the parking brake pedal 1 While sitting on the seat depress the parking brake pedal up to the Locked position 2 With the cutting height adjustment lever in a position other than Start Engine turn...

Страница 81: ...properly the engine speed will drop immediately and the engine will stop If the engine does not stop make the necessary adjustment How to Adjust 1 Adjusting the safety switch for the parking brake ped...

Страница 82: ...Blade 3 Adjusting the Safety Switch for the Seat When the safety switch brakes down ask the dealer from which you purchased your Ride on Bush Cutter to inspect the machine and make adjustment 4 Inspec...

Страница 83: ...blade other than manufacturer s genuine blade Don t grind the cutting blade The blade may break which brings a very dangerous situation Warning How to Inspect 1 Turn the ignition key to the Off posit...

Страница 84: ...bolts and if dimple on the head of bolt is lost replace the bolt immediately reper to p 79 80 of this manual 6 When replacing the cutting blade attachment bolt replace it with knife bolt set Refer to...

Страница 85: ...g blade If the cover does not need to be removed use the lock bolt M6 to lock the removal installation lever 1 Remove the lock bolt M6 which fixing removal installation lever 2 Move the cutting blade...

Страница 86: ...l 2 Fix the knife stay R792E not to rotate 3 Use a socket wrench of 22mm to remove the upper lock nut M14 and then remove the lower lock nut M14 4 Pull out the knife lock bolt and remove the knife 5 P...

Страница 87: ...ing it with the torque shown in the figure on the right Pay attention to the installing direction of nut Upper Lower Tightening torque 40 58N m 410 590 kgf cm After tightening the lower nut tighten up...

Страница 88: ...ttery is used continuously or charged when the level of battery fluid is below the lower limit LOWER LEVEL marked on the side face of the battery various parts of the battery container will deteriorat...

Страница 89: ...ery back into the machine wire the battery in the correct polarities as before Caution Quick charge is a method of charge using a high charge current to quickly make up for the electricity discharged...

Страница 90: ...to deform Daily Storage 1 Clean the machine as much as possible 2 Store the machine indoors whenever possible If the machine must be kept outdoors keep it with waterproof covers etc 3 Make sure to app...

Страница 91: ...o p 82 of this manual 2 Check the level of battery fluid and refill battery fluid if necessary 3 Store the battery in a cool and dry place away from the direct sunlight Battery Charge the battery befo...

Страница 92: ...l wiring connector Ask the dealer from which you purchased your machine The engine does not start smoothly Lack of fuel Add fuel Refer to p 29 Air or water was mixed into fuel Inspect the pipes and ti...

Страница 93: ...haust condition Too much engine oil Inspect and adjust the oil level Refer to p 53 to 55 Defective fuel Replace fuel Refer to p 84 Worn cylinder or piston ring is broken Inspect and repair the problem...

Страница 94: ...Replace the blade Refer to p 76 to 80 Bush cutting Cut bush is not released properly The bush is wet Wait for the bush to get dry before cutting it The bush is long Adjust the cutting height to highe...

Страница 95: ...to 80 The engine speed is low Adjust the engine speed to the maximum Check the engine revolutions The working speed is high Lower the working speed Bush is piled up to or tangled up to the turning piv...

Страница 96: ...table Work clutch Belt tension type interlocked with brake Maximum work efficiency a h 95 85 in the Eco drive mode Driving system Main Transmission HST with differential lock Brake Internal expanding...

Страница 97: ...Red black 5 Red white 4Black yellow Green black 1 3 A diode Black yellow Yellow black Green Green Black Green Green Red Red Red Black Black Blue Yellow Limit switch ECO lamp Engine oil warning lamp D...

Страница 98: ...675 740 220 0 1 Relating to cutting blade 7 Rear Cover 980F COMP 0675 740 300 0 1 Relating to cutting blade 8 Foam element 11013 7046 1 Engine part 9 Spark plug 92070 7004 2 Engine part BPR4ES 10 Fuel...

Страница 99: ...Cable choke 24 0672 651 011 0 1 Engine choke 39 Cable brake F 0672 621 011 0 1 Traveling brake 40 Cable differential lock 0671 680 011 0 1 Differential lock 41 Cable clutch cutter 0675 760 011 0 1 Cut...

Страница 100: ...mounting bolt guard excellent durability Part No 0672 982 200 0 Tool Knife N This tool enables you attach and remove the knife cutting blade safely and easily Corresponding to both types of knives th...

Страница 101: ...e the machine on flat area and remove the engine cover Refer to p 24 25 of this manual 2 Install the Protection frame 950 COMP to the frame and tighten 4 pieces of Bolt SP as shown in below picture 3...

Страница 102: ...min 1 rpm 3350 3350 VIBRATION AR950F AR950 Weighted root mean square acceleration less than value to which the arms are subjected 2 2 m s2 2 2 m s2 Weighted root mean square acceleration less than val...

Страница 103: ...with al the requirements of the directive 2006 42 EC 2004 108 EC 2000 14 EC amended by 2005 88 EC relating to the noise emission in the environment by equipment for use outdoors Declaration The equipm...

Страница 104: ...ith al the requirements of the directive 2006 42 EC 2004 108 EC 2000 14 EC amended by 2005 88 EC relating to the noise emission in the environment by equipment for use outdoors Declaration The equipme...

Страница 105: ......

Страница 106: ...0675 944 011 0 ATEX CO LTD 1 2 5 Kinuyama Matsuyama Ehime 791 8524 Japan...

Отзывы: