


Hardware
4-7
4.4 APP-501 Computer Control Chassis
The major difference between the APP-601 Computer Control Chassis and APP-501 Computer Control
Chassis is the incorporation of a slide out laptop computer. This approach was used in the APP-501
recorder with great success and satisfaction. Benefits include a computer solution that is economical,
familiar, has a local built-in human interface (window & keyboard), and provides a high degree of
processing power.
An Intel Core 2 Duo 2GHz or Core I5 2.6 GHz processor is used in the APP-501 chassis laptop. In
applications using more than 200 analog channels the APP-501 Computer Control Chassis is
recommended. The APP-501 computer chassis contains fans for processor and chassis cooling.
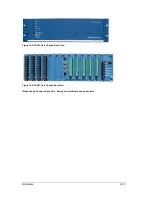
The APP-501 Computer Control chassis is constructed in a 3U 19” rack mount chassis. The chassis depth is
approximately 15.5”. Housed inside the chassis are an electrically isolated laptop computer, laptop internal
modem, laptop internal 2.5” Hard Drive, USB to Ethernet converter, and 24V 100 Watt power supply.
The laptop computer is mounted on a slide out shelf. The shelf and computer can be slid out of the
enclosure by loosening the front panel thumb screws, opening the hinged panel, and carefully pulling the
shelf forward.
The computer chassis can be powered from a 86-373Vdc or 88-264Vac source. Power is connected to the
rear panel terminal block terminals 1 & 2. Ideally power should come from an APP-601 Data chassis via its
power supply terminal block (terminals 5 & 6). In this manner, the Data chassis can control power to the
Computer Control chassis. This gives a remote user, local user, or the system watchdog a means of
rebooting the computer chassis.
The laptop computer battery is removed to allow for automatic power toggle during the automatic reboot
processes. Also, the D-series laptops have their power buttons shorted and the E-series laptops have the
BIOS configured to allow the computer to automatically startup with no human intervention.
The chassis power supply is used to take a universal incoming voltage (typical 125VDC, 250VDC,
120VAC, or 240VAC) and convert it to 24VDC. Manually, the 24VDC is reduced to approximately
21VDC via an easy access power supply pot. The 21VDC signal is used to power the laptop computer.
*WARNING*
When the chassis rear panel is open high voltage is exposed. This
voltage can be deadly. Only trained experienced electrical personnel
should service this power supply circuit and only after the unit has
been turned off and power has been carefully removed from terminals
1 and 2. Ensure power has been removed from terminals 1 & 2 by
measuring the voltage across terminals 1 & 2 (it should read zero
volts).
Since the laptop computer only has one Ethernet port, a second port is created by using a Trendnet USB to
Ethernet converter. The laptop Ethernet port is used for the DSP network and the Ethernet connection from
the Trendnet converter is used for customer LAN connection.
In our standard configuration, the 2.5” computer hard drive is setup as the “C-Drive” and holds the
Windows operating system and the APP Recorder program. The APP ClearView program is also installed
on the hard drive so a local person can view and analyze fault records or test runs.
The “C-Drive” also holds the
Setup
folder and
Data
folders. Typically, the
Setup
folder contains the all
important Point Assignment Record, trace files, and calibration file. The
Data
folder contains the triggered
transient records, triggered extended records, and various continuous recording folders such as continuous
RMS, continuous frequency, continuous phase, continuous oscillography, and Power Quality (PQ).
Содержание APP-601
Страница 1: ...APP 601 Recorder Operating Manual...
Страница 15: ...Introduction 1 1 1 Introduction...
Страница 18: ...2 1 2 Specifications...
Страница 25: ...Installation Overview 3 1 3 Installation Overview...
Страница 38: ...Hardware 4 1 4 Hardware...
Страница 61: ...Installing the Recorder Software 5 1 5 Installing the Recorder Software...
Страница 67: ...Using the APP Recorder 6 1 6 Using the APP Recorder...
Страница 117: ...Using the APP Recorder 6 51...
Страница 124: ...Using the APP Driver 7 1 7 Using the APP Driver...
Страница 128: ...Using the OScope 8 1 8 Using the OScope...
Страница 139: ...Other Information 9 1 9 Other Information...