


Installation Overview
3-9
*WARNING*
All #6 ring terminals connecting to the power circuit board should be
insulated ring terminals.
17.
Ensure that the power switches, located on the back of each chassis, are in the OFF position.
*WARNING*
Ensure that your power source wires are not live (turned off or
disconnected). Follow OSHA power safety lock out procedures.
Ensure that your source can provide sufficient current to each Data
chassis. Ensure that your power source is fused and properly earth
grounded.
18.
Connect power from your source to all the Data chassis power supply boards (terminals 1&2).
Connect power to the Computer chassis per the drawings. Use installed #6 ring terminals.
19.
Open the hinged front door of the Computer Control chassis, pull out the computer, and flip up the
monitor.
20.
If the factory does not know the chassis arrangement prior to shipping, the Ethernet and IP
addresses of the each Data chassis must be set before powering up the system as a whole.
If this is the case, complete the following
Unplug all Ethernet cables from the Data chassis. Connect the provided programming cable from a
DSP circuit board to the Computer chassis RS232 connector or to your laptop running APP
ClearView. With caution, power up the Data Chassis and Computer chassis. The APP Recorder
program should automatically start. Via the Tools menu click “DSP Board Ethernet Settings” to
display the settings window. The preferred Ethernet address is 1-35-69-86-120-X where X is 1, 2,
3 etc. according to the chassis number. The preferred IP address is 195.168.3.X where X is 1, 2, 3
etc. according to the chassis number. The preferred default gateway is 195.168.3.220. After setting
the Ethernet address and IP Address in each Data chassis, power down all chassis and plug in all
the Ethernet cables.
21.
Carefully and with great prior inspection and thought, turn on power to all chassis.
22.
If a proper turn on occurs, you should see the following:
Computer startup
APP Recorder service program begin
On each Data chassis, the front panel POWER LED illuminate green, the ON LINE LED
illuminate green, the 1PPS LED illuminate green, and only if the continuous recording is
enabled the CONT RECORD LED illuminate amber (yellow).
23.
If the system has not powered up correctly, please recheck your wiring and reference the wiring
prints that came with the recorder.
24.
Please call the factory for any required assistance (317) 536-5300.
Содержание APP-601
Страница 1: ...APP 601 Recorder Operating Manual...
Страница 15: ...Introduction 1 1 1 Introduction...
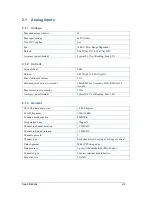
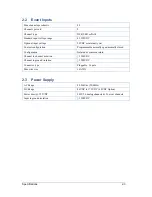
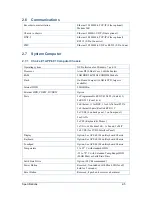
Страница 18: ...2 1 2 Specifications...
Страница 25: ...Installation Overview 3 1 3 Installation Overview...
Страница 38: ...Hardware 4 1 4 Hardware...
Страница 61: ...Installing the Recorder Software 5 1 5 Installing the Recorder Software...
Страница 67: ...Using the APP Recorder 6 1 6 Using the APP Recorder...
Страница 117: ...Using the APP Recorder 6 51...
Страница 124: ...Using the APP Driver 7 1 7 Using the APP Driver...
Страница 128: ...Using the OScope 8 1 8 Using the OScope...
Страница 139: ...Other Information 9 1 9 Other Information...