background image

L0190D


29


CLOCK SETTINGS  


1. 

TIME AND DATE – 

Enter the current time and date. 

This information will be used for data logs and error 
records. 

# - Exit without saving (if you make a mistake) 
*-Saves your setting 
You will then be prompted to press 1 for AM, or 
2 for PM. After you make this choice, you will 
be prompted to enter the date. 
 

Enter the 4 digits for today’s date. Press # to exit without 
saving, or * to save.  After you save the date, you will be 
prompted to enter the year.  Again, Press # to exit 
without saving, or * to save and return to the CLOCK 
SETTINGS Menu. 
 
2. 

DAYLIGHT SAVINGS – 

The factory default is “

Y

”, 

and the time is automatically adjusted for Daylight 
Savings Time to the 

US

 scheme.  Press “2” to step 

through the rules settings for ‘

EU

’( Europe), 

AU

’(Australia),  ‘

MX

’(Mexico), or “

N

” to disable this 

feature completely. 

3. 

DISPLAY CLOCK 

– The factory default is “

Y”. 

The 

current time will appear on the display beneath the 
scrolling message when the vendor is not in use. If 
you choose “

N

”, the time will not be displayed. 

Press “

3

” to toggle between Y and N, then press “

#

” 

to Save the setting and exit. 

4. 

12/24 FORMAT 

– The user can choose to display 

the time in 12-hour or 24-hour (military) format. The 
factory default is 12-hour format. Press “

4

” to toggle 

between Y and N, then press “

#

” to Save the setting 

and exit. 


FREE VEND  

 
The factory default is “

N

” for no. The vendor can be quickly set to 

vend all products for free. Prices are ignored while FREE VEND 
is enabled. The original prices will be restored when FREE VEND 
is turned off. 

Note that Free Vend will not time out on its own.


Press “1” to 

VIEW / EDIT  

and then to


toggle between 

Y

 and 

N

then press “#” to Save the setting and exit. 
 
If you turn free vend on, the Display will briefly show “FREE 
VEND IS ON” before returning to the menu. 


AUXILIARY OUTPUT  

 
The auxiliary output is a 5VDC signal lasting 100 milliseconds 
following a successful vend. This signal can be used to trigger 
user-supplied external devices. AMS does not currently supply 
such accessory devices and cannot offer technical assistance for 
such devices. This feature is provided only as a convenience to 
those users of advanced technical skill who wish to connect such 
a device to their AMS vendor and have sufficient electronic 
expertise to do so. 
 
Press “1” to 

VIEW / EDIT 

and then to


toggle between 

Y

 and 

N

then press “#” to Save the setting and exit. 


DATA LOGS  

 
The user can review recorded data on vendor temperature, 
power outages, and door openings. This data is sometimes 
helpful in diagnosing problems with the vendor. These logs are 
cleared whenever the software is changed, and once the 
maximum number of entries is reached, the oldest entry will drop 
from the list.  There are some special situations on these logs – 
please read the Notes indicated. 
 

TEMPERATURE –

 The temperature log contains temperature 

measurements taken at half-hour intervals over the previous 
48 hours. When you enter this submenu, the Display will 
show you to press “

1

” to move to the next ‘older’ reading or 

2

” to move up to the next ‘more recent’ reading.  After a 

brief delay, the program will begin at the most recent reading 
(#1). 


The reading number (1 through 96

NOTE

), the recorded 

temperature and the date and time of the reading will be 
displayed. 
 
Press either “

1

” or “

2

” to step through the readings.  Press 

#

” to EXIT when you’ve finished. 


POWER OUTAGE 

– The power outage log shows power off and 

on information. When you enter this submenu, the Display 
will show you to press “

1

” to move to the next ‘older’ event or 

2

” to move up to the next ‘more recent’ reading.  After a 

brief delay, the program will begin at the last power ON data 
(#1). 


The reading number (1 - 10

 NOTE

), then whether this record 

was for power ON or OFF, and the recorded temperature at 
the time will be shown on the top line, with the date and time 
of the reading displayed on the bottom line of the Display. 
Press either “

1

” or “

2

” to step through the readings. 

 
Press “

#

” to EXIT when you’ve finished. 


DOOR SWITCH 

– The door switch log records door openings 

and closings. Display will show you to press “

1

” to move to 

the next ‘older’ event or “

2

” to move up to the next ‘more 

recent’ reading.  After a brief delay, the program will begin at 
the last door OPEN data (#1). 


The reading number (1 - 10

 NOTE

), then whether this record 

was for door OPEN or CLOSED, and the recorded 
temperature at the time will be shown on the top line, with 
the date and time of the reading displayed on the bottom line 
of the Display. 


Press either “

1

” or “

2

” to step through the readings.  Press 

#

” to EXIT when you’ve finished. 


NOTES:  In a new machine, or right after a software upgrade, 
temperature readings will not be taken  for 30 minutes, so you 
will not be able to enter the Temperature Menu. 
 
Records will not be displayed if they haven’t been recorded yet – 
so you will not have all 96 temperature readings until the new 
board or software upgrade has been operating for a full 48 hours.  
 
The temperature readings for an ambient (not chilled) snack 
machine will be shown as 125°.  


6


SERVICE


PROGRAMMING


Содержание EPIC SENSIT 3

Страница 1: ...04 725 6983 FAX www amsvendors com info amsvendors com INTERNATIONAL A M S S DE RL DE CV KM 9 CARR AL CASTILLO NO 8200 MPIO DE EL SALTO JAL MEXICO 45680 5233 36 88 07 17 5233 36 88 13 14 FAX www amsint com mx servicio amsint com mx SENSIT 3 OPERATION AND SERVICE MANUAL Glass Front Vendor TM L0190 REV D ...

Страница 2: ...eplacement the customer is to contact the AMS Service Department at 304 725 6921 for return authorization AMS reserves the right to refuse any collect shipment This warranty applies only if the equipment has been serviced and maintained in strict accordance with the instructions presented in the AMS service manual and no unauthorized repair alteration or disassembly has been done Any defects cause...

Страница 3: ... 3 SYSTEM OPERATION 9 CONTROL BOARD 9 Upgrading Firmware 9 Mode Switch DEX Jack VEND SENSOR 9 Primary Sensor Secondary Sensor LED TRIM LIGHTING 10 DASHBOARD 10 Validator and Card Reader Locations Coin Changer Location Coin Box Door Switch Display Keypad Coin Return Button Motorized Scavenge Assembly TRAY RAILS 10 TRAYS 10 Vend Motors 11 Sensit 3 Vend Motors Sensit II Vend Motors Helices Dividers C...

Страница 4: ... Motors Link Motors Motor Type Motor Types Table 24 Delayed Stop Letter Number 25 Configure Motors Coupled Motors MDB MULTI DROP BUS SETTINGS 25 Force Vend No Cheat Change Bill Hold Lost Credit Multi Vend Lev2 Coin Mech Instant Revaluation Hide Card Value 26 Card Refund Special MDB Related Operation OPTIONS 27 Message Prize Language Speech Serial Number 28 SALES BLOCKING 28 1 4 Set Periods CLOCK S...

Страница 5: ... TABLE OF FIGURES NUMBER NAME PAGE Figure 1 1 Typical Serial Plate 1 Figure 1 2 39 Cabinet Dimensions 3 Figure 1 3 Helix Orientations 4 Figure 1 4 Available Helices 5 Figure 2 1 Tray Extension Warning Label 8 Figure 3 1 Control Board Components 9 Figure 3 2 LED Control Board 10 Figure 3 3 Motorized Scavenge Assembly 10 Figure 4 1 Installing Payment Devices 14 Figure 4 2 Removable Inserts 16 Figure...

Страница 6: ... our Service Department with your requests or comments Note 1 The Sensit 3 Control Board is sometimes referred to as the VMC or Vending Machine Controller Note 2 Throughout this manual the terms Coin Changer and Coin Mech or Mech are used interchangeably and refer to the device that accepts and validates coins inserted through the coin slot and which also includes storage for and means with which ...

Страница 7: ...ix returns to the home position See TRAY SETUP on page 23 for more information Additional Benefits a Opening the delivery bin door will not affect the Sensit 3 system The sensors are located above the delivery bin and will not be blocked by the bin door Product that falls while the door is open will still pass through the beam b Shining a light at a sensor will not allow vandals to receive free pr...

Страница 8: ...mps 65 Watts International 230 VAC 50 60 Hz 0 6 Amps 65 Watts Energy Consumption Daily energy consumption varies due to input voltage and manufacturer of cash and or cashless devices and lighting adjustments but the following nominal value is presented for comparison only Epic 39 1 6 KWH day Coin Changers and Bill Validators AMS vendors will support all Multi Drop Bus MDB coin changers bill valida...

Страница 9: ...L0190D 3 Figure 1 2 39 Cabinet Dimensions 1 INTRODUCTION 28 06 34 86 34 41 39 45 28 06 35 8 39 30 120 72 3 Legs fully in 73 2 Legs fully out 4 42 2 79 34 76 ...

Страница 10: ...on of the size of the product that may be loaded All of the helices shown above are of the small 2 6 diameter when used singly these are typically used for candy When configured as coupled pairs as illustrated above they are used to vend wider products Larger diameter helices are also available and are commonly used for pastries and larger snacks A list of all available helices is provided in Figu...

Страница 11: ...dy Counter Clockwise 18 Pitch 20120 24 Helix Candy Counter Clockwise 24 Pitch 20120 32 Helix Candy Counter Clockwise 32 Pitch 21207 15 Helix G M Counter Clockwise Black 15 pitch 21207 25 Helix G M Counter Clockwise Black 25 pitch 21336 06 Helix CCW 3 5 Opening Bottle 21337 06 Helix CCW 3 2 Opening Can 21465 04 Helix Snack Counter Clockwise 4 Pitch 21465 05 Helix Snack Counter Clockwise 5 Pitch 214...

Страница 12: ...L0190D 6 THIS PAGE INTENTIONALY LEFT BLANK ...

Страница 13: ... areas include the electrical panel It is important to understand that contact with the high voltage wiring can result in injury or death a Always test the outlet for proper voltage polarity and grounding before plugging in the vendor b Always disconnect power to the vendor before servicing Allow only fully trained service technicians to service the vendor c Always keep electrical connections dry ...

Страница 14: ...ely Move a Machine If you need to move your Vending Unit you ll want to use a material handling device such as a pallet jack appliance dolly or forklift to position it Make certain that the door is shut and secured To improve safety and to provide maximum protection for the machine and levelling legs it is recommended that you use the supplied shipping boards whenever transporting the machine Grou...

Страница 15: ...data and check error codes for troubleshooting Data is displayed on the front display panel and entered at the front selection panel Pressing the switch again closing the door or waiting approximately 3 minutes will automatically switch the controller back to vend mode DEX Jack The DEX jack see Figure 3 1 on the right is provided for use with external features such as Speech See OPTIONS on page 27...

Страница 16: ...d the price of a selected item and the credit accumulated When the machine is idle it can display the time and a customizable scrolling message Keypad The keypad is located below the display on the front of the dashboard A vending selection is made by keying in the number combination that corresponds to the location of an item in the machine The keypad is also used to enter data in operation and s...

Страница 17: ...ameter There are several pitches available in each size and is determined by counting the number of product openings in the helix See CHANGING HELICES on page 18 MOTOR POSITIONS on page 18 and HELIX HOME POSITION on page 19 Dividers The dividers separate product columns on the tray To remove the divider push rearward and lift To install insert the rear tab in the desired slot push rearward and the...

Страница 18: ...L0190D 12 THIS PAGE INTENTIONALLY LEFT BLANK ...

Страница 19: ...ed decal on the back of the vendor near the power cord NOTE This requirement does not apply to any vendor using 115V service ELECTRICAL SERVICE REQUIREMENT FOR CE COMPLIANCE THIS EQUIPMENT IS INTENDED FOR USE ONLY IN PREMISES HAVING A SERVICE CURRENT CAPACITY OF AT LEAST 100A PER PHASE SUPPLIED FROM A DISTRIBUTION NETWORK HAVING A NOMINAL VOLTAGE OF 400 230V THE USER SHOULD DETERMINE IN CONSULTATI...

Страница 20: ...uppermost MDB opening shipped with the lighted POS Display installed can also be used for an MDB device although this position is above the maximum height allowed by the ADA Rules Mounting and Connecting Coin Changer The AMS vendor will support any NAMA approved Multi Drop Bus MDB Coin Changer On some export models Executive type Changers are supported as well Please read the manufacturer s litera...

Страница 21: ...sition see Fig 5 1 on page 19 pull it out of the motor turn it until it is properly positioned and reinsert the helix into the motor Note When not in Service Mode but with the door open you can press to force switched motors to Home position Not applicable to motors set to Sensit See TRAY SETUP on page 23 Motors already at home will not move 6 Test vend the product and adjust the position of helix...

Страница 22: ... cabinet Before beginning be sure that all four leveling legs are screwed in completely 2 With the door closed and locked check the four legs and adjust any leg that is not contacting the floor Place a level on top of the cabinet and check for horizontal level from side to side 3 Using an adjustable wrench or channel locks adjust the left or right pair of leveling legs that are on the low side one...

Страница 23: ...acks and candy can be configured by the user for up to 10 columns wide for 39 cabinets trays Typically the vend columns are set to single 2 66 or double 5 32 width to be used with the standard small or large helices respectively Single and double width columns can be configured in any arrangement on the tray by following the procedure below Plan your tray arrangement before beginning to determine ...

Страница 24: ... shaped portion is angled towards the front of the tray The best position and angle for the ejector is determined by test vending products HELIX ALIGNMENT DEVICE The helix alignment device is installed under the bottom left side of the large helices to help keep them centered in their columns To remove grasp the front of the helix alignment device with pliers and pull or pry upward Take care not t...

Страница 25: ...t See Figure 5 2 below An incorrect loading may cause the bag to fall top first which could lead to a hang up Loading left corner first prevents the product from falling top first TALL PRODUCT VENDING Place tall narrow products in a column with a candy pusher bar Typically these are installed in columns 8 and 9 on the candy trays Rotate the bar upward or downward to the desired position It should ...

Страница 26: ...L0190D 20 THIS PAGE INTENTIONALLY LEFT BLANK ...

Страница 27: ...elivered to the cashbox since last reset First the TOTAL Value of these coins is shown then by pressing you can step through each coin denomination These counts and values are resettable 9 STACKED BILLS Displays number and value of bills stacked in the bill box since last reset First the TOTAL Value of these bills is shown then by pressing you can step through each bill denomination These counts a...

Страница 28: ...ed price The vending machine operator should advertise the special combinations and prices 1 RESPOND TIME is used to set the number of seconds 20 to 99 the customer has to make the second selection before any remaining credit is returned Set the time to at least 30 if dual languages are scrolled in the display 1 Press to increase the seconds 2 Press to decrease the seconds Press to save the new se...

Страница 29: ... is missing b JOG ALL All motor positions in the vendor will be tested Each motor will be turned only a very small amount so that products loaded in the vendor will not be dispensed The display will show the number of the motor being jogged or it will show a message that a motor is missing c CHECK JAMMED The control will attempt to run each motor that has caused a jammed motor error The status of ...

Страница 30: ... will be deducted Once the error is cleared the vendor will return to its original sensor setting Note that this will only work with the 23007 and 23007 01 motors and during this temporary mode selecting an item with the older style motor will read selection unavailable 4 Delayed Stop The user can program a delayed stop of up to one second to allow a motor to continue running after the product has...

Страница 31: ...t Sales reporting in the Accounting Menu or the DEX system will only list sales from the lowest numbered column The Coupled Motor feature will not work with Sensit 2 motors MDB MULTI DROP BUS SETTINGS The user can select from many different operating features using the following settings 1 Force Vend The factory default is N for no If set to Y the customer is forced to make a selection before the ...

Страница 32: ...ill be treated as equivalent to a coin mech escrow return Bill Only Application Notes In a bill only system prices must be restricted to the scaling factor of the bill validator Usually this scaling factor will start from the smallest paper currency unit instead of the smallest coin unit This will limit setting selection prices that would require change making Due to the absence of a coin mech the...

Страница 33: ...ance With a coin mech the VMC will allow credit to exceed the maximum balance as long as any excess can be paid back in coins Without a coin mech the VMC rejects any bills that would exceed the maximum balance in a card first revaluation or rejects the Cashless medium entirely in a cash first revaluation OPTIONS 1 Message The user can customize the scrolling message that is displayed when the vend...

Страница 34: ... you ve entered will be displayed briefly and you will be prompted to enter the END time 4 Enter the time when sales blocking period 1 is to end then press to SAVE as indicated 5 Select a m or p m for the ending time NOTE A time period can be started for example at 9 00 p m and may be set to end at 6 00 a m which would be the following day 6 Now you are prompted to enter which days of the week wil...

Страница 35: ...ta on vendor temperature power outages and door openings This data is sometimes helpful in diagnosing problems with the vendor These logs are cleared whenever the software is changed and once the maximum number of entries is reached the oldest entry will drop from the list There are some special situations on these logs please read the Notes indicated TEMPERATURE The temperature log contains tempe...

Страница 36: ...nsumption When enabled EnergySensit predicts periods of inactivity and allows the internal temperature of the vendor to rise slightly and the lighting turned off to take advantage of these inactive times This feature is not available in the Epic snack vendor 6 SERVICE PROGRAMMING ...

Страница 37: ...BE Jammed coin tube Clear any obstructions from the coin tube CHK SUM CHECK SUM Check sum error Consult changer manual or manufacturer CHUTE CHUTE No coins accepted for a period of time Clear any obstructions from the coin chute BILL VALIDATOR A message has been generated by the bill validator Press 1 for bill validator sub level error codes COMM COMMUNICATIONS Communications error Check MDB harne...

Страница 38: ...mory 2 DETAILS displays the time and date of last error occurrence 1 SUBLVL ERRORS to display any sublevel error codes including MDB devices 0 CLEAR ERROR to erase the error code from memory first correct the error Viewing Sub Level Error Codes To view the sub level error codes press the 1 key while the top level error code is being displayed Correct the condition which caused the error first then...

Страница 39: ...s possible control board error Vendor does not accept coins Options set for Free Vend Scroll to Free Vend and change to N Changer unplugged Plug in changer Coins jammed Clear changer Defective changer or other MDB Device Replace changer Credit amount exceeds the highest price Prices may be set at 0 00 Set prices Control board is in service mode Exit service mode Vendor will not pay out coins Chang...

Страница 40: ... t light when pressed If scavenge system operates normally replace the coin return switch Check the 2 wire harness connection to the scavenger control board red and black wires for 24VDC Note Pulling down on the return lever actuator plate will energize motor to confirm that 24VDC is present Check that the 6 pin connector at the scavenger control board is connected If all connections are OK replac...

Страница 41: ...one way Some models may latch it in place 4 Press the yellow Mode button After a few seconds four software options will scroll on the display 5 Press 3 for NEW FIRMWARE then the key to scroll through the files 6 When the desired software version is shown on the display press the key 7 The selected software will be loaded and verified this will take about 30 seconds 8 After the software has been lo...

Страница 42: ...u will want to retain those unique Serial Numbers and you should choose NO If you are replacing a Control Board and want to retain the Serial Number of the board that supplied the configuration file choose YES This is very important for operations that utilize DEX reporting RECORDING DEX DATA ON SD CARD DEX data can be saved to a file on the microSD card for analysis late via PC or other computing...

Страница 43: ...holes on the back of the machine Reinstall screws through the holes in the cover Do not over tighten the screws 6 Plug the power cord into the power outlet The power should come on in the vendor 7 If the power is on in the vendor test the GFCI as follows press the TEST pushbutton on the GFCI to trip the GFCI and shut it off The vendor power should turn off Then press the RESET pushbutton to return...

Страница 44: ...L0190D 38 THIS PAGE INTENTIONALLY LEFT BLANK ...

Страница 45: ...L0190D 39 Epic Model 9 WIRING DIAGRAM Note Transformer part numbers are forma ed as 120 V 220V ...

Страница 46: ...L0190D 40 THIS PAGE INTENTIONALLY LEFT BLANK ...

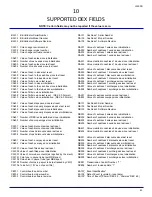
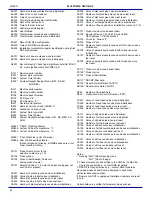
Страница 47: ...No CB101 Control board serial number CB102 Control board model number CB103 Control board software revision DA101 Cashless 1 Serial Number DA102 Cashless 1 Model Number DA103 Cashless 1 Software Revision DA201 Value of cashless 1 sales since initialization DA202 Number of cashless 1 vends since initialization DA203 Value of cashless 1 sales since last reset DA204 Number of cashless 1 vends since l...

Страница 48: ...ends since last reset PA208 Value of discounts given since last reset PA209 Number of surcharged paid vends since initialization PA210 Value of surcharged paid vends since initialization PA401 Number of free vends since initialization not sent if 0 PA7012 Product number one based index PA702 Payment Device CA Cash Coin and Bill DA Cashless 1 DB Cashless 2 PA703 Price List Always 0 PA704 Product Pr...

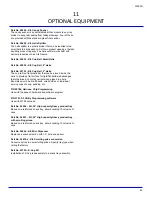
Страница 49: ...surface for rigid flat bottomed packages that otherwise do not stay upright when placed in a helix Examples would be drink boxes small bottles or individual serving cups of soup pudding etc P N 20786 Harness Chip Programming Use with the speech hardware and software program P N 3701 S3 Utility Programming software Use with 20786 harness Part No 24056 Kit 39 High capacity Heavy product tray Based o...

Страница 50: ...L0190D 44 THIS PAGE INTENTIONALLY LEFT BLANK ...

Страница 51: ... PRICE SETTINGS 1 SET PRICES 2 VALUEVEND 3 CALORIES TRAY SETUP 1 TEST MOTORS 2 LINK MOTORS 3 MOTOR TYPE 4 DELAYED STOP 5 LETTER NUMBER 6 CONFIGURE 7 COUPLE MOTORS MDB SETTINGS 1 FORCE VEND 2 NO CHEAT 3 CHANGE BILL 4 HOLD LOST CREDIT 5 MULTI VEND 6 LEVEL2 COIN MECH 7 INSTANT REVALUATION 8 HIDE CARD VALUE 9 CARD REFUND OPTIONS 1 MESSAGE 2 PRIZE 3 LANGUAGE 4 PRODUCT SENSOR 5 SPEECH 6 SERIAL NUMBER 7 ...

Страница 52: ...L0190D 46 THIS PAGE INTENTIONALLY LEFT BLANK ...

Отзывы: