L0190D
23
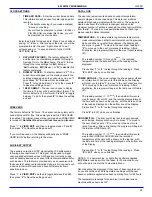
Calorie information for that selection. The values of
nnnn can range from 0 (water or diet soda) to 9999.
This number will be stored in memory locations that
are the same as ‘Product Name’ are presently.
Should fewer than 4 digits be entered when the
Save Command is made (‘#’ key) any necessary
leading zeros are to be assumed.
3. When a selection is made and there is insufficient
credit for the selection, the top line of the display will
show “yy>CALORIES= nnnn” WHERE yy = the
selection number and nnnn is the present price
(leading zeros will be suppressed). The bottom line
will show the product price.
4. When a selection is made and there is sufficient
credit for the selection, a normal vend will occur.
If
Option 3 – Force Display*
is chosen, the following applies:
1. Just as in Option 2, when a selection is made and
there is insufficient credit for the selection, the top
line of the display will show “yy>CALORIES= nnnn”
WHERE yy = the selection number and nnnn is the
present price (leading zeros will be suppressed).
The bottom line will show the product price.
2. When a selection is made and there
is
sufficient
credit for the selection, the user will be forced to
choose whether to continue with the vend:
3. The top line of the display will show
“yy>CALORIES= nnnn” WHERE yy = the selection
number and nnnn is the present price (leading zeros
will be suppressed).
The bottom line of the display will show “1-VEND 2-CANCEL”
Vending is suspended until customer chooses from the
options shown:
a. If he presses ‘1’, the vend process proceeds as it
normally does now,
b. If he presses any other button, or if no button is pressed
in 10 seconds, the Display reverts to the ‘CREDIT –
$$$$’ as was displayed before the selection was made
and the hope is that the customer chooses another
product.
*This is the only option that meets the FDA Rules for
electronic display of calorie information.
TRAY SETUP
This section is used to establish the presence of and test the
motors that are present in your machine as it is configured. It is
also used to program the motors to operate per your preferences.
1. Test Motors
Enter the selection number to be tested, or press
*
to see the
following options for testing multiple motors.
a.
JOG TRAY
– All motor positions on the selected
tray will be tested. The display will show the number
of the motor being jogged, or it will show a message
that a motor is missing.
b.
JOG ALL
– All motor positions in the vendor will be
tested. Each motor will be turned only a very small
amount, so that products loaded in the vendor will
not be dispensed. The display will show the number
of the motor being jogged, or it will show a message
that a motor is missing.
c.
CHECK JAMMED
– The control will attempt to run
each motor that has caused a jammed motor error.
The status of the motor will be displayed afterward.
2. Link Motors
The user can link selections to ensure even vending of dated
products, or other “space-to-sales” functions. Linked selections
are vended sequentially for better product rotation. Up to 40
groups
can have motors linked together
regardless of location or
tray
. The linked selection with the lowest number is the master
selection. All other linked selections are vended using the
selection number and price of the master selection. Entering the
selection number of any linked selection will default to the master
selection number, and the control will vend the next linked
selection in the sequence. If motors are linked- but not present (or
jammed), the next available motor will run.
From Tray Setup, select
2-Link Motors
.
Enter Selection:
then select from the following.
9- EDIT
– Use 1 & 2 to select desired link group.
*
saves
this
selection to
this
link group.
0- CLEAR
– This will unlink the current selection. The price will
revert to its original value. All other linked selections in that group
will remain unchanged.
* NEXT
– Press to increment by one selection. Any selection
number may be entered directly for faster access.
# EXIT
– Returns to the Tray Setup menu.
Repeat for each linked selection.
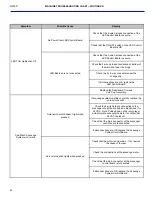
3. Motor Type
Motor Type allows the user to change the motor-stop and credit
deduction behavior. See the ‘Motor Types’ table below for more
details on the various settings available under this function.
Enter tray
– enter tray number to change motor type.
Press
1
to change motor type.
Press
#
to save and exit.
Press 2 to save entire vendor to this
motor type.
Note:
All motors on a tray must be of the same design (S2 or S3),
but trays with different motor types can be used in the same
vendor.
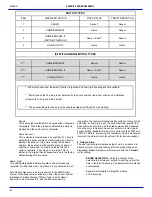
Motor Type Descriptions:
HomeSensor/
After a selection is made, the motor will make one full
turn and stop at home position. If a drop was detected,
credit will be accepted. If no drop detected, “Please
Make Another Selection” will scroll allowing the customer
to try that or another selection (or press coin return for a
refund).
You must press
6
(configure) after making any
changes to motor type, or quantity, of vend motors.
6
SERVICE
PROGRAMMING
Содержание EPIC SENSIT 3
Страница 12: ...L0190D 6 THIS PAGE INTENTIONALY LEFT BLANK ...
Страница 18: ...L0190D 12 THIS PAGE INTENTIONALLY LEFT BLANK ...
Страница 26: ...L0190D 20 THIS PAGE INTENTIONALLY LEFT BLANK ...
Страница 44: ...L0190D 38 THIS PAGE INTENTIONALLY LEFT BLANK ...
Страница 45: ...L0190D 39 Epic Model 9 WIRING DIAGRAM Note Transformer part numbers are forma ed as 120 V 220V ...
Страница 46: ...L0190D 40 THIS PAGE INTENTIONALLY LEFT BLANK ...
Страница 50: ...L0190D 44 THIS PAGE INTENTIONALLY LEFT BLANK ...
Страница 52: ...L0190D 46 THIS PAGE INTENTIONALLY LEFT BLANK ...


