


Temposonics
®
R-Series
V
POWERLINK
Operation Manual
I 43 I
The other menu items contain the following information:
TempoLink:
Includes information about the TempoLink
®
smart
assistant
Status:
Includes current information about the sensor status
Sensor Info:
Includes information about the connected sensor
Parameters:
Includes information about the operational settings
of the connected sensor
NOTICE
• To enable the controller to communicate with the sensor, the node
ID set on the sensor must also be set on the controller.
• For detailed information about the TempoLink
®
smart assistant see
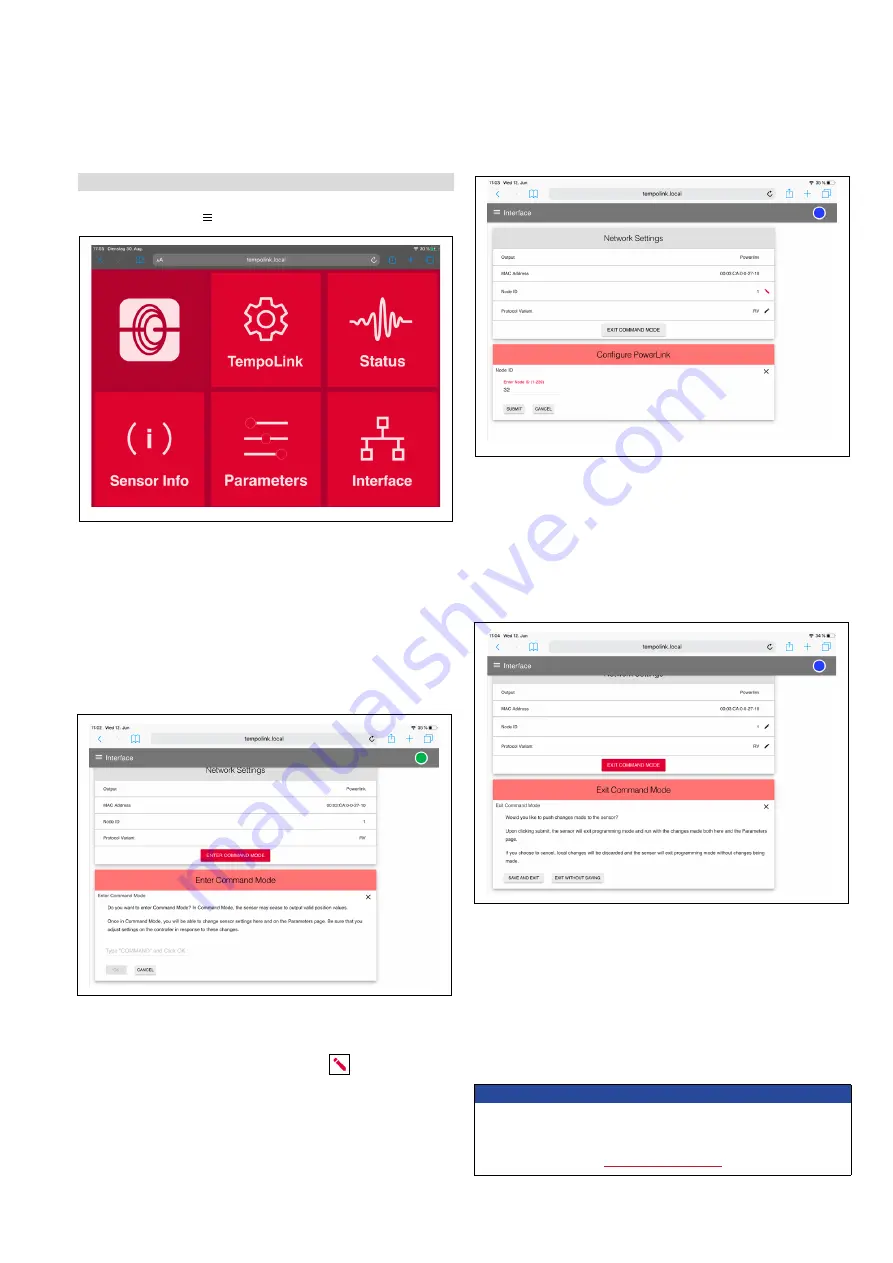
After the node ID has been configured, click the EXIT COMMAND
MODE button. A new window for exiting the command mode will open
(Fig. 62). Click the SAVE AND EXIT button to exit the command mode
and to transfer the changed node ID to the sensor. The sensor returns
to the normal function and outputs the current position value. When
you exit the command mode the connection icon changes to green.
6.1.4 Graphical User Interface (GUI)
Click the menu symbol in the top left to get to the main menu:
Fig. 59: Main menu of the graphical user interface (GUI)
Fig. 60: Starting the command mode to change settings of the connected sensor
After entering the command mode the connection icon on the top
right will turn from green to blue. A pencil icon
will appear to
the right of the node ID. By clicking the pencil icon a new window for
configuring the node ID will open. Enter the new node ID of the sensor
and confirm the change by clicking the SUBMIT button (Fig. 61). Only
values between 1 and 239 are permitted. The value 240 is reserved for
the Managing Node.
To change the node ID of the connected sensor, select the menu item
Interface (Fig. 59). Interface includes information about the network
settings of the sensor. To change the settings you must start the
command mode. In the command mode, the sensor does not output
a position value. By clicking the ENTER COMMAND MODE button a
new menu will open. After reading the information, enter the word
COMMAND and confirm by clicking OK (Fig. 60).
Fig. 61: Changing the node ID of the connected sensor
Fig. 62: Exiting the command mode