18
19
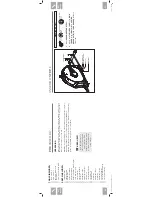
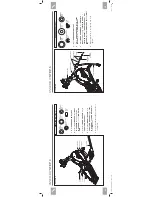
CON
S
OLE
HAN
D
LE
B
AR B
OO
T
B
OL
TS (D
D)
U
PPE
R HAN
D
LE
B
AR
CON
S
OLE C
AB
LE
S
L
O
WE
R HAN
D
LE
B
AR
PR
E-I
N
ST
ALLE
D
S
ET S
CR
EWS
CON
S
OLE MAST
B
OL
T (D
D)
12 mm
Qty: 4
HAR
D
W
AR
E F
OR STE
P 8
:
N
O
TE
: Be
careful
not
to
pinc
h
any
wires
while
att
ac
hing
the
console
or
handlebars.
* T
his step is for 3.1AE models only
.
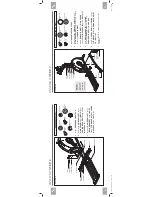
A
Open
HAR
D
W
AR
E FOR STE
P 8
.
B
Att
ac
h the 3
C
ON
SOL
E C
AB
LE
S
to the
C
ON
SOL
E
.
C
Carefully tuc
k the
C
ON
SOL
E C
AB
LE
S
into the
C
ON
SOL
E MAST
before att
ac
hing the
C
ON
SOL
E
.
Att
ac
h
C
ON
SOL
E
to
C
ON
SOL
E MAST
using 4
BOL
TS (
DD
)
.
D
Slide
HAN
DL
E
BAR BO
O
TS
over upper handlebars.
E
Slide
U
P
P
E
R HAN
DL
E
BAR
S
onto
LO
W
E
R
HAN
DL
E
BAR
S
making sure handlebars are joined
together completely
. Secure
U
P
P
E
R HAN
DL
E
BAR
S
to
LO
W
E
R HAN
DL
E
BAR
S
using
P
R
E-A
T
TA
CH
E
D
S
ET SCR
EWS
.
F
Slide
HAN
DL
E
BAR BO
O
TS
down to cover
handlebar att
ac
hments.
Make
sure
upper
handlebars
are
as
far
down
as
possible.
Handlebars
can
be
damaged
If
not
secured
correctly
.
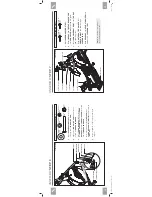
3.1AE
A
S
S
E
M
B
LY
STE
P 8
3
.1
A
E S
H
O
W
N
3.1AE
A
S
S
E
M
B
LY
C
O
M
P
LETE!
B
OL
TS (D
D)
U
PPE
R HAN
D
LE
B
AR
HAN
D
LE
B
AR WI
R
E
S
PR
E-I
N
ST
ALLE
D
S
ET S
CR
EWS
L
O
WE
R HAN
D
LE
B
AR
HAN
D
LE
B
AR
WI
R
E
AE
R
O HAN
D G
R
IPS
B
OL
T (D
D)
15 mm
Qty: 4
HAR
D
W
AR
E
F
OR STE
P 8
:
N
O
TE
: Be
careful
not
to
pinc
h
any
wires
while
att
ac
hing
the
aero
hand
grips
or
handlebars.
* T
his step is for 4.1AE models only
.
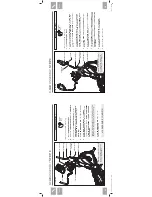
A
Open
HAR
D
W
AR
E FOR STE
P 8
.
B
Carefully pull the
HAN
DL
E
BAR W
IR
E
from the
AE
RO HAN
D
G
R
IP
through the
U
P
P
E
R HAN
DL
E
BAR
using the twist tie
located inside the
U
P
P
E
R HAN
DL
E
BAR
and then discard the
twist tie.
C
Pull the
HAN
DL
E
BAR W
IR
E
from the bottom of the
U
P
P
E
R
HAN
DL
E
BAR
while sliding the
AE
RO HAN
D G
R
IP
onto the
U
P
P
E
R HAN
DL
E
BAR
to prevent the
HAN
DL
E
BAR W
IR
E
from
becoming pinc
hed and create slac
k to connect the wire.
D
Att
ac
h
AE
RO HAN
D G
R
IP
to
U
P
P
E
R HAN
DL
E
BAR
using 2
BOL
TS (
DD
)
.
E
Guide the
HAN
DL
E
BAR W
IR
E
through the top of the
LO
W
E
R
HAN
DL
E
BAR
and through the slot.
F
Slide
U
P
P
E
R HAN
DL
E
BAR
onto
LO
W
E
R HAN
DL
E
BAR
making
sure handlebars are joined together completely
. Secure
U
P
P
E
R
HAN
DL
E
BAR
to
LO
W
E
R HAN
DL
E
BAR
using
P
R
E-I
N
ST
AL
LE
D
S
ET SCR
EWS
.
G
Connect the
HAN
DL
E
BAR W
IR
E
from the
U
P
P
E
R
HAN
DL
E
BAR
to the wire from the
C
ON
SOL
E MAST
.
H
Repeat steps B – G on other side.
4.1AE
A
S
S
E
M
B
LY
STE
P 8
4
.1
A
E S
H
O
W
N
3.
1
A
E
4.
1
A
E
$(B
$(B
2
0B
5H
Y
B
LQ
GG
$0
Содержание 3.1AE
Страница 74: ...146 147 B B20B5HY B LQGG 0...


