background image

3-3

Using the BIOS Array Configuration Utility

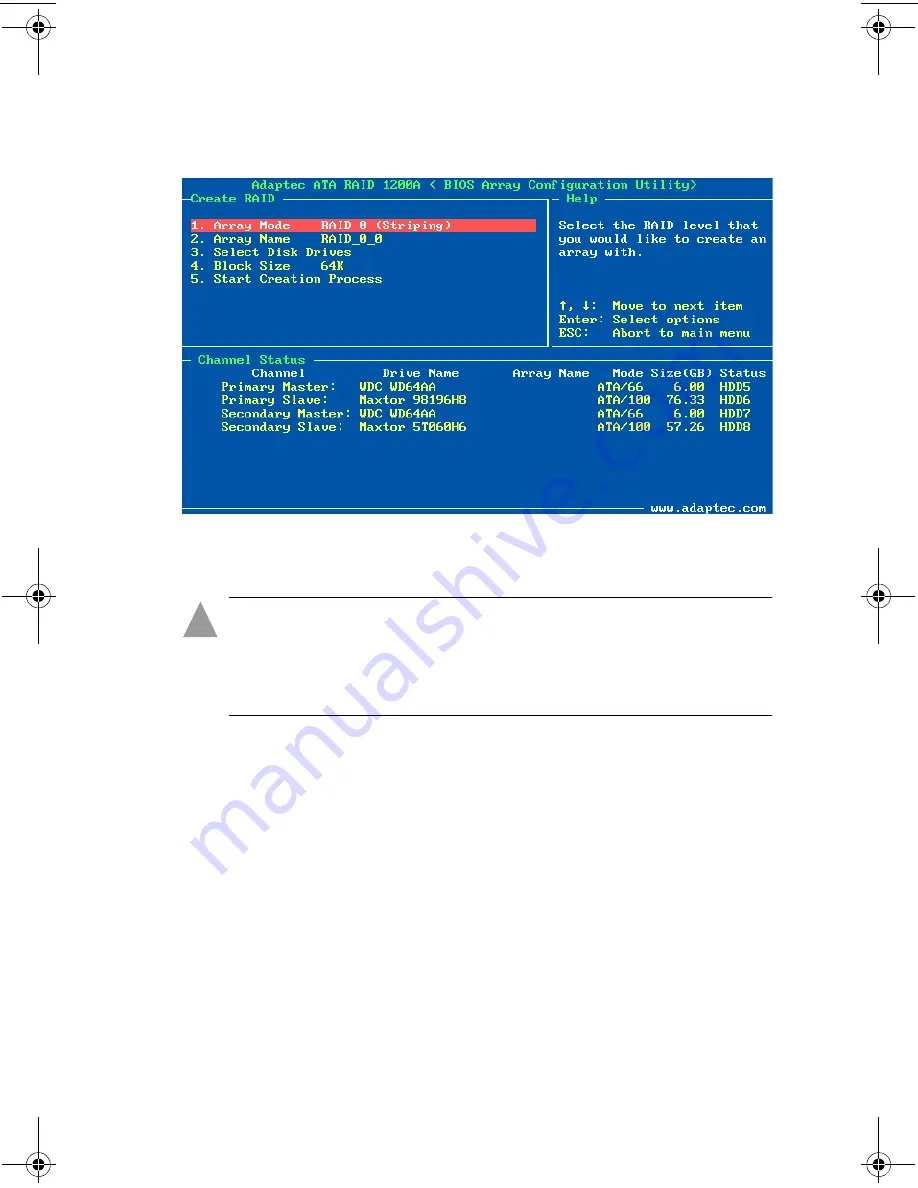
After you have selected the Create Array option in the Main menu, 
press Enter to display the Create RAID menu as shown in

Figure 3-2

Figure 3-2  Create RAID Menu

Caution: 

 If you proceed to create RAID, all the data stored in 

the hard disks will be lost. The exception is RAID 1 
Duplication where data is copied from the Source disk to the 
Target disk.

Array Mode

This option allows you to select the appropriate RAID mode for the 
desired array. There are four modes to choose from (see 

Figure 3-3

):

RAID 0 (Striping) 

—This option is recommended for high 

performance usage. Requires at least two disks.

RAID 1 (Mirroring)

—This option is recommended for data 

security usage. Requires two disks.

RAID 0/1 (Mirrored Striping)

—This option is recommended 

for data security and high performance usage. Allows 
Mirroring with two Striping Arrays. Requires four disks.

!

ATA RAID 1200A IUG.book  Page 3  Wednesday, November 13, 2002  2:22 PM

Содержание 1200A

Страница 1: ...R Adaptec ATA RAID 1200A Installation and User s Guide...

Страница 2: ...ration in the US and other countries used under license All other trademarks are the property of their respective owners Changes The material in this document is for information only and is subject to...

Страница 3: ...n outlet on a circuit different from that to which the receiver is connected Consult the dealer or an experienced radio television technician for help Use a shielded and properly grounded I O cable an...

Страница 4: ...anadian Interference Causing Equipment Regulations Cet appareil num rique de la classe B respecte toutes les exigences du R glement sur le mat riel brouilleur du Canada Japanese Compliance Voluntary C...

Страница 5: ...you don t lose it Support Options Search the Adaptec Support Knowledgebase ASK at ask adaptec com for articles troubleshooting tips and frequently asked questions for your product For support via Emai...

Страница 6: ...les online at www adaptec com buy cables Australia and New Zealand Visit our Web site at www adaptec com au To speak with a Technical Support Specialist call 612 9416 0698 Monday to Friday 10 00 A M t...

Страница 7: ...tec and its licensors retain title and ownership of the Software recorded on the original media and all subsequent copies of the Software regardless of the form or media in which or on which the origi...

Страница 8: ...r the terms of a GSA contract use reproduction or disclosure is subject to the restrictions set forth in the applicable ADP Schedule contract If the Software is acquired under the terms of a DoD or ci...

Страница 9: ...RAID Performance Hints 1 6 2 Installing the Hardware Adaptec ATA RAID 1200A Card Layout 2 2 Installing the Adaptec ATA RAID 1200A Card 2 2 Connecting the LED Activity Indicator Optional 2 4 Setting u...

Страница 10: ...When Windows 98 is Already Installed 4 3 Installing the Device Driver for Windows Me 4 4 Installing the Driver When Installing Windows Me 4 4 Installing the Driver When Windows Me is Already Installe...

Страница 11: ...roller 5 6 Viewing the Channel 5 6 Create Arrays 5 7 Create RAID 0 Striping 5 8 Create RAID 1 Mirroring 5 9 Create RAID 0 1 Mirrored Striping 5 11 Create JBOD Volume Array 5 12 View the Event Log 5 12...

Страница 12: ...ipheral Component Interconnect bus Features The Adaptec ATA RAID 1200A is a low profile small form factor card that provides two channels with 256 bytes of FIFO per channel Each channel uses an intern...

Страница 13: ...nfiguration Utility to create the first array for bootable array configuration and then install the software device drivers for your operating system Use the Adaptec ATA RAID Management Software which...

Страница 14: ...Bus Mastering A minimum of one ATA drive CD ROM or DVD ROM drive Floppy disk drive 64 MB or more of system memory 5 MB of free hard disk space for the Adaptec ATA RAID Management Software Operating S...

Страница 15: ...RAID 1200A controller To achieve the ATA 100 transfer speeds you must ensure that The drives are ATA 100 hard drives The cable must be 80 conductor ATA 100 cables and the length should not exceed 18...

Страница 16: ...erformance and high capacity A RAID is defined as Unified array Two or more hard drives are grouped to appear as one single device to the host system while operating independently of one another Fault...

Страница 17: ...lable disk space of the smaller RAID 0 array JBOD Volume Subsystem of disk drives Allows you to combine disk drives into larger logical volumes Two or more hard disk drives of unequal size can be grou...

Страница 18: ...nd any other electronic component ground yourself by touching an unpainted metal surface on your computer chassis Adaptec ATA RAID 1200A Card Layout 2 2 Installing the Adaptec ATA RAID 1200A Card 2 2...

Страница 19: ...l your Adaptec ATA RAID 1200A card follow these steps Note If you are installing the Adaptec ATA RAID 1200A card into an existing system back up all data before continuing this installation 1 Turn OFF...

Страница 20: ...AID 1200A card with a SCSI controller in the same system and you want to make the ATA card bootable install it at the lowest BIOS address Check your system documentation to determine which slot is at...

Страница 21: ...ATA RAID 1200A as shown in Figure 2 3 Note If you connect the LED cable to the Adaptec ATA RAID 1200A card the LED lights whenever there is activity on hard disks connected to the Adaptec ATA RAID 120...

Страница 22: ...d Note If you refer to the ATA drive s documentation for installation instructions be sure to return to this document to continue with installation of the software included in your kit Setting Jumpers...

Страница 23: ...ble from your computer s power supply Refer to your computer and device documentation for instructions on installing devices inside your computer Figure 2 4 ATA Drive Mounted in Drive Bay Connecting Y...

Страница 24: ...onnectors Blue Connects to the controller Black Connects to the master or single drive Gray Connects to the slave or second drive Note Although the master slave configuration is determined by the jump...

Страница 25: ...ller card as shown in Figure 2 6 being careful to match pin 1 of the cable to pin 1 of the connector The cables and connectors are keyed If the cable does not slide easily into the connector do not fo...

Страница 26: ...before continuing Figure 2 7 Connecting an ATA Drive 3 If you are connecting only two hard disk drives connect the blue connector of the second ATA 100 cable to the channel 2 connector on the controll...

Страница 27: ...remaining slave drive Note Use the ATA 100 cables supplied with your Adaptec ATA RAID 1200A controller kit for optimum performance Figure 2 9 Connecting Four ATA Drives Set Mainboard CMOS Setup The Ad...

Страница 28: ...on your hard disk drives Before you can use your BIOS Array Configuration Utility make sure you have done the following 1 Installed the Adaptec ATA RAID 1200A card into a valid PCI slot 2 Attached the...

Страница 29: ...Array Configuration Utility appears as shown in Figure 3 1 Figure 3 1 BIOS Array Configuration Utility Main Menu To use the menu Press F1 to view array status Press the arrow keys to navigate between...

Страница 30: ...a is copied from the Source disk to the Target disk Array Mode This option allows you to select the appropriate RAID mode for the desired array There are four modes to choose from see Figure 3 3 RAID...

Страница 31: ...y Name This option allows you to specify an array name of eight characters or less If you don t want to specify an array name press Enter and one will be automatically created Select Disk Drives This...

Страница 32: ...l get an error message at the end of the creation process Start Creation With RAID 1 When you select the Start Creation option under RAID 1 you will get a Process option sub menu displaying the follow...

Страница 33: ...a RAID array on your Adaptec ATA RAID 1200A card Note After you have made and confirmed this selection all the data stored in the hard disk drive will be lost The entire partition configuration will...

Страница 34: ...array Using the arrow keys from the Main menu select Select Boot Disk and press Enter In Channel Status select the drive you would like to set as the bootable disk and press Enter There will be an ast...

Страница 35: ...ystems Windows 98 and Windows 98 Second Edition Windows Me Windows 2000 Windows NT 4 0 Windows XP Installing the Device Driver for Windows 98 4 2 Installing the Device Driver for Windows Me 4 4 Instal...

Страница 36: ...he Adaptec ATA RAID 1200A before installing the driver 2 Select Start from the task bar then select Settings and Control Panel 3 Double click the System icon then select the Device Manager tab 4 Selec...

Страница 37: ...Hardware Wizard to guide you through the device driver installation 2 On the Add New Hardware Wizard window select Next 3 Select Search for the best driver for your device and click Next 4 On the Wind...

Страница 38: ...1200A before installing the driver 2 Select Start from the task bar then select Settings and Control Panel 3 Double click the System icon then select the Device Manager tab If the System icon is not...

Страница 39: ...talling the new hardware device Click Finish 4 The Adaptec RCM device is detected and the driver is automatically loaded Installation is now complete Installing the Device Driver for Windows 2000 Inst...

Страница 40: ...y installed follow these steps 1 Start Windows 2000 Windows 2000 will automatically discover the new hardware and start the Found New Hardware Wizard to guide you through the device driver installatio...

Страница 41: ...n screen prompts After a few moments you will see a blue screen message To set up Windows now press Enter Press Enter to begin the installation 4 Press S to specify an additional device 5 Press Enter...

Страница 42: ...ct Settings 3 From the Settings menu select Control Panel 4 From the Control Panel select the SCSI Adapters icon 5 From the SCSI Adapters window select the Drivers tab 6 From the Drivers window select...

Страница 43: ...CD and restart your system to begin the Windows XP installation You might see the following message Press any key to boot from CD You will have five seconds to press a key to boot from the CD 2 When t...

Страница 44: ...ic location Advanced then select Next 3 Select the option Don t search I will choose the driver to install then click Next 4 Click Have Disk button 5 Insert the Adaptec ATA RAID 1200A floppy disk into...

Страница 45: ...re you can add delete or reconfigure RAID arrays on your system You can use the easy to use on screen features to manage your RAID configurations and monitor device information and event notifications...

Страница 46: ...reate delete rename and monitor arrays Add a spare disk View events Installing the Adaptec ATA RAID Management Software To install Adaptec ATA RAID Management Software on your Windows Server or Workst...

Страница 47: ...r you have installed the Adaptec ATA RAID Management Software click the Start button on the Windows task bar and select the Adaptec ATA RAID Management Software program see Figure 5 2 Figure 5 2 Launc...

Страница 48: ...he right pane displays detailed information for the arrays and hard disk drives you have selected From the Main menu you can also select the array and right click the mouse to open a drop down menu of...

Страница 49: ...0 1 the options are see Figure 5 5 Delete Build This option allows you to verify data integrity and fix miscompares Rename Figure 5 5 RAID 0 1 Drop down Menu See the different RAID level sections in t...

Страница 50: ...pane displays the host bus adapter HBA The right pane displays detailed information for the HBA you have selected see Figure 5 6 Figure 5 6 Controller Information Viewing the Channel From the Controll...

Страница 51: ...e Information Create Arrays To create a RAID array go to the Main menu and from the toolbar select a RAID array The Adaptec ATA RAID Management Software supports the following RAID levels RAID 0 Strip...

Страница 52: ...Main menu toolbar select RAID 0 2 From the Available Disks screen select the disk and click Add then click Next Note You must have at least two hard disk drives to create an array 3 Select the Block s...

Страница 53: ...s been created successfully You will be prompted to restart your system Click Yes to restart After you have restarted your system your Main menu will display your built arrays Warning If you have crea...

Страница 54: ...gure 5 10 Create RAID 1 Menu 3 To add a spare disk click the Add a spare disk option Select a spare disk from the Available Disks screen and click Add 4 Specify an array name of eight characters or le...

Страница 55: ...menu will display your built arrays Create RAID 0 1 Mirrored Striping To create a RAID 0 1 array follow these steps 1 From the Main menu Menu bar select Configuration Create RAID 0 1 Mirrored Striping...

Страница 56: ...l be displayed 4 Click Create The following message appears All data on the selected disks will be deleted Are you sure you want to continue Click Yes to continue 5 You will get a confirmation message...

Страница 57: ...e Figure 5 11 Figure 5 11 Event Log 3 From the toolbar or drop down menu click Exit to return to Main menu Delete Arrays To delete an array follow these steps 1 From the Main menu select the array and...

Страница 58: ...must do so in the BIOS See Select Boot Disk on page 3 7 Rename Arrays To rename an array follow these steps 1 From the Main menu select an array and right click your mouse A drop down menu will be di...

Страница 59: ...Main menu Menu bar select Configuration Monitor Duplicate The Duplicate option verifies data integrity and fixes any miscompares Add Disk to Array From the Main menu Menu bar select Configuration Moni...

Страница 60: ...the way into the PCI slot Check that the PCI expansion slot is 5V and compliant with PCI 2 2 or previous version and supports Bus Mastering Check that the Adaptec ATA RAID 1200A card is detected durin...

Страница 61: ...TLA 307075 only gets 7768 MB in Windows 98 s FDISK utility please contact Microsoft for the latest version of FDISK utility or download IBM s Disk Manager DiskGo 2 5 to fix it For Windows 2000 there i...

Страница 62: ...to power OFF the system and replace the problem drive with a functional unit Power ON your system when you are done 4 Select option 3 to select the drive you wish to use for the rebuild and proceed to...

Страница 63: ...ting arrays 3 2 creating deleting spares 3 6 defining 3 1 deleting arrays 3 6 selecting boot disk 3 7 start creation 3 5 bootable controller 1 4 C CMOS setup 2 10 connecting LED activity indicator 2 4...

Страница 64: ...RAID 1 support 1 6 supported levels 1 5 RAID 0 1 5 RAID 0 1 1 6 RAID 1 1 6 S setting up ATA hard drives 2 5 supported RAID levels 1 5 system requirements 1 3 T troubleshooting A 1 U unified array 1 5...

Страница 65: ...Milpitas Boulevard Milpitas CA 95035 2001 2002 Adaptec Inc All rights reserved Adaptec and the Adaptec logo are trademarks of Adaptec Inc which may be registered in some jurisdictions PART NUMBER 512...

Отзывы: