Chapter 20 Time Range
GS2210 Series User’s Guide
169
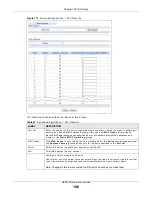
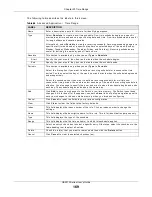
The follow ing t able descr ibes t he labels in t his scr een.
Table 68
Advanced Applicat ion > Tim e Range
LABEL
DESCRIPTION
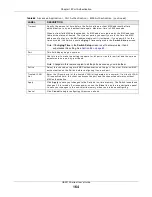
Nam e
Ent er a descr ipt ive nam e for t his r ule for ident ify ing pur poses.
Type
Select Absolu t e t o creat e a one- t im e schedule. One- t im e schedules begin on a specific
st ar t dat e and t im e and end on a specific st op dat e and t im e. One- t im e schedules ar e useful
for long holiday s and vacat ion per iods.
Alt ernat ively, select Pe r iodic t o cr eat e a recur ring schedule. Recur ring schedules begin at a
specific st ar t t im e and end at a specific st op t im e on select ed days of t he w eek ( Sunday,
Monday, Tuesday, Wednesday, Thursday, Fr iday, and Sat ur day ) . Recur r ing schedules ar e
useful for defining t he w or kday and off- w or k hour s.
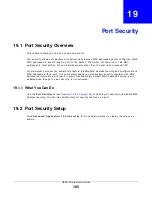
Absolut e
This sect ion is available only w hen you set Typ e t o Absolu t e .
St ar t
Specify t he year, m ont h, day, hour and m inut e w hen t he schedule begins.
End
Specify t he year, m ont h, day, hour and m inut e w hen t he schedule ends.
Per iodic
This sect ion is available only w hen you set Typ e t o Pe r iodic.
Select t he fir st opt ion if you want t o define a r ecur ring schedule for a consecut ive t im e
period. You t hen select t he day of t he w eek, hour and m inut e w hen t he schedule begins and
ends r espect ively.
Select t he second opt ion if you want t o define a r ecur r ing schedule for m ult iple non-
consecut ive t im e per iods. You need t o select each day of t he w eek t he r ecur r ing schedule is
effect ive. You also need t o specify t he hour and m inut e w hen t he schedule begins and ends
each day. The schedule begins and ends in t he sam e day.
Add
Click Add t o save your changes t o t he Sw it ch’s run- t im e m em ory. The Sw it ch loses t hese
changes if it is t ur ned off or loses pow er, so use t he Sa v e link on t he t op nav igat ion panel t o
save your changes t o t he non- volat ile m em or y w hen you ar e done configur ing.
Cancel Click
Ca n ce l t o r eset t he fields t o your pr evious configurat ion.
Clear
Click Cle a r t o clear t he fields t o t he fact or y default s.
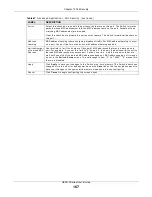
I ndex
This field display s t he index num ber of t he r ule. Click an index num ber t o change t he
set t ings.
Nam e
This field display s t he descr ipt ive nam e for t his r ule. This is for ident ificat ion pur pose only.
Type
This field display s t he t y pe of t he schedule.
Range
This field display s t he t he t im e per iod( s) t o w hich t his schedule applies.
Select an ent r y’s check box t o select a specific ent r y. Ot her w ise, select t he check box in t he
t able heading r ow t o select all ent r ies.
Delet e
Check t he r ule( s) t hat you want t o r em ove and t hen click t he D e le t e but t on.
Cancel
Click Ca n ce l t o clear t he select ed checkbox( es) .


