background image

ZENN

iO

 AVANCE Y TECNOLOGÍA 


vwww.zennio.com 


27 


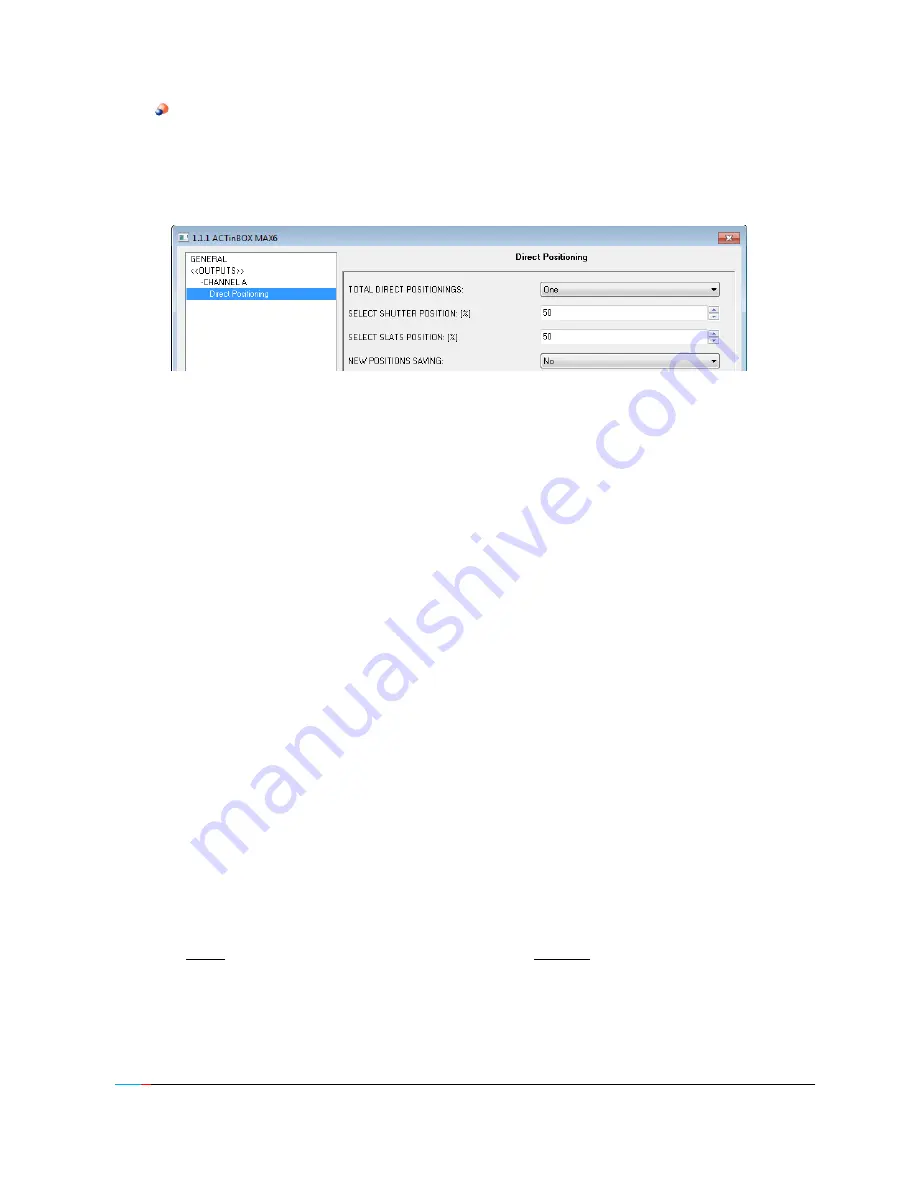
Direct positioning: 

this function allows moving the shutter to a prefixed position via 1-bit 

communication objects (“[CX] Direct Positioning” and “[CX] Direct Positioning 2”). When value 

“1” is received through one of these objects, the shutter will be moved to the parameterized 

position. When a “0” is received, no action is performed. 


Figure 3.16. Direct positioning 

It is possible to configure the following parameters: 


Total direct positionings:

 to choose one or two.  


Select  shutter  position  [%]: 

choose  the  exact  position  to  move  the  shutter  to 

(Remember: 0%=Top; 100%=Bottom).  

For blinds with slats, it will also apperar the parameter "Select Slats position [%]", where 

to established the position to move the slats to when receiving the value "1" through the 

corresponding positioning object. 

If  two  direct  positionings  are  configured,  there  will  be  two  boxes  here:  Select  Shutter 

Position 1 and Select Shutter Position 2. (And the parameter "Select Slats position 1" and 

"Select Slats position 2" for blinds with slats). 


New  positions  saving: 

set  whether  to  allow  (“Yes”)  or  not  new  positions  saving. 

After enabling this option, one or two new communication objects appear (depending on 

the number of positionings): “[CX] Save Position” and “[CX] Save Position 2”. To save a 

new position it is necessary to send a “1” to these objects when the shutter is located in 

the desired position.  

Note:


To save a new position, the shutter must be stopped

.


Summary of Contents for ACTinBOX MAX6

Page 1: ...ACTinBOX MAX6 6 Outputs Actuator ZN1IO AB60 Program version 3 0 Manual edition a PRODUCT MANUAL...

Page 2: ...nfiguration 5 2 1 Individual outputs 5 2 2 Shutter channels 6 2 3 Relay control using IR remote 7 3 ETS Parameterization 9 3 1 Default configuration 9 3 2 Outputs 10 3 2 1 Individual outputs 11 3 2 2...

Page 3: ...s with or without slats Up to 6 individual outputs 10 multi operational logical functions module which may be enabled or disabled independently by means of a communication object Manually operating ov...

Page 4: ...ramming mode and the associated LED 3 lights red Note If this button is held while plugging the device into de KNX bus ACTinBOX MAX6 goes into secure mode The LED blinks red every 0 5 seconds Outputs...

Page 5: ...ers This section is meant to control the outputs by means of a timer setting times for the ON and OFF of the output Scenes Allows running and or saving a specific action over the output s where this f...

Page 6: ...of the shutters in charge of carrying out these actions should be properly connected to each output of the channel to perform the required action The Table 1 1 shows the action carried out by the out...

Page 7: ...pecific position via 1 bit communication object Start up configuration Default or custom All these configuration options are explained in detail in the section 3 ETS Parameterization 2 3 RELAY CONTROL...

Page 8: ...re 2 1 Pressing zones in the IR remote The relay control using IR remote is just an output test of the actuator None of its parameterized functions such as scenes timers etc are taken into account at...

Page 9: ...figuration from which the device parameterization starts When entering for the first time to the parameters edition of ACTinBOX MAX6 the following window will be shown Figure 3 1 Configuration screen...

Page 10: ...ear in the menu on the left side It looks as follows Figure 3 2 Outputs configuration The outputs are grouped in pairs by channels up to 3 named from A to C disabled by default When selecting one of t...

Page 11: ...tus of the output activated or deactivated OX Block allows blocking unblocking the output disable enable its control by sending the values 1 or 0 to the object respectively Note Only the Alarm functio...

Page 12: ...nt through the object OX Timer and the OFF response in the output takes place If no delay is needed please set 0 in this field On Duration time the output remains ON before recovering the OFF status A...

Page 13: ...ponding object before the parameterized time for the timer ends Flashing See figure 3 6 This function is meant for the output to run the sequence ON OFF ON OFF when needed It can be parameterized an O...

Page 14: ...ne is received through the Scenes object the parameterized action for the output will be carried out OFF or ON so it will be possible to create different environments in the installation Besides runni...

Page 15: ...t wanted it will be necessary to receive the opposite value to Trigger through the Alarm object before the cyclical monitoring period ends The cyclical monitoring can be disabled by setting a 0 in thi...

Page 16: ...active alarm Normal depending on what was parameterized on Trigger Value the alarm will be deactivated when the actuator receives a 0 or a 1 through the alarm object Frozen with this method a normal d...

Page 17: ...tion is chosen ETS will show the following window Figure 3 10 Custom Start up configuration Where to configure the following parameters Initial position this field defines the exact initial position f...

Page 18: ...a simple raise lower movement When selecting this kind of shutter 2 communication objects will be enabled CX Move and CX Stop to raise lower and stop the shutter movement respectively Moreover the fo...

Page 19: ...In the next figures it can be seen the windows that appear when configuring an output channel as Shutter no slats and as Blind with slats Figure 3 11 Channel A configured as Shutter no slats Figure 3...

Page 20: ...device receives the order to lower the shutter while this is being raised ACTinBOX MAX6 will stop it for a while security time to later lower it It is recommended to keep the default value in this fie...

Page 21: ...when it is completely down 100 The rest of values represent the intermediate values It can be chosen by parameter whether the shutter position is sent every second or not enabling or not the parameter...

Page 22: ...account that the associated numerical values to learn scenes are in the range 128 191 the values 0 63 are reserved for running scenes Up to 5 scenes can be run and or learnt for each shutter channel...

Page 23: ...ir current position Please see the following example of scenes configuration Example Consider a facility where 3 scenes will be used 4 6 and 18 in ACTinBOX MAX6 to locate the blind with slats in a pre...

Page 24: ...nel is in Alarm 1 status and Alarm 2 occurs Alarm 1 prevails Trigger value set the value 1 or 0 to activate the alarm status An alarm status will be activated when the value set in this field is sent...

Page 25: ...rm is not deactivated any action over the channel outputs will be ignored After a while t2 the alarm is deactivated CX Alarm 0 thus lowering the shutter Before the cyclical monitoring period 3 minutes...

Page 26: ...n this case it will be necessary that the output is manually enabled from another point in the installation End this parameter sets the channel response in one of these statuses when the alarm finishe...

Page 27: ...slats it will also apperar the parameter Select Slats position where to established the position to move the slats to when receiving the value 1 through the corresponding positioning object If two dir...

Page 28: ...ll show the following window Figure 3 17 Custom Start up configuration Where to configure the following parameters Initial position this field defines the exact initial position for the shutter should...

Page 29: ...erent logical functions can be enabled independent of each other which can carry out up to 4 operations each To use any of them it is necessary to enable them in the following ETS window which appears...

Page 30: ...percentage when it is completely open The shutter is in the position down position 100 in percentage when it is completely closed And the slats positioning criteria The slats are in the position up or...

Page 31: ...ain in detail every available option Figure 4 2 Blinds with slats configuration window ETS As seen in figure 4 2 for this type of shutters several times can be parameterized On the one hand the times...

Page 32: ...tion after the blind reaches the desired position or not Example Suppose the parameter Maintain slats positioning when shutter completes motion has been enabled The initial position of the slats is 50...

Page 33: ...d slats can be configured independently Alarms Response Specific position Same as before Direct positioning Configuration of the positions 1 or 2 depending on the parameterized number in percentage of...

Page 34: ...1 0 Last LF 1 bit Data Entry 1 LF 1 bit Data Entry 32 Binary Data Entry 0 1 Binary Data Entry 0 1 34 49 1 byte I W 0 255 0 Last LF 1 byte Data Entry 1 LF 1 byte Data Entry 16 1 byte data entry 0 255 1...

Page 35: ...bytes INDIVIDUAL OUTPUTS 96 101 1 bit I W 0 1 Indifferent Indifferent OX ON OFF N O 0 Open 1 Close relay N C 0 Close 1 Open relay 102 107 1 bit O RT 0 1 Parameteriz Parameteriz OX Status 0 Output Off...

Page 36: ...rsed moving 0 Down 1 Up 120 125 even 1 bit I W 0 1 Indifferent Indifferent CX Direct positioning 1 Go to position 0 No action 120 125 odd 1 bit I W 0 1 Indifferent Indifferent CX Direct positioning 2...

Page 37: ...G A vwww zennio com 37 SECTION NUMBER SIZE IN OUT FLAGS VALUES NAME DESCRIPTION RANGE 1st TIME RESET RESET 153 1 bit O T 0 0 0 Reset 0 Voltage recovery Sending of 0 154 1 bit O T 1 1 1 Reset 1 Voltage...

Page 38: ...38 ZENNIO TECHNICAL DOCUMENTATION BECOME USER http zennioenglish zendesk com TECHNICAL SUPPORT...

Reviews: