When the scope is switched on, the gain of the image intensifier tube goes on in the
medium amplification range. Using the “Plus” and “Minus” buttons, you can now
adapt the gain to the existing lighting conditions.
It is advisable to use a camera tripod (Carl Zeiss tripod, Cat. No. 1206.889) for prolon-
ged observation from one spot. The camera features a1/4 inch thread mount
(fig. 5k)
.
If your tripod has a 3/8 inch connection, use a coin to screw out the insert.
Cutout function
The night scope is provided with protective cutout function to prevent the (recharge-
able) batteries from being discharged too much.
If the supply voltage falls below a defined level, the unit will automatically switch off.
You can switch the scope back on again, but it will again switch off automatically
after approx. 10 seconds.
This is a clear indication that you should charge the rechargeable batteries or replace
the batteries.
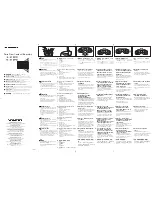
Attaching the carrying strap (fig. 6)
Attach the carrying strap to the eyelet on the eyepiece side and on the opposite side
to the eyelet provided on the strap of the padded pouch.
A threaded-in eyelet is provided on the strap of the padded pouch on the eyepiece
side
(fig. 6)
. Pass the end of the carrying strap first through the strap fastener and
through the eyelet from the outside. Pass the strap back through the fastener and to
the buckle. Adjust the length of the strap and pass the end of the strap along the
strap through the buckle.
Proceed in the same order on the other side of the unit (unused eyelet).
Due to the different fastening points of the carrying strap, you must adjust different
lengths of the strap on both sides to ensure that the neck pad comes to lie in the
position intended and the unit hangs straight in front of you.
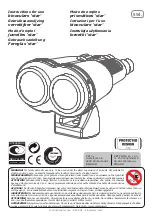
Mounting the protective caps (fig. 7/8)
The protective caps for the eyepiece and the objective lens are mounted unsecured.
If you wish, you can fasten these caps to the unit using a cord.
You can attach the eyepiece protective cap to the carrying strap: Pass the loop of the
cord fully through the loop of the carrying strap on the side opposite to the padded
pouch
(fig. 7)
and open the loop of the cord. Then pass the protective cap through
the loop and tighten the loop.
Use the eyelet on the lens side to fasten the protective cap for the objective lens
(fig. 8)
using a cord.
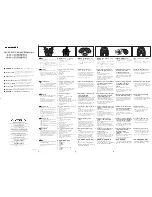
Mounting the padded pouch for left-hand use (fig. 9–13)
Fold out right inside page fully! It is possible to remove the padded pouch from the
right-hand side (status on delivery) to the left-hand side of the unit.
Proceed as follows. Start with the padded pouch completely dismantled (remove all
individual components of the padded pouch).
1. Pass the strap of the padded pouch through the left-hand eyelet of the hand pad
from the inside to the outside. Important: the correct position of the strap buckle
(fig. 9)
.
2. Slip the first strap fastener on the strap.
3. Pass the strap end from the left through the eyelet on the lens side.
4. Pass the strap back through the fastener.
5. Continue pulling the strap until the buckle is in the middle of the hand pad and
the hand pad is approx. 3 cm away from the eyelet on the lens side
(fig. 10)
.
6. Pass the strap back through the left eyelet of the hand pad inward.
7. Pass the strap in the padded pouch underneath the buckle and through the right-
hand eyelet of the hand pad from the inside to the outside
(fig. 10)
.
8. Slip on the second strap fastener.
9. Pass the strap from the left to the right through the eyelet on the eyepiece side.
10. Pass the strap back through the strap fastener.
11. Mount the carrying strap eyelet on the strap.
12. Pass the strap back through the right-hand eyelet of the hand pad inward toward
the strap buckle
(fig. 11)
.
13. Now adjust the hand width (pull at the strap end or loosen the strap).
14. Pass the strap from below through the center slot of the buckle.
15. Pass the strap through the right-hand slot of the buckle from the top down
(fig. 12)
.
16. Stow away the strap end and the buckle in the padded pouch and press the snap
fasteners of the pouch together
(fig. 13)
.
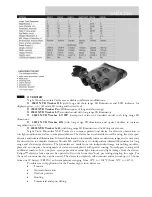
Generation 2 plus
20,000 amplification
5,6 x
62 mm
5 m
146 m
500 m
1,100 g
233 mm
70 mm
100 mm
Image intensifier tube
Magnification
Objective lens dia.
Shortest focusing distance
Field of view at 1,000 m
Range at 3mlx ambient brightness,
with standardized test chart
Weight
Length
Width
Height
Technical Data
Victory NV 5.6 x 62 T* night vision scope