background image

DICOM Gateway

Humphrey Matrix User Manual

2660021138935 Rev. F  2015-11

A-2

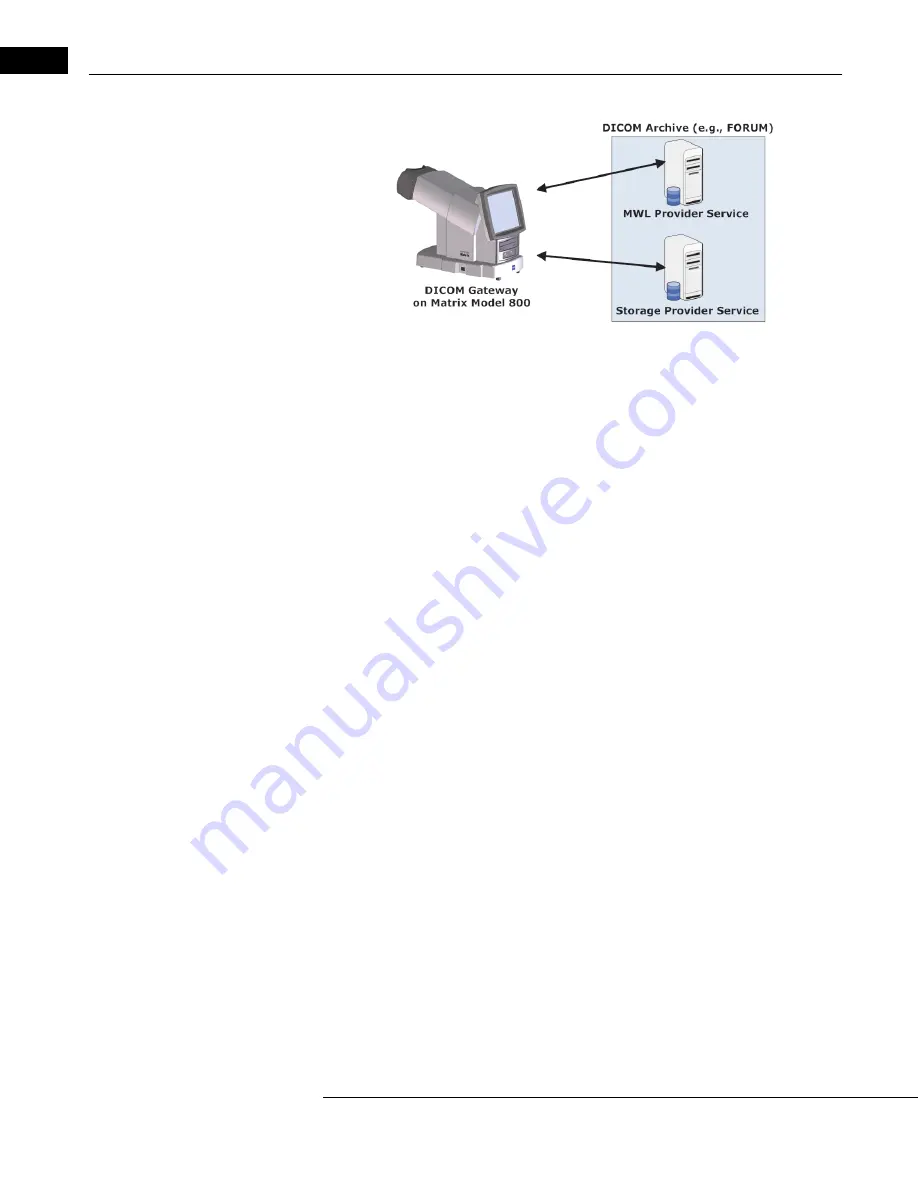
Figure A-1 DICOM Gateway Configuration Diagram

Configuration Overview

The process for your complete DICOM Gateway solution includes the following steps that 
you will need to perform:

1. DICOM Server Setup: Set up your DICOM storage server to recognize the AE Titles of 

your Matrix instruments that will be connecting through the DICOM Gateway. This is a 
potentially complex and time-consuming process whose details depend on your EMR 
and which should only be attempted by someone who has expert knowledge of your 
EMR system (e.g., an IT or DICOM network administrator).

2. Network the Matrix: Configure your Matrix instrument to connect to your network 

with an Ethernet cable. See your IT, EMR/PMS, or PACS administrator and 

(8) 

Networking Configuration

 for more information.

3. Configure DICOM Gateway: Configure the DICOM Gateway to communicate with the 

designated Storage and Modality Worklist servers and perform a connection test. See 

DICOM Gateway Configuration

 on page 

A-3

 for more information.

4. Set Automatic Export of PDF at End of Test: See 

Automatic End of Test Export to 

a DICOM System

 on page 

A-3

 for more information.

5. Use DICOM Gateway: Query your Modality Worklist server for requested exams, 

perform these exams and export them to your DICOM System in ePDF format, either 
automatically, as described in Step 4 above, or manually, by saving them to your 
DICOM System, as described in 

Printing/Saving Test Results

 on page 

6-3

.

Summary of Contents for Humphrey Matrix 800

Page 1: ...User Manual Humphrey Matrix Model 800...

Page 2: ...marks or trademarks of Carl Zeiss Meditec Inc in the United States and or other countries HP and PCL are registered trademarks of Hewlett Packard Company All other trademarks used in this document are...

Page 3: ...patibility EMC 14 Symbols and Labels 17 Protective Packing Symbols 18 Product Labels and Serial Number Location 18 Instrument Disposition 19 2 Setting Up the Instrument 1 Chapter Overview 1 Unpacking...

Page 4: ...cheduled for Today 2 Worklist Patient Conflicts 4 MWL Custom Query Search the Worklist 5 Local Database Search Local Database or Add New Patient 7 OMLocal OfficeMate Practice Management Software 9 Adm...

Page 5: ...tings on the Matrix 13 Add Network Shared Folders 14 Selecting a Subfolder in a Network Share 17 9 Printer Configuration 1 Chapter Overview 1 Introduction 1 Approved Printers 1 Printer Safety 2 Instal...

Page 6: ...1 Configuration Overview 2 DICOM Gateway Configuration 3 Enable DICOM 3 Local Application Entity Settings 4 Remote Application Entities 4 Advanced DICOM Settings 6 Automatic End of Test Export to a DI...

Page 7: ...ve resulted in an instrument that provides rapid clinically validated and user friendly visual field testing Frequency Doubling Technology FDT Frequency Doubling Technology FDT isolates a subset of lo...

Page 8: ...determine the extent of the peripheral visual field of a patient The device is intended to determine the amount of visual field loss in a patient which can then be used to diagnose track the progress...

Page 9: ...ter 11 Specifications Application related warnings are given in this chapter and elsewhere User Profile We assume that users are clinicians with professional training or experience in the use of ophth...

Page 10: ...rated Note This manual provides instructions for System Software Version 8 0 on Model 800 Note For the purpose of this manual a DICOM system Patient Managment System PMS and Electronic Medical Records...

Page 11: ...ovided electronically in Adobe Portable Document Format PDF on the Humphrey Matrix User Documentation CD included in the instrument accessory kit You can view the User Manual PDF using any computer If...

Page 12: ...in isolating the eye for testing and automatically occludes the opposite untested eye A size keyboard with an integrated track pad controls the operation of the instrument A plain paper 8 5 x 11 USB...

Page 13: ...g to local area networks LANs Universal Serial Bus USB Connectors The Universal Serial Bus USB is a standard connector for peripheral devices USB flash drives USB disk drives USB floppy drives USB key...

Page 14: ...the computer interface connector may damage the instrument Patient Response Button Connector On the underside of the base of the Matrix is the Patient Response button connector shown below USB Port R...

Page 15: ...side adjust the height of the chinrest 1 2 3 4 Figure 1 4 Matrix Model 800 with Chinrest Module 1 Chinrest Height adjustment knob 3 Blue right eye marker 2 Keyboard tray Observe tray extension limit...

Page 16: ...tc the complete system must continue to meet the applicable medical requirements of IEC 60601 1 safety standard This standard requires the usage of an Isolation Transformer to power the non medical pe...

Page 17: ...plugged into electrical outlets Tips to Avoid Damage CAUTION Users are not authorized to dismantle or modify the Matrix hardware Only Carl Zeiss Meditec authorized technicians should disassemble or s...

Page 18: ...including peripherals can jeopardize the safety of operators and patients the performance of the instrument and the integrity of patient data it also voids the instrument warranty CAUTION It is possib...

Page 19: ...vers Opening the instrument covers could expose you to electrical and optical hazards and will VOID the warranty CAUTION If a table is available do not reconfigure system components on the table nor a...

Page 20: ...tion electromagnetic emissions The Matrix is intended for use in the electromagnetic environment specified below The customer or user of the Matrix should assure that it is used in such an environment...

Page 21: ...rential mode 2 kV common mode Mains power quality should be that of a typical commercial or hospital environment Voltage dips short interruptions and voltage variations on power supply input lines IEC...

Page 22: ...he compliance level in each frequency range b Interference may occur in the vicinity of equipment marked with the following symbol Radiated RF IEC 61000 4 3 3 V m 80 MHz to 2 5 GHz 3 V m Note 1 At 80...

Page 23: ...um output power not listed above the recommended separation distance d in metres m can be estimated using the equation applicable to the frequency of the transmitter where P is the maximum output powe...

Page 24: ...ument as facing the operator is the product label On the underside of the base of the instrument is the serial number label European Conformity Disposal of the Product within the EU Do not dispose via...

Page 25: ...with the relevant national regulations Disposal of the Product within the EU In accordance with applicable EU guidelines at the time at which the product was brought into the market the product speci...

Page 26: ...Introduction Humphrey Matrix User Manual 2660021138935 Rev F 2015 11 1 20...

Page 27: ...page 2 10 Unpacking Equipment Two equipment boxes are shipped stapped together the smaller box contains the chinrest and keyboard tray Unpack the smaller box first 1 Open the shipping box by carefully...

Page 28: ...e small round connector jack towards the patient end underneath the base of the unit at the center and near the patient response button symbol See Patient Response Button Connector on page 1 8 USB Key...

Page 29: ...the first four tab settings GENERAL TESTING EXPORT and BACKUP to the factory default system settings All user settings on the SYSTEM SETTINGS Screens are backed up with a database backup To restore o...

Page 30: ...to specify the assigning authority of the Patient ID The Issuer of ID should be a practice wide identifier which is the same for all instruments and patient information systems By default the Issuer...

Page 31: ...gs Select to use patient s previous settings Default Working Folder Select the default folder in which each test is saved Folders are provided to allow some user defined sorting of the tests in the da...

Page 32: ...Back Up Test to automatically back up to the default backup location see System Settings Backup on page 2 9 Select Export to automatically export to the default export location see USB Storage Device...

Page 33: ...n menu For Network Share you must have previously added network shared folders to select them here see Add Network Shared Folders on page 8 14 For information on USB storage devices see USB Storage De...

Page 34: ...Share the first shared folder in the SAVED SHARES list will be selected as the Network Share If there are no other shared folders in the list the Network Share will be disabled However it is still se...

Page 35: ...sponding drop down menu For Network Share you must have previously added network shared folders to select them here see Add Network Shared Folders on page 8 14 For information on USB storage devices s...

Page 36: ...connected to the front instrument USB port Connect printers to the bottom USB port When you insert a USB storage device the device is automatically connected after a few seconds and can be selected i...

Page 37: ...k the Choose Selected Directory button and the selected folder appears under the selected USB storage device Figure 2 6 Figure 2 6 USB Folder Selected Note The selected USB folder is remembered after...

Page 38: ...the Matrix You can only safely remove the USB storage device if it is not currently being accessed The message The USB storage device may now be safely removed will be displayed if you can safely remo...

Page 39: ...let then switch the Power Switch O I to the ON I position The system will begin to load the operating software A status bar will indicate progress of the instrument initialization After approximately...

Page 40: ...The screen name is displayed at the top of every screen The bottom of the screen contains the date and time The Shut Down button is also located at the bottom of the screen Only shut down the instrume...

Page 41: ...ackup Perform Backup does a Full Backup of your database in the Database Backup Format fdt2 as well as a backup of system settings and user settings The location of the backup is set in System Setting...

Page 42: ...is selected you may run a test recall previous test s analyze test results revise patient information or delete the patient from the local database To delete a patient from the local database it is n...

Page 43: ...deleted test is only recovered if it is available on a previous database backup Note The Reset button clears all search fields and resets the From and To date fields to default values Note The Issuer...

Page 44: ...FILE FUNCTIONS F4 Screen is where the patient test database is backed up or imported merged or restored User settings can also be restored from a database backup The FILE FUNCTIONS Screen is where ava...

Page 45: ...WAY SHARING and PRINTING Details can be found in System Settings on page 2 3 8 Networking Configuration and 9 Printer Configuration Note The Reset Settings button restores the default settings under t...

Page 46: ...user may view the instrument s system information including system software version SBC Software Version When needed the Install Software Calibration Diagnostics and Logging functions are also access...

Page 47: ...provide qualitative results regarding the patient s visual function Screening tests are typically used for patients where no eye disease has been detected as part of a routine eye examination Thresho...

Page 48: ...ach of the other levels to complete the N 30 screening As a result the screening test time will increase for patients with eye disease The 24 2 5 or 24 2 1 FDT screening test is a screening version of...

Page 49: ...Humphrey Matrix User Manual 2660021138935 Rev F 2015 11 Test Results and Reliability Measures 4 3 Figure 4 1 Full Threshold Test Example...

Page 50: ...or use in general visual field testing and glaucoma management These tests also provide a Glaucoma Hemifield Test that provides a plain language interpretation of the visual field results based on an...

Page 51: ...ent achieved for the test locations with this shading The probability is less than 2 P 2 that a normal subject of the same age would perform at the threshold level that this patient achieved for the t...

Page 52: ...lts may be unreliable Fixation Errors The ratio of the number of times the patient responded to a target placed in the blind spot versus the total number of times fixation was tested i e total number...

Page 53: ...e Patient Eyepiece on the RIGHT side facing the Patient Visor If the Patient Visor is not correctly positioned a popup message will appear on the screen when the Start Test button is pressed 3 Make su...

Page 54: ...tom Query Search the Worklist on page 5 5 OMLocal Only available if using OfficeMate Practice Management Software with the Matrix See OMLocal OfficeMate Practice Management Software on page 5 9 Note T...

Page 55: ...al system date on the Matrix Select the desired patient by clicking on its row to highlight it and then select the Run Test button to start testing Alternatively you may double click anywhere in the p...

Page 56: ...m on page A 7 Worklist Patient Conflicts If no patients in the local database have a matching Patient ID and Issuer of Patient ID as an imported patient but a patient in the local database that does n...

Page 57: ...om Query in the Source drop down menu to perform a custom search of the Modality Worklist by patient information date exam information AE Title and other fields Broad Query and Patient Based Query are...

Page 58: ...n title to see a more detailed description For example Requested Procedure ID is the Scheduled Procedure Step Start Date Select the desired exam by clicking on its row to highlight it and then select...

Page 59: ...column in ascending or descending order by clicking on its column title You can also resize the width of any column by clicking between columns to activate the resizing tool holding down the left tra...

Page 60: ...tively you may double click anywhere in the patient s row to start testing Add New Patient Figure 5 6 Enter New Patient Screen By selecting Local Database from the Source drop down menu a new patient...

Page 61: ...ients Screen OMLocal Using OMLocal allows you to quickly display all patients exams scheduled from OfficeMate Practice Management Software PMS Input of patient data is not required if using OfficeMate...

Page 62: ...t and then select the Run Test to open the TESTING Screen Figure 5 8 and start testing Alternatively you may double click anywhere in the patient s row to start testing Using either method of initiati...

Page 63: ...first eye tested in this screen by selecting the OD RIGHT or OS LEFT buttons above the chart In the TESTING Screen the video eye monitoring will display a live image of the patient s eye to aid in pro...

Page 64: ...mage throughout the test Keeping the pupil perfectly centered for proper alignment is not necessary but it should stay within the circle A very important factor affecting test reliability is the stead...

Page 65: ...the screen to control the test Pause Selecting this button pauses the test When paused the progress bar will say Paused and the Pause button changes to Resume Test Pressing the Resume Test button wil...

Page 66: ...he Operator LCD When the testing for both eyes is completed the results are automatically saved to the instrument s hard drive backed up to a CD if enabled and sent to the default printer if enabled M...

Page 67: ...ple Tests page 6 8 Viewing Test Results You may view and print previous visual field test results for a particular patient by selecting a patient from the VIEW PATIENTS F2 Screen and then selecting th...

Page 68: ...uding Gray Scale Total Deviation dB Probability Plot Pattern Deviation dB Probability Plot Note Only the Total Deviation Probability Plot is available for screening tests You may also select the OD RI...

Page 69: ...se formats PDF saves the test results of the printout in PDF format Portable Document Format from Adobe JPEG saves the test results as a photo image of the printout in JPEG Joint Photographic Experts...

Page 70: ...atically generated for each Note The selected location and format for the Save As dialog is remembered after instrument shutdown The selected Network Share or USB storage device including folder is al...

Page 71: ...on the default working folder or to reassign tests to a different patient select the test s you want and then select Edit Test see Figure 6 4 Figure 6 4 Edit Test Dialog Move to Folder Select Move to...

Page 72: ...nt Dialog Search for the patient you want by entering patient information in the fields provided the patient list is updated automatically You can sort on any column in ascending or descending order b...

Page 73: ...t select a test type from Test Selection and an eye from Select Eye Select Print to print the Overview Plot to the default printer or Save As to save it to a location see Printing Saving Test Results...

Page 74: ...Viewing and Printing Tests Humphrey Matrix User Manual 2660021138935 Rev F 2015 11 6 8 Sample Tests Figure 6 8 N 30 5 FDT Screening...

Page 75: ...Humphrey Matrix User Manual 2660021138935 Rev F 2015 11 Viewing and Printing Tests 6 9 Figure 6 9 N 30 1 FDT Screening...

Page 76: ...Viewing and Printing Tests Humphrey Matrix User Manual 2660021138935 Rev F 2015 11 6 10 Figure 6 10 24 2 5 FDT Screening...

Page 77: ...Humphrey Matrix User Manual 2660021138935 Rev F 2015 11 Viewing and Printing Tests 6 11 Figure 6 11 24 2 1 FDT Screening...

Page 78: ...Viewing and Printing Tests Humphrey Matrix User Manual 2660021138935 Rev F 2015 11 6 12 Figure 6 12 N 30 F FDT Threshold...

Page 79: ...Humphrey Matrix User Manual 2660021138935 Rev F 2015 11 Viewing and Printing Tests 6 13 Figure 6 13 24 2 FDT Threshold...

Page 80: ...Viewing and Printing Tests Humphrey Matrix User Manual 2660021138935 Rev F 2015 11 6 14 Figure 6 14 30 2 FDT Threshold...

Page 81: ...Humphrey Matrix User Manual 2660021138935 Rev F 2015 11 Viewing and Printing Tests 6 15 Figure 6 15 10 2 FDT Threshold...

Page 82: ...Viewing and Printing Tests Humphrey Matrix User Manual 2660021138935 Rev F 2015 11 6 16 Figure 6 16 Macula FDT Threshold...

Page 83: ...Humphrey Matrix User Manual 2660021138935 Rev F 2015 11 Viewing and Printing Tests 6 17 Figure 6 17 24 2 FDT Threshold Overview...

Page 84: ...Viewing and Printing Tests Humphrey Matrix User Manual 2660021138935 Rev F 2015 11 6 18...

Page 85: ...of the backup file is created from the instrument serial number and the date and time of the backup e g SN51111122222_FullBackup_05 11 2010_06 48 44_1 fdt2 Along with backup of test data a database b...

Page 86: ...Screen Figure 7 1 Figure 7 1 File Functions Screen 2 In the Database Backup section select the browse button to select a backup location The Save Location dialog appears Figure 7 2 Figure 7 2 Save Loc...

Page 87: ...ck up the database from each Humphrey Matrix instrument to a different destination 2 In the Database Import Merge section select the browse button to select a database location The Location dialog app...

Page 88: ...patient is detected Note When importing a database if a patient conflict resolution dialog is presented and the user asks for more test details the Issuer of Patient ID IPID may be truncated When tru...

Page 89: ...e System Settings on page 2 3 To restore only the user settings from a database backup 1 Select File Functions F4 to display the FILE FUNCTIONS Screen Figure 7 1 2 In the Restore User Settings section...

Page 90: ...Humphrey Matrix User Manual 2660021138935 Rev F 2015 11 7 6 Note Printer settings are not backed up and therefore not restored Note Information on the Upgrade System function is found under Upgrade S...

Page 91: ...ubleshoot or repair problems with network connectivity Note See your IT System or DICOM network administrator for help in entering correct configuration information Network Capabilities The Matrix Mod...

Page 92: ...the attempt to use a non approved device are not covered under warranty Note Carl Zeiss Meditec does not provide technical support for the use of unapproved third party hardware or software Using the...

Page 93: ...ve or Tape backup unit for offsite data storage Note It is the user s responsibility to protect their exam data from loss by frequent backup of the network server Backup media should be of archival qu...

Page 94: ...ernet port see on page 1 7 Plug the other end of the cable into the 10 100 network switch This switch controls the bandwidth in and out of Matrix Connect another standard network patch cable between t...

Page 95: ...as named Netshare Figure 8 2 Figure 8 2 Right click New Folder Select Sharing and Security 2 Right click on the new folder and then select Sharing and Security as shown in Figure 8 2 3 If you have Sim...

Page 96: ...ple File Sharing disabled the following Netshare Properties dialog opens to the Sharing tab Figure 8 4 Figure 8 4 Netshare Properties Simple File Sharing OFF 4 If you see the Netshare Properties dialo...

Page 97: ...re Dialog Select the Allow checkbox for Full Control as shown in Figure 8 5 so that all checkboxes for Allow are checked Click OK to save changes and close the Permissions for Netshare dialog Note You...

Page 98: ...on of the new group To add one or more users to the group click Add 6 Click Create and then click Close To add a member to the Authenticated Users group 1 Open Computer Management Click Start and then...

Page 99: ...The new folder can be created in any available path on the hard disk drive In the example below the new folder was created by right clicking on the Windows desktop and then selecting New Folder Figure...

Page 100: ...share Properties Sharing Tab 3 Select the Advanced Sharing button If you have User Account Control enabled you will see a User Account Control Windows needs your permission to continue dialog Click Co...

Page 101: ...k OK to save changes and close the Permissions for Netshare dialog 8 Click OK to close the Advanced Sharing dialog 9 Click OK to close the Netshare Properties dialog Note Before a shared folder on a W...

Page 102: ...If you don t see Local Users and Groups double click the Groups folder 4 Click Action and then click New Group 5 Type the group name Authenticated Users and a description 6 Click Add and then type th...

Page 103: ...e IP Address Subnet Mask and Default Gateway fields Matrix Name is a user configurable setting The default value is Matrix serial_number Reboot the instrument and DICOM server if you change the value...

Page 104: ...e Matrix to use for the default Backup and Export locations System Settings Backup on page 2 9 and USB Storage Devices on page 2 10 the Save As location Printing Saving Test Results on page 6 3 and al...

Page 105: ...computer Select Anonymous login if you can log in as a guest guest is automatically entered for the User name and the password is blank Note You may use a simple name for the Computer Name or IP or yo...

Page 106: ...eens System Settings Backup on page 2 9 USB Storage Devices on page 2 10 and Printing Saving Test Results on page 6 3 and all data management functions 7 Database Management 5 If you want to remove a...

Page 107: ...lder for selection Figure 8 15 Choose Directory Dialog Network Share After selecting a subfolder click the Choose Selected Directory button and the selected subfolder appears under the selected Networ...

Page 108: ...Networking Configuration Humphrey Matrix User Manual 2660021138935 Rev F 2015 11 8 18...

Page 109: ...nters The printer does not require external drivers to support these printer languages Note Only native PCL 3 PCL 5 or postscript printers will work with the Matrix Printers that depend on a windows p...

Page 110: ...ugh the Matrix which could result in electrical shock to the patient and or examiner It could also invalidate the system safety approval CAUTION Do not use the printer or the instrument with an extens...

Page 111: ...er shipping box by carefully cutting the packing tape securing the top flaps of the box 2 Remove the printer USB cable power cord printer information and printer software CD for reference only from th...

Page 112: ...sformer you must plug the printer power cord into a different power outlet than the Matrix Note You may need a different power cable with a smaller plug to connect your printer to the power outlet on...

Page 113: ...ngs F5 Printing to display the PRINTING Screen Figure 9 2 Figure 9 2 System Settings Printing Screen Click on a printer to highlight and select it Add Printer Select this button to add a new network o...

Page 114: ...l Tests Overview Analysis Logging Export Sys Info and Diagnostics A green checkmark appears on the printer icon to the left of the printer name when Make Default is checked and the printer is moved to...

Page 115: ...trator for help 6 Select Finish to complete the Network Printer Setup The printer is added to the list of printers available for selection on the PRINTING Screen Figure 9 2 7 If desired select the pri...

Page 116: ...sample page on this printer If a test page does not print make sure you selected the correct Shared Printer and printer Type If needed see your Network Administrator for help 7 Select Finish to compl...

Page 117: ...ONLY There are NO USER SERVICEABLE PARTS INSIDE the Humphrey Matrix instrument Disassembly of the instrument presents a possible ELECTRICAL SHOCK hazard and will VOID the warranty An authorized servi...

Page 118: ...Patient Response button 0000001045678 Patient Response button Holder 0000001054028 Keyboard 2660021142427 Calibration Lens Cap 0000001299290 Table Top Tray 0000001356019 Dust Cover 0000001096628 Power...

Page 119: ...power cord if defective Connect instrument power cord to a working outlet The Humphrey Matrix will turn on but will not boot up to the MAIN MENU Screen Turn the Humphrey Matrix OFF and let sit for 10...

Page 120: ...t both ends Cycle the printer power off on and try again Check the USB cable on a known working USB peripheral if available No paper in the printer Missing or empty ink cartridges Refer to the Printer...

Page 121: ...ly added network shared folders to select them here see Add Network Shared Folders on page 8 14 For information on USB storage devices see USB Storage Devices on page 2 10 Note The upgrade location is...

Page 122: ...1 section Back up the instrument s database prior to upgrading the software Select the browse button to select a backup location and then click the Back Up button For more information see Database Bac...

Page 123: ...ion integrates the software upgrade procedure with pre and post backup functions to help ensure a safe and complete upgrade process See Install Software on page 10 5 for more information The Advanced...

Page 124: ...K to save the file to the selected location For Network Share you must have previously added network shared folders to select them here see Add Network Shared Folders on page 8 14 For information on U...

Page 125: ...elp F6 Calibration Figure 10 5 Figure 10 5 Calibration Screen Before selecting the Calibrate button in the CALIBRATION Screen make sure the Patient Eyepiece is covered with the Calibration Cap Once th...

Page 126: ...rectly The Patient Response button PRB Status is provided to confirm the PRB is properly connected and operating correctly Print Sample Test Keyboard Test and Mouse Test buttons are provided to test t...

Page 127: ...e 10 7 Diagnostics Screen Advanced Note The Network Test reports those devices connected to your network The Share Test reports those shared folders you are allowed to read and write to in System Sett...

Page 128: ...rvice use in troubleshooting any problems Select Help F6 Logging to display the LOGGING Screen Figure 10 8 Figure 10 8 Logging Screen You can export the logs individually select a log from the Log Typ...

Page 129: ...twork shared folders to select them here see Add Network Shared Folders on page 8 14 For information on USB storage devices see USB Storage Devices on page 2 10 For Network Share and USB you can also...

Page 130: ...ect the patient contact surfaces the Forehead Rest Chinrest and Patient Response button as necessary by wiping the surfaces with a soft cloth that has been lightly dampened with 70 Isopropyl alcohol A...

Page 131: ...Hz 200 VA maximum Auxiliary Power Output 115 V 50 60 Hz 50 Watts maximum for printer Power Connection IEC 320 standard power inlet connector for worldwide use Power Cord Approved hospital grade detac...

Page 132: ...atch Trials False Positive Trials False Negative Trials Test Strategy N 30 5 1 Screening 19 4 3 3 0 Supra Threshold 24 2 5 1 Screening 55 2 10 10 0 Supra Threshold N 30 F Threshold 19 4 6 6 3 MOBS 24...

Page 133: ...screening test Reliability Indices Fixation and False Positive Reliability Measures Fixation Monitoring Heijl Krakau method Catch trial contrast 25 Presentation Order Pseudo Random Pattern approximate...

Page 134: ...ser Manual 2660021138935 Rev F 2015 11 11 4 Humphrey Matrix N 30 FDT Tests 8 9x9 10 degree FDT patterns 25 Hz 0 25 cycles degree Horizontal axis offset 1 degree Vertical axis offset 3 degrees 1 degree...

Page 135: ...Rev F 2015 11 Specifications 11 5 Humphrey Matrix N 24 2 55 pts and 30 2 69 pts FDT Tests 5x5 degree FDT patterns 18 Hz 0 5 cycles degree Horizontal axis offset 1 degree Vertical axis offset 3 degrees...

Page 136: ...Humphrey Matrix Macula 16 pts FDT Test and Humphrey Matrix 10 2 44 pts FDT Test 2x2 degree FDT patterns 12 Hz 0 5 cycles degree No horizontal or vertical axis offset in central 4 degrees 1 degree axis...

Page 137: ...e will notify You and any repairs You authorize will be performed at Our normal rates All replaced parts will become the property of ZEISS This Warranty specifically covers the Matrix instrument This...

Page 138: ...R ANY OTHER PARTY INVOLVED IN THE CREATION PRODUCTION OR DELIVERY OF THIS INSTRUMENT OR SOFTWARE COLLECTIVELY REFERRED TO AS CONTRIBUTOR S SHALL BE LIABLE FOR ANY DAMAGE LOSS OF USE OR LOSS OF ANY KIN...

Page 139: ...trix under the terms of this License If the Matrix on which You use the Software is a multi user system this License covers all users on that single system 2 The license is granted solely for the use...

Page 140: ...e transfers You may not sublicense rent or lease the Software 6 ZEISS warrants the operation of the Software only with the operating system for which it was designed Use of the Software with an operat...

Page 141: ...supports archiving patient data such as Picture Archiving and Communication System PACS A DICOM Modality Worklist Provider can be part of an image management system that supports scheduling patients s...

Page 142: ...k the Matrix Configure your Matrix instrument to connect to your network with an Ethernet cable See your IT EMR PMS or PACS administrator and 8 Networking Configuration for more information 3 Configur...

Page 143: ...ble DICOM checkbox is unchecked by default to disable the DICOM Gateway software on the Matrix To enable the DICOM Gateway Software check Enable DICOM When disabled MWL Today s Patients and MWL Custom...

Page 144: ...ts to Remote Application Entities MWL and Storage Provider AE Title Enter your DICOM System s MWL and Storage Provider Application Entity Title Input a total of up to 16 characters text is case sensit...

Page 145: ...are still unsuccessful take the following actions Check with your network administrator to verify that your instrument is connected to the network Retry Make sure the DICOM Modality Worklist and stor...

Page 146: ...hould contact Carl Zeiss Meditec Customer Service for assistance at 1 800 341 6968 Outside the U S contact your local Carl Zeiss Meditec distributor Advanced DICOM Settings We recommend that you use t...

Page 147: ...f Test Action as described in the sections below Note When the ePDF is received by the DICOM system the corresponding scheduled exam for the patient on the Modality Worklist is automatically removed S...

Page 148: ...rt as an Automatic End of Test Action To select Export as an Automatic End of Test Action select System Settings F5 Testing to display the TESTING Screen Select Export in the Automatic End of Test Act...

Page 149: ...Matrix serial port For more information see the Humphrey Matrix Serial Connectivity Kit User Instructions OfficeMate PC Requirements Windows XP ExamWriter version 7 3 or later 9 pin RS 232 port Note...

Page 150: ...OfficeMate PMS Instructions Humphrey Matrix User Manual 2660021138935 Rev F 2015 11 B 2...

Page 151: ...ta Transfer Functions Optical disks can be used for all export and import functions Export and Import Note Most CD R disks are limited to about 48 separate writes It is also a good idea to alternate b...

Page 152: ...atrix software in the usual way except that you select the optical drive CD R W as the location or source drive for data transfer and you insert a compatible disk in the optical drive See 7 Database M...

Page 153: ...is permanent Unrecoverable if not available from a prior backup 168 WARNING Selected test will be permanently deleted from the database Continue User confirmation needed Deleting tests from the datab...

Page 154: ...128 68 24 2 241 Please select a path for the printer Asks the operator to specify the location of the network shared printer This message is no longer used The printer is now selected graphically Ent...

Page 155: ...d prevents normal operation of the system 619 3 Critical Error Factory calibration needed Select Shut Down and then cycle power to restart your instrument and restore normal operation If problem persi...

Page 156: ...Error Codes Humphrey Matrix User Manual 2660021138935 Rev F 2015 11 D 4...

Page 157: ......

Page 158: ...c zeiss com www meditec zeiss com Carl Zeiss Meditec AG Goeschwitzer Strasse 51 52 07745 Jena Germany Phone 49 36 41 22 03 33 Fax 49 36 41 22 01 12 info meditec zeiss com www meditec zeiss com 2660021...

Reviews: