background image

y t  

4 7

DE

x

!

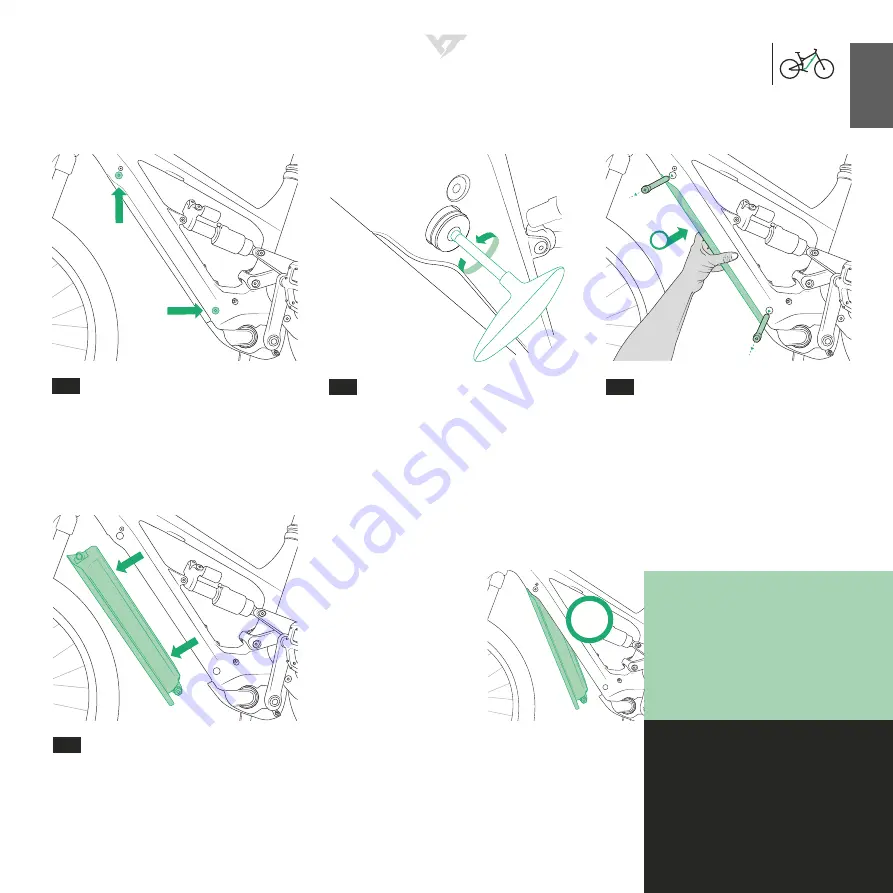
Die Batterie ist mit jeweils einem Bolzen am 
oberen und unteren Ende im Downtube ver-
schraubt.

Entnehme die Batterie parallel zum Unterrohr.
Der Einbau der Batterie erfolgt in umgekehrter 
Reihenfolge: Erst die Batterie in den Rahmen 
setzen, dann beide Bolzen einstecken und 
leicht anziehen. 

Beachte: 

Erst jetzt darfst Du 

die Bolzen festziehen.

 Ziehe unbedingt den 

unteren Bolzen als erstes fest! 

Benutze einen 5 mm Inbus, um die Verschrau-
bung zu lösen. Lasse beide Bolzen vorerst im 
Bike stecken.

Halte die Batterie mit einer Hand fest,  
während Du beide Bolzen entfernst. So ver- 
hinderst Du, dass die Batterie aus dem Rah-
men fällt. Lege die Bolzen anschließend zur 
Seite.

ACHTUNG!

  Die Batterie darf nicht 

rotiert werden, während sie noch von 
einem Bolzen im Rahmen gehalten 
wird. Erst müssen beide Bolzen ent-
fernt werden, bevor Du die Batterie ent- 
nimmst. Andernfalls können Batterie 
und Rahmen beschädigt werden!

AUS- UND EINBAU DER BATTERIE

Halte bei der Montage   
bitte die Drehmoment- 
angaben ein:

Batteriebolzen // 

10 – 15 Nm

11.1

11.4

11.2

11.3

Summary of Contents for E-MTB BASE

Page 1: ...read first then unpack erst lesen dann auspacken D abord lire ENSUITE DEBALLER najpierw przeczytaj następnie rozpakuj rTFM 2 0 2 0 ...

Page 2: ...3 6 7 8 11 12 13 14 15 16 16 17 18 19 20 21 22 24 25 26 28 27 29 30 31 SUSPENSION FORK FEDERGABEL FOURCHE WIDELEC AMORTYZOWANY FRAME RAHMEN CADRE RAMA WHEEL LAUFRAD ROUE KOŁO 33 34 35 36 37 38 23 9 10 32 39 32 ...

Page 3: ...eur arrière Przerzutka tylna 21 Chain Kette Chaîne Łańcuch 22 Crankset Kurbel Pédalier Korby 23 Pedal Pedal Pédale Pedał 24 Crown Gabelkrone Té Korona widelca 25 Stanchions Standrohr Plongeur Rura czołowa 26 Casting Tauchrohr Fourreaux Widelec przedni 27 Stem Vorbau Potence Mostek 28 Brake Lever Bremshebel Levier de frein Dźwignia hamulca 29 Handlebar Lenker Cintre Kierownica 30 Shifter Schalthebe...

Page 4: ...04 yt PUT YOUR TRUST IN YT CHECK ORDERED YOUR BIKE CHECK GOOD TIMES CHECK Good Job congrats thanks for that ...

Page 5: ... up maintenance and repair yourself No need to break out in cold sweat Play it safe and hand the job over to a specialist workshop Or get in touch with us We ll take care of you Our service will stand by your side answering your questions There s only one thing left to say This will happen within the scope of our warranty and liability limitatons and exclusions When dealing with inquiries by phone...

Page 6: ...on then pull them out towards you and place them to the side Pull the wheels upwards out of the box and place them to the side Pull the cover of the BikeBox upwards using the handles Remove the top box Place the frame on the front and rear axle stands Make sure the bike is stable TIP keep the box and the packing materials for potential future shipments of your bike 1 1 1 4 1 2 1 3 1 5 ...

Page 7: ...tom part of the stem clamps ac cording to the manufacturer s specifications Take care not to leave a gap here zero gap Only then should you secure the handlebar with the upper bolts as well Renthal Apex Steerer tube screws 5 Nm Handlebar clamp screws 5 Nm Make sure the clamp gap of the upper screws is even and the handlebar is centered and inserted correctly The adjustment lines will help you with...

Page 8: ...o gap Only then should you secure the handlebar with the lower bolts as well Make sure that the clamp gaps under the low er stem bolts are even and that the handlebar is correctly centered and aligned in the stem there are markings to assist you with this Torque all bolts precisely to the spec indicated by the stem and or handlebar manufacturer E13 Plus Steerer tube screws 5 7 Nm Handlebar clamp s...

Page 9: ... a gap here zero gap Only then should you secure the handlebar with the lower bolts as well Raceface Aeffect Steerer tube screws 8 Nm Handlebar clamp screws at the top 4 Nm underneath 6 Nm Make sure that the clamp gaps under the low er stem bolts are even and that the handlebar is correctly centered and aligned in the stem there are markings to assist you with this Torque all bolts precisely to th...

Page 10: ... 5 mm allen key Use the torque wrench to properly fasten the derailleur bolt Make sure that the tab of the derailleurs rests against the corresponding tab on the derailleur hanger Hold the derail leur firmly in position with your other hand to avoid cross threading and to make sure no gap is left 3 1 1 3 1 2 3 1 3 3 1 4 Rear derailleur screw 8 10 Nm REAR DERAILLEUR ASSEMBLY SHIMANO DEORE XT SLX Pl...

Page 11: ...ble to align the derailleur properly in the next step 5 mm Allen key REAR DERAILLEUR ASSEMBLY SHIMANO DEORE XT DI2 Rear derailleur screw 8 10 Nm Use the torque wrench to tighten the derail leur bolt Make sure that the derailleur tab sits against the corresponding tab on the derail leur hanger Hold the derailleur in place with your second hand to avoid it rotating out of position and leaving a gap ...

Page 12: ...rials from both wheels and place the wheels within easy reach Unscrew the quick release rear axle and re move it together with the rear axle stand Remove the transport spacer from the rear brake caliper and store it for future transport needs 4 1 1 4 1 3 4 1 2 ...

Page 13: ...in on the smallest cog REAR WHEEL ASSEMBLY By pulling the lever outwards you can adjust its position Align the lever handle in the for ward direction along the seatstay to minimize the risk of damage to the lever Place the clutch lever see picture 1 back in the On position to engage the clutch Move the clutch lever to the Off position as indicated in the illustration The On position engages the cl...

Page 14: ...t axle and remove it together with the front axle stand Remove the transport spacer from the front brake caliper and store it for future transport needs Remove the packing materials from both wheels and place the wheels within easy reach 5 1 1 5 1 3 5 1 2 ...

Page 15: ...erly secure the wheel The axle is delivered already adjusted Once the lever is tight and parallel to the stanchion the wheel is secure Please also observe the manufacturer s advice FOX ROCKSHOX TIP Please do not inflate the tires beyond the maximum pressure as indicated on the tire The optimal tire pressure depends on the rider s weight the terrain and personal preferences If you have further ques...

Page 16: ...y using the brake lever clamps Torque the brake clamp bolts to spec 5 6 Nm Use an allen key to install the pedal in the crankarm Grease the threads of the pedal to ensure it can function as intended including future removal Note that there is a left and right hand side pedal The pedal on the non drive side is left threaded and should be tightened in the counter clock wise direction BRAKE SWAP SRAM...

Page 17: ... bike the suspen sion will compress to a certain degree the so called sag The sag value that cor responds to your riding style is best deter mined with a few test rides Test rides and personal preferences will also determine the settings of the compression and re bound speeds of the suspension elements 8 Loosen and remove the shock bolt from the rear shock mount with a 5 mm allen key Remove the Fl...

Page 18: ...d replace the dropper post you must remove the battery and release the ca ble clamp in the downtube The cable must then be re positioned properly and the cable clamp secured again Failure to do so may cause damage to the cable routing of the seat post 10 Light cable Electrical wire Power cable Dropper post Brake cable Shift cable CABLE ROUTING We added a rubber seal for the YT Postman dropper post...

Page 19: ...st Use a 5 mm allen key to loosen the battery bolts Do not remove the bolts yet Hold the battery with one hand while you re move the two bolts This way you avoid hav ing the battery fall out of the frame Place the two bolts to the side ATTENTION The battery must not be allowed to rotate while it is still attached with only one bolt in the frame Always remove both bolts before pulling out the batte...

Page 20: ...port of the battery The correct orientation is indicated by a pin on the plug which prohibits wrongful insertion ATTENTION Fully charge the battery every three months even if the bike is not being used Make sure to close the cover after charging the battery to prevent water ingress and to prolong the service life of your battery 12 1 1 12 1 2 12 1 3 ...

Page 21: ...HARGING THE BATTERY OFF THE BIKE BATTERY STATUS INDICATOR CHARGER STATUS INDICATOR ERROR CODES Deep discharge Charge the battery Temperatureproblem Returnthebatterytoanormaloperatingenvironment Short circuit due to foreign object Remove the foreign object Contact YT service yt industries com The battery has been in use for 5 years or has reached the end of its predetermined lifespan Contact YT ser...

Page 22: ... Use the Shimano tool to insert or remove the cable plugs This is the only way to prevent dam age to the cables COCKPIT FORK STOP Test that the forks stops are working in both directions No contact between the fork and the frame should be possible The fork stops are there to prevent damage to the frame in case of a crash CABLE ROUTING DI2 13 1 13 2 13 3 ...

Page 23: ...cted only displayed when electronic shifting is installed Boost The ideal mode when you need a lot of power for example dur ing steep climbs Range approx 50 km Trail This mode supplies medium power it is perfect for easier climbs or for flat ground Range approx 75 km Eco Use this mode for covering longer distances on flat ground If you don t pedal hard the power from the motor will be reduced and ...

Page 24: ...e parts Using replacement parts from other manufacturers such as brake pads or tires of other dimensions can make your bike unsafe which may lead to a risk of accident In case you do not respect this provision the CE mark and any related warranties are rendered null and void If no original spare parts are available for repairs inform yourself about poten tial replacements in the catalog of the VSF...

Page 25: ...for approximately 2 seconds The LED will light up the Shimano display on the han dlebar will turn off ATTENTION Only turn on your E MTB in neutral mode which means without any pressure on the pedals In case you don t an error code will be displayed Read about what to do in case of an er ror code in the Shimano manual included with your bike TURNING THE BIKE ON AND OFF 14 EN ...

Page 26: ...ox Attach the wheel covers on the side of the brake rotor and then join the two wheels to gether with a zip tie Attach the wheel spacer to the front wheel with a zip tie see illustra tion Attach the sensor cable to the brake mount with adhesive tape Wrap the chain stays and seat stays drive side with foam wrappers and secure them with cable ties Secure the middle part of the chain with a zip tie a...

Page 27: ...KASTEN Remove the cable that is routed through the frame from the display the cable that leads to the motor and unbolt the handlebar from the stem Slide the rubber protector over the brake and dropper post levers and wrap the handlebar as well as the display in protective material Insert the handlebar all the way into the slot provided in the front axle stand Take care not to damage any cables or ...

Page 28: ...plying too much pressure on the pedals This will help protect your drive train components Please choose a safe and familiar terrain for your ini tial test and training rides You can find all you need to know about your bike in our SAFETY FIRST manual as well Familiarize yourself with the bike manual before getting on your bike the first time BEFORE EACH RIDE By nature mountain bikes are placed und...

Page 29: ...safe function of your bike over the long term If you do not possess the necessary specialist knowledge or tools to carry out the required work yourself a trip to the workshop is essential For guidance we have prepared some maintenance information We recommend an initial inspection depending on how hard you ride after 5 to 15 hours of operation This includes Checking the torques on all screws and n...

Page 30: ...der no circumstances should you install rings screw connections clamps or other elements which exert mechanical forces on the carbon tube Never clamp the carbon tube or carbon seat post of your bike on the gripping jaws of a work stand or bike rack Be careful when using U locks under certain circumstances they can cause damage to your frame Seat clamp seat post The prescribed tightening torque of ...

Page 31: ...eries may contain harmful substances which if not properly stored or disposed of could damage the environment and your health In addition batteries contain important raw materi als such as iron zinc manganese or nickel which can be recycled after you return the batteries For this reason you must not dispose of batteries with household waste but must return them after use to a specialty store at a ...

Page 32: ...32 yt YT VERTRAUT BIKE BESTELLT GOOD TIMES GEBUCHT Alles richtig gemacht Glückwunsch danke dafür ...

Page 33: ...trotzdem nicht auf die Kette Kein Grund zu verzweifeln Bieg in einer Fachwerkstatt ab und lass die Andern machen Oder melde Dich einfach bei uns Wir helfen Dir weiter Unser Service wird Dir bei Deinen Fragen zur Seite stehen Eines sei jedoch gesagt Das Ganze passiert im Rahmen un serer Gewährleistungs und Haftungsausschlüsse Bei tele fonischen oder schriftlichen Nachfragen können wichtige Details ...

Page 34: ... vorne aus dem Karton und lege sie auf die Seite Hebe die Laufräder nach oben aus dem Karton und stelle sie auf die Seite Ziehe den Deckel der BikeBox an den dafür vorgesehenen Halterungen nach oben ab Entnehme die Top Box Stelle den Rahmen auf dem Front und Rear Axle Stand ab Achte auf einen sicheren Stand des Bikes TIPP Hebe das Verpackungsmaterial für einen eventuellen Rückversand Deines Bikes ...

Page 35: ...chellen mit dem an gegebenen Anzugsmoment komplett fest Achte darauf dass kein Spalt vorhanden ist zero gap Dann klemmst Du den Lenker mit den oberen Schrauben fest Renthal Apex Schrauben Gabelschaft 5 Nm Schrauben Lenkerklemmung 5 Nm Achte auf einen gleichmäßigen Klemmspalt bei den oberen Schrauben und auf den genauen mittigen Einbau des Lenkers Die Einstelllinien helfen Dir dabei Das Dreh moment...

Page 36: ... gap Dann klemmst Du den Lenker mit den unteren Schrauben fest Achte auf einen gleichmäßigen Klemmspalt bei den unteren Schrauben und auf den ge nauen mittigen Einbau des Lenkers Die Ein stelllinien helfen Dir dabei Das Drehmoment der Schrauben sollte genau den Hersteller richtlinien des Vorbaus und oder Lenkers folgen E13 Plus Schrauben Gabelschaft 5 7 Nm Schrauben Lenkerklemmung 5 7 Nm E13 Base ...

Page 37: ...n ist zero gap Dann klemmst Du den Lenker mit den unteren Schrauben fest Raceface Aeffect Schrauben Gabelschaft 9 Nm Schrauben Lenkerklemmung oben 4 Nm unten 6 Nm Achte auf einen gleichmäßigen Klemmspalt bei den unteren Schrauben und auf den ge nauen mittigen Einbau des Lenkers Die Ein stelllinien helfen Dir dabei Das Drehmoment der Schrauben sollte genau den Hersteller richtlinien des Vorbaus und...

Page 38: ... um es im nächs ten Schritt korrekt ausrichten zu können Inbus 5 mm SCHALTWERKMONTAGE SHIMANO DEORE XT SLX Ziehe die Schraube des Schaltwerks mithilfe des Drehmoment Schlüssels an Achte darauf dass der Anschlag des Schaltwerks auf dem Anschlag des Schaltauges liegt Halte das Schaltwerk mit der anderen Hand fest um ein Verdrehen zu verhindern und damit kein Spalt entsteht 3 1 1 3 1 2 3 1 3 3 1 4 Ha...

Page 39: ...anz fest um es im nächs ten Schritt korrekt ausrichten zu können Inbus 5 mm SCHALTWERKMONTAGE SHIMANO DEORE XT DI2 Halte bei der Montage bitte die Drehmoment angaben der Hersteller ein Schaltwerkschraube 8 10 Nm Ziehe die Schraube des Schaltwerks mithilfe des Drehmoment Schlüssels an Achte darauf dass der Anschlag des Schaltwerks auf dem Anschlag des Schaltauges liegt Halte das Schaltwerk mit der ...

Page 40: ...der und lege die Räder griffbereit zu recht Schraube die Hinterradachse aus dem Rahmen und entferne den Schnellspanner zusammen mit dem Rear Axle Stand Ziehe die Transportsicherung aus dem Sattel der Hinterradbremse Hebe sie für einen erneuten Transport des Bikes auf 4 1 1 4 1 3 4 1 2 ...

Page 41: ...TERRADEINBAU Im herausgezogenen Zustand kannst Du die Position des Hebels verstellen Der Hebel sollte entlang der Sitzstreben nach vorne ausgerichtet sein um eine Beschädigung zu verhindern Stelle den On Off Schalter siehe Bild 1 wieder in die On Position um die Ket tenbewegung zu verringern Stelle den im Bild markierten Hebel in die Off Position um den Einbau des Hinterrads zu erleichtern Die On ...

Page 42: ...t ferne sie zusammen mit dem Front Axle Stand Ziehe die Transportsicherung aus dem Sattel der Vorderradbremse Hebe sie für einen erneuten Transport Deines Bikes auf Entferne die Versandverpackung der beiden Laufräder und lege die Räder griffbereit zu recht 5 1 1 5 1 3 5 1 2 ...

Page 43: ... zu gewährleisten Der Mechanis mus kommt voreingestellt Legst Du den Hebel parallel zum Tauchrohr an ist das Rad gesichert Beachte hierzu auch das Her steller Manual TIPP Bitte befülle die Reifen auf den maxi malen Reifendruck der auf den Reifen steht Dein optimaler Reifendruck steht in Zusammenhang mit Fahrergewicht be fahrenem Gelände und persönlichen Prä ferenzen Bei weiteren Fragen kontaktiere...

Page 44: ... am Lenker Ziehe die Bremsgriffe auf das vorgeschrie bene Drehmoment fest 5 6 Nm Verschraube die Pedale mit einem Inbus schlüssel in der Kurbel Fette die Gewinde der Pedale um eine perfekte Funktion zu gewähr leisten Achte darauf dass es ein linkes und ein rechtes Pedal gibt Das Pedal auf der Nicht Antriebsseite hat ein Linksgewinde und wird gegen den Uhrzeiger sinn zugezogen Ziehe die Schrauben m...

Page 45: ...k befüllt werden Deshalb haben wir Deinem YT eine Dämpferpumpe beigelegt Wie das genau geht erfährst Du in den beigelegten Hersteller Manuals FEDERELEMENTE ACHTUNG Betreibe Dein Bike nie mit zu wenig bzw zu viel Luftdruck Beschädigungen der Gabel oder des Dämpfers sind die Folge Wie das genau geht erfährst Du in den beigelegten Hersteller Manuals Grundlegende Einstellungen Sowohl das Gewicht des F...

Page 46: ...n der Sat telstütze musst Du die Batterie entnehmen und die Kabelklemmung im Downtube öff nen Das Kabel muss entsprechend nach verlegt und die Kabelklemme wieder fest verschraubt werden Achtung Nichtbeachtung kann die Kabel verlegung der Sattelstütze beschädigen 10 Lichtkabel Displaykabel Motorkabel Sattelstütze Bremsleitung Schaltzug KABELFÜHRUNG In der ToolBox findest Du eine Gummidich tung für ...

Page 47: ...mm Inbus um die Verschrau bung zu lösen Lasse beide Bolzen vorerst im Bike stecken Halte die Batterie mit einer Hand fest während Du beide Bolzen entfernst So ver hinderst Du dass die Batterie aus dem Rah men fällt Lege die Bolzen anschließend zur Seite ACHTUNG Die Batterie darf nicht rotiert werden während sie noch von einem Bolzen im Rahmen gehalten wird Erst müssen beide Bolzen ent fernt werden...

Page 48: ...plett einrastet DiekorrekteAusrichtungistdurchei nenPinaufdemSteckervordefiniert Falsches Einstecken wird so verhindert Achte darauf die Dichtung nach dem Laden des Akkus wieder dicht zu verschließen um Eindringen von Wasser zu verhindern und die Lebensdauer des Akkus zu verlängern ACHTUNG Lade den Akku alle drei Monate vollständig auf auch bei Nichtbenutzung 12 1 1 12 1 2 12 1 3 ...

Page 49: ... LED geladen LADEN DER BATTERIE IM AUSGEBAUTEN ZUSTAND STATUSANZEIGE BATTERIE STATUSANZEIGE LADEGERÄT FEHLERCODES Tiefenentladung Akku laden Temperaturproblem BatterieineinenormaltemperierteUmgebungbringen Kurzschluss durch Fremdkörpereinwirkung Fremdkörper entfernen Bitte wende Dich in diesem Fall direkt an service yt industries com Die Batterie ist bereits 5 Jahre in Gebrauch oder hat ihre kalku...

Page 50: ...CHTUNG Benutze das SHIMANO Werkzeug um die Stecker einzu setzen oder zu entfernen Nur so kannst Du Beschädigungen der Ka bel verhindern LENKANSCHLAG Prüfe ob der Lenkanschlag auf beiden Seiten funktioniert Zwischen Rahmen und Gabel darf kein Kontakt herrschen Im Falle eines Sturzes verhindert der Lenkanschlag Beschädigungen am Rahmen KABELVERLEGUNG DI2 13 1 13 2 13 3 ...

Page 51: ...tung in Gebrauch ist Boost Der ideale Modus wenn Du starke Unterstützung brauchst z B bei steilen Bergauffahrten Reichweite ca 50 km Trail Der Modus stellt Dir mittelstarke Unterstützung bereit und ist perfekt wenn Du bequem eine leichte Stei gung hochfahren oder auf ebenem Untergrund fahren willst Reichweite ca 75 km Eco Wenn Du eine lange Strecke auf ebenem Untergrund fährst schaltest Du in dies...

Page 52: ...ACHTUNG Verwende grundsätzlich Original Ersatzteile Verschleißteile von anderen Herstellern wie z B Brems beläge oder Reifen anderer Dimen sionen können Dein Bike unsicher machen Unfallgefahr Bei Abweichun gen erlischt das CE Kennzeichen und seine Garantie Wenn im Reparaturfall keine Original Er satzteile mehr verfügbar sind informiere Dich über den Tauschteilekatalvog des VSF ZIV und des Bundesin...

Page 53: ...der Unterseite des Toptubes für ca 2 Sek Die LED leuchtet nach das Display am Lenker erlischt ACHTUNG Schalte das E MTB nur im unbelasteten Zustand also ohne Druck auf die Pedale ein Bei Nichtbeachtung erscheint ein Fehlercode auf dem Display Wie Du bei einer Fehlermeldung vorgehst liest Du im beigelegten Shimano Manual BIKE AN AUSSCHALTEN 14 ...

Page 54: ...end Laufräder Rahmen und Lenker mit der Top Box Befestige die Wheel Cover auf der Seite der Bremsscheiben an den Laufrädern und siche re beide Laufräder mit einem Kabelbinder an einander Befestige den Wheel Spacer mit ei nem Kabelbinder am Vorderrad siehe Abb Befestige das Sensorkabel mit Klebeband an der Bremsaufnahme Umwickle die Ket ten sowie die Sitzstrebe Antriebsseite mit Schaumstoff und bef...

Page 55: ...e sicher auf Reisen gehen und kommt es heil bei uns an ALLES IM KASTEN Entferne das Kabel das vom Rahmen kommt bzw zum Motor führt vom Display und schraube den Lenker aus dem Vorbau Stülpe den Gummischutz über Brems und Dropper hebel und schütze den Lenker sowie das Dis play mit Schutzfolie Stecke den Lenker senk recht in die Aussparung im Front Axle Stand Achte darauf keine Leitungen zu beschädig...

Page 56: ...chalthebel Schalte ruhig und möglichst ohne großen Druck auf die Pedale um die Antriebs komponenten zu schonen Bitte wähle für Deine ersten Probefahrten und Fahr übungen ein ungefährliches vertrautes Gelände Weitere Informationen zu Deinem Bike findest Du auch in unserer Broschüre SAFETY FIRST Mach Dich mit dem Handbuch vertraut bevor Du das erste Mal aufs Bike steigst VOR JEDEM EINSATZ DEINES MOU...

Page 57: ...Austausch beschädigter Bauteile gewährleistet die dauerhaft sichere Funktion Deines Bikes Falls Du nicht über die nötigen Fachkenntnisse und Werkzeuge verfügst um die anfallenden Arbeiten selbst auszuführen bleibt der Gang in eine Fach werkstatt unerlässlich Für Deine Orientierung haben wir einige Wartungshinweise ausgearbei tet Die erste Inspektion empfehlen wir je nach Beanspruchung nach 5 bis 1...

Page 58: ...lemmungen oder andere Elemente die mechanische Kräfte auf das Carbon Rohr ausüben Spanne Dein Bike nie an einem Carbon Rohr oder einer Carbon Sattelstütze in die Klemmbacken eines Montageständers oder Radtransportträgers Vorsicht auch beim Gebrauch von Bügelschlös sern diese können unter Umständen Deinen Rahmen beschädigen Sattelklemmschelle Sattelstütze Das vorgeschriebene Anzugsmoment der Sattel...

Page 59: ...ALLE DREI MONATE AUF AUCH WENN DU SIE NICHT BENUTZT BATTERIEN DÜRFEN NIEMALS VERBRANNT AUSEIN ANDERGEBAUT UND KURZGESCHLOSSEN WERDEN WENN SICH DIE LEISTUNG DER BATTERIE WESENT LICH VERRINGERT SOLLTEST DU SIE ERSETZEN WÄHREND DES LADENS MUSS SICH DIE BATTERIE AN EINEM GUT BELÜFTETEN ORT BEFINDEN LADE DIE BATTERIE NIEMALS ÜBER EIN VERLÄNGE RUNGSKABEL AUF SONDERN IMMER DIREKT ÜBER EINE SPANNUNGSVERSO...

Page 60: ...60 yt Félicitations et merci FAIRE CONFIANCE À YT C EST FAIT COMMANDER TON NOUVEAU VÉLO C EST FAIT GOOD TIMES C EST FAIT ...

Page 61: ...s prêt pour effectuer le montage l entretien et les réparations toi même Pas de panique Demande sim plement à un atelier spécialisé de t aider Ou bien parle nous en on t aidera Notre équipe technique sera à tes côtés pour te guider et répondre à toutes tes questions Il ne nous reste qu une chose à dire cela concerne notre garan tie Au cours de sollicitations téléphoniques ou par écrit nous ne pouv...

Page 62: ...uis les retirer et les placer les de côté Tirer les roues vers le haut puis les placer de côté Tirer le couvercle du BikeBox vers le haut à l aide des poignets Retirer la boite à carton du haut Positionner le cadre sur les supports des axes avant et arrière Faire attention à la stabilité du vélo CONSEIL garder le carton et les ma tériaux d emballage pour des éven tuels futurs transports du vélo 1 ...

Page 63: ...potence selon les spécifications du fabricant S assu rer de ne pas laisser de fente apparente zero gap Qu après cela procéder au serrage des boulons supérieurs pour attacher le guidon Merci de respecter le couple de serrage préconisé par les fabricants Renthal Apex Vis tige de fourche 5 Nm Vis cintre 5 Nm Veille à une fente régulière entre les brides de serrage et le corps de la potence et à un mo...

Page 64: ...ap Qu après cela procéder au ser rage des boulons inferieurs pour attacher le guidon Les fentes des brides sous les boulons infe rieurs doivent être égales et le guidon doit être correctement centré et aligné des marquages sont là pour t aider Les boulons doivent être serrés selon le couple spécifié par le constructeur du guidon et ou de la potence Merci de respecter le couple de serrage préconisé...

Page 65: ... zero gap Qu après cela procéder au ser rage des boulons inferieurs pour attacher le guidon Merci de respecter le couple de serrage préconisé par les fabricants Raceface Aeffect Vis tige de fourche 8 Nm Vis cintre au dessus 4 Nm dessous 6 Nm Les fentes des brides sous les boulons infe rieurs doivent être égales et le guidon doit être correctement centré et aligné des marquages sont là pour t aider...

Page 66: ...catement le collier rilsan avec une pince coupante puis enlèver le papier bulle ainsi que la mousse protectrice du dérailleur arrière Monter le dérailleur arrière sur la patte de dé railleur clé Allen 5 mm Serrer la vis de dérailleur à l aide d une clé dy namométrique Bien aligner le cran du dérail leur avec celui de la patte de dérailleur Tenir le dérailleur avec ta deuxième main afin d éviter d ...

Page 67: ...lignement du dérailleur dans la prochaine étape clé Allen 5 mm MONTAGE DU DÉRAILLEUR SHIMANO DEORE XT DI2 Merci de respecter le couple de serrage préconisé par les fabricants Rear dérailleur screw 8 10 Nm Serrer le boulon du dérailleur à l aide d une clé dynamométrique S assurer que la butée de la vis du dérailleur repose contre la butée de la patte de dérailleur Maintenir le dérailleur en positio...

Page 68: ...carton d emballage de chaque roue puis placer les roues a porté de mains Démonter l axe de la roue arrière puis enlever le support de l axe Retirer l entretoise de l étrier du frein arrière La conserver pour de futurs transports du vélo 4 1 1 4 1 3 4 1 2 ...

Page 69: ...TAGE DE LA ROUE ARRIÈRE En soulevant le levier tu peux lui changer sa position Le levier doit être orienté vers l avant aligné aves les haubans afin d éviter d être endommagé Placer de nouveau le levier de l embrayage en position On pour l engager Placer le levier de l embrayage en position Off comme indiqué dans l illustration La position On engage l embrayage du dérail leur ce qui rend la manipu...

Page 70: ... axe de la roue avant puis enlever le support de l axe Retirer l entretoise de l étrier du frein avant La conserver pour de futurs transports du vélo Enlever le carton d emballage de chaque roue puis placer les roues a porté de mains 5 1 1 5 1 3 5 1 2 ...

Page 71: ...rche Le mécanisme arrive préajusté en fermant le levier dans le sens des fourreaux de la fourche la bonne pression sera obtenue Se référer aux instructions du fabricant FOX ROCKSHOX CONSEIL Ne pas gonfler le pneu audelà de la pression maximale indiquée sur le pneu La pression optimale dépend du poids du cycliste le terrain ainsi que les préférences personnelles Si tu as d autres questions prend co...

Page 72: ...e serrage Serrer les boulons en respectant le couple préconisé par le fabricant 5 6 Nm Attacher les pédales au pédalier à l aide d une clé allen Graisser légèrement le filetage afin d en assurer le bon fonctionnement Faire at tention à l orientation il y a un pédale de droite et un de gauche La pédale de gauche cote non transmission possède un filetage inversé et doit donc se vis ser à contre sens...

Page 73: ... position assise déjà un certain débattement est nécessaire c est le SAG Tu peux détermi ner la valeur du SAG correspondant à ton style de pilotage en effectuant quelques essais Ce sont tes préférences qui permet tent ensuite de régler au mieux les vitesses de compression et de détente des éléments de suspension 8 Desserrer puis enlever le boulon arrière de l amortisseur avec une clé allen de 5 mm...

Page 74: ... abord enlever la batterie puis desserrer le guide câble dans le tube oblique Le câble doit ensuite être repositionné et le guide câble de nouveau serré Le non respect peut endommager le routage des câbles de la tige de selle 10 Câble de phare Câble de l affichage Câble du moteur Câble tige de selle Câble de frein Câble dérailleur ROUTAGE DES CÂBLES Nous avons rajouté un joint en caoutchouc pour l...

Page 75: ...bas en premier Desserrer les boulons de la batterie à l aide d une clé allen de 5 mm Ne pas enlever les boulons pour le moment Retenir la batterie avec une main pendant que tu retires les deux boulons Cela évite de faire tomber la batterie du cadre Placer les deux boulons de côté ATTENTION La batterie ne doit pas être pivotée alors qu elle est encore attachée avec un seul boulon dans le cadre Il f...

Page 76: ...L orientation correcte est indiquée par une broche sur le connecteur ce qui empêche l insertion erro née Bien refermer le couvercle après avoir char gé la batterie pour éviter une contamination éventuelle par l eau et pour prolonger la durée de vie de la batterie ATTENTION Charger la batterie à 100 tous les trois mois même en cas de non usage du vélo 12 1 1 12 1 2 12 1 3 ...

Page 77: ...tterie chargée CHARGER LA BATTERIE EN DEHORS DU VÉLO INDICATEUR DE D ÉTAT DE LA BATTERIE INDICATEUR DE L ÉTAT DU CHARGEUR CODES ERREUR Déchargement complet Charger la batterie Problèmedetempérature Remettrelabatteriedansunenvironnementnormale Court circuit dû à un objet externe retirer l objet externe Contacter YT service yt industries com La batterie a été en service plus de cinq ans ou elle est ...

Page 78: ... uniquement l outil Shimano pour insérer ou re tirer les fiches des câbles C est l unique façon d éviter d endomma ger les câbles BUTÉES DE FOURCHE Vérifier le bon fonctionnement des butées de la fourche dans les deux directions Aucun contact entre la fourche et le cadre ne doit être possible Les butées sont là pour éviter d endommager le cadre en cas de chute ROUTAGE CÂBLES DI2 13 1 13 2 13 3 ...

Page 79: ...engage affiché uni quement pour les vélos équipés de vitesses électroniques Boost le mode parfait quand tu as besoin de beaucoup de puissance par exemple pendant les montées raides Autonomie env 50 km Trail Ce mode fournit une puissan ce moyenne parfait pour les montées faciles ou du terrain plat Autonomie env 75 km Eco Utiliser ce mode pour couvrir plus de distance en terrain plat Si tu ne pédale...

Page 80: ...pièces de rechange originales Monter des pièces d autres fabricants tels que les plaquettes de freins ou des pneus de dimensions différentes peut rendre ton vélo dangereux ce qui pourrait entrainer des accidents En cas de non respect de cette disposition la marque CE ainsi que ses garanties seront caducs En cas de manqué de pièces de rechan ge originales renseignes toi quant aux alternatives dans ...

Page 81: ...peu près 2 se condes Le LED s allumera l affichage Shima no sur le guidon s éteindra ATTENTION Il faut toujours allu mer ton E MTB en mode neutre c est à dire sans mettre de pres sion sur les pédales Si non un code erreur sera affiché Le ma nuel Shimano fourni avec ton vélo contient des informations concernant les codes erreurs et les actions correctives corres pondantes ALLUMER ET ÉTEINDRE LE VÉL...

Page 82: ...cher les couvre roues du côté des rotors de frein puis joindre les deux roues avec un collier rilsan Attacher l entretoise de roue à la roue avant avec un collier rilsan Fixer le câble du capteur sur la patte du frein avec du scotch Envelopper les bases et les haubans du côté transmission avec des gaines de mousse puis les sécuriser avec des colliers rilsan Joindre le milieu de la chaîne à la base...

Page 83: ...ble qui passe par le cadre en provenance du moteur de l unité d affichage puis détacher le guidon de la potence Glisser les protections en caoutchouc sur les leviers de frein et de la tige de selle puis emballer le guidon ainsi que l unité d affichage dans un matériau protecteur Insérer le guidon jusqu au bout de la fente dans le support de l axe avant prévue à cet effet Faire attention de ne pas ...

Page 84: ...on de ton vélo Pour tes premiers essais et exercices merci de choisir un terrain sans risque que tu connais Tu trouveras toutes les informations concernant ton vélo dans notre brochure SAFETY FIRST Lisbienlemanueldetonvéloavantd effectuer ta première sortie AVANT CHAQUE UTILISATION DE TON VTT Un VTT est par nature très sollicité Les composants du vélo réagissent différemment aux sollicitations sub...

Page 85: ...tuer des révisions régulières un entretien et une maintenance soignés réparer ou échanger rapidement les pièces endommagées de ma nière conforme est le seul moyen de garantir le fonctionnement du vélo sur le long terme en toute sécurité Si tu ne disposes pas des connaissances et des outils nécessaires pour effectuer toi même ces travaux il convient de se rendre dans un atelier spécialisé Nous avon...

Page 86: ...ait cependant être un motif de réclamation POUR UTILISER VOTRE CADRE CARBONE DE FAÇON OPTIMALE Généralités Ne montez en aucun cas des colliers de tension des raccords à vis des brides ou autres éléments qui exerceraient une force mécanique sur le tube de carbone Ne serrez jamais le vélo au niveau d un tube de carbone ou d une tige de selle en carbone dans les mâchoires d un pied de montage ou d un...

Page 87: ...ATTERIES NE DOIVENT JAMAIS ÊTRE BRULÉES DÉSASSEMBLÉES OU COURT CIRCUITÉES QUAND LA PERFORMANCE DE LA BATTERIE BAISSE DE FAÇON SIGNIFICATIVE LA BATTERIE DOIT ÊTRE REMPLACÉE PLACER LA BATTERIE DANS UN ENDROIT BIEN VENTI LÉ POUR LA CHARGER NE PAS CONNECTER LE CHARGEUR AVEC UNE RALLONGE TOUJOURS DIRECTEMENT DANS LA PRISE MURALE INSTRUCTIONS DE CHARGEMENT CONSEILS D UTILISATION Votre cadre carbone doit...

Page 88: ...88 yt ZAUFAŁEŚ YT ZAMÓWIŁEŚ ROWER GOOD TIMES PRZED TOBĄ WSZYSTKO SIĘ ZGADZA Gratulujemy wyboru i dziękujemy ...

Page 89: ... montażem konserwacją lub naprawą Bez paniki Podjedź do specjali stycznego warsztatu i poproś o pomoc Albo po prostu skon taktuj się z nami Chętnie Ci pomożemy Nasz zespół serwisowy z przyjemnością odpowie na Twoje pytania Podkreślamy jednak Wszystko to odbywa się w ramach wyłą czenia gwarancji i odpowiedzialności z naszej strony W przy padku zapytań telefonicznych lub pisemnych może się zdarzyć ż...

Page 90: ... otwartego zamka Następnie wyciągnij pierścienie z kartonu i odłóż na bok Wyjmij koła z kartonu ruchem ku górze i po staw je z boku Chwyć pokrywę BikeBoxa za przeznaczone do tego celu uchwyty i unieś ją w górę Wyjmij Top Box Ustaw ramę na przedniej oraz tylnej podporze osi Upewnij się że rower jest stabilnie usta wiony WSKAZÓWKA Zachowaj opako wanie w celu ewentualnego zwro tu roweru 1 1 1 4 1 2 1...

Page 91: ...em podanego momentu dokręcania Upewnij się że nie ma odstępu Następnie przymocuj kierownicę za pomocą śrub górnych Upewnij się że górne śruby są równomiernie dokręcone i że kierownica jest ustawiona ide alnie pośrodku Pomogą Ci w tym specjalne kreski montażowe Moment obrotowy śrub powinien dokładnie odpowiadać wytycznym producenta mostka i lub kierownicy Podczas montażu prosimy zachować wartość mo...

Page 92: ...ie przymocuj kierownicę za pomocą śrub dolnych Upewnij się że dolne śruby są równomiernie dokręcone i że kierownica jest ustawiona ide alniev pośrodku Pomogą Ci w tym specjalne kreski montażowe Moment obrotowy śrub powinien dokładnie odpowiadać wytycznym producenta mostka i lub kierownicy Podczas montażu prosimy zachować wartość momentu obrotowego PODANĄ PRZEZ PRODUCENTA E13 Plus Śruby trzonu wide...

Page 93: ...erownicę za pomocą śrub dolnych Upewnij się że dolne śruby są równomiernie dokręcone i że kierownica jest ustawiona ide alniev pośrodku Pomogą Ci w tym specjalne kreski montażowe Moment obrotowy śrub powinien dokładnie odpowiadać wytycznym producenta mostka i lub kierownicy Podczas montażu prosimy zachować wartość momentu obrotowego PODANĄ PRZEZ PRODUCENTA 2 1 1 2 1 2 2 1 3 2 1 4 MONTAŻ KIEROWNICY...

Page 94: ... z ramą klucz imbusowy 5 mm MONTAŻ PRZERZUTKI SHIMANO DEORE XT SLX Przykręć śrubę przerzutki kluczem do po miaru momentu obrotowego Upewnij się że ogranicznik przerzutki spoczywa na ogra niczniku haka łączącego z ramą Przytrzymaj przerzutkę drugą ręką tak aby zapobiec jej przekręceniu się pozwoli to uniknąć po wstania odstępu 3 1 1 3 1 2 3 1 3 3 1 4 Śruba przerzutki 8 10 Nm Podczas montażu prosimy...

Page 95: ...go przerzutkę z ramą klucz imbusowy 5 mm MONTAŻ PRZERZUTKI SHIMANO DEORE XT DI2 Podczas montażu prosimy zachować wartość momentu obrotowego PODANĄ PRZEZ PRODUCENTA Śruba przerzutki 8 10 Nm Przykręć śrubę przerzutki kluczem do po miaru momentu obrotowego Upewnij się że ogranicznik przerzutki spoczywa na ogra niczniku haka łączącego z ramą Przytrzymaj przerzutkę drugą ręką tak aby zapobiec jej przek...

Page 96: ...ia z obydwu kół i przygotuj koła do montażu Wykręć oś tylnego koła z ramy i wyjmij szyb kozamykacz wraz z podporą tylnej osi Zdejmij osłonę transportową z zacisku ha mulca tylnego koła Zachowaj ją na wypadek konieczności ponownego transportu roweru 4 1 1 4 1 3 4 1 2 ...

Page 97: ...ONTAŻ TYLNEGO KOŁA Po wyjęciu możesz zmienić ustawienie dźwi gni Dźwignia powinna być skierowana w przód wzdłuż górnej rury tylnego trójkąta pozwoli to uniknąć uszkodzenia Przestaw przełącznik On Off patrz rys 1 ponownie do pozycji On aby ograniczyć przemieszczanie się łańcucha Ustaw zaznaczoną na rysunku dźwignię w pozycji Off aby ułatwić montaż tylnego koła Ustawienie w pozycji On powoduje amort...

Page 98: ...go koła i zdejmij ją wraz z podporą przedniej osi Zdejmij osłonę transportową z zacisku hamul ca przedniego koła Zachowaj ją na wypadek konieczności ponownego transportu roweru Zdejmij elementy opakowania z obydwu kół i przygotuj koła do montażu 5 1 1 5 1 3 5 1 2 ...

Page 99: ...równolegle do widelca powoduje zabezpieczenie koła Pamiętaj również o zapoznaniu się z instrukcją pro ducenta FOX ROCKSHOX WSKAZÓWKA Napompuj opony stosując maksymalną wartość ciśnienia podaną na oponach Ciśnienie powietrza w oponach ma znaczący wpływ na zachowanie ro weru podczas jazdy Optymalna wartość ciśnienia w oponach zależy bezpośrednio od Twojej wagi ciała terenu po którym będziesz jeździć...

Page 100: ...wyty hamulców z uwzględnie niem wskazanego momentu obrotowego 5 6 Nm Przykręć pedały kluczem imbusowym do kor by Nasmaruj gwinty pedałów aby zapewnić ich optymalne funkcjonowanie Upewnij się że lewy i prawy pedał zostały zamontowane po odpowiedniej stronie roweru Pedał od strony przeciwnej do napędu ma lewy gwint i należy go wkręcić w kierunku przeciw nym do ruchu wskazówek zegara Przykręć śruby z...

Page 101: ...nego jako SAG W przypadku rowerów Enduro SAG powinien wynosić25 30 całkowitegoskoku Dokładną wartośćSAG taką którabędzieodpowiadać indywidualnemu stylowi jazdy najlepiej jest ustalićodbywająckilkajazdpróbnych Wypró bowanie roweru w rzeczywistych warunkach pozwoli Ci również ustawić prędkość ściska nia i rozciągania elementów sprężynowych zgodnie z własnymi preferencjami 8 Poluzuj i wykręć sworzeń ...

Page 102: ...m sztycy należy wy jąć akumulator oraz otworzyć zacisk kabli w dolnej rurze ramy Następnie należy ponownie odpowiednio umieścić kabel i mocno dokręcić zacisk Uwaga Niezastosowanie się do tych instrukcji może spowodować uszkodzenie kabli w sztycy 10 Kabel do oświetlenia Kabel wyświetlacza Kabel silnika Sztyca Przewód hamulcowy Linka przerzutki UMIESZCZENIE KABLI W zestawie ToolBox znajdziesz gumową...

Page 103: ...worzeń Poluzuj śruby za pomocą klucza imbusowe go 5 mm Pozostaw na razie oba sworznie w rowerze Przytrzymaj akumulator mocno jedną ręką a drugą wyjmij oba sworznie Pozwoli to unik nąć wypadnięcia akumulatora z ramy Odłóż sworznie na bok UWAGA Nie wolno obracać akumu latora dopóki jest on przymocowany do ramy za pomocą sworznia Przed wymontowaniem akumulatora należy najpierw wyjąć oba sworznie W pr...

Page 104: ... ułożenie Pozwala to uniknąć niewłaściwego włożenia wtyczki ŁADOWANIE AKUMULATORA PO ZAMONTOWANIU Pamiętaj aby po naładowaniu akumulatora dokładnie zamknąć zatyczkę pozwoli to uniknąć przedostania się wody do środka oraz wydłużyć żywotność akumulatora UWAGA Co trzy miesiące całko wicie naładuj akumulator również wtedy gdy nie jest on używany 12 1 1 12 1 2 12 1 3 ...

Page 105: ... AKUMULATORA WSKAŹNIK POZIOMU NAŁADOWANIA ŁADOWARKI 76 100 51 75 26 50 11 25 0 10 KODY BŁĘDÓW Całkowite rozładowanie Naładuj akumulator Problem dotyczący temperatury Przenieś akumulator w miejsce o tempe raturze pokojowej Spięcie na skutek przedostania się ciała obcego Usuń ciało obce W takim przypadku prosimy o bezpośredni kontakt pod adresem service yt industries com Akumulator jest w użyciu od ...

Page 106: ... trybów Łopatkowy przełącznik trybów UWAGA Do włożenia lub wyjęcia wtyczek posłuż się narzędziem SHI MANO Tylko w taki sposób możesz zapobiec uszkodzeniu kabli KOKPIT OGRANICZNIK RUCHU KIEROWNICY Sprawdź czy ogranicznik działa z obu stron Rama nie powinna stykać się z wi delcem Ogranicznik zapobiega uszkodze niom ramy w razie upadku UŁOŻENIE KABLI DI2 13 1 13 2 13 3 ...

Page 107: ...o w przypadku stosowania elektronicznego wybo ru biegów Boost Idealny tryb w sytuacji gdy potrzebne jest Ci mocne wsparcie np podczas jazdy pod górę na stromej pochyłości Zasięg ok 50 km Trail Tryb ten zapewnia średnie wsparcie i doskonale sprawdza się w sytuacji gdy chcesz komfortowo wjechać na niezbyt strome wzniesie nie lub przemieszczać się po równym terenie Zasięg ok 75 km Eco Przełącz rower ...

Page 108: ...ginalne części zamienne Ulegające zużyciu części pochodzące od innych pro ducentów np okładziny hamulcowe lub opony o innych wymiarach mogą zmniejszyć bezpieczeństwo jazdy stwarzając ryzyko wypadku Niezasto sowanie się do tych wymogów spow oduje unieważnienie znaku CE oraz gwarancji Jeśli w razie konieczności naprawy oryginalne części zamienne nie będą już dostępne zasięgnij informacji w katalogu ...

Page 109: ...od spodu górnej rury przez około 2 sekundy Dioda LED będzie się żarzyć a wyświetlacz na kierownicy zgaśnie UWAGA Włączaj E MTB tylko w stanie braku obciążenia tzn bez wywierania nacisku na pedały W przeciwnym razie na wyświe tlaczu pokaże się kod błędu Z załączonych instrukcji Shimano dowiesz się jak postąpić w razie wystąpienia błędu WŁĄCZANIE WYŁĄCZANIE ROWERU 14 PL ...

Page 110: ...Top Box Attach the wheel covers on the side of the brake rotor and then join the two wheels to gether with a zip tie Attach the wheel spacer to the front wheel with a zip tie see illustra tion Attach the sensor cable to the brake mount with adhesive tape Wrap the chain stays and seat stays drive side with foam wrappers and secure them with cable ties Secure the middle part of the chain with a zip ...

Page 111: ...M KASTEN Remove the cable that is routed through the frame from the display the cable that leads to the motor and unbolt the handlebar from the stem Slide the rubber protector over the brake and dropper post levers and wrap the handlebar as well as the display in protective material Insert the handlebar all the way into the slot provided in the front axle stand Take care not to damage any cables o...

Page 112: ...plying too much pressure on the pedals This will help protect your drive train components Please choose a safe and familiar terrain for your ini tial test and training rides You can find all you need to know about your bike in our SAFETY FIRST manual as well Familiarize yourself with the bike manual before getting on your bike the first time BEFORE EACH RIDE By nature mountain bikes are placed und...

Page 113: ... safe function of your bike over the long term If you do not possess the necessary specialist knowledge or tools to carry out the required work yourself a trip to the workshop is essential For guidance we have prepared some maintenance information We recommend an initial inspection depending on how hard you ride after 5 to 15 hours of operation This includes Checking the torques on all screws and ...

Page 114: ...der no circumstances should you install rings screw connections clamps or other elements which exert mechanical forces on the carbon tube Never clamp the carbon tube or carbon seat post of your bike on the gripping jaws of a work stand or bike rack Be careful when using U locks under certain circumstances they can cause damage to your frame Seat clamp seat post The prescribed tightening torque of ...

Page 115: ...ice yt industries com WHEN NOT IN USE THE BATTERY SHOULD BE RECHARGED EVERY THREE MONTHS AT A MINIMUM BATTERIES SHOULD NEVER BE BURNED DISASSEMBLED OR SHORT CIRCUITED WHEN THE PERFORMANCE OF THE BATTERY IS SIGNIFICANTLY REDUCED THE BATTERY SHOULD BE REPLACED PLACE THE BATTERY IN A WELL VENTILATED AREA FOR CHARGING NEVER PLUG THE BATTERY CHARGER INTO AN EXTENSION CORD ALWAYS CONNECT IT DIRECTLY TO ...

Page 116: ... China Japan Canada Mexico New Zealand Norway Philippines Switzerland Singapore South Korea Taiwan USA L i v e u n c a g e d r YT INDUSTRIES GmbH Pilatus Campus 9 91353 Hausen Germany Phone 49 0 9191 73 63 05 0 service yt industries com yt industries com 2019 10 00 41019 00 00 ...

Reviews: