background image


32


4. Operating procedure 

Programming Method 


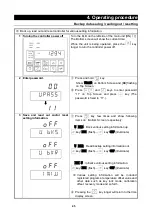
NO 

Indication 

Operating procedure 


[

PROG

] flashes.   


 The PROGRAM lamp flashes. 


[

USED

]  means  that  the  program  has  already  been 

registered. 


  [

1

] of 

P01

:

0

flashes. 


  Makes [

1

] of 

P0

1:

01 flash.


  Input as [P0

2:

01

]. 


1-1 

Inputting  [

P02:

**

]  of  program  pattern 

02 


[

2

]  of 

P0

2

:01

  flashes  and  the  Top  screen  shows 

[

----

]  which  means  any  programs  are  not 

registered. 


Summary of Contents for FP102

Page 1: ...er only In order to use this Equipment properly please read this Instruction Manual and Warranty Card thoroughly before use Keep them in safe place close to this Equipment so that you can refer to them any time Warning Please read the important warning notes in this Manual carefully and thoroughly and get the good understanding of their contents before using this Equipment Yamato Scientific Americ...

Page 2: ...rogram operation 27 How to copy or delete programs 37 About the wait function 39 Setting key lock mode 40 Calibration offset 41 Setting the recovery mode 42 Resetting integrated CO2 volume and CO2 emission factor 43 Backup data saving reading out resetting 45 Monitoring data 46 Independent Overheat Prevention Device 48 5 Handling precautions 50 Warning and caution 50 Warning and caution 51 Warning...

Page 3: ...pecifications 60 Specifications 60 11 Accessory 62 List of accessories 62 List of optional settings 63 12 Wiring diagram 64 FP102 Wiring diagram 64 FP302 Wiring diagram 65 FP312 Wiring diagram 66 FP412 Wiring diagram 67 Wiring diagram part symbols 68 13 List of dangerous substances 69 14 Standard setup manual 70 ...

Page 4: ... intoxication that may leave after effects or require hospitalization or outpatient visits for a long time Note 2 Minor injury means a wound or an electrical shock that does not require hospitalization or outpatient visits for a long time Note 3 Property damage means damage to facilities devices and buildings or other properties Meanings of symbols This symbol indicates a matter urging user to fol...

Page 5: ...neral Cautions Caution Electrical Shock Caution Burns Caution Heating Container without water Caution Water Leak Caution For water only Caution Toxic Chemicals Prohibitions General Prohibited Actions No open flame Do not disassemble Do not touch Compulsions General Mandatory Actions Connect grounding wire Leveled Installation Disconnect Power Regular Inspection ...

Page 6: ...ual risk map Contact us when the caution texts are illegible because the nameplate has peeled off or characters are eliminated We will send you a new name plate for value Safety sign Burning Caution ratings sticker Warning sticker ...

Page 7: ...ace that may be subject to splashes of liquid Section 2 6 8 Warning Explosion or fire Do not use the unit in a flammable or an explosive atmosphere Section 2 7 9 Warning Fire or electrical shock Connect the power supply to the dedicated distribution board Section 2 8 10 Warning Fire or electrical shock Take care for handling of the power cord Section 2 9 11 Warning Fire or electrical shock Be sure...

Page 8: ...tion 5 25 29 Warning Injury Take care not to allow your finger to be pinched in the fan at the back of the unit Section 5 28 30 Warning Fire or electrical shock Inspect the ELB and the standalone overheat preventive unit at regular intervals Section 5 29 During inspection and maintenance Degree of risks Details of risks Protective measures to be implemented by the machine users Relevant chapters 3...

Page 9: ...curred and unexpected trouble and malfunction may be happened Weight of this Equipment is as follows The container weight is approx 29kg for FP102 approx 43kg for FP302 312 and approx 51kg for FP412 Use cargo handling equipment for carrying and installation Two or more people shall be necessary when transporting by humans 3 Implement safety measures when installing the unit Earthquakes or unexpect...

Page 10: ...A or more ELB capacity 15A FP412 AC220V single phase 50 60Hz 18A or more ELB capacity 20A The operational voltage range is 10 the voltage range where the specified performance is guaranteed is rating 5 the frequency is rating 1 Check line voltage of its receptacle switch board of facilities and or whether utilize the same line with other equipments or not if this Equipment does not start up operat...

Page 11: ...ing wire green of ground adaptor to ground terminal on switch board of facilities 11 Must connect grounding wire properly FP302 FP312 FP412specification Require to ground by Electrical Equipment Technical Standards Section 19 calss D in Japan if grounding terminal is not provided Please contact with local dealer local electrician or Yamato Customer Service Center Connect the terminals firmly to sw...

Page 12: ...nor modify this Equipment Those actions may cause this Equipment malfunction fire or electric shock 13 Place specimens on the furnace floor plate When placing specimens in the furnace first put the floor plate on the bottom in the furnace on which specimens will be placed Placing specimens directly may damage the furnace body or cause a fire ...

Page 13: ...andle Door Radiation port FP412 only Caution nameplate Operation panel Front Back Power cord FP302 312 412 ELB Radiation port Cooling fan Standalone overheat preventive unit Exhaust port Installation port of the exhaust unit Power cord FP102 only Radiation port ...

Page 14: ...11 3 Names and Functions of Parts Structure diagram Side Furnace body Door Door furnace body Exhaust port Ceiling heater Side heater Control sensor Overheat preventive sensor Cooling fan ...

Page 15: ...ion mode is selected 11 PROGRAM Lamp lluminate in the Program operation mode 12 AUTO START Lamp lluminate in the Auto start mode 13 AUTO STOP Lamp lluminate in the Auto stop mode 14 MODE key Use at changing Operation Mode among No 10 thru No 13 on the Panel 15 Controller POWER key Turn Idle State Controller is sleeping or Standby State Controller is awaking of Keys except MENU Key by pressing and ...

Page 16: ...Check if the ELB functions properly See Maintenance method on P 54 Chapter 6 Check ELB performance once a month or before continuous long term operation Tick current time on Bottom Screen of Control Panel at ELB ON 3 Check the Independent Overheat Preventive device Make sure to set IOPD temperature more than 100 higher of Target Temperature in the furnace Check IOPD performance before continuous l...

Page 17: ...g on page 45 Set up date time properly in accordance with local time after replacing with new battery 1 Turn on the controller Turn on Earth Leakage Breaker ELB on the right side of this Equipment Bottom Screen of the controller indicate clock time This is Idle State of this Equipment Press and hold key to display standby screen This is Standby State of this Equipment Indicate read temperature in ...

Page 18: ...ss key twice to get back to initial screen after completion of those settings Buzzer function selection 1 Select buzzer function Press key and key to display bUZZ on Bottom Screen with same process of clock time setting described in 2 and then press key Select one from three types of buzzer function with keys and then press key ON Activate clicking sound for all keys and beeping sound for alarm Se...

Page 19: ...CK Setting time Selecting PROGRAM Setting target temp Setting clock time Setting time To stop To cancel To check setting time clock time during operation To check program content during operation Timer starts time counting once the read temperature reached to the target temperature PRoG flashing Inputting program patarn Setting target temp Go to next step Setting time Programming method Setting re...

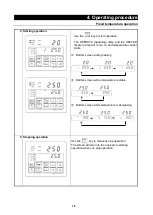
Page 20: ...op Screen and indicate target temperature on Bottom Screen The fan motor will start 2 Set to the fixed temperature mode Press key to turn FIXED TEMP Fixed Temperature mode lamp on Fixed Temperature mode would be selected at first time operation After that most latest operated mode is selected 3 Set a temperature Press key Then flash changeable digits on Bottom Screen Shift to flashing digit with k...

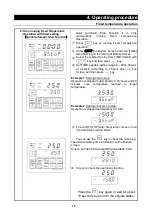
Page 21: ... and the HEATER heater lamp will come on and temperature control starts Bottom screen during heating Bottom screen while temperature is stable Bottom screen while temperature is decreasing 5 Stopping operation Use the key to manually stop operation The screen will return to the one before starting operation when you stop operation ...

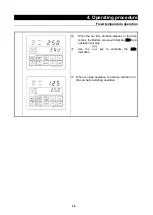
Page 22: ...ble setting range 0 99hr 59min or CLOCK according to 24 hour time on Top Screen and then press key Example 1 Setting time to stop Operation is stopped automatically in 35 hours and 30 minutes once temperature reached to target temperature Example 2 Setting clock time to stop Operation is stopped automatically at 15 00 The AUTO STOP Auto Stop lamp comes on and the Auto Stop function starts You can ...

Page 23: ...ration When the set time duration elapses or the time comes the Bottom screen will indicate END and operation will stop Use the key to eliminate the END indication When you stop operation the screen will return to the one before starting operation ...

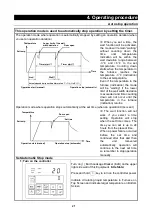
Page 24: ...operation stops automatically at the set time when an operation time is set The wait function will not work if you select a time setting Operation will stop when the set time comes The time you can set is up to 24 hours from the present time When a power failure occurred before the set time and continued after that and then the unit recovered automatically operation will continue to the next set t...

Page 25: ...e to stop Press key Select stop method from TIME CLOCK with keys and then press key Set TIME capable setting range 0 99hr 59min or CLOCK according to 24 hour time on Top Screen and then press key Set target temperature on Bottom Screen and then press key Example 1 Setting running time Operation is stopped automatically in 35 hours and 30 minutes once temperature reached to 250 of target temperatur...

Page 26: ...information on the Bottom screen Screen to check the remaining operation time Screen to check the operation stop time Press the key again or wait for about 10 seconds to return to the original status 5 Cancelling operation When the set time duration elapses or the time comes the Bottom screen will indicate END and operation will stop Press the key to eliminate the END indication When you stop oper...

Page 27: ...r Standby State Indicate circulating liquid temperature in the furnace on Top Screen and indicate target temperature on Bottom Screen 2 Select Automatic Start mode Press key to turn FIXED TEMP Fixed Temperature mode and AUTO START Automatic Start mode lamp on Fixed Temperature mode would be selected at first time operation After that the latest operated mode is selected 3 Set target temperature an...

Page 28: ...e at 15 00 4 Starting operation Press key to be standby mode for starting operation Press key to be standby mode for starting operation The Top screen shows the present temperature in the furnace while the Bottom screens shows the operation wait duration and the operation start time When you have selected a wait time counting down of the set time starts You can check the set temperature on the Bot...

Page 29: ...ge its status from flashing to staying on as well as the HEATER Heater lamp comes on and temperature control will start You cannot use the Quick auto stop function for the Auto start operation 5 Stopping operation Use the key to manually stop operation The screen will return to the one before starting operation when you stop operation ...

Page 30: ...method Create as many as steps up to 99 at maximum and save programmed pattern data up to 99 in total For example 11 program patterns will be stored at maximum if each pattern is programmed 9 steps The number of steps in the repeat interval will be the number of the steps set in the registration part irrespective of the number of repetitions 2 Select program mode Press key to turn PROGRAM Lamp on ...

Page 31: ... operation Never run its cycle if END is not set at the end step in the program Check again that program setting if cycle do not start You can check the program pattern number the step number or the remaining operation time being executed on the Bottom screen with the key during operation Screen to check the number of a program pattern being executed Screen to check the number of a program step be...

Page 32: ... 5 Cancelling program operation When the set program ends the Bottom screen shows END and operation will stop You can eliminate the END indication using the key The screen will return to the one before starting operation when you stop operation ...

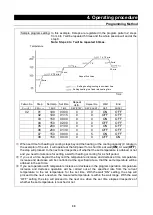
Page 33: ...r the set temperature is attained or not and you need to take care for setting a wait for heating or cooling for a short period If you set a time beyond the beyond the temperature increase and decrease time temperature increase and decrease will be controlled at the specified rate so that the set temperature will be attained in the set time If you set operation with temperature increase or decreas...

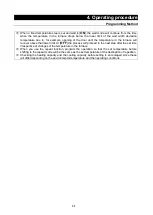
Page 34: ...ecover above that lower limit At OFF the process will proceed to the next step after the set time irrespective of changes of the temperature in the furnace When you use the repeat function program the operation so that the set temperature before shifting to the repeat mode will be the same as the set temperature of the destination of repetition Checking the heating capacity and the cooling capacit...

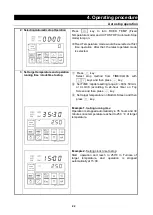
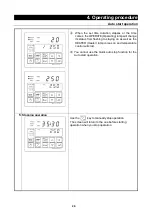
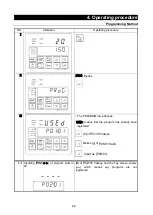
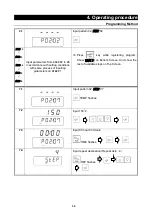
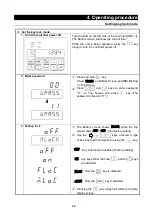
Page 35: ...PROG flashes Ⅲ The PROGRAM lamp flashes USED means that the program has already been registered 1 of P01 01 flashes Makes 1 of P01 01 flash Input as P02 01 1 1 Inputting P02 of program pattern 02 2 of P02 01 flashes and the Top screen shows which means any programs are not registered ...

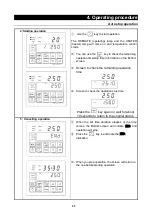
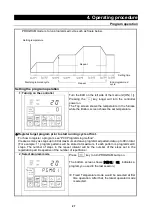
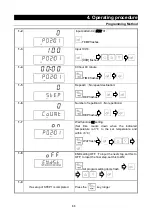
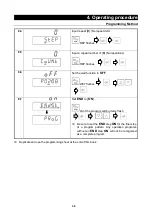
Page 36: ...P flashes 1 6 Number of repetition 0 No repetitions REP flashes 1 7 Wait function ON setting Set time counts down when the indicated temperature is 3 to the set temperature and within 6 WAT flashes 1 8 END setting OFF To input the next step set this to OFF to input the final step set this to ON All program setting items flash 1 9 If a setup of STEP1 is completed Press the key longer ...

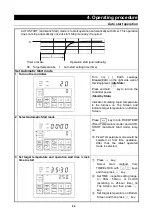
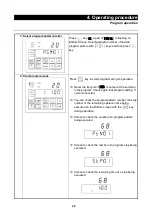
Page 37: ...ce with setting conditions with same process of inputting parameters on STEP 1 Press key while registering program Show REST P on Bottom Screen And show the rest of available steps on Top Screen 7 1 Input pattern 02 STEP 07 TEMP flashes 7 2 Input 150 7 3 Input 00 hour 00 minute TIME flashes 7 4 Input repeat destination Repeat dstn 4 REP flashes STEP 05 ...

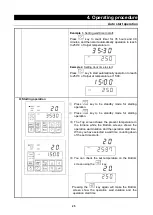
Page 38: ...et time counts down when the indicated temperature is 3 to the set temperature and within 6 WET flashes 7 7 END setting OFF To input the next step set this to OFF to input the final step set this to ON All of the program setting items flash 8 1 Input pattern 02 STEP 08 Press the key longer TEMP flashes 8 2 Input 150 8 3 Input 00 hour 30 minutes Inputting INF for the final step makes its time limit...

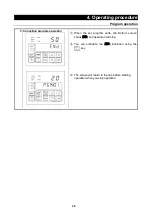
Page 39: ...EP flashes 8 6 Set the wait function to OFF WET flashes 8 7 Set END to ON All of the program setting items flash Be sure to set the END step ON for the final step of a program pattern Any operation programs without an END step ON will not be recognized as a complete program Duplicate and use the programming sheet at the end of this book ...

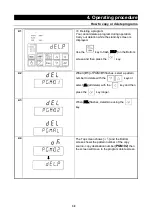
Page 40: ...the keys and then determine using the key 1 3 DEST flashes on the Top screen shows while pattern numbers not used and of PGM flash on the Bottom screen and input a pattern number of the copy destination with the keys and determine using the key 1 4 The Top screen shows and the Bottom screen shows the pattern number of the copy source copy destination number 01 02 then the screen will move to the p...

Page 41: ...on the Bottom screen and then press the key 2 2 When 01 of PGM 01 flashes select a pattern number to delete with the keys or select AL all delete with the key and then press the key longer 2 3 When DEL flashes determine using the key 2 4 The Top screen shows and the Bottom screen shows the pattern number of the copy source copy destination number PGM 02 then the screen will move to the program del...

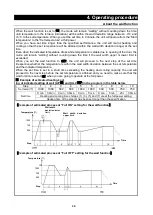
Page 42: ...me irrespective whether the temperature is within the wait width deviation between the set temperature and the indicated temperature When the set time is set to a short time exceeding the heating and cooling capacity the unit will proceed to the next step before the set temperature is attained and you need to make sure that the wait function is set at ON when you are going to operate at the full p...

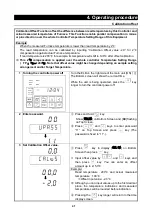
Page 43: ...Bottom Screen and 00 flashing on Top Screen Press and keys to enter password 11 on Top Screen and press key The password is fixed to 11 3 Set key lock The Bottom screen shows KLOCK while the Top screen sows OFF OFF is the factory setting Use the keys to select a type of key lock and then determine using the key OFF Key lock function disabled Factory setting ON Any keys other than the and the keys ...

Page 44: ...e changed depending on sample setting arrangement and or Target Temperature 1 Turning the controller power off Turn the ELB on the right side of the main unit ON The Bottom screen will show the current time While the unit is being operated press the key longer to turn the controller power off 2 Enter password Press and hold key Show UPASS on Bottom Screen and 00 flashing on Top Screen Press and ke...

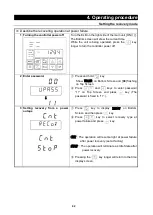
Page 45: ... hold key Show UPASS on Bottom Screen and 00 flashing on Top Screen Press and keys to enter password 11 on Top Screen and press key The password is fixed to 11 3 Setting recovery from a power outage Press key to display RECOV on Bottom Screen and then press key Press key to select recovery type at power failure and press key CNT The operation will resume right at power failure after power recovery...

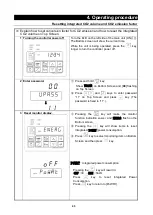
Page 46: ... password Press and hold key Show UPASS on Bottom Screen and 00 flashing on Top Screen Press and keys to enter password 11 on Top Screen and press key The password is fixed to 11 3 Reset monitor display Pressing the key will make the monitor function indication ENERGY and ENERG flash on the Bottom screen Pressing the key will show items to reset integrated POWRT power consumption Press key to sele...

Page 47: ...rm the discharge coefficient of different utility companies with each company Pressing the key will result in 550 lit 0550 flash Press the keys to change a discharge coefficient key is used to determine key is used to return CO2 RT Integrated CO2 Emission Press key and then change from OFF illuminate to RUN flash on Top Screen key is used to reset Integrated CO2 Emission key is used to return Pres...

Page 48: ... enter password 11 on Top Screen and press key The password is fixed to 11 3 Save and read out and or reset setting information Press key few times and show following items on Bottom Screen respectively U BKS Back various setting information up key RUN flash key OFF illuminate U BKR Read backup setting information out key RUN flash key OFF illuminate INI U Initialize various setting information ke...

Page 49: ...wer at one hour Power consumption may be indicated as 0 0 and 3 6 alternately while temperature is stable Power consumption is indicated as 0 0 during standby TOT MW Integrated power consumption MWh This is indicated in a three digit integer number TOT KW Integrated power consumption kWh This is indicated in a three digit integer number Sample indication Integrated power consumption 123 456kWh CO2...

Page 50: ...ated live time shall be the accumulated time elapsed from turning the ELB ON to OFF OFF POW TM Integrated live time hours Up to the thousand place is displayed Sample indication Integrated Power ON Hours 50 067 hours Adding capability will up to 65 535 hours PUN TM Integrated operation time hours Only the ten thousand digit will be indicated Integrated Operation Run Hours mean to add operation hou...

Page 51: ... at least 100 higher than Target Temperature The temperature is set at 1250 at the factory shipping Note that the objective of this IOPD will not protect for samples but from overheating this Equipment Note that this can prevent accidents as a result of using explosive or combustible substances Factory settings and setting temperature ranges are as shown below Model Set temperature at shipment Set...

Page 52: ...rence since it will change depending on the amount of samples or the environmental temperature Use these figures as a reference for temperature increase during programming Use these figures as a reference for temperature decrease during programming FP102 302 312 412_Temperature Decrease Time FP102 302 312 412_Temperature Increase Time Temperature Time mm Temperature Time mm ...

Page 53: ...Do not place any object other than the optional exhaust unit on the product It might fall and cause a malfunction or a personal injury Do not place paper or other easily combustible objects around the unit 6 Do not stack this product on another one Do not stack this product on another one A fire or a malfunction may result 7 Turn immediately off the Breaker of the Equipment at thundering Turn imme...

Page 54: ...neously 13 Opening the door at a high temperature will affect the device adversely Minimize opening the door when the furnace body temperature is 500 or above Opening the door at a high temperature will adversely affect the sensor the furnace body and the heater lives Radiation heat might cause damages to the operation panel and the controller If you cannot avoid opening or closing the door immedi...

Page 55: ... sensor which it is installed on Furnace inside upper portion and control Furnace temperature Therefore if the amount of specimen is large or the equipment is in the middle of heating sensor detected temperature may not agree with temperature of the samples In particular actual Furnace temperature will differ greatly from Read Temperature displayed on Controller right after opening or closing of t...

Page 56: ...ire included with the exhaust unit to the chassis of the main body 27 Precautions on using N2 gas In the N2 gas atmosphere nitriding on the heater surface proceeds due to a high temperature which prevents formation of a protective film and the upper limit of operation temperature will be lower unlike in the air atmosphere Due to the upper use limit in the N2 gas atmosphere Keep the temperature in ...

Page 57: ...ord Cable to receptacle or Switch Board of facilities Check ELB OFF then turn ELB ON Press test button on ELB with ball point pen etc If ELB is shut down ELB will be functional Check operation of Independent Overheat Prevention Device IOPD Be operating this Equipment at appropriate Target Temperature on Fixed Temperature Operation Mode Set this IOPD working temperature down to approximately 10 low...

Page 58: ...possible for separation or recycling to contribute to the preservation of the global environment according to the specified garbage collection method stipulated by each local government List major components and their materials for this Equipment as follows Names of major parts Material Major components of the Equipment Main unit Steel plate melamine epoxy composite resin paint stainless steel Fur...

Page 59: ... Yamato Customer Service Center ER03 HEAT Heater Line Disconnection Heater Line Disconnection Fail on Current Transformation CT sensor The source voltage has dropped Contact the general customer service center ER07 OHEAT Independent Overheat Prevention Device IOPD activated Activate Independent Overheat Prevention Device IOPD Turn ELB on again and check both Furnace temperature and setting Tempera...

Page 60: ... Error Code Name Causes and their solutions ER15 EPROM EEPROM Failure Check at turning ELB on again Change its data code on EEPROM Contact with local dealer or Yamato Customer Service Center if this error cannot be reset by ELB on Must be replaced backup battery ...

Page 61: ...ied power Required Voltage 10 Fail Controller Connect to adequate power supply Replace Controller Do not rise Furnace temperature Activate IOPD and or Self diagnosis Function built in on Controller and shut heater circuit down Error code displayed Refer to Cause and their solutions of Table 8 1 Error Code on page 56 Display temperature unstable Fluctuate ambient temperature heavily Fail supplied p...

Page 62: ...d Please send Warranty Card to Yamato Customer Service Center Yamato CSC by facsimile described Fax number in the left top corner of it Then keep its Card with good care Repair this Equipment for free of charge according to the contents on Warranty Card Warranty period is 1 one year from date of purchase Consult with local dealer one of Yamato sales office or Yamato CSC for any repair after warran...

Page 63: ... 60Hz Controller Type V shaped Temperature Control Method PID Z control Temperature setting method Digital setting with keys Temperature Display Method Setting temp display Orange 5 digit LED Digital Display Resolution 1 Temp display Green 4 digit LED Digital Display Resolution 1 Other displays LED indicates temperature patterns for heating stable cooling Timer timer resolution Time 1 minute and 9...

Page 64: ... L 1 5 7 5 11 3 Power supply 50 60Hz Single phase AC115V Single phase AC220V Rated current 10A 15A 21 5A 30A 13A 15A 18A 20A Weight Approx 29kg Approx 43kg Approx 51kg Accessories Exhaust port cap 1 Fuse 1 Furnace floor plate 1 Instruction manual 1 copy V type quick manual 1 copy Warranty card 1 copy Articles The length of the power cord outside the unit is about 2m 1 Performances have been measur...

Page 65: ...cable model Remarks Temperature output terminal 4 20mA 214166 OFP48 Common for all models Terminal to output 4 20mA analogue signals of the temperature sensor of the unit to the externals External Alarm Output Terminal 214167 OFP56 Common for all models Output alarm signal at occurring error on this Equipment Display its particular error on Bottom Screen External communication terminal RS485 21416...

Page 66: ...ture in the furnace Exhaust unit 200V 214161 OFP38 FP312 412 N2 gas introduction unit with a flow meter 214162 OFP24 FP102 This is effective for preventing oxidization in the bath and of specimens and can control flow of N2 gas to be introduced on the flow meter N2 gas introduction unit with a flow meter 214163 OFP26 FP302 312 N2 gas introduction unit with a flow meter 214164 OFP28 FP412 ...

Page 67: ...64 12 Wiring diagram FP102 Wiring diagram Dotted line means optional parts ...

Page 68: ...65 12 Wiring diagram FP302 Wiring diagram Dotted line means optional parts ...

Page 69: ...66 12 Wiring diagram FP312 Wiring diagram Dotted line means optional parts ...

Page 70: ...67 12 Wiring diagram FP412 Wiring diagram Dotted line means optional parts ...

Page 71: ...evention Device SSR1 Relay for FAN control TH1 1 Sensor for temperature control SSR2 Relay for Heater control TH1 2 Sensor for Overheat Prevention l H1 Heater Power code CT1 Current Sensing Element X1 Main Operation Relay FM1 Fan CR1 Spark Killer RLB V type Planar Board Optional parts Symbol Nomenclature Symbol Nomenclature OPB V type Optional Board TI01 Terminal Block TI02 Terminal Block ...

Page 72: ...chlorates Potassium Peroxide Sodium Peroxide Barium Peroxide and other inorganic peroxides Potassium Nitrate Sodium Nitrate Ammonium Nitrate and other nitrates Sodium Chlorite and other chlorites Calcium Hypochlorite and other hypochlorites Flammable Substances Ethyl Ether Gasoline Acetaldehyde Propylene Chloride Carbon Disulfide and other substances with ignition point at a degree 30 or more degr...

Page 73: ...Specification Power Supply P 7 P 7 P 8 P 60 2 Operation checking Explain about names and functions of each part Execution of auto stop operation Set temp 150 Setting time 30 min 3 Names and functions of each part Main unit operational panel 4 Operating procedure Auto stop operation P 10 11 P 21 23 Description 1 Operational descriptions Explain operations of each com ponent and handling precautions...

Page 74: ...9 20 21 22 23 24 25 Step Pattern number Step Set temperature Time Repeat dstn Number of repetitions Wait Event End P 00 P02 TEMP TIME REP REP WAIT EVENT END Hr Min STEP COUNT ON OFF 1 2 3 ST 01 02 03 04 05 06 07 08 09 10 11 12 13 14 15 16 17 18 19 20 21 22 23 24 25 Remarks Note Event is optional item Duplicate and use this sheet 100 200 300 0 300 200 100 0 Set temperature ...

Page 75: ...pt to perform matters prohibited in this Instruction Manual Otherwise unexpected accident may result Notice Descriptions in this Instruction Manual are subject to change without notice WE as Yamato Scientific Co Ltd will replace this Instruction Manual with missing page or paging disorder Instruction Manual Muffle Furnace FP102 302 312 412 First Edition May 23 2016 Revised Yamato Scientific Americ...

Reviews: