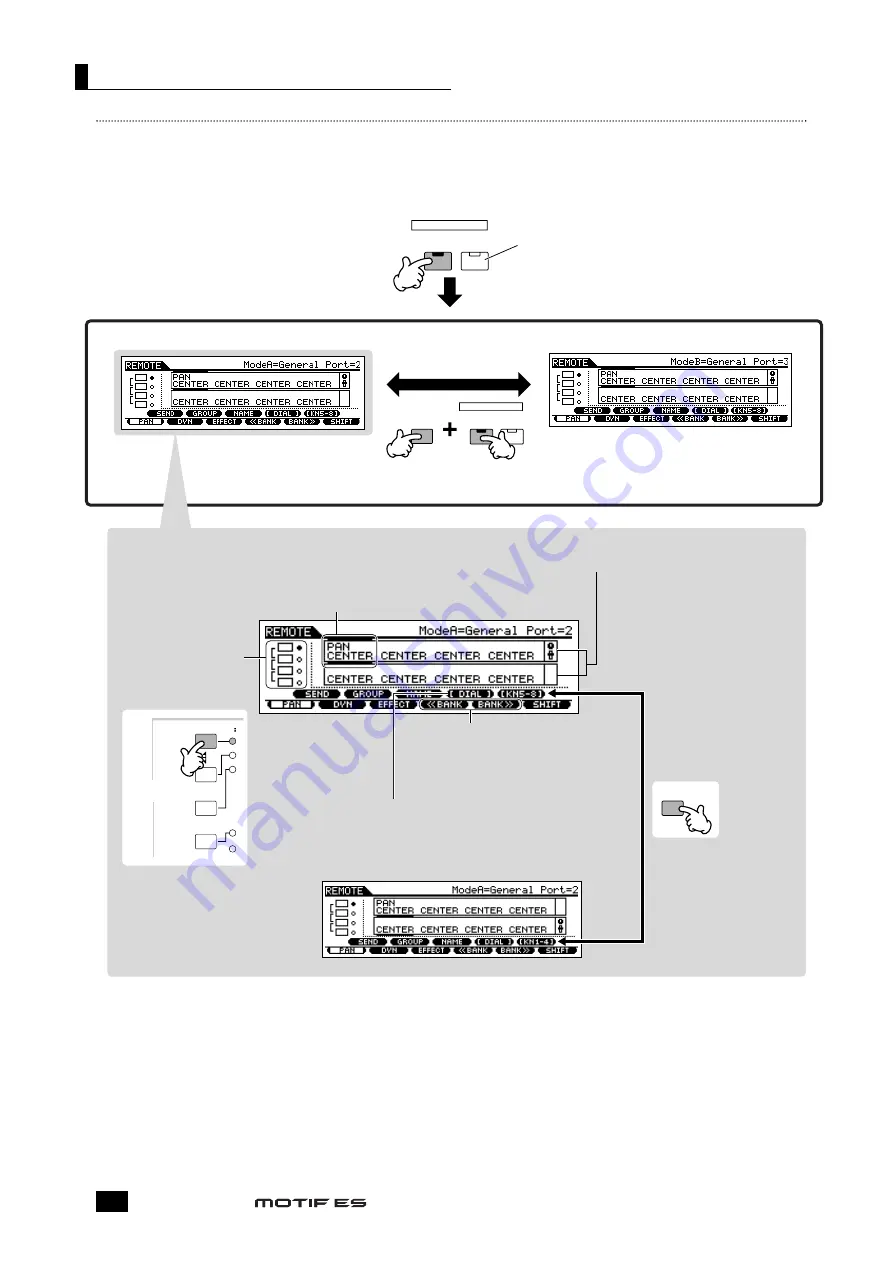
Funciones asignadas a los botones del panel en el modo Remote Control
Para acceder al modo Remote Control, pulse el botón REMOTE [ON/OFF] (indicador iluminado). A continuación aparecerá la
pantalla REMOTE (como las que se indican en la ilustración) y se activarán los controles del panel para el funcionamiento a
distancia del software del ordenador (sus funciones normales se desactivan).
Pulse el botón otra vez para salir del modo Remote Control.
Control de un ordenador desde el instrumento
Manual de instrucciones
150
REMOTE
ON / OFF
R-AUDIO
G-MIDI
REMOTE
ON / OFF
R-AUDIO
G-MIDI
SF
5
F
6
KNOB
CONTROL
FUNCTION
ARP FX
EQ
TONE
ASSIGN
PAN/SEND
Mode A
Mode B
This button is available when the Mode is set to
"General" and is used to switch between editing audio
tracks (lamp is red) and MIDI tracks of the sequence
software (lamp is green).
Changing the Mode
(Changing the software to be
controlled)
Change the Mode by pressing the REMOTE [ON/OFF] button
while holding the [F6] SHIFT button.
This is the cursor which indicates the currently edited
track/part by the knob/slider.
Controlling the knob/slider moves the cursor to the
corresponding track/part automatically. You can also
move the cursor by using the Cursor [<] and [>] buttons.
Press the [KNOB
CONTROL FUNCTION]
button to change the
functions assigned to the
[F1] - [F6] and [SF1] -
[SF5] buttons (shown at
the bottom of the
display).
Refer to the separate
Data List.
Parameters and their values controlled by knobs/
sliders are shown in two rows, in the boxes.
n
Parameter names are shown
according to the information
transferred from the DAW
software on the computer.
The characters may be
garbled depending on the
DAW software or OS
lamguage of your computer.
When [<<BANK] and [BANK>>] are shown
here, you can use the [F4] and [F5] buttons to
change the bank of eight tracks/parts (shown
in the display) to be controlled.
Controlling the knob may change the [SF4] menu to indicate [DIAL].
When [DIAL] is shown here, the function of the last operated knob is
assigned to the data dial, [INC/YES] and [DEC/NO] buttons. If you wish
to restore these to the original function (song position control), press the
[SF4] button to delete the [DIAL] menu.
To switch the cursor
between the upper
and lower row, press
the [SF5] button.
Este botón está disponible cuando se ajusta el modo a
“General” y se utiliza para conmutar entre la edición de
las pistas de audio (el indicador se pone en rojo) y las
pistas MIDI del software de secuenciación (el indicador se
pone en verde).
Modo A
Cambio del modo (cambio del
software que se va a controlar)
Cambie el modo con el botón REMOTE [ON/OFF] mientras
mantiene pulsado el botón [F6] SHIFT.
Pulse el botón [KNOB
CONTROL FUNCTION]
para cambiar las funciones
asignadas a los botones
[F1] - [F6] y [SF1] - [SF5]
(parte inferior de la
pantalla). Consulte la lista
de datos adjunta.
Este es el cursor que indica la pista/parte actual editada
con los mandos/deslizantes.
El control del mando/deslizantes mueve el cursor a la
pista/parte correspondiente de manera automática.
También es posible mover el cursor con los botones de
cursor [<] y [>].
Los parámetros y sus valores controlados por los man-
dos/deslizantes aparecen en dos filas, en los cuadros.
Cuando aquí aparecen [<<BANK] y [BANK]>>,
podrá utilizar los botones [F4] y [F5] para
cambiar el banco de ocho pistas/partes
(indicadas en la pantalla) para controlarlos.
El control del mando puede que cambie el menú [SF4] para que indique
[DIAL]. Cuando aparece [DIAL], la función del último accionado se asigna
a la rueda de datos y a los botones [INC/YES] y [DEC/NO]. Si desea
restablecer las funciones originales (control de posición de canción), pulse
el botón [SF4] para borrar el menú [DIAL].
Para conmutar el cursor
entre la fila superior e
inferior, pulse el botón [SF5].
Los nombres de los
parámetros se indican de
acuerdo con la información
transferida desde el software
DAW del ordenador. Los
caracteres puede que estén
truncados según sea el
software DAW o el lenguaje
del sistema operativo del
ordenador.
Modo B
Summary of Contents for MOTIF ES8
Page 1: ...Manual de instrucciones 1 Modos MOTIF ES6 MOTIF ES7 MOTIF ES8 ...
Page 2: ...Modes Manual de instrucciones 2 ...
Page 3: ...Manual de instrucciones 3 Funciones y sub funciones ...
Page 4: ...Selección de un programa Manual de instrucciones 4 ...
Page 5: ...Manual de instrucciones 5 Movimiento del cursor y ajuste de parámetros ...


