background image

Paper and Media 


Phaser 7100 Color Printer 

51 


User Guide 


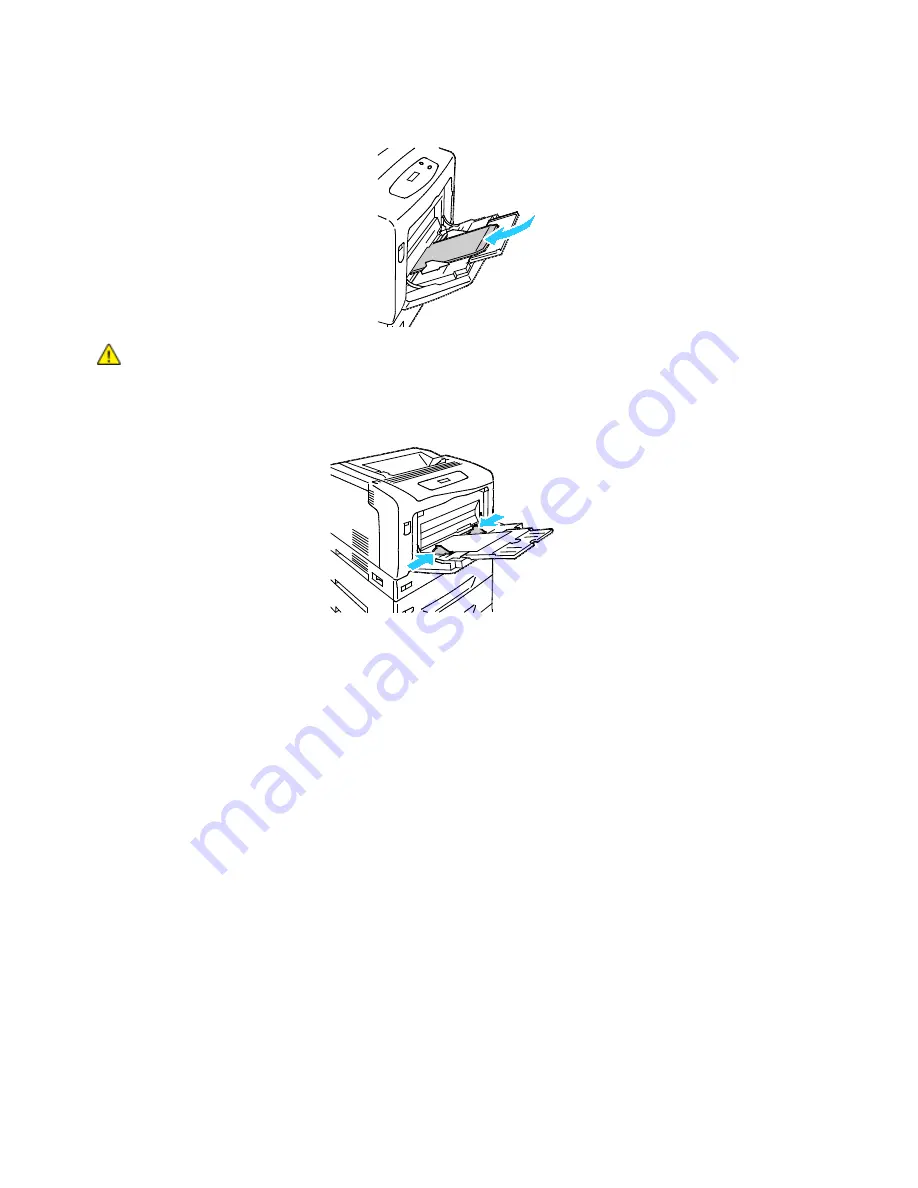
Load large envelopes with the flaps open and facing up. 


CAUTION: 

Never use self-stick envelopes, envelopes with exposed adhesives, or envelopes with 

windows. They can lead to paper jams and can damage the printer. 


3.


Adjust the width guides to fit the envelopes. 


4.


If no paper change settings are necessary at the control panel prompt, press 

Back

. To change the 

size, type, and color, press 

OK

 and follow the prompts. 


Labels 

You can print labels from any tray. 


Guidelines for Printing Labels 


Use labels designed for laser printing. 


Do not use vinyl labels. 


Do not feed a sheet of labels through the printer more than once. 


Do not use dry gum labels. 


Print only on one side of the sheet of labels. Use full sheet labels only. 


Store unused labels flat in their original packaging. Leave the sheets of labels inside the original 

packaging until ready to use. Return any unused sheets of labels to the original packaging and 

reseal it. 


Do not store labels in extremely dry or humid conditions or extremely hot or cold conditions. Storing 

them in extreme conditions can cause print-quality problems or cause them to jam in the printer. 


Rotate stock frequently. Long periods of storage in extreme conditions can cause labels to curl and 

jam in the printer. 

Summary of Contents for Phaser 7100

Page 1: ...buch Español Guía del usuario Português Guia do usuário Nederlands Gebruikershandleiding Svenska Användarhandbok Dansk Betjeningsvejledning Suomi Käyttöopas Norsk Brukerhåndbok Русский Руководство пользователя Čeština Uživatelská příručka Polski Przewodnik użytkownika Magyar Felhasználói útmutató Türkçe Kullanıcı Kılavuzu Ελληνικά Εγχειρίδιο χρήστη ...

Page 2: ...oshop and PostScript are trademarks of Adobe Systems Incorporated in the United States and or other countries Apple AppleTalk Bonjour EtherTalk Macintosh Mac OS and TrueType are trademarks of Apple Inc registered in the U S and other countries HP GL HP UX and PCL are trademarks of Hewlett Packard Corporation in the United States and or other countries IBM and AIX are trademarks of International Bu...

Page 3: ...ntrol Panel 21 Printer Reports 22 Printing Reports 22 Printing the Menu Map 22 Energy Saver Mode 23 Setting Up Energy Saver Modes 23 Administration Features 24 CentreWare Internet Services 24 Finding the IP Address on the Control Panel 24 Finding the IP Address on the Configuration Report 25 Billing and Usage Information 25 More Information 26 3 Installation and Setup 27 Installation and Setup Ove...

Page 4: ...es and Weights 40 Supported Standard Paper Sizes 40 Supported Paper Sizes and Weights for Automatic 2 Sided Printing 41 Supported Custom Paper Sizes 41 Loading Paper 42 Loading Paper in Trays 1 4 42 Loading Paper in the Bypass Tray 46 Changing Paper Size Type and Color 48 Printing on Special Paper 49 Envelopes 49 Labels 51 Glossy Paper and Glossy Cardstock 54 5 Printing 55 Printing Overview 56 Sel...

Page 5: ...4 Enabling Dew Prevention 85 Billing and Usage Information 86 Ordering Supplies 87 Locating the Serial Number 87 Consumables 87 Routine Maintenance Items 88 Customer Replaceable Units 88 When to Order Supplies 88 Viewing Printer Supply Status 89 Recycling Supplies 89 Moving the Printer 90 7 Troubleshooting 91 General Troubleshooting 92 Printer Does Not Turn On 92 Printer Resets or Turns Off Freque...

Page 6: ...n with Duplex Unit and Three Optional 550 Sheet Feeders 122 Clearance Requirements 123 Environmental Specifications 125 Operating Temperature 125 Relative Humidity 125 Elevation 125 Electrical Specifications 126 Power Supply Voltage and Frequency 126 Power Consumption 126 ENERGY STAR Qualified Product 126 Performance Specifications 126 Print Quality 127 Print Speed 127 B Regulatory Information 129...

Page 7: ...0 Color Printer 7 User Guide Domestic Household Environment 138 Professional Business Environment 138 Collection and Disposal of Equipment and Batteries 139 Battery Symbol Note 139 Battery Removal 139 Other Countries 140 ...

Page 8: ......

Page 9: ... 10 Operational Safety 11 Maintenance Safety 13 Printer Symbols 14 Your printer and the recommended supplies have been designed and tested to meet strict safety requirements Attention to the following information ensures the continued safe operation of your Xerox printer 1 Safety ...

Page 10: ...aged or frayed Liquid is spilled into the printer The printer is exposed to water The printer emits smoke or the surface is unusually hot The printer emits unusual noise or odors The printer causes a circuit breaker fuse or other safety device to activate If any of these conditions occur do the following 1 Turn off the printer immediately 2 Disconnect the power cord from the electrical outlet 3 Ca...

Page 11: ...nter configuration see Physical Specifications on page 122 Do not block or cover the slots or openings on the printer These openings are provided for ventilation and to prevent overheating of the printer Place the printer in an area where there is adequate space for operation and servicing Place the printer in a dust free area Do not store or operate the printer in an extremely hot cold or humid e...

Page 12: ...al outlet must be near the printer and must be easily accessible The power cord is attached to the printer as a plug in device on the back of the printer If it is necessary to disconnect all electrical power from the printer disconnect the power cord from the electrical outlet Printer Supplies Use the supplies designed for your printer The use of unsuitable materials can cause poor performance and...

Page 13: ...ce procedure that is not specifically described in the documentation supplied with your printer Do not use aerosol cleaners Clean with a dry lint free cloth only Do not burn any consumables or routine maintenance items For information on Xerox supplies recycling programs go to www xerox com gwa ...

Page 14: ...es a mandatory action to take in order to avoid damage to the property Do not burn the item Do not expose the imaging unit to light for more than 10 minutes Do not expose the imaging unit to direct sunlight Do not touch the part or area of the printer Warning Wait for the printer to cool for the specified time before touching that specific area of the printer Warning Cover is not self supporting U...

Page 15: ...led For details see Recycling and Disposal on page 135 Do not try to close the Toner Cover while Cover C is open Caution To prevent a printer malfunction or internal hard drive damage ensure that the HDD control panel indicator is off before turning off the power switch ...

Page 16: ......

Page 17: ...Phaser 7100 Color Printer 17 User Guide This chapter includes Parts of the Printer 18 Printer Reports 22 Energy Saver Mode 23 Administration Features 24 More Information 26 2 Features ...

Page 18: ...Container Cover 20 Control Panel 20 Front View 1 Power Switch 2 Cover A Release Latch 3 Toner Cover 4 Output Tray 5 Control Panel 6 Cover A 7 Cover B Release Button 8 Bypass Tray 9 Tray 1 10 Optional 550 Sheet Feeders Trays 2 4 Note A 250 sheet adjustable Tray 1 and a 150 sheet Bypass Tray are standard Up to three optional 550 Sheet Feeders provides a maximum of five trays for a maximum 2050 sheet...

Page 19: ... 3 Power Connector 4 Rear Cover Internal Components Under Covers A and C 1 Cover A Release Latch 2 Cover A 3 Transfer Roller 4 Toner Cover Handle 5 Cover C 6 Cover C Release Lever 7 Toner Cartridges 8 Transfer Belt 9 Cleaning Tool 10 Imaging Units Note The Transfer Belt is not customer replaceable ...

Page 20: ...100 Color Printer User Guide Internal Components Under Cover B and Waste Toner Container Cover 1 Cover B Release Button 2 Cover B 3 Duplex Unit 4 Fuser 5 Waste Toner Container Cover 6 Waste Cartridge Waste Toner Container ...

Page 21: ...tored in the printer or the server such as Secure Print This feature is available when the optional RAM disk or Productivity Kit is installed 5 Power Saver enters or exits Energy Saver mode The button illuminates when in Energy Saver mode 6 Cancel stops the current job 7 OK selects or executes the option or function displayed on the screen 8 Arrow buttons navigate to the next menu item or option 9...

Page 22: ...avigate through the menus Printing Reports 1 At the control panel press Menu 2 Navigate to Print Reports then press OK 3 Navigate to the desired report then press OK 4 To print the report at the prompt press OK 5 To return the printer to Ready press Menu Printing the Menu Map 1 At the control panel press Menu 2 Navigate to Print Reports then press OK 3 Navigate to Menu Map then press OK 4 To print...

Page 23: ...stem Settings then press OK 4 Navigate to Low Power Mode then press OK 5 To turn on or off Low Power mode use the arrow buttons to select Enabled or Disabled press OK then press Back 6 Navigate to Low Power Timer then press OK 7 To set the delay before the printer enters Low Power mode use the arrow buttons to set the time press OK then press Back The range is 1 240 minutes 8 Navigate to Sleep Mod...

Page 24: ...nter and the network in Windows Macintosh UNIX or Linux environments TCP IP and HTTP enabled in the printer A network connected computer with a Web browser that supports JavaScript For details see the Help in CentreWare Internet Services or the System Administrator Guide Accessing CentreWare Internet Services At your computer open a Web browser type the IP address of the printer in the address fie...

Page 25: ...o Configuration then press OK 4 To print the report at the prompt press OK 5 To return the printer to Ready press Menu Billing and Usage Information Billing and printer usage information appears on the Meter Report Job Counter Report Current Meter information screen and Billing and Counters Status page in CentreWare Internet Services The impression counts shown are used for billing For details see...

Page 26: ... for your printer includes online technical support Online Support Assistant and driver downloads www xerox com office 7100support Information pages Print from the control panel menu Order supplies for your printer www xerox com office 7100supplies A resource for tools and information such as interactive tutorials printing templates helpful tips and customized features to meet your individual need...

Page 27: ...hapter includes Installation and Setup Overview 28 Modifying General Settings 32 Installing the Software 33 See also Installation Guide packaged with your printer System Administrator Guide at www xerox com office 7100docs 3 Installation and Setup ...

Page 28: ... print quality Rapid heating of a cold room can cause condensation inside the printer directly interfering with image transfer 2 Place the printer on a level solid non vibrating surface with adequate strength for the weight of the printer The printer must be horizontal with all four feet in solid contact with the surface To find the weight for your printer configuration see Physical Specifications...

Page 29: ...faster than USB and allows direct access to printer settings using CentreWare Internet Services Note For details on configuring wireless network settings see the System Administrator Guide at www xerox com office 7100docs USB If you connect the printer to one computer and do not have a network use a USB connection A USB connection offers fast data speeds but typically not as fast as an Ethernet co...

Page 30: ...printer using the power switch ensuring that the HDD control panel indicator is not on or blinking CAUTIONS To prevent a printer malfunction or internal hard drive damage ensure that the HDD control panel indicator is off before turning off the power switch Wait 10 seconds after the control panel goes dark before turning the power switch back on Do not plug or unplug the power cord while the power...

Page 31: ...e power cord and then plug in the printer and turn it on 4 Connect the A end of the USB cable to the USB Port on the computer 5 When the Windows Found New Hardware Wizard appears cancel it 6 You are ready to install the print drivers For details see Installing the Software on page 33 Initial Printer Setup Make sure that the printer is set up before installing the printer software Setup includes en...

Page 32: ...o select the Language menu use the arrow buttons then press OK 3 To select your language use the arrow buttons then press OK 4 To return the printer to Ready press Menu Disabling the Configuration Report at Startup 1 At the control panel press Menu 2 To select Admin Menu press the arrow buttons then press OK 3 To select the System Settings menu press the arrow buttons then press OK 4 To select the...

Page 33: ...ectly and has a valid IP address To find the IP address see Finding the IP Address on the Control Panel on page 24 or Finding the IP Address on the Configuration Report on page 25 If the Software and Documentation disc is not available download the latest drivers from www xerox com office 7100drivers Operating System Requirements Windows XP SP1 and later Windows Vista Windows 7 Windows Server 2003...

Page 34: ...d printers d When the printer appears in the window click to highlight it then click Next 6 If the printer still does not appear in the list of discovered printers and you do not know the IP address a Click Advanced Search b If you know the gateway address and subnet mask click the top button and enter the addresses into the Gateway and Subnet Mask fields c If you know the IP address of another pr...

Page 35: ...age check boxes 13 Click Continue then click Close Note The printer is added automatically to the printer queue To verify that the print driver recognizes the installed options 1 From the Apple menu click System Preferences Print Fax or Print Scan 2 Select the printer in the list then click Options and Supplies 3 Click Driver then confirm that your printer is selected 4 Confirm that all of the opt...

Page 36: ...uide then follow the installation instructions Notes To load Linux print drivers perform the preceding procedures but select Linux as the operating system Select Xerox Services for Linux Systems driver or the Linux CUPS Printing Package You can also use the CUPS driver included in the Linux package Supported Linux drivers are available at www xerox com office 7100drivers For details about UNIX and...

Page 37: ...Phaser 7100 Color Printer 37 User Guide This chapter includes Supported Paper 38 Loading Paper 42 Printing on Special Paper 49 4 Paper and Media ...

Page 38: ... is available at www xerox com paper Recommended Media List United States www xerox com europaper Recommended Media List Europe Ordering Paper To order paper transparencies or other media contact your local reseller or go to www xerox com office 7100supplies General Paper Loading Guidelines Letter 8 5 x 11 in and A4 210 x 297 mm sizes can be loaded with the long edge or short edge leading into the...

Page 39: ... details Paper Storage Guidelines Storing your paper and other media properly contributes to optimum print quality Store paper in dark cool relatively dry locations Most paper is susceptible to damage from ultraviolet and visible light Ultraviolet light from the sun and fluorescent bulbs is particularly damaging to paper Reduce the exposure of paper to strong lights for long periods of time Mainta...

Page 40: ...ss Tray only Glossy 106 163 g m Glossy Cardstock 164 220 g m Envelope Supported Standard Paper Sizes Tray European Standard Sizes North American Standard Sizes All trays A3 297 x 420 mm 11 7 x 16 5 in A4 210 x 297 mm 8 3 x 11 7 in A5 148 x 210 mm 8 3 x 5 8 in Letter 216 x 279 mm 8 5 x 11 in Legal 216 x 356 mm 8 5 x 14 in Tabloid 279 x 432 mm 11 x 17 in 216 x 330 mm 8 5 x 13 in Bypass Tray only A6 ...

Page 41: ...17 in Weight 60 g m 120 g m Note The printer does not support 2 sided printing on labels or envelopes Supported Custom Paper Sizes Tray Number Paper Sizes Minimum Maximum Trays 1 4 Width 75 297 mm 3 11 7 in Length 98 432 mm 3 9 17 in Bypass Tray Width 75 297 mm 3 11 7 in Length 98 432 mm 3 9 17 in Two banner page sizes are supported 297 x 1200 mm 11 7 x 47 3 in 210 x 900 mm 8 3 x 35 5 in ...

Page 42: ...ing Paper in Trays 1 4 42 Loading Paper in the Bypass Tray 46 Changing Paper Size Type and Color 48 Loading Paper in Trays 1 4 1 Pull out the tray until it stops 2 Remove any paper that is a different size 3 Extend the length of the paper tray as needed a Tilt the tray upward and pull to remove it ...

Page 43: ...er pinch the release tab and fully extend the rear of the tray c To reduce Tray 1 pinch the release tab and slide the rear of the tray back into the tray body d To extend Trays 2 4 for large format paper slide both locking tabs out to their unlocked position and fully extend the rear of the tray ...

Page 44: ... locking tabs click into their locked position 4 Adjust the length and width guides to fit the paper a Pinch the guide lever on each guide b Slide the guides to the size of the paper c To secure the guides in position release the levers Adjust Tray 1 width guides Adjust Trays 2 4 width guides 5 Flex the sheets back and forth and fan them then align the edges of the stack on a level surface This pr...

Page 45: ...ace up and the top edge to the right Load hole punched paper with the holes toward the back Insert large format paper short edge feed with the print side face down and the top edge facing the front of the tray Load hole punched paper with the holes to the left Insert large format paper short edge feed with the print side face up and the top edge facing the back of the tray Load hole punched paper ...

Page 46: ...and color press OK and follow the prompts Loading Paper in the Bypass Tray The Bypass Tray supports the widest variety of paper types It is intended primarily for small quantity jobs using special paper The tray extension provides support for larger paper Notes For faster print speeds load paper 320 mm 12 6 in or shorter long edge feed Load paper longer than 320 mm 12 6 in short edge feed Do not l...

Page 47: ... hole punched paper with the holes facing you Insert large format paper short edge feed with the print side face up and the top edge facing into the printer Load hole punched paper with the holes to the left Insert large format paper short edge feed with the print side face down and the top edge facing you Load hole punched paper with the holes to the left 3 Adjust the width guides until they touc...

Page 48: ...u 2 To select Admin Menu press the arrow buttons then press OK 3 To select Printer Settings press the arrow buttons then press OK 4 To select During Loading press the arrow buttons then press OK 5 To select No Attrib Change press the arrow buttons then press OK 6 To return the printer to Ready press Menu To set the paper size type or color for a tray in No Attribute Change mode 1 At the control pa...

Page 49: ...nd construction of the envelopes Try another envelope brand if you do not get desired results Maintain constant temperatures and relative humidity Store unused envelopes in their packaging to avoid the excess moisture and dryness which can affect print quality and cause wrinkling Excessive moisture can cause the envelopes to seal before or during printing Remove air bubbles from the envelopes befo...

Page 50: ...ay can cause the printer to jam 1 Open the Bypass Tray and pull out the tray extensions for larger sizes 2 Load envelopes with the flaps closed and facing up Load No 10 Monarch or DL envelopes with the long edge facing into the printer Note If you do not load envelopes immediately after they have been removed from the packaging they can bulge Flatten them to avoid jams ...

Page 51: ...abels designed for laser printing Do not use vinyl labels Do not feed a sheet of labels through the printer more than once Do not use dry gum labels Print only on one side of the sheet of labels Use full sheet labels only Store unused labels flat in their original packaging Leave the sheets of labels inside the original packaging until ready to use Return any unused sheets of labels to the origina...

Page 52: ...ould damage the printer Loading Labels in Trays 1 4 1 Pull out the tray until it stops 2 Ensure that the paper guides are set in the correct position for the size labels you are loading 3 For long edge feed load labels face up with the top edge to the left 4 For short edge feed load labels face up with the top edge facing away from the printer 5 Close the tray Set the paper size type and color on ...

Page 53: ...y extensions for larger sizes 2 For labels 320 mm 12 6 in or shorter insert the labels face down long edge feed with the top edge to the left 3 For labels longer than 320 mm 12 6 in insert the labels face down short edge feed with the top edge leading into the printer 4 Adjust the width guides until they touch the edges of the labels ...

Page 54: ... are ready to load them into the printer Leave glossy cardstock in the original wrapper and leave the packages in the shipping carton until ready to use Remove all other paper from the tray before loading glossy cardstock Load only the amount of glossy cardstock you are planning to use Do not leave glossy cardstock in the tray when you are finished printing Replace unused cardstock in the original...

Page 55: ...Phaser 7100 Color Printer 55 User Guide This chapter includes Printing Overview 56 Selecting Printing Options 57 Printing Features 60 5 Printing ...

Page 56: ...ropriate tray On the printer control panel specify the size color and type 3 Access the print settings in your software application For most software applications press CTRL P for Windows or CMD P for Macintosh 4 Select your printer from the list 5 Access the print driver settings by selecting Properties or Preferences for Windows or Xerox Features for Macintosh The title of the button can vary de...

Page 57: ...e computer do not save the settings after the application is closed Print Driver Help Xerox print driver software Help information is available from the Printing Preferences window Click the Help button in the bottom left corner of the Printing Preferences window to see the Help Information about Printing Preferences appears in the Help window From there you can select by topic or use the search f...

Page 58: ...rint quality mode when printing a particular document select Enhanced in Printing Preferences before printing the job 1 With the document open in your software application access the print settings For most software applications click File Print or press CTRL P for Windows 2 Select your printer and click the Properties or Preferences button to open the Printing Preferences window The title of the ...

Page 59: ...ts 5 Click Print to send the job to the printer Saving a Set of Commonly Used Printing Options for Macintosh You can define and save a set of options so that you can apply them to future print jobs To save a set of printing options 1 With the document open in your application click File Print 2 Select your printer from the Printers list 3 Select the desired printing options from the drop down list...

Page 60: ...Notification for Windows 67 Printing Special Job Types 67 Printing on Both Sides of the Paper Printing a 2 Sided Document If your printer supports Automatic 2 Sided Printing the options are specified in the print driver The print driver uses the settings for portrait or landscape orientation from the application for printing the document Note Ensure that the paper size and weight are supported For...

Page 61: ...ns show the result for documents with portrait and landscape orientations respectively 2 Sided Print Flip on Short Edge prints on both sides of the paper The images print to allow binding on the short edge of the paper The following illustrations show the result for documents with portrait and landscape orientations respectively Note 2 Sided Printing is part of the Earth Smart settings To change y...

Page 62: ...age document you can print more than one page on a single sheet of paper Print 1 2 4 6 9 or 16 pages per side by selecting Pages Per Sheet on the Page Layout tab Page Layout is on the Document Options tab Printing Booklets With 2 sided printing you can print a document in the form of a small booklet Create booklets from any paper size that is supported for 2 sided printing The driver automatically...

Page 63: ...rint drivers only The only print quality mode for PCL is Standard Image Options Image options controls the way the printer uses color to produce your document The Windows PostScript and the Macintosh drivers provide the widest range of color controls and corrections on the Image Options tab To convert all color in the document to black and white or shades of gray select Xerox Black and White Conve...

Page 64: ...that you specify the paper to use for the inserts Modify these settings when printing inserts Insert Options provides the options to place an insert After Page X where X is the specified page or Before Page 1 Insert Quantity specifies the number of pages to insert at each location Page s specifies a page or a range of pages after which you want an insert added Separate individual pages or page ran...

Page 65: ...hort edge of the pages Job Settings displays the attributes of the paper for the remainder of the job Notes If your printer does not support automatic 2 sided printing not all of the options are available Some combinations of 2 sided printing with certain paper types and sizes can produce unexpected results Scaling Scaling reduces or enlarges the original document to match the selected output pape...

Page 66: ... see both the watermark and the document content Print in Foreground prints the watermark over the text and graphics in the document 4 Click Pages then select the pages on which to print the watermark Print on All Pages prints the watermark on all pages of your document Print on Page 1 Only prints the watermark only on the first page of the document 5 Click OK Printing Mirror Images If the PostScr...

Page 67: ...Completion Notification for Windows You can select to be notified when your job finishes printing A message appears on your computer screen with the name of the job and the name of the printer where it was printed Note This feature is only available on a Windows computer printing to a network printer To select job completion notification from the Advanced tab 1 Click Notification 2 Click Notify fo...

Page 68: ...The job is held at the printer until the same passcode is entered at the control panel Notes If the control panel is dark press the Power Saver button Use the arrow buttons to navigate through the menus To release a Secure Print job for printing 1 At the control panel touch Print Menu 2 Navigate to Secure Print then press OK 3 Navigate to your directory under Select User ID then press the Right ar...

Page 69: ... To print the job after you send it but before the scheduled time release the job at the printer control panel 1 At the control panel touch Print Menu 2 Navigate to Delayed Print then press OK 3 Navigate to the desired print job then press the Right arrow 4 Navigate to Print Now then press OK 5 To print the job press OK 6 To return the printer to Ready press Back ...

Page 70: ......

Page 71: ...0 Color Printer 71 User Guide This chapter includes Maintenance and Cleaning 72 Adjustments and Maintenance Procedures 82 Billing and Usage Information 86 Ordering Supplies 87 Moving the Printer 90 6 Maintenance ...

Page 72: ...uch cleaners increase the risk of fire and explosion WARNING Do not remove the covers or guards that are fastened with screws You cannot maintain or service any parts that are behind these covers and guards Do not attempt any maintenance procedure that is not described in the documentation supplied with your printer WARNING Internal parts of the printer can be hot Use caution when doors and covers...

Page 73: ...ing the Printer Exterior Regular cleaning keeps the control panel and its display free from dust and dirt To clean the printer exterior 1 To avoid activating buttons and menus ensure that the printer is in Sleep mode If the Power Saver button is not illuminated press the Power Saver button 2 To remove finger prints and smudges clean the control panel and its display with a soft lint free cloth ...

Page 74: ...r belt Scratches dirt or oil from your hands on the belt can deteriorate print quality Ensure that nothing touches or scratches the surface of the imaging drum Scratches dirt or oil from your hands on the drum can deteriorate print quality To protect the imaging units against bright light close Cover C within 10 minutes Longer exposure can deteriorate print quality WARNING If you accidentally get ...

Page 75: ...Support Cover C by lowering its support 1 and inserting it into its associated slot 2 WARNING Cover is not self supporting Use care to support with your hand or the built in support 4 To remove the cleaning tool lift it out of the printer 5 Remove the yellow imaging unit ...

Page 76: ...lor Printer User Guide 6 Clean the laser lens by wiping the length of its surface three times using the soft end of the cleaning tool 7 Replace the imaging unit 8 Repeat steps 5 through 7 for each color 9 Replace the cleaning tool ...

Page 77: ...ty Sensors If the print or color density is too light missing or the background is foggy clean the density sensors CAUTIONS Ensure that nothing touches or scratches the surface of the transfer belt Scratches dirt or oil from your hands on the belt can deteriorate print quality To protect the imaging units against bright light close Cover C within 10 minutes Longer exposure can deteriorate print qu...

Page 78: ...ort 1 and inserting it into its associated slot 2 WARNING Cover is not self supporting Use care to support with your hand or the built in support 4 Use a dry cotton swab to clean the color toner density sensors 5 To close Cover C raise it slightly then raise the support rod 1 and snap it into its holder 2 ...

Page 79: ...Maintenance Phaser 7100 Color Printer 79 User Guide 6 Close Cover C 1 the Toner Cover 2 and Cover A 3 ...

Page 80: ...Maintenance 80 Phaser 7100 Color Printer User Guide Routine Maintenance For information on ordering supplies see Ordering Supplies on page 87 ...

Page 81: ...Maintenance Phaser 7100 Color Printer 81 User Guide Periodic Maintenance For information on ordering supplies see Ordering Supplies on page 87 ...

Page 82: ...djust the color registration Performing an Automatic Color Registration Adjustment Automatic color registration adjustment occurs every time a new toner cartridge is installed You can run this adjustment at other times as needed To perform an automatic color registration adjustment 1 At the printer control panel press the Menu button 2 Navigate to Admin Menu then press OK 3 Navigate to Image Quali...

Page 83: ...djust Magenta or Adjust Cyan then press OK 14 To enter the values navigate to the left or right field Then use the arrow buttons to adjust the value to what you circled in steps 9 and 10 then press OK 15 Press Back then repeat steps 13 and 14 for the other colors 16 Print another Registration Chart then repeat the process until you complete the color registration corrections Adjusting Paper Type U...

Page 84: ...s smearing or can be rubbed off the paper increase the offset for the paper you are using If the toner is blistered or mottled decrease the offset for the paper you are using To adjust the fuser 1 At the printer control panel press the Menu button 2 Navigate to Admin Menu then press OK 3 Navigate to Image Quality then press OK 4 Navigate to Fuser Temperature then press OK 5 Navigate to the paper t...

Page 85: ...inter is located in a warm room Condensation can form in a printer after it has been sitting in a cold room that is heated quickly To enable Dew Prevention 1 At the printer control panel press the Menu button 2 Navigate to Admin Menu then press OK 3 Navigate to System Settings then press OK 4 Navigate to Dew Prevention then press OK 5 Select Enabled then press OK ...

Page 86: ...ress OK 3 Navigate to Current Meter then press OK 4 To view the impression counts press the arrow buttons Total Color is the number of pages printed that specify color Total Black is the number of pages printed with no color specified Total is the total number of color impressions plus black impressions Note A page is one side of a sheet of paper that can be printed on one or two sides A sheet pri...

Page 87: ...the desired report then press OK 4 To print the report at the prompt press OK 5 To return the printer to Ready press Menu Consumables Consumables are printer supplies that get depleted during the operation of the printer Consumable supplies for this printer are the Genuine Xerox Toner Cartridges in Cyan Magenta Yellow and Black Notes Each consumable includes installation instructions Install only ...

Page 88: ... include the following 110 V Fuser 220 V Fuser Transfer Roller Tray 1 Feed Roller Kit Tray 2 Feed Roller Kit Bypass Tray Feed Roller When to Order Supplies A warning appears on the control panel when supplies near their replacement time Verify that you have replacements on hand It is important to order these items when the messages first appear to avoid interruptions to your printing An error mess...

Page 89: ...IP address of the printer in the address field then press Enter or Return Note For details see Finding the IP Address on the Control Panel on page 25 2 Select the Status tab 3 In the top left corner of the Status page under Status click Consumables Recycling Supplies For information on Xerox supplies recycling programs go to www xerox com gwa Supplies include a prepaid return label Please use it t...

Page 90: ...ree people to lift the printer CAUTION Failure to repackage the printer properly for shipment can result in damage not covered by the Xerox Warranty Service Agreement or Total Satisfaction Guarantee The Xerox Warranty Service Agreement or Total Satisfaction Guarantee do not cover damage to the printer caused by improper moving CAUTION The Xerox Total Satisfaction Guarantee is available in the Unit...

Page 91: ...Phaser 7100 Color Printer 91 User Guide This chapter includes General Troubleshooting 92 Paper Jams 96 Print Quality Problems 109 Getting Help 115 7 Troubleshooting ...

Page 92: ... by simply restarting the printer Printer Does Not Turn On Probable Causes Solutions The power switch is not turned on Turn on the switch The power cord is not correctly plugged into the outlet Turn off the printer power switch and plug the power cord securely into the outlet Something is wrong with the outlet connected to the printer Plug another electrical appliance into the outlet and see if it...

Page 93: ...n the network could be an issue Determine if a print spooler or a computer sharing the printer is buffering all print jobs and then spooling them to the printer Spooling can slow print speeds To test the speed of the printer print some information pages such as the Office Demo Page If the page does not print at the rated speed of the printer you could have a network or printer installation issue T...

Page 94: ... from which you are printing 3 Set the paper source to match the tray selected in the print driver or set the paper source to Automatically Select Automatic 2 Sided Printing Problems Probable Causes Solutions Unsupported or incorrect paper Ensure that you are using a supported paper size and weight for 2 sided printing Envelopes and labels cannot be used for 2 sided printing For details see Suppor...

Page 95: ... the Date and Time to Automatic by enabling NTP For details see the System Administrator Guide at www xerox com office 7100docs The time zone date or time is set incorrectly Set the time zone date and time manually For details see the System Administrator Guide at www xerox com office 7100docs Condensation has Formed Inside the Printer Moisture can condense inside a printer where the humidity is a...

Page 96: ...Troubleshooting 96 Phaser 7100 Color Printer User Guide Paper Jams This section includes Clearing Paper Jams 97 Minimizing Paper Jams 105 Troubleshooting Paper Jams 107 ...

Page 97: ...move jammed paper carefully without tearing it Try to remove the paper in the same direction it normally moves through the printer Even a small piece of paper left in the printer can cause a jam Do not reload paper that has jammed Clearing Jams at Trays 1 4 To resolve the error displayed on the control panel you must clear all paper from the paper path 1 Check each tray to ensure that no paper rem...

Page 98: ...hooting 98 Phaser 7100 Color Printer User Guide 3 Tilt the tray upward and pull to remove it 4 Remove any crumpled paper from the tray 5 Remove any remaining pieces of paper 6 Reinsert the tray into the printer ...

Page 99: ...wall to allow the tray to be inserted fully into the printer Clearing Jams at the Bypass Tray To resolve the error displayed on the control panel you must clear all paper from the paper path WARNING Internal parts of the printer can be hot Use caution when doors and covers are open 1 Remove any paper from the bypass tray 2 Lift the Cover A Release Latch and open the cover ...

Page 100: ...lor Printer User Guide 3 If paper is visible remove the jammed paper by pulling in the direction shown 4 Close the cover 5 Replace the paper in the tray Note Do not load paper above the maximum fill line Overfilling can cause paper jams ...

Page 101: ...om the paper path WARNING Internal parts of the printer can be hot Use caution when doors and covers are open 1 Lift the Cover A Release Latch and open the cover 2 Lower both green fuser levers and remove the paper by pulling it in the direction shown Note When Cover A is closed both fuser levers automatically return to their original position 3 Close the cover ...

Page 102: ... WARNING Internal parts of the printer can be hot Use caution when doors and covers are open 1 Press the Cover B Release Button and open the cover 2 Lift both green fuser levers to their full upright position then remove the paper by pulling it in the direction shown Note When Cover B is closed both fuser levers automatically return to their original position 3 Close the cover ...

Page 103: ...ou must clear all paper from the paper path WARNING To avoid burns do not clear paper jams immediately after printing The fuser becomes hot during use 1 Press the Cover B Release Button and open the cover 2 To open the fuser cover pull its tab forward 3 To open the fuser rollers lift both green fuser levers to their full upright position ...

Page 104: ...Troubleshooting 104 Phaser 7100 Color Printer User Guide 4 To open Cover E pull the tab forward and hold it open 5 Remove the jammed paper 6 Release Cover E 7 Lower the levers to their original position ...

Page 105: ...paper Loading paper incorrectly Overfilling the tray Adjusting the paper guides improperly Most jams can be prevented by following a simple set of rules Use only supported paper For details see Supported Paper on page 38 Follow proper paper handling and loading techniques Always use clean undamaged paper Avoid paper that is curled torn moist creased or folded To separate the sheets before loading ...

Page 106: ... ready to load them into the printer Leave stored paper in the original packaging The paper wrapper protects the paper from moisture loss or gain Avoid the following Polyester coated paper that is specially designed for inkjet printers Paper that is folded wrinkled or excessively curled Loading more than one type size or weight of paper in a tray at the same time Overfilling the trays Allowing the...

Page 107: ...paper Use only Xerox approved paper For details see Supported Paper on page 38 Humidity is too high for coated paper Feed paper one sheet at a time Paper Misfeeds Probable Causes Solutions The paper is not correctly positioned in the tray Remove the misfed paper and reposition it properly in the tray Adjust the paper guides in the tray to match the size of the paper The paper tray is too full Remo...

Page 108: ...and facing away from the printer Envelopes are wrinkling The heat and pressure of the laser printing process can cause wrinkling Use supported envelopes For details see Guidelines for Printing Envelopes on page 49 Paper Jam Message Stays On Probable Causes Solutions Some paper remains jammed in the printer Recheck the media path and make sure that you have removed all of the jammed paper One of th...

Page 109: ...cease functioning at a predetermined point Grayscale images printed with the composite black setting increment the color pages counter because color consumables are used Composite black is the default setting on most printers Controlling Print Quality Various factors can affect the quality of the output of your printer For consistent and optimum print quality use paper designed for your printer an...

Page 110: ...rint job from the print driver For instructions on setting the print quality see Selecting Printing Options on page 57 To control the print quality Ensure that the print quality is set to the correct mode For example if the image does not appear as vivid and sharp as you expect set the print quality to Photo The default setting is Standard Use the print quality settings in the print driver to cont...

Page 111: ...e the fuser Stray black dots or white areas dropouts 1 Replace the paper with a recommended size and type and confirm that your control panel and print driver settings are correct For details see Supported Paper on page 38 2 Verify that the toner cartridges meet specifications and replace them if necessary For details see Consumables on page 87 Repeating Spots or Lines Spot or lines appear at regu...

Page 112: ...ble Dew Prevention From the control panel select Menu Admin Menu System Settings Dew Prevention Enabled then press OK Colors Too Light or Too Dark The print or color density is too light missing or the background is foggy 1 Verify that the paper you are using is the correct type for the printer and is loaded properly 2 Verify that the paper loaded in the tray matches the paper type selected at the...

Page 113: ...ment to center the printed image on the paper For more information go to www xerox com office 7100support Vertical White Lines or Streaks One Color Lines or streaks appear in one color of your output 1 Print the test pages to identify the affected color To print the Demo Page on the control panel select Menu Print Reports Demo Page then press OK To print the Calibration Chart on the control panel ...

Page 114: ...and Weights on page 39 3 Adjust the fuser For details see Adjusting the Fuser on page 84 4 If condensation is forming inside the printer enable Dew Prevention For details see Enabling Dew Prevention on page 85 Blotchy or mottled images 1 Compensate for the paper thickness For details see Adjusting Paper Type on page 83 2 Adjust the bias voltage offset for the affected paper type For details see Ad...

Page 115: ...ion about error or status messages on the control panel The Information button is labeled with the letter i For details see Control Panel on page 20 Error and Status Messages The printer control panel provides information and troubleshooting help When an error or warning condition occurs the control panel informs you of the problem Error messages warn you about printer conditions such as low suppl...

Page 116: ...Total Color is the number of pages printed that specify color Total Black is the number of pages printed with no color specified Total is the total number of color impressions plus black impressions Note A page is one side of a sheet of paper that can be printed on one or two sides A sheet printed on two sides counts as two impressions 5 To return the printer to Ready press Menu Using the Integrat...

Page 117: ...stration and configuration software installed on the embedded Web server in the printer It allows you to configure and administer the printer from a Web browser CentreWare Internet Services requires A TCP IP connection between the printer and the network in Windows Macintosh UNIX or Linux environments TCP IP and HTTP enabled in the printer A network connected computer with a Web browser that suppo...

Page 118: ...nline Technical Support Online Support Assistant and driver downloads www xerox com office 7100support Information about menus or error messages Control panel Help button Information pages Print from the control panel menu Order supplies for your printer www xerox com office 7100supplies A resource for tools and information such as interactive tutorials printing templates helpful tips and customiz...

Page 119: ...inter 119 User Guide This appendix includes Printer Configurations and Options 120 Physical Specifications 122 Environmental Specifications 125 Electrical Specifications 126 Performance Specifications 126 A Specifications ...

Page 120: ... tray 150 sheet Bypass Tray 1 GB RAM Universal Serial Bus USB 2 0 Ethernet 10 100 Base T True Adobe PS3 PCL 6 and XPS PostScript and PCL fonts Data Security CentreWare Internet Services CentreWare Web Remote driver installation WebJet Admin Interface Tivoli LPR Port 9100 SMB IPP IPPS and WSD printing protocols SMTP RARP auto IP IPv4 IPv6 SNMPv1 v2 v3 IPsec 802 1X WSD Bonjour SMB DNS WINS DHCP BOOT...

Page 121: ... watermarks firmware downloads using CentreWare Internet Services and storing fonts forms and macros 1 GB additional memory RAM Disk enables Secure Print Saved Print and RAM collation 550 Sheet Feeder with one universal adjustable tray Stand adjustable to 220 mm 8 7 in or 295 mm 11 6 in height Duplex Unit enables automatic 2 sided printing WNA 100 Wireless Network Adapter ...

Page 122: ...Specifications 122 Phaser 7100 Color Printer User Guide Physical Specifications Standard Configuration Configuration with Duplex Unit and Three Optional 550 Sheet Feeders ...

Page 123: ...Specifications Phaser 7100 Color Printer 123 User Guide Clearance Requirements Standard Configuration ...

Page 124: ...Specifications 124 Phaser 7100 Color Printer User Guide Configuration with Three Optional 550 Sheet Feeders ...

Page 125: ...olor Printer 125 User Guide Environmental Specifications Operating Temperature 15 32 C 59 90 F Relative Humidity Operating 15 80 non condensing Elevation For optimum performance use the printer at elevations below 3100 m 10 170 ft ...

Page 126: ...ERGY STAR Program Requirements for Imaging Equipment The ENERGY STAR and ENERGY STAR mark are registered United States trademarks The ENERGY STAR Imaging Equipment Program is a team effort between United States European Union and Japanese governments and the office equipment industry to promote energy efficient copiers printers fax multifunction printers personal computers and monitors Reducing pr...

Page 127: ...entation For faster print speeds load paper long edge feed Loading paper short edge feed reduces print speeds Paper size Letter 8 5 x 11 in and A4 210 x 297 mm sizes share the fastest print speed Larger sizes reduce print speeds Paper weight Lightweight prints faster than heavier paper such as Cardstock and Labels Paper type Plain prints faster than Glossy The maximum print speed for 1 sided print...

Page 128: ......

Page 129: ...Phaser 7100 Color Printer 129 User Guide This appendix includes Basic Regulations 130 Material Safety Data Sheets 133 B Regulatory Information ...

Page 130: ...dio or television reception which can be determined by turning the equipment off and on the user is encouraged to try to correct the interference by one or more of the following measures Reorient or relocate the receiving antenna Increase the separation between the equipment and receiver Connect the equipment into an outlet on a circuit different from that to which the receiver is connected Consul...

Page 131: ...n as 2 sided printing capability This enables you to print on both sides of the paper automatically and therefore helps to reduce the use of valuable resources by reducing your paper consumption The Lot 4 Imaging Equipment agreement requires that on models greater than or equal to 40 ppm color or greater than or equal to 45 ppm monochrome the duplex function has been auto enabled during the setup ...

Page 132: ...he market If you wish to set a longer Activation Time or would like to completely deactivate the Power Save Mode please consider that this device may then only switch to a lower energy level after a longer period of time or not at all To learn more about Xerox participation in sustainability initiatives please visit our website at www xerox com about xerox environment enus html Germany Blendschutz...

Page 133: ...e Material Safety Data Sheets For Material Safety Data information regarding your printer go to North America www xerox com msds European Union www xerox com environment_europe For the Customer Support Center phone numbers go to www xerox com office worldcontacts ...

Page 134: ......

Page 135: ...Phaser 7100 Color Printer 135 User Guide This appendix includes All Countries 136 North America 137 European Union 138 Other Countries 140 C Recycling and Disposal ...

Page 136: ...egulated due to environmental considerations The presence of these materials is fully consistent with global regulations applicable at the time that the product was placed on the market For recycling and disposal information contact your local authorities Perchlorate Material This product may contain one or more Perchlorate containing devices such as batteries Special handling may apply please see...

Page 137: ...t take back and reuse recycle program Contact your Xerox representative 1 800 ASK XEROX to determine if this Xerox product is part of the program For more information about Xerox environmental programs visit www xerox com environment or for recycling and disposal information contact your local authorities ...

Page 138: ...ical and electronic equipment to designated collection facilities free of charge Please contact your local disposal authority for information In some member states when you purchase new equipment your local retailer may be required to take back your old equipment free of charge Please ask your retailer for information Professional Business Environment Application of this symbol on your equipment i...

Page 139: ...or more information about collection and recycling of old products and batteries please contact your local municipality your waste disposal service or the point of sale where you purchased the items Penalties may be applicable for incorrect disposal of this waste in accordance with national legislation Business Users in the European Union If you wish to discard electrical and electronic equipment ...

Page 140: ...Recycling and Disposal 140 Phaser 7100 Color Printer User Guide Other Countries Please contact your local waste management authority to request disposal guidance ...

Reviews: