16_
live
live
Name
Description
System
Operation
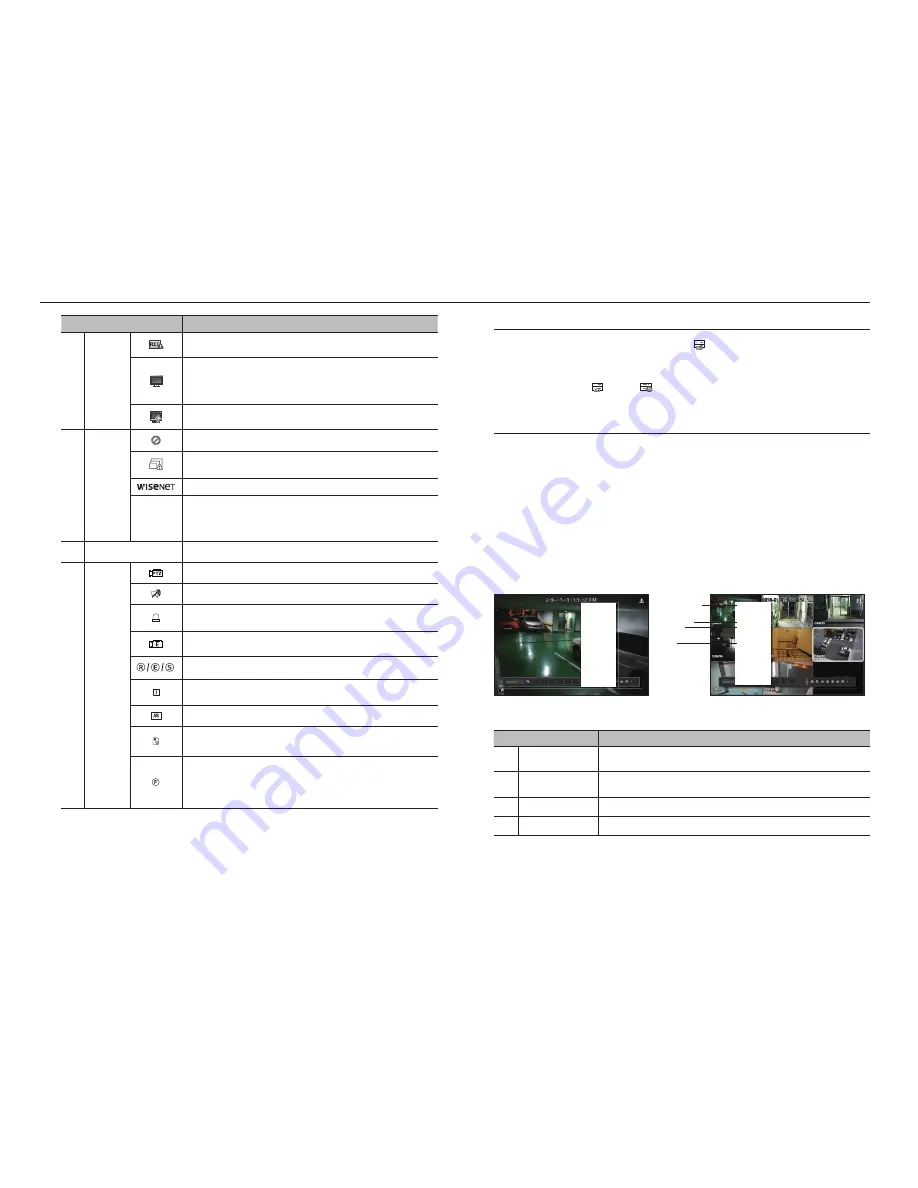
It is displayed when the max permitted amount of data for each channel is exceeded.
It is displayed when the network is overloaded.
`
It occurs when the max receiving allowance is exceeded, causing an overload to the
CPU. It will disappear if you modify the camera settings or delete a camera to reduce
the performance burden.
It is displayed when there is firmware to update the server.
Video Input
Status
Displayed if no input is entered in the condition that the camera is set to <
ON
>.
Displayed when the live image with the camera turned <
ON
> exceeds the supported
resolution.
Displayed if no permission to live view is granted.
If a camera is <
OFF
>, or if no camera is registered, or it is in <
Covert2
> mode, nothing
will be displayed on the screen.
If the camera is set to <
Covert1
>, the video will be displayed but the OSD menus will not
be displayed.
Camera Title / Channel
Display the camera title and channel number.
Camera
Operation
This icon is displayed for a channel that a PTZ-featuring camera is connected to.
Displays AUDIO ON/MUTE. Not displayed in video mode if deactivated.
If the sensor is set to <
ON
>, the input signal will be displayed on the screen of the
connected channel.
This icon is displayed when Motion Detection is set to <
ON
> and a camera motion or
camera event occurs.
It displays the status of general/event/scheduled recording.
It is displayed when it fails to decode all the frames due to limited decoding performance
and in this case only the I-Frame is decoded.
This is displayed when a POS (text) event occurs.
RED
- Displayed when there is any abnormality in the RED-SD card.
YELLOW
- Displayed when there is no storage space in the SD card.
Simple focus starts when clicking on the corresponding icon.
When the defocus event occurs, the light blinks from the camera. When the corresponding
icon is clicked, the simple focus command is sent to the camera.
`
Only available on the camera which has defocus detection function.
Error Information
• If the built-in HDD is not connected, the “NO HDD” icon (
) will be displayed in the top left corner. In this
case, make sure you contact the service center for assistance as this may cause a failure of recording,
playback or backup.
M
`
If you see the NO HDD (
), HDD FAIL (
) icons on the screen, contact the service center for more details.
Live Screen Menu
Beside the functional buttons for your remote control, in the live screen mode, you can right click with the
mouse button or press the [
MENU
] button on your remote control to launch the live screen menu from where
you can access each menu from.
The context menu differs depending on the state of Log in/out, split mode, and NVR operation status.
M
`
Depending on the user permissions, you may have limited access to menu items of Live View, Backup, Stop Recording,
Search, PTZ, Remote Alarm Output, and Exit.
Single Mode Menu
The single mode menu is available only in Single Mode.
If the menu is displayed as <
Screen Mode
> in the single screen, it is displayed as a <
Full Screen
> in the
menu where only one channel is selected in the split screen.
Menu
Description
Full Screen
Select and click a desired channel in Split mode to switch to the full screen of the selected
channel.
b
PTZ Control
Accesses the PTZ Control menu. The PTZ menu will be active on the Live screen after you
select a single channel. (Page 23)
c
ZOOM
You can enlarge the selected screen. (Page 21)
Capture
Captures the screen of the selected channel. (Page 22)
Scene Mode
Layout
Keep ch. scr ratio
Status
PTZ Control
ZOOM
Audio
Freeze
Stop Alarm
Capture
Record
Play
Search
Backup
Menu
Quick Setup
Shutdown
Logout
Hide Launcher
< Single Mode Menu >
< One channel selection menu in the split screen >
Full Screen
Layout
Keep ch. scr ratio
Status
PTZ Control
ZOOM
Audio
Freeze
Stop Alarm
Capture
Record
Play
Search
Backup
Menu
Quick Setup
Shutdown
Logout
Hide Launcher
b
c


