background image

1143200 

SmartPAC PRO Installation Manual 

36 


Chapter 2 – Installing SmartPAC PRO 


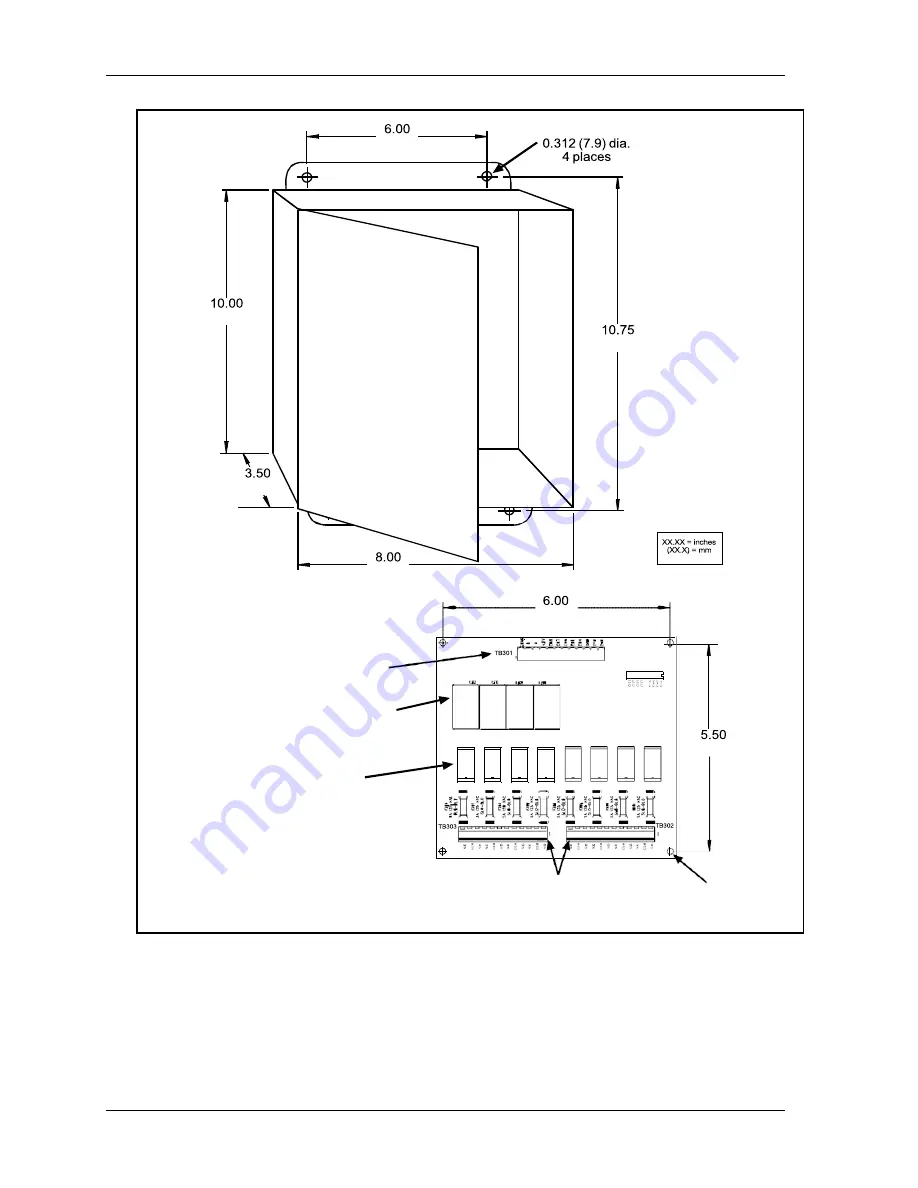
Figure 2-11. ProCamPAC Output Assembly


Cam output 
enclosure


(152.4) 


(254.0) 


(273.1) 


(88.9) 


(203.2) 


(152.4) 

Cam output 
board


Connections to control 

DS301 

Sockets for solid state relays 
only (Channels 5 through 8) 

CH8  CH7  CH6  CH5  CH4  CH3  CH2  CH1 


(139.7) 

Sockets for 

standard relays

(Channels 1 

through 8) 


NOTE: 
For channels 5-8,
plug in standard or 
solid state, but not both 

CHAN 8  CHAN 7  CHAN 6  CHAN 5 

CHAN 4   CHAN 3  CHAN 2  CHAN 1 

Terminals for connecting wires to equipment 

Clearance hole 
for #6 screw 
(4 places) 

Summary of Contents for SmartPAC PRO

Page 1: ...ne 800 586 8324 8 5 EST www wintriss com Wintriss Controls Group LLC 100 Discovery Way Unit 110 Acton MA 01720 USA Phone 800 586 8324 Fax 978 263 2048 PRINTED IN USA For complete SmartPAC PRO documentation scan the code below or visit www wintriss com edocs options case sensitive ...

Page 2: ......

Page 3: ...rning We ask that you either email or fax us a PO for that amount or enclose the PO with the returned item This will enable us to ship the item back to you as soon as the repair has been completed If the item cannot be repaired or there are additional charges you will be contacted for approval Please be sure to carefully pack all returned items and ship to our Acton MA location Expedited Repair Pr...

Page 4: ......

Page 5: ...ro Sensor Interface to SmartPAC PRO 31 Connecting ProCamPAC Programmable Cam Channels 34 Wiring Setup Mode Circuit 39 Wiring a Remote Reset Switch Optional 40 Wiring a Sensor Disabled Output Optional 40 Wiring the ProCamPAC Output with Your Mechanical Top Stop Cam Switch Optional 41 Zeroing the Resolver 42 Turning on Power to SmartPAC PRO 42 Verifying Installation of DiProPAC and or ProCamPAC Opti...

Page 6: ...ncorrect 57 Stop time exceeded 58 Messages for Programming Problems 59 No tool number has been loaded 59 Tool number table checksum error 59 Messages for Sensor Faults 60 Green sensor missed 60 Green sensor actuated late 60 Green sensor failure 60 Green constant fault 60 Green quick check sensor actuated outside ready 61 Green special fault 61 Fault message for yellow sensors This N O sensor is gr...

Page 7: ...rtPAC PRO Panel Mount Cutout Dimension 20 Figure 2 3 SmartPAC PRO Panel Mount Dimensions 21 Figure 2 4 Resolver Dimensions 22 Figure 2 5 Location of Terminal Blocks TB1 through TB8 22 Figure 2 6 Wiring AC to Terminal Block Inside Enclosure Top Right 26 Figure 2 7 Input Check Voltage Switch S101 in the Factory Default 60 250V Position 28 Figure 2 8 SmartPAC PRO Main RTS Board showing option module ...

Page 8: ...ring Sensors 17 24 33 Table 2 6 DiPro Sensor Interface DSI 2 to SmartPAC PRO Wiring Sensors 25 32 33 Table 2 7 ProCamPAC to Cam Output Assembly SMARTPAC PRO01 Wiring Cams 1 8 37 Table 2 8 ProCamPAC to Cam Output Assembly SMARTPAC PRO01 Wiring Cams 9 16 37 Table 2 9 Connections to Relays 38 Table 2 10 Aux I O TB5 Wiring 40 Table 2 11 SFI Port 1 and Module Port 2 TB6 Wiring 51 Table 2 12 Special Por...

Page 9: ...he messages that display on the SmartPAC PRO front panel when a fault condition occurs or a counter preset is reached and shows you how to correct SmartPAC PRO faults Setup sheets at the end of the manual provide forms on which you can maintain a record of Initialization and Program settings for your SmartPAC PRO Wiring diagrams Figures 1 through 8 following the Setup sheets provide wiring connect...

Page 10: ......

Page 11: ...voided will result in death or serious injury A WARNING symbol indicates a potentially hazardous situation which if not avoided could result in death or serious injury CAUTION A CAUTION indicates a potentially hazardous situation which if not avoided may result in property damage NOTICE A NOTICE symbol indicates important information that you should remember including tips to aid you in performanc...

Page 12: ......

Page 13: ...oper installation misuse misapplication negligence accident or unauthorized modification The provisions of this warranty do not extend the original warranty of any product which has either been repaired or replaced by Wintriss Controls No other warranty is expressed or implied Wintriss accepts no liability for damages including any anticipated or lost profits incidental damages consequential damag...

Page 14: ......

Page 15: ...r be used to provide timing signals for any safety use including clutch brake control or muting of light curtains Failure to comply with these instructions will result in death or serious injury NOTICE OPTIONAL MODULES PROCAMPAC AND DIPROPAC INCLUDED IN MANUAL When you order your SmartPAC PRO you may include the DiProPAC die protection and or ProCamPAC programmable cam switch option This manual in...

Page 16: ...our Mechanical Top Stop Cam Switch Optional 41 Zeroing the Resolver 42 Turning on Power to SmartPAC PRO 42 Verifying Installation of DiProPAC and or ProCamPAC Optional 43 Moving the Ram to Top Dead Center TDC 44 Setting the Resolver Zero Position 44 Installing the Position Sensor Optional 45 Final Checkout 49 Set Up a Test Tool 49 Check and Set Direction of Rotation of Resolver 49 Check for Positi...

Page 17: ... cases the AC power supply wires should be connected directly to the press control cabinet Do not use the ProCam output enclosure as a junction box for the AC control wires Provide a separate junction box for this purpose Communications wiring should be run separately in its own conduit Communications wiring will be installed if SmartPAC PRO is connected to the WPC 2000 Wintriss Clutch Brake Contr...

Page 18: ...the shield braid or drain wire to either a chassis ground stud or under the screw on a PC board standoff Find one of these as close as possible to the terminal block you are wiring 3 Connect the shield drain wire or braid to the chassis ground stud or beneath the screw in the PC board standoff 4 Connect the insulated wires to their designated positions on the terminal block Checking the Press Befo...

Page 19: ...6 cm if you wish to fully open the enclosure s door 1 Determine a convenient location for the enclosure Ideally the enclosure should be mounted where operators and setup personnel can easily see the readouts and reach the display Make sure that all cables can reach the enclosure Leave enough room to open the door at least 120 The enclosure can be mounted on a pedestal pendant or the press itself 2...

Page 20: ... and reach the display 2 Cut out a hole in your enclosure and drill and tap twelve holes for 10 32 screws referring to Figure 2 2 page 20 and Figure 2 3 page 21 for mounting and cutout dimensions 3 Prop the panel mount near the cutout location You can do this by connecting ty wraps from two of the left holes on the panel to the corresponding holes on the enclosure or console creating hinges 4 Perf...

Page 21: ...n the resolver shaft retains the resolver sprocket Use a pin or other method to fix the location of the sprocket on the crankshaft Failure to comply with these instructions will result in death or serious injury The resolver see Figure 2 4 Resolver Dimensions for dimensions provides SmartPAC PRO with the exact position of the crankshaft at every angle throughout the stroke see Resolver based Opera...

Page 22: ...1143200 SmartPAC PRO Installation Manual 22 Chapter 2 Installing SmartPAC PRO Figure 2 4 Resolver Dimensions Figure 2 5 Location of Terminal Blocks TB1 through TB8 91 9 3 75 ...

Page 23: ...e additional precautions when designing the resolver drive Do not use a long sloppy chain The distance between the center of the resolver shaft and the center of the crankshaft should be no more than 3 feet 1 m Do not use gears right angle joints or shafts with universal joints because these will develop too much backlash or too much play Do not try direct coupling to the crank because this requir...

Page 24: ... Refer to Figure 2 20 page 48 for a typical position sensor mounting location The position sensor is usually placed near the resolver 3 Find the resolver connector TB 3 on the SmartPAC PRO board see Figure 2 5 page 22 4 Measure and cut the resolver wires so they comfortably reach SMARTPAC PRO If you run the position sensor cable through the same conduit do not cut these wires until the position se...

Page 25: ...ing connections This includes power to the machine control and motor Failure to comply with these instructions could result in death or serious injury Run the AC power wires through a high voltage conduit see Installation Guidelines page 17 along with the wiring for emergency stop top stop and input check circuits No 16 wire No 14 if local codes require it with a minimum 75 C temperature rating is...

Page 26: ...connection as follows SmartPAC PRO Enclosure Connect your ground green or green yellow wire to the set screw terminal on the inside of the enclosure To connect to the set screw terminal strip the ground wire about 1 4 in 6 4 mm from end loosen the screw on the terminal slide the wire in the hole and tighten the screw to secure the wire in place SmartPAC PRO Panel Mount Connect the ground wire to t...

Page 27: ... one of the coils on the Dual Safety Valve that controls the clutch brake When the clutch is engaged 12 250 VAC or VDC 50 60 Hz must be present across terminals A and B as shown in Figure 2 9 The connection can be made inside the press control where the circuits to the valve relays are connected Refer to your press control manual and electrical prints It does not matter which wire goes to terminal...

Page 28: ...ll wires in a way consistent with your press s electrical prints 5 Make all the necessary conduit connections to ensure NEMA 12 protection Setting the Input Check Voltage Switch To set voltage for the input check circuit do the following 1 Find the input check voltage switch S101 on the SmartPAC PRO board It is located on the right side of the board just to the left of the E stop relays 2 Place S1...

Page 29: ...t boards or chips by touching a large metal object such as the press Static electricity can destroy electronic components Failure to comply with these instructions could result in property damage NOTICE INSTALL DIPROPAC AND OR PROCAMPAC BOARD IN CORRECT LOCATIONS Install these boards in the locations shown in Figure 2 8 page 30 If you install a board in the wrong location SmartPAC PRO will not rec...

Page 30: ...se instructions could result in property damage 2 Making sure that you are grounded install the new board by plugging it into the appropriate connector Connectors are keyed so you can plug in the boards in only one direction 3 When the board is properly seated screw it down to the four standoffs using the screws that came with the kit 4 Remove the connector s from the board one connector for an 8 ...

Page 31: ...o SmartPAC PRO NOTICE For information about using the DiProPAC see Chapter 6 Using DiProPAC Die Protection Optional in your user manual To connect your DiPro die protection sensors through the DiPro Sensor Interface DSI 2 refer to Table 2 3 to wire sensors 1 8 Table 2 4 to wire sensors 9 16 Table 2 5 to wire sensors 17 24 Table 2 6 to wire sensors 25 32 Refer to wiring diagrams at the end of the m...

Page 32: ...tion 11 5 VDC No connection Shield Terminate drain wire to ground stud Terminate drain wire to ground stud Your colors may be different Table 2 4 DiPro Sensor Interface DSI 2 to SmartPAC PRO Wiring Sensors 9 16 Wire color 2nd DSI 2 TB2 DiProPAC TB554 Pin Pin Designation Pin Pin Designation Brown 1 SENSOR 1 292 SENSOR 9 Red 2 SENSOR 2 293 SENSOR 10 Orange 3 SENSOR 3 294 SENSOR 11 Yellow 4 SENSOR 4 ...

Page 33: ...e drain wire to ground stud Terminate drain wire to ground stud Your colors may be different Table 2 6 DiPro Sensor Interface DSI 2 to SmartPAC PRO Wiring Sensors 25 32 Wire color 4th DSI 2 TB2 DiProPAC TB555 Pin Pin Designation Pin Pin Designation Brown 1 SENSOR 1 190 SENSOR 25 Red 2 SENSOR 2 191 SENSOR 26 Orange 3 SENSOR 3 192 SENSOR 27 Yellow 4 SENSOR 4 193 SENSOR 28 Green 5 SENSOR 5 194 SENSOR...

Page 34: ... instructions below These instructions may be used with either the 8 or 16 channel ProCamPAC board Refer to Table 2 7 and Table 2 8 for wiring connections A wiring diagram is provided in Figure 3 at the end of the manual 1 Select a convenient location for running conduit from the ProCamPAC Output Assembly to the equipment that it will control 2 Mount the output enclosure using the mounting holes o...

Page 35: ...board two cables are supplied one for channels 1 through 8 the other for channels 9 through 16 Figure 2 10 ProCamPAC Boards 8 and 16 Channel Location of Components 6 Remove the appropriate connector s from its socket on the ProCamPAC board TB401 for an 8 channel ProCamPAC TB451 and TB452 for a 16 channel ProCamPAC Connect wires from the 12 conductor cable s to the pin locations on the appropriate ...

Page 36: ...t board Connections to control DS301 Sockets for solid state relays only Channels 5 through 8 CH8 CH7 CH6 CH5 CH4 CH3 CH2 CH1 139 7 Sockets for standard relays Channels 1 through 8 NOTE For channels 5 8 plug in standard or solid state but not both CHAN 8 CHAN 7 CHAN 6 CHAN 5 CHAN 4 CHAN 3 CHAN 2 CHAN 1 Terminals for connecting wires to equipment Clearance hole for 6 screw 4 places ...

Page 37: ...C TB452 cams 9 16 Pin 2nd Cam Output Board TB301 Pin CHAS 1 White Relay Pwr 281 B 2 Black GND 280 A 3 Red 5 279 5 Vdc 4 Tan Ch 16 278 Ch 8 5 Pink Ch 15 277 Ch 7 6 Gray Ch 14 276 Ch 6 7 Blue Ch 13 275 Ch 5 8 Yellow Ch 12 274 Ch 4 9 Orange Ch 11 273 Ch 3 10 Purple Ch 10 272 Ch 2 11 Brown Ch 9 271 Ch 1 12 7 Plug the connector s back into the socket s 8 Run the cable s through conduit to TB301 in the ...

Page 38: ...C one wire to N O polarity does not matter SPST WARNING INCORRECT SUPPRESSOR INSTALLATION MAY CAUSE RELAYS TO REMAIN ENERGIZED Ensure that suppressors are correctly installed They must not be installed across the relay contacts inside the ProCamPAC Output enclosure If a suppressor is installed across the relay contacts and it fails shorted the equipment controlled by that relay will remain energiz...

Page 39: ...circuit is enabled when Inch mode is selected on your clutch brake control When you inch the press SmartPAC PRO will not stop the press when a fault condition is detected The Setup mode terminal can be wired to an extra contact on the Inch position of the Stroke Select keyswitch of your press control or you can use an external switch to activate the circuit If you intend to use the Setup mode circ...

Page 40: ... can be wired to a normally open switch to activate the circuit Be sure to plan how you will run your wiring for this connector so that you do not have to disconnect conduit or re run wires through conduit later Connect a wire from SmartPAC PRO TB5 terminal 249 labelled RST to a normally open switch see Table 2 10 and Figure 4 at the end of the manual Connect another wire from the switch to GND TB...

Page 41: ...imic Auto compensated Top Stop ACTS Test the system after wiring as described below to ensure proper functioning of the Top stop circuit Failure to comply with these instructions could result in death or serious injury The diagrams provided in Figure 2 14 show how to wire ProCamPAC and your mechanical cam switch for Top Stop This optional top stop wiring only aids in adjusting the top stop and in ...

Page 42: ...ure next Turning on Power to SmartPAC PRO To turn on power to SmartPAC PRO do the following 1 Make sure there is no die in the press 2 Turn the PROG RUN keyswitch to PROG 3 Power up the SmartPAC PRO The green Power light on the SmartPAC PRO front panel illuminates the display shows various startup screens and the Brake Warning LED flashes at approximately two second intervals while SmartPAC PRO co...

Page 43: ...rtPAC PRO board and the display Power up SmartPAC PRO again If the display remains off contact Wintriss Tech Support Verifying Installation of DiProPAC and or ProCamPAC Optional If you installed DiProPAC and or ProCamPAC on SmartPAC PRO you need to verify that the installation was done correctly and that the option is available Do the following 1 On the SmartPAC PRO Main Program Menu select INITIA...

Page 44: ...the tool following the directions in COUNTERS Chapter 4 SmartPAC PRO Program Mode in your user manual 3 Load the tool following the instructions in Loading a Tool Chapter 4 SmartPAC PRO Program Mode in your user manual 4 Turn the PROG RUN keyswitch to RUN and inch the press to 0 2 NOTICE USE A DIAL INDICATOR TO DETERMINE TDC Do not rely on the SmartPAC PRO display to indicate when the press has re...

Page 45: ... RESOLVER ANGLE Figure 2 17 Resolver Zero Screen 4 Press Exit when you are finished You are returned to the Main Initialization Menu Installing the Position Sensor Optional CAUTION MISALIGNMENT OF RESOLVER AND CRANKSHAFT If you have installed the position sensor enable it during initialization and leave it enabled even though it is optional for SmartPAC PRO operation If you disable the position se...

Page 46: ...esence of the magnet A gap between switch and magnet of between 1 8 in and 3 16 in about 3 5 mm is recommended The position sensor must be mounted so that it is not connected to the resolver shaft or sprocket or any of the drive components leading to the resolver and continue to operate if the resolver or its drive mechanism fails The position sensor must be installed only after the resolver is ze...

Page 47: ...ing a Tool in Chapter 4 Program Mode of your user manual 10 Access the Position Sensor screen again see steps 4 and 5 11 Check the CURRENT RESOLVER ANGLE setting If it is not zero 0 inch the press until it reads zero NOTICE The crankshaft angle reading should increase as you inch the press If it decreases 359 358 357 for example swap the black and yellow wires terminals 213 and 216 on connector TB...

Page 48: ...e next step If the reading is OFF there is a problem Try the following remedies Double check the wiring Make sure that the ram hasn t moved since you installed the sensor If it has move the ram to TDC i e 0 and re install the magnet see step 14 If the ram hasn t moved check the distance between the magnetic switch and the magnet Re adjust if necessary If a Position Sensor Incorrect error message d...

Page 49: ... 1 Create a Test tool following the steps under Creating a New Tool in Chapter 4 Program Mode of your user manual 2 Enter a counter preset of 10 000 for the tool following the directions under COUNTERS in Chapter 4 Program Mode of your user manual 3 Load the tool following the instructions Loading a Tool in Chapter 4 Program Mode of your user manual then turn the PROG RUN keyswitch to RUN Check an...

Page 50: ...our user manual If the press stops correctly go to step 8 If the press does not stop there is a wiring problem in your emergency stop circuit Recheck all wiring and trace the cause of the problem Check Cam Channels ProCamPAC Only 8 Create some test settings for your cam channels in Program mode see Run Mode CAM SWITCH ProCamPAC in Chapter 7 ProCamPAC Instructions in your user manual load the tool ...

Page 51: ...ignal Port Pin Signal Port 235 RXD1 SFI PORT 1 224 RXD3 SPECIAL PORT 3 236 RXD1 225 RXD3 237 TXD1 226 TXD3 238 TXD1 227 TXD3 239 TXD1 228 TXD3 240 GND 229 GND 241 RXD2 MODULE PORT 2 230 RXD4 PORT 4 242 RXD2 231 RXD4 243 TXD2 232 TXD4 244 TXD2 233 TXD4 234 TXD4 Table 2 13 Spare 1 Port 5 and WPC Port 6 TB8 Wiring Pin Signal Port 330 TXD6 WPC PORT 6 329 TXD6 328 RXD6 327 RXD6 326 GND 325 TXD5 324 TXD...

Page 52: ...1143200 SmartPAC PRO Installation Manual 52 Chapter 2 Installing SmartPAC PRO ...

Page 53: ...ncreases to within 10 mS of the Stop time Limit set in Initialization see SET BRAKE MONITOR in Chapter 3 SmartPAC PRO Initialization Mode in your user manual the amber Brake Warning LED on the SmartPAC PRO front panel see Chapter 1 in your user manual will flash Illumination of this LED often means that the brake is worn and or defective To respond do the following 1 Contact your maintenance crew ...

Page 54: ...In the following sections messages are grouped in four categories Messages that display when a counter preset is reached Messages that display for equipment or brake monitor problems Messages that display for programming problems Messages that display when a sensor signals a fault Counter Preset Reached Messages Good parts counter preset reached Explanation The value set for the parts counter has ...

Page 55: ...nternal problems with SmartPAC PRO Loss of rotation detected Explanation The resolver did not start rotating within the start time limit set in Initialization see SET BRAKE MONITOR in Chapter 3 SmartPAC PRO Initialization Mode in your user manual or stopped rotating while the press was running SmartPAC PRO knows when the Dual Safety Valve DSV is energized If it sees that the DSV is energized but t...

Page 56: ...ailure Explanation The resolver turned five times indicating that the press was running but SmartPAC PRO received no signal from the input check circuit The input check circuit may not have been connected or wired properly If this message occurs when the press stops the brake may be worn Remedy Check the wiring of the input check circuit and rewire if necessary following the instructions in Connec...

Page 57: ... have a position sensor be sure to disable the position sensor in Initialization mode and make no connections to pin 246 on TB5 E Stop errors Explanation If the word ESTOP appears in a message one or both of the emergency stop relay circuits are not working satisfactorily and may be defective Remedy Check both stop relay circuits To reset SmartPAC PRO turn the unit off then on again You cannot use...

Page 58: ...cient to allow for normal brake wear or the brake is excessively worn and needs servicing If the brake is worn a dangerous safety problem may exist and should be corrected immediately Remedy First perform several 90 stop time test runs to get an actual reading for your press s stop time Compare these results with the results you got the last time you performed the test Decide if the current stop t...

Page 59: ...nformation in the older firmware does not synchronize properly with the information in the new firmware Settings can also be damaged due to an internal SmartPAC PRO malfunction SmartPAC PRO creates a checksum for every tool to check that the tool settings stored in memory are the same as the settings that are loaded with the tool The checksum value calculated when tool settings are stored in memor...

Page 60: ...on A green or green quick check sensor turned on within 50 milliseconds after the end of the Ready signal If a green or green quick check sensor does not come on during its Ready signal SmartPAC PRO continues to look for the sensor signal If it sees the sensor come on within 50 milliseconds after the Ready signal ends this message displays The angle at which the sensor turned on is shown in the me...

Page 61: ...ault Explanation A green special sensor did not actuate i e there was no contact closure to ground within the maximum number of strokes set in Program mode Remedy Check for the press or equipment malfunction that the sensor was supposed to detect Check for any cause that would keep the sensor from going on Make sure the maximum stroke count is set correctly especially that it is not set too low Se...

Page 62: ... Chapter 4 Program Mode of your user manual The resolver position is different from when the unit was turned off Explanation This message will only appear if SmartPAC PRO detects that the resolver angle when the press is turned on is different from the angle when the press was turned off This can happen when you move the press or upgrade SmartPAC PRO firmware Remedy Press RESET to clear If the mes...

Page 63: ...Channels 5 8 Loss of Communication at Address 4 RamPAC Loss of Communication at Address 5 ProPAC Troubleshooting Using the Error Event Log The Error Event Log which you can view in Run mode is a useful troubleshooting aid You can use the Error Event log to help you diagnose the cause of a problem or you can send the log to Wintriss Tech Support to help them narrow down probable causes For more inf...

Page 64: ...1143200 SmartPAC PRO Installation Manual 64 Chapter 8 SmartPAC PRO Fault Messages ...

Page 65: ... _______mS Top Stop Toggle Pulse for _______mS Increment mode circle one Strokes Good Parts Strokes Good Parts Strokes Good Parts Increment angle degrees This tool should be serviced when the TOTAL HITS count reaches ________________ Strokes Part _____________ OR Parts Stroke ______________ Tool Information Item Value Units Tool Memo box text 30 characters total __ __ __ __ __ __ __ __ __ __ __ __...

Page 66: ......

Page 67: ...F Multiple arcs for ON OFF only 6 extras total Arc Normally 1 arc per channel can be up to 4 ON angle OFF angle 1 ____ ____ mS ____ sec Arc 1 Arc 2 Arc 3 Arc 4 2 ____ ____ mS ____ sec Arc 1 Arc 2 Arc 3 Arc 4 3 ____ ____ mS ____ sec Arc 1 Arc 2 Arc 3 Arc 4 4 ____ ____ mS ____ sec Arc 1 Arc 2 Arc 3 Arc 4 5 ____ ____ mS ____ sec Arc 1 Arc 2 Arc 3 Arc 4 6 ____ ____ mS ____ sec Arc 1 Arc 2 Arc 3 Arc 4 ...

Page 68: ......

Page 69: ...ultiple arcs for ON OFF only 6 extras total Arc Normally 1 arc per channel can be up to 4 ON angle OFF angle 9 ____ ____ mS ____ sec Arc 1 Arc 2 Arc 3 Arc 4 10 ____ ____ mS ____ sec Arc 1 Arc 2 Arc 3 Arc 4 11 ____ ____ mS ____ sec Arc 1 Arc 2 Arc 3 Arc 4 12 ____ ____ mS ____ sec Arc 1 Arc 2 Arc 3 Arc 4 13 ____ ____ mS ____ sec Arc 1 Arc 2 Arc 3 Arc 4 14 ____ ____ mS ____ sec Arc 1 Arc 2 Arc 3 Arc ...

Page 70: ......

Page 71: ... SMART STOP ON OFF 7 G R Y GC GQ GS ______strokes E STOP TOP STOP SMART STOP ON OFF 8 G R Y GC GQ GS ______strokes E STOP TOP STOP SMART STOP ON OFF 9 G R Y GC GQ GS ______strokes E STOP TOP STOP SMART STOP ON OFF 10 G R Y GC GQ GS ______strokes E STOP TOP STOP SMART STOP ON OFF 11 G R Y GC GQ GS ______strokes E STOP TOP STOP SMART STOP ON OFF 12 G R Y GC GQ GS ______strokes E STOP TOP STOP SMART ...

Page 72: ......

Page 73: ...OP SMART STOP ON OFF 23 G R Y GC GQ GS ______strokes E STOP TOP STOP SMART STOP ON OFF 24 G R Y GC GQ GS ______strokes E STOP TOP STOP SMART STOP ON OFF 25 G R Y GC GQ GS ______strokes E STOP TOP STOP SMART STOP ON OFF 26 G R Y GC GQ GS ______strokes E STOP TOP STOP SMART STOP ON OFF 27 G R Y GC GQ GS ______strokes E STOP TOP STOP SMART STOP ON OFF 28 G R Y GC GQ GS ______strokes E STOP TOP STOP S...

Page 74: ......

Page 75: ......

Page 76: ......

Page 77: ......

Page 78: ......

Page 79: ......

Page 80: ......

Page 81: ......

Page 82: ......

Page 83: ......

Page 84: ......

Page 85: ......

Page 86: ......

Page 87: ......

Page 88: ......

Page 89: ......

Page 90: ......

Page 91: ......

Page 92: ......

Reviews: