4-4
n
Vesta Gas and Electric Slide-In Ranges
DIAGNOSTICS & TROUBLESHOOTING
For Service Technician Use Only
FOR SERVICE TECHNICIAN’S USE ONLY
4
5.
To activate the relays manually in the test mode, press the following
keypads:
NOTE:
■
In Test Mode, double line break relays (K13 and K14) are automatically
turned on.
When a relay is activated the appropriate letter as shown in the chart will be
displayed.
If the control reads that the cavity sensor is open or not connected, it will
display “0Pn.” If the control reads that the cavity sensor is shorted, it will
display “Srt.”
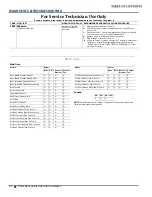
Key Pressed
Relay Activated
Bake (Main)
K4 (bake igniter or element) On/Off
Broil
K5 (broil igniter or element) On/Off and
K3 (broil assist element) On/Off (for gas models only)
Keep Warm
K7 (convection fan) On/off
Bake (Drawer)
K1 (drawer element) On/Off
Convect
K2 (convection element) On/Off
Downdraft High
K11 (downdraft fan high) On/Off
Downdraft Low
K8 (downdraft fan low) On/Off
Warming Zone
K12 (warming zone) On/Off
Oven Light
K6 (oven light) On/Off
Timer
K9(cooling fan) On/Off
Relay Activated
Display
Bake
b
Broil
r
Convect
c
Convect Fan
H
Cooling Fan
C
Door Open
l
Door Closed
0
Drawer
D
Oven Light
%
Cooktop Lockout Solenoid Valve (for gas models only)
Cooktop icon is lit
5
6.
Press the number 3 or 6 keypads until “Usage” is displayed, then press the
Start keypad.
7.
Select the “On” time for the different modes (all time in hours).
8.
Press the number 3 or 6 keypads until “Version” is displayed, then press
the Start keypad.
9.
Verify the software version.
10.
Press the number 3 or 6 keypads until “Display” is displayed, then press
the Start keypad.
11.
Verify that all the segments of the display are lit.
12.
Press the number 3 or 6 keypads until “Control Reset” is displayed, then
press the Start keypad.
13.
Reset the control for soft control reset.
14.
Press the number 3 or 6 keypads until “Faults” is displayed, then press the
Start keypad.
15.
Press the number 3 or 6 keypads to navigate through the errors and see all
the recorded faults.
16.
Press the number 3 or 6 keypads until “Semi Auto Test” is displayed, then
press the Start keypad.
■
Semi Automatic Test is the enhanced diagnostic procedure where the
control tests all the relay loads and Input/Output on the control
automatically and reports the failures and faults.
17.
Open and close the oven door when directed.
18.
Press the appropriate keypad to indicate Yes or No for the component relay
for desired testing. The control will display the appropriate component fault
code(s) in the format “F#E#” (the description of the component fault is also
displayed).
19.
If no faults are detected, the control screen will read “Control good - No
Fault Found.”
20.
Do not replace the control unless the display screen indicates the control is
not working or you are directed to do so.
NOTES:
■
The Cancel keypad can be pressed at any time when the control is in the
Diagnostic Mode or any of the submenus. Pressing the Cancel keypad will
return the control to the time of day screen.
■
Entering Diagnostic Mode will cancel any active oven operation.
■
Enter the Diagnostic Mode only after the oven is cool.
■
Semi Automatic test is a self diagnostic function built into the oven control.
■
Diagnostic Mode automatically times out and returns to the time of day
screen after 5 minutes.
■
To erase all error codes: Enter Diagnostic Mode by pressing
CANCEL>CANCEL>START within 5 seconds. Press the number 3 or 6
keypads until “Faults” appears. Press START TIME or DELAY START to
clear all error codes.


