background image

Marquee ACON Ultra Installation/Operation Guide 

D-6 


Subassembly Replacement 

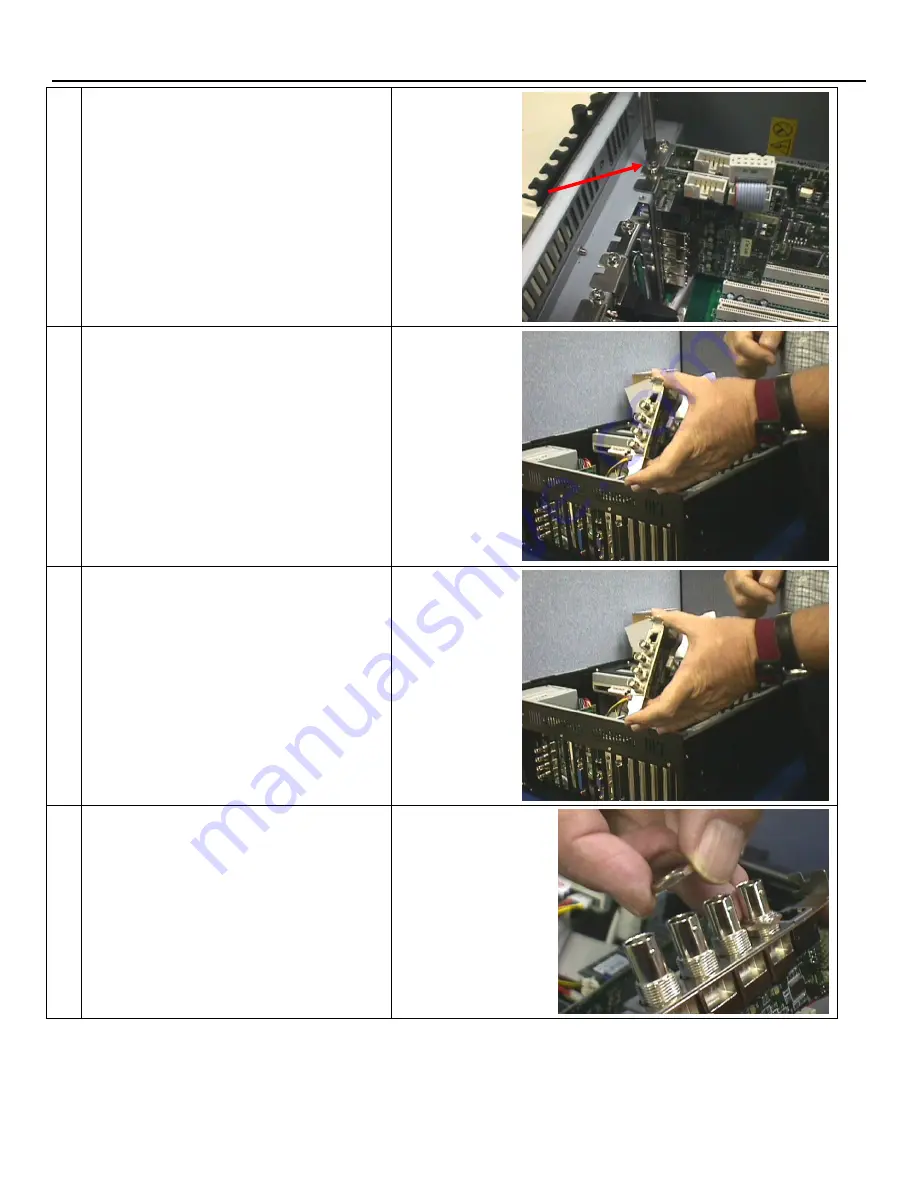
25.  Remove the screw securing the PCB in the 

second slot. 


26.  Carefully remove the video expansion PCB 

from the second slot. 


27.  Remove the new PCB (81753-01) from the 

package and record its serial number. 


28.  Remove 2 nuts from the BNC connectors. 


Summary of Contents for 69871-01

Page 1: ...l service in house repair center WE BUY USED EQUIPMENT Sell your excess underutilized and idle used equipment We also offer credit for buy backs and trade ins www artisantg com WeBuyEquipment REMOTE INSPECTION Remotely inspect equipment before purchasing with our interactive website at www instraview com LOOKING FOR MORE INFORMATION Visit us on the web at www artisantg com for more information on ...

Page 2: ...VDCDS Doc 79024 01 Revision 2 0 2 07 30 2007 MARQUEE ACON Ultra Operation Maintenance Manual ...

Page 3: ......

Page 4: ......

Page 5: ......

Page 6: ...ser Interface for ACON Ultra 2 1 2 2 1 The Graphical User Interface GUI 2 1 2 2 2 Drop Down Menus 2 2 2 2 3 Additional Menus and Dialogs 2 7 2 2 4 AU Remote Control Operation 2 23 2 3 The Setup and Calibration Process 2 24 2 3 1 Setup and Calibration Overview 2 24 2 3 2 ACON Ultra prerequisite tasks 2 24 2 3 3 Primary Relationships 2 25 2 3 4 Test Point Locations 2 27 2 3 5 Calibration 2 31 2 3 6 ...

Page 7: ...ed within a grayed text box Menu Selections are formatted as This is menu text format Control titles window titles button titles checkbox titles etc are formatted as This is a window title a button title or a checkbox title format Text that prompts the user to action is formatted as This is prompting text format Physical keyboard keys or buttons are formatted as This is a button and this is anothe...

Page 8: ...re ACON Ultra 1 EA 2 Foam ACON Ultra S camera Shipping 1 EA 3 Foam ACON Ultra S Electronics Box Shipping 1 EA 4 Box ACON Ultra S Camera Shipping 1 EA 5 Box ACON Ultra S Electronics Box Shipping 1 EA 6 Bag 10 x 8 x 24 Gusseted 7 2 EA 7 Label Blank Laser 2 5 8 x 2 1 EA 8 Cable Assy 40 20 Pin ACON Ultra S 1 EA 9 Cable Assy 40 13 Pin ACON Ultra S 1 EA 10 Wrench Lens lock nut ACON Ultra 1 EA 11 Assy He...

Page 9: ...2 Contact VDC DS ACON Ultra Server Hard drive 59789S03 ACON Ultra Server Power Supply 300W ATX 81753S01 ACON Ultra Server Frame Grabber Expansion Board 81732S01 ACON Ultra Server Frame Grabber Board 81788S01 ACON Ultra Server 4 Port Serial Board 81751 01 UPS Rackmount Table 1 5 ACON Ultra Reorder Replacement P N 1 3 Camera Installation Instructions There are two camera installations one on the pro...

Page 10: ...er it is highly recommended that they do Refer to your relevant projector User s Guide for selecting and setting the projectors address ID NOTE See Section 1 4 5 for logging in the relevant projector and AU system information 1 3 1 1 Setting the Camera Address ID 1 Remove the camera assembly and hardware from the package 2 Visually inspect the contents and each component carefully for any damage 3...

Page 11: ...ly on to the front panel of the Marquee series projector a Remove the existing front panel by removing the 2 each Phillips screws as shown in Figure 1 4 b Place the camera assembly with the cover mounting surface facing up c On the new or existing front panel mount the camera assembly Item 10 as shown in Figure 1 3 d On the projector remove the lower front trim by removing the two 2 small Phillips...

Page 12: ...nly the hardware supplied in the kit Screws that are too short will strip the holes in the camera Screws that are too long will short the ACON Ultra power supply 4 places 4 places 4 places 10 6 4 5 UPGRADED FRONT COVER SUPPLIED SEPARATELY Backside Front side Refer to Table 1 1 for Item number references Manufacturer Serial Number Label Location ...

Page 13: ...r screws to secure Figure 1 4 g Remove the center two 20 bolts from the top cross bar over the green CRT and discard Figure 1 5 h Position the spacer with the long end to the left as you face the projector and align two holes with the two holes in the cross bar i Position the bracket on top of the spacer and align the bracket holes with the spacer holes j Install two 20X1 screws with washers throu...

Page 14: ...LED FROM BELOW TOP CROSS BAR 1 4 20X1 3 4 SCREW WASHER 2 8 32X5 8 SCREW WASHER 1 4 20X1 2 SCREW WASHER 4 Figure 1 5 Top Bracket Installation 1 3 2 3 Mounting the ACON Ultra 2 Camera Unit The ACON Ultra 2 camera unit is divided into two physical cases the Camera Head and the Electronics Chassis Each has a set of through holes to allow mounting to a customer designed bulkhead Two 3 cables connect th...

Page 15: ...ure 1 6 Camera Dimensions Components Inputs and Outputs To Camera head Video Out To Electronic Chassis Mounting holes Tilt Motor Pan motor Camera Mounting holes AC Power Out AC Power In Rs232 in Rs232 Out AC IN RS 232 Out RS 232 In VIDEO Out AC Out to projector Motion Control Board MCB Power Supply Camera Motor Tilt Camera Camera Motor Pan CAUTION Hot Surface ...

Page 16: ...Channel There are several USB ports which may be used for the various server peripherals in addition to the standard mouse MSE and keyboard KYPD connections The server has two built in communication ports and one expansion port This expansion port can be used for four 4 additional serial com ports using the supplied adaptor VDCDS P N 81749 02 See Figure 1 8 WA R NIN G Video Matrix USB 2 ea COM2 LP...

Page 17: ...ne AU server Each AU server incorporates 3 RS232 Serial Ports which is expanded to 6 using the adaptor cable provided and 12 Camera video inputs The projector communication in this example uses 3 of the server 6 serial ports The first projector in the group is looped to an additional two projectors The camera communication is similar to that of the projector configuration whereas the first camera ...

Page 18: ... port 4 in Figure 1 12 is connected to Camera ID 1 then looped to Camera ID 2 and then looped to Camera ID 3 Then RS232 port 5 to Camera ID 4 looped to Camera ID 5 looped to Camera ID 6 Leaving RS232 serial port 6 connected to Camera ID 7 looped to Camera ID 8 looped to Camera ID 9 1 4 4 1 Camera AC power Configuration Main AC power is supplied to each camera assembly mounted on a projector either...

Page 19: ......

Page 20: ...ID 5 Video ID 2 2 Projector ID 006 Camera ID Video ID 2 3 Projector ID 007 Camera ID 7 Video ID 3 1 Projector ID 008 Camera ID 8 Video ID 3 2 Projector ID 009 Camera ID 9 Video ID 3 3 COM 1 RS232 Camera COM 4 RS232 Projector COM 2 COM 5 COM 3 COM 6 Cable DB37 to 4 Each DB9 VDCDS P N 81749 02 Communications to addtional projectors devices i e HUD unit OPTIONAL Serial Communication 30 Serial Cable V...

Page 21: ...Marquee ACON Ultra Installation Operation Guide 1 12 ACON Ultra Camera Server Installation Instructions This page intentionally left blank ...

Page 22: ...el Configuration Notes ____________________________________________________________________________________________________ ____________________________________________________________________________________________________________________ ____________________________________________________________________________________________________________________ __________________________________________...

Page 23: ...Marquee ACON Ultra Installation Operation Guide 1 14 ACON Ultra Camera Server Installation Instructions This page intentionally left blank ...

Page 24: ...mera to be used as a physical constant by which to refer measurements The complete setup and calibration should only need to be done once in the lifetime of the AU configuration unless the physical relationship of the camera to the projector or to the projection facet changes in which case the complete Setup and Calibration operations may need to be performed again After observing AU perform sever...

Page 25: ...ion action Projector s selection window o Under the Proj column select one or more projectors to perform the AU functions o Select a single projector by simply pointing to a particular projector ID and pressing the left mouse button o Select a combination of projectors by pointing and selecting a projector ID while holding down the control Ctrl or Shift key o Select all projectors by clicking on t...

Page 26: ...mplete ACON Ultra Performs both the automatic geometric and the convergence portions of the AU operation Same as the Main screen command button Geometry Correction Performs just the automatic geometric portion of the AU operation Same as the Main screen command button Convergence Correction Performs just the automatic convergence portion of the AU operation Same as the Main screen command button R...

Page 27: ...f Standby On This explicit command places the selected projector or projectors in the Standby or video mute mode Standby Off This explicit command takes the projector s out of standby or video mute mode and displays the image on the screen s Patterns Select display projector pattern Colors Selects color of projection 2 2 2 4 Setup menu Projectors Configuration ...

Page 28: ...function is used to configure the location of the file containing the configuration settings parameters of the selected projector All projectors must have a configuration file and must have the correct location of that file properly configured via this function Use the browse button to select the file location o Advanced Configuration These functions allow the user to import and export various scr...

Page 29: ...unction Convergence This function allows the user to directly access the Convergence Test Point set which is used during the Convergence Correction operation and the third pass of the Geometry Correction operation Section 2 3 4 details the configuration of the three test point sets Screen Geometry This function allows the user to directly access the Screen Geometry Test Point Set which is used dur...

Page 30: ...in the window Projection Setup status Setup Tasks Guided Test Point setup Message window Each of these regions will be described in the following sections The Projector Setup Status panel holds current setup information on each channel in the system The tabs contain the ID of the projector Selecting a tab displays that channel s setup information The Information displayed for each channel includes...

Page 31: ...Marquee ACON Ultra Installation Operation Guide 2 8 AU User Controls Settings and Operation ...

Page 32: ...3 1 1 Dependencies The setup tasks in the flow chart show which tasks must be completed before others can be started If there are arrows from a task pointing to a task on a higher row the lower task must be completed before the upper row task can be started ...

Page 33: ...unstable results If the user chooses to continue with the editing operation a message appears that gives editing instructions When editing the flags is complete pressing the Edit setup Flags commits the changes to memory Before the changes are stored the user is given another warning and prompted to verify the changes If upgrading the software from version 1 0 it is advisable NOT to manually chang...

Page 34: ...nual mapping of the physical relationship of the projectors in the system Choose Overlap for channels whose projections are intersecting or overlapped Choose Adjacent for channels whose projections are adjacent but do not intersect or overlap Choose Disjoint for channels whose projections neither overlap nor are adjacent ...

Page 35: ...tes in the X and Y edit boxes and press the Move button to move to a known location b SELECT Select an existing point and move the motor to its coordinates by clicking on an existing corner point in the list c ADD Add new points to the list by moving the view finder to the appropriate test point on the screen Click the Add button to add the location to the list as a new point d UPDATE Select an ex...

Page 36: ...will be necessary to change the test pattern between the sparse and dense patterns NOTE For more rectangular shaped screens it is possible that a single test pattern may be used for both geometry and convergence correction In this instance the same test pattern is presented when the process requests the test pattern Primary Relationship Manual Dialog If the automated primary relationship operation...

Page 37: ...ton 5 Click on the Memorize Pattern button for memorizing the test patterns The user may be prompted to display a dense pattern followed by a sparse pattern If just one pattern is available use the same for both options 6 Click on the OK button to save the results and exit the dialog If the need arises use the AGC button to make sure that the pattern is visible in the camera field of view 2 2 3 1 ...

Page 38: ...s selected the Projector Selection Dialog appears prompting the selection of the channels on which the calibration process is to be performed Multiple projectors may be selected NOTE If projectors are overlapped they will be scheduled to operate sequentially to prevent interference NOTE If Convergence Calibration is being run only three projectors will be scheduled to perform the calibration proce...

Page 39: ... for its correction operations After the initial setup process is complete periodic maintenance of the AU configuration uses the same controls The title bar of the window indicates the test point set being edited and the projector channel being configured TP Convergence This flag is shown red if the selected test point is in error or green for a good test point The error could be in Setup Scale or...

Page 40: ...play the Graph Page dialog 2 2 3 1 1 1 Graph Page Dialog The graph dialog displays all of the active test points in the current set Clicking on a test point selects that test point for editing Test points are shown in different colors to indicate the error state of each test point ...

Page 41: ...ultiple test points at the same location 2 2 3 2 2 Tabbed Property Sheets Most of the Maintenance Dialog controls are accessible through tabbed property sheets Basic Motor Control and Visibility The properties of the current test point set are displayed and edited through these tabbed property sheets Select the appropriate sheet by clicking on the tab then edit the properties as desired When finis...

Page 42: ...ion This displays coordinates of the current motor location Move This button allows you to enter coordinates of the desired motor location Advance Set This button changes the active test point to the next point and stores the current motor coordinates MotorReset This button will perform initial motor setup e g homes the motor and moves the motor to location 0 0 TP Reset This button will position t...

Page 43: ... process the image Projector Includes brightness contrast drive and G2 These settings are used to optimize the camera image for an evenly distributed image level Camera Includes Gain and Offset The settings are usually adjusted as follows Gain at maximum and Offset at midrange Color Depending on the actual function or step in the process select Green Blue Red or White all on Preview This button wi...

Page 44: ... It enables the desired parameters and selects the range of the search Ranges are inclusive so in the above dialog Contrast would have two steps during a search 40 and 50 Controls Enable checkbox low level high level step size Parameters Global Projector Params color independent Contrast Brightness Camera Params color independent Gain Offset Color Projector Params color dependent Drive G2 Complexi...

Page 45: ...s prompted to apply the changes or discard them before the search is performed After the search is complete the results are displayed on the four result graphs Result Graphs A combined or comprehensive score is displayed on the topmost graph Each color s contribution to the score is displayed below Any score either an individual color or the comprehensive score below 50 indicates a failure conditi...

Page 46: ...arquee remote control Operations can be performed on either a single unit local or all units global simultaneously The selection of combinations of channels is not available through the IR Remote Control NOTE The AU program must be running to operate the AU functions from the remote control If the AU program is closed all remote control functions within the projector s menu structure relating to t...

Page 47: ...e diagram represent initial setup operations to perform As these lower levels are completed their higher level dependencies may also be completed until the test point sets are built calibrated and finally memorized As indicated in the previous table the initial Alignment and Configuration process involves several steps some of which may have to be repeated during the complete configuration process...

Page 48: ...el conversion factors 3 Motor location for the center of the projected raster The AU software only allows modification of these Primary relationships through the Auto Setup operation While establishing the Grid intensities for the test patterns the user will be requested to change the image generator IG pattern to the pattern that is being learned ACON Ultra performs its Geometry and Convergence c...

Page 49: ...is time the software alternates between the three CRTs to attempt to isolate any possible glare from the CRT If the correct test pattern is not identified during this 45 minute period the software will abort the commanded operation The verification that is being performed is a check against the density of the test pattern s grid During the Auto Setup routine the user is prompted to present first t...

Page 50: ...tion contained within the SAV file can be copied to the next installation and assuming the mechanical components of the simulator are equivalent under normal manufacturing specs the Primary relationships should not have to be recalculated There are boundaries to the amount of variation that is acceptable although there are no numerical limits attached to the acceptable variation which defines a si...

Page 51: ... Even if this intersection would otherwise be considered a poor juncture this point must be chosen to allow AU to make corrections to this zone A poor intersection is most at risk of dropping off the facet edge due to drift or otherwise becoming unrecognizable by the AU software If this happens the AU correction routines may fail to make the required corrections to the area or in the worst case ma...

Page 52: ...r clockwise direction outline the edges of the facet by placing a test point on every other horizontal line When tracing a horizontal facet edge place a point on every other vertical line Always position the test points near to the edge of the screen If either line of a desired intersection is less than the length of a complete grid box from the edge of the screen the intersection is too close to ...

Page 53: ...s This method operates in a very quick and reliable way and provides a fairly good estimate of test point positions However if the screen contains some irregularities e g a cockpit cutout the Screen Geometry Maintenance Window may still have to be visited to reposition the effected test points outside the irregularity 2 3 4 4 The Convergence Test Point set Both Convergence Correction and the third...

Page 54: ...hrough the entire available range If too many projectors are doing this at once the ambient light levels skew the calibration results to the lower end of the available range giving less than optimum results Geometry calibration can be performed safely on all projectors in the installation 2 3 5 1 Visibility Settings and Automated Gain Control calibration With the AU camera set to the location of t...

Page 55: ...al settings combined with the AGC results and the Test Current Level button to make one test point as good as possible Then copy these settings to all other test points in the set The Automated Gain Control algorithm or AGC sweeps the enabled parameters through a defined range to use a brute force method of identifying the best set of parameters When sweeping through multiple parameters the sweeps...

Page 56: ...brate about 90 of all test points Level 2 will typically calibrate 9 of the remaining points It is suggested when first calibrating the AGC for a test point set to start at Level 1 complexity and to elevate the complexity for each test point that fails at that level If none of the four pre defined complexity levels calibrate a test point the AGC interface allows the user to create a custom search ...

Page 57: ... routine the appropriate Setup Calibration Geometry menu is chosen based on the test point set s altered must be performed again To explain further consider the Skew geometry adjustment When Vertical Skew is changed the measured Screen Geometry test points should show little change in the horizontal reading and positive or negative change in the vertical direction The vertical change is proportion...

Page 58: ...within the calibration of the test points These warnings are treated in the FMEA style diagnostic worksheet VDC D N 79041 01 The document is organized as a chart with failure modes followed by possible effects and possible corrective actions Work through this chart to identify what if any corrective action is required to facilitate a successful memorization 2 3 7 Correction Operations After AU has...

Page 59: ...particular test point The AU correction routine re tries to fix the point after it has completed the rest of the points in the set up to five such passes of all test points are made during the Edge Geometry correction phase Convergence correction operates in an identical manner to the Edge Geometry operation except the Blue and Red intersections are compared to the current Green intersection After...

Page 60: ...th the VDC Marquee Loader program prior to upgrading the firmware 4 The mechanical and electrical setup of the projector has been completed and all settings are satisfactory e g scheimpflug beam centering electrical geometry settings mechanical and electrical convergence settings color temperature etc a Consult the projector s manual or other provided SOP concerning projector configuration and set...

Page 61: ...choose between re running the automated process and performing the process manually If the manual process is selected perform the following steps to manually complete Primary Relationships Otherwise re run the automated process until success is indicated setup flag is green a On the Manual Primary Relationships MPR window find the location of the Center zone From the zone dropdown selector select ...

Page 62: ...s suggested that you NOT perform the InitialTP Setup Convergence process Instead manually change the InitialTP Setup Convergence flag to indicate complete green color and move to step 2 5 a From the Automated Setup Dialog press the InitialTP button b When prompted click on the presented options until only the Convergence option is selected Press the Continue button c Choose the projectors on which...

Page 63: ... will fine tune the Visibility or AGC calibration for all test points in the set so this step may be skipped if desired a For the first test point perform the AGC calibrate routine until acceptable test scores are obtained If necessary some of the visibility parameters may be manually adjusted or the complexity level of the AGC operation may be elevated until AGC completes successfully All scores ...

Page 64: ...ayed rectangular cursor If the initial TP setup completes successfully and the test points look to be well placed go to section 3 Calibration otherwise go on to step 9 to perform the manual screen geometry setup 9 Enter the Screen Geometry Maintenance Window and position the test points in a regular pattern around the edge of the facet If you have a valid screen geometry test point set in the Scre...

Page 65: ... test point location and the Visibility Tab to adjust visibility settings and scale factors as necessary to calibrate each individual test point as indicated by program feedback a If the test point had an error during the calibration routine the error flag located in the upper left hand corner of the Maintenance Window will be red Pressing this button will indicate what type of error was encounter...

Page 66: ...n to step 3 3 until there is no Calibration feedback that requires intervention 4 Memorization Operation 1 Set the IG to the Geometry test pattern and select Setup Memorization a Memorization can be executed simultaneously on all projectors in the system b Partway through the operation the IG will need to be changed to the Convergence test pattern 2 If there is feedback indicating test points that...

Page 67: ......

Page 68: ...stallation is complete To do this refer to the Marquee Loader user s manual provided with Marquee Loader software for details Step 2 Turn Power Off and unplug the Projector Step 3 Remove the Control Module CLM by loosening the two retaining type screws securing the CLM to the projector STATIC SENSITIVE COMPONENTS CAUTION APPROPRIATE STATIC PRECAUTIONS MUST BE TAKEN DURING ALL SERVICING Step 4 Remo...

Page 69: ...g in the projector The amber LED on the back panel should be lighted If it is not unplug the projector then check the installation of U35 Make sure it is fully inserted and in the correct socket Also check for bent socket pins Make sure that no pins are shorted and that all pins make proper contact c If the amber LED lights after the projector is plugged in press POWER to turn the projector on The...

Page 70: ...mployed at the front of the PC is periodically checked and cleaned as required In the event the filter does require cleaning perform the following steps and refer to Figure B 1 1 The filter media for the PC is located directly behind the front panel air vents 2 On the front of the server PC using the key open the front access door where the CD ROM Floppy Drive etc are located 3 On the left side of...

Page 71: ...f projectors in system 4 Operation check one a Hardware b Auto Setup c Maintenance Dialogs i Convergence ii Center Geometry iii Screen Geometry d Calibration i Convergence ii Center Geometry iii Screen Geometry e Memorization f Correction i Convergence ii Center Geometry 5 Report type check one a Bug Defect b Requested feature 6 Comments include projector number if applicable attach appropriate se...

Page 72: ...N Ultra user interface To Import or Export a script file from the AU user interface perform the following steps a Select a projector b Select Setup Projectors Configuration c From the Projector Configuration dialog select Convergence Order TPGeom Center or TPGeom Screen from the Scripts listbox Except for the FModel Geom Seed option all other options are future features d Press the adjacent Import...

Page 73: ...re similar but not identical to those viewed in the Maintenance Window One test point in the Maintenance Window maps to two lines in the script file One line is for the horizontal measure of the point the second line is for the vertical measure of the point The next two columns if on the horizontal measure give the motor coordinates for the test point followed by a 1 indicating that the line of th...

Page 74: ...t are used during the geometry calibration operation This script file tells the calibration operation where to look for each specific file Before importing this file into a projector configuration the presence and location of the files listed should be verified Edge 5 S2SR C VDC Display Systems ACONUltra Projectors SeedFiles Seed2_StrongRight fcl S2SL C VDC Display Systems ACONUltra Projectors See...

Page 75: ......

Page 76: ...moval and installation of several subassemblies It is suggested that you remove the cover locate the steps covering the removal and installation of the faulty subassembly replace that subassembly then replace the cover Do only the steps required for whatever subassembly has failed 1 To replace the hard drive 2 Ensure that power to the server is OFF Put the key in the hard drive lock Turn the key c...

Page 77: ...ve in the bay Turn the key clock wise Apply power to the server and look for a green power indicator light on the lower right 7 For access to the internal subassemblies 8 Remove the 4 screws holding the top cover 2 each side 9 Slide the cover to the rear and lift up Note that front edge is under a lip 10 Remove two screws that secure the support bar ...

Page 78: ...rt bar and set it aside 12 To replace the frame grabber PCB in slot number 1 13 Locate the ribbon cable from the second PCB to the first PCB Disconnect the cable from the first PCB 14 Remove 1 screw from the PCB 15 Carefully remove the frame grabber PCB from the first slot ...

Page 79: ...t 16 Remove the new PCB 81752 01 frame grabber from the package and record its serial number Install the PCB in the first slot 17 Slide the PCB into the slot and press firmly to seat 18 Connect the ribbon cable from the second PCB to the first PCB 19 Install 1 screw to secure ...

Page 80: ... 14mm or 9 16in deep socket fits in the space available 22 Remove the nuts and washers from BNCs 2 and 4 Keep the nuts and washers for installation Note A 14mm or 9 16in deep socket fits in the space available 23 Remove the bezel from the BNCs on the second PCB 24 Locate the ribbon cable from the PCB in slot number 3 to the PCB in slot number 2 Disconnect the connector from the PCB in slot number ...

Page 81: ...ssembly Replacement 25 Remove the screw securing the PCB in the second slot 26 Carefully remove the video expansion PCB from the second slot 27 Remove the new PCB 81753 01 from the package and record its serial number 28 Remove 2 nuts from the BNC connectors ...

Page 82: ...ration Guide D 7 29 Remove the bezel 30 Ensure that there are shunts on ST5 and ST6 ST5 ST6 31 Install PCB in the second slot press firmly to seat Install 1 screw and tighten to secure 32 Install the bezel over the BNCs on the second PCB ...

Page 83: ...d 3 and tighten nuts Note A 14mm or 9 16in deep socket fits in the space available 34 54011 Nut 1 2 x 13 Qty 2 53027 Lockwasher internal tooth 1 2 Qty 6 35 Install 3 washers each on BNCs 2 and 4 36 CAUTION The nuts and BNCs must not be crossthreaded On the second PCB install a nut on BNCs 2 and 4 and tighten nuts Note A 14mm or 9 16in deep socket fits in the space available ...

Page 84: ...he PCB in the second slot 38 Connect the ribbon cable to the first PCB as shown 39 If the video expansion PCB in slot number 2 is not to be replaced immediately locate the ribbon cable connector on the PCB in slot number 3 40 Plug the connector into the first PCB Press firmly to seat ...

Page 85: ...Keep the nuts for installation Note A 14mm or 9 16in deep socket fits in the space available 43 Remove a nut and 3 washers each from BNCs 2 and 4 Keep the nuts and washers for installation Remove the bezel 44 Locate the ribbon cable from the PCB in slot number 3 to the PCB in slot number 2 Disconnect the connector from the PCB in slot number 2 45 Remove 1 screw and carefully remove the PCB from th...

Page 86: ...ift it to the left and connect it as shown Press firmly to seat 47 Remove the shunt from ST5 bare pins are exposed Ensure there is a shunt on ST6 48 Install PCB in the third slot and install 1 screw to secure 49 Install a bezel over the BNCs on the third PCB CAUTION The nuts and BNCs must not be crossthreaded Install a nut on BNCs 1 and 3 and tighten nuts Note A 14mm or 9 16in deep socket fits in ...

Page 87: ... CAUTION The nuts and BNCs must not be crossthreaded Install a nut on BNCs 2 and 4 and tighten nuts Note A 14mm or 9 16in deep socket fits in the space available PCBs in 2ed and 3 rd slots must have identical bezel hardware 51 Position the connector from the third PCB as shown 52 Plug the connector into the second PCB ...

Page 88: ... Operation Guide D 13 53 Press firmly to seat 54 Note PCB number 1 plugs into PCB number 2 PCB number 3 plugs into PCB number 2 55 To replace the power supply 56 Inside the chassis disconnect power supply PS cable from the hard drive ...

Page 89: ...on Guide D 14 Subassembly Replacement 57 Disconnect 2 PS cables from the single board computer SBC 58 Disconnect PS cables as shown 59 From the rear panel remove 4 screws Keep screws for installation Carefully remove the PS from the chassis ...

Page 90: ...CON Ultra Installation Operation Guide D 15 60 Install the new PS in the chassis Install 4 screws and tighten to secure 61 Inside the chassis connect PS cable to the hard drive 62 Connect 2 PS cables to the SBC ...

Page 91: ...n Guide D 16 Subassembly Replacement 63 Connect PS cables as shown 64 To close the server after subassembly replacement 65 Install support bar in the chassis 66 Install 2 screws to secure 67 Install top cover Slide the cover under lip on top ...

Page 92: ...Marquee ACON Ultra Installation Operation Guide D 17 68 Install 4 cover screws and tighten to secure End of procedure ...

Page 93: ...l service in house repair center WE BUY USED EQUIPMENT Sell your excess underutilized and idle used equipment We also offer credit for buy backs and trade ins www artisantg com WeBuyEquipment REMOTE INSPECTION Remotely inspect equipment before purchasing with our interactive website at www instraview com LOOKING FOR MORE INFORMATION Visit us on the web at www artisantg com for more information on ...

Reviews: