Chapter 3 Using the Operator Panel
3-20
Display the desired baud rate and press the
ENTER
key.
Press the
MENU
key. The message display returns to
Ready
.
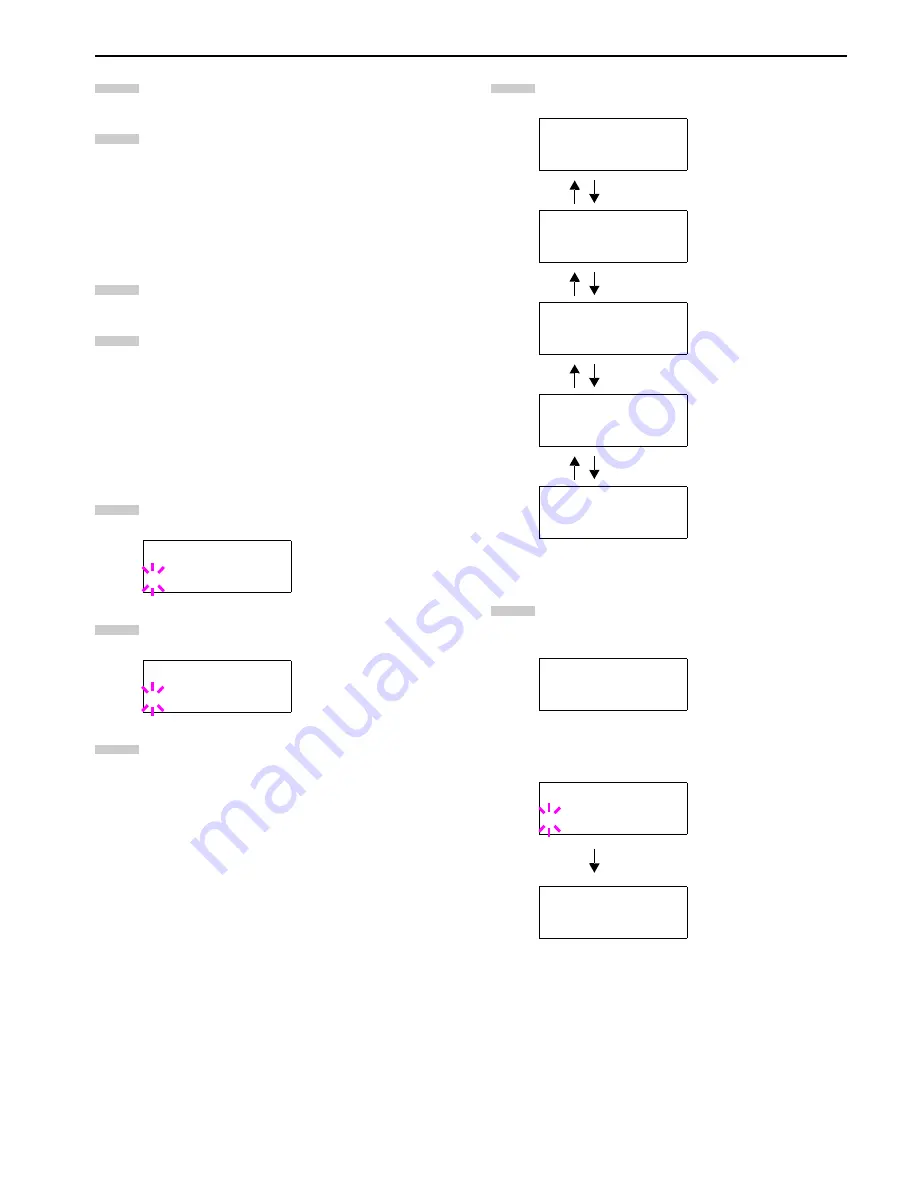
Changing Network Interface Parameters
This printers is equipped with the network interface.
For details on networking, refer to the “Quick Configuration
Guide”.
Press the
MENU
key.
Press the
3
or
4
key repeatedly until
Interface >
appears. One of the interface names shown below ap-
pears, indicating the current interface.
Parallel
(default)
Serial
Network
Option
(only when an optional network interface
card is installed)
Press the
ENTER
key. A blinking question mark (
?
) ap-
pears.
Press the
3
or
4
key repeatedly until
Network
ap-
pears.
Press the
ENTER
key again.
Press the
2
key. Each time the
3
or
4
key is pressed,
the display changes as shown below.
The following example explains how to activate TCP/IP
protocol to connect the printer in the network. You can
select Netware or EtherTalk in a similar manner.
If TCP/IP is currently
Off
is displayed, select
On
using
the
3
or
4
key. Press the
ENTER
key again.
Interface
?Parallel
Interface
?Network
9
10
1
2
3
4
5
>NetWare
On
>TCP/IP
On
>EtherTalk
Off
>Network Status
Page On
If turns ON, print the
standard Network Inter-
face Status Page after
the Printer Status Page.
See
page 3-10
.
>Opt. StatusPage
On
If turns ON, print the op-
tional Network Interface
Status Page after the
Printer Status Page.
See
page 3-10
.
>TCP/IP >
On
>TCP/IP
? Off
>TCP/IP >
On
6
7
Summary of Contents for LP 3036
Page 12: ...1 1 Chapter 1 Name of Parts A B C D E F 2 3 4 1 0 9 8 7 6 5 H I J K M L G ...
Page 90: ...Appendix A Fonts A 2 PCL Scalable and Bitmap Fonts 1 ...
Page 91: ...Appendix A Fonts A 3 PCL Scalable and Bitmap Fonts 2 ...
Page 92: ...Appendix A Fonts A 4 KPDL Fonts 1 ...
Page 93: ...Appendix A Fonts A 5 KPDL Fonts 2 ...
Page 94: ...Appendix A Fonts A 6 KPDL Fonts 3 ...
Page 95: ...Appendix A Fonts A 7 KPDL Fonts 4 ...


