UPS725-02-02 PowerWave 1000 (4.5 - 10 kVA) User Manual UK Dated 13/03/15
35
3: Installation and Set-up
3.8.1 Establishing communication
1. Connect the RS232 serial cable between the computer and UPS.
2. Turn
ON
the UPS input supply but DO NOT press the UPS control panel
ON
button.
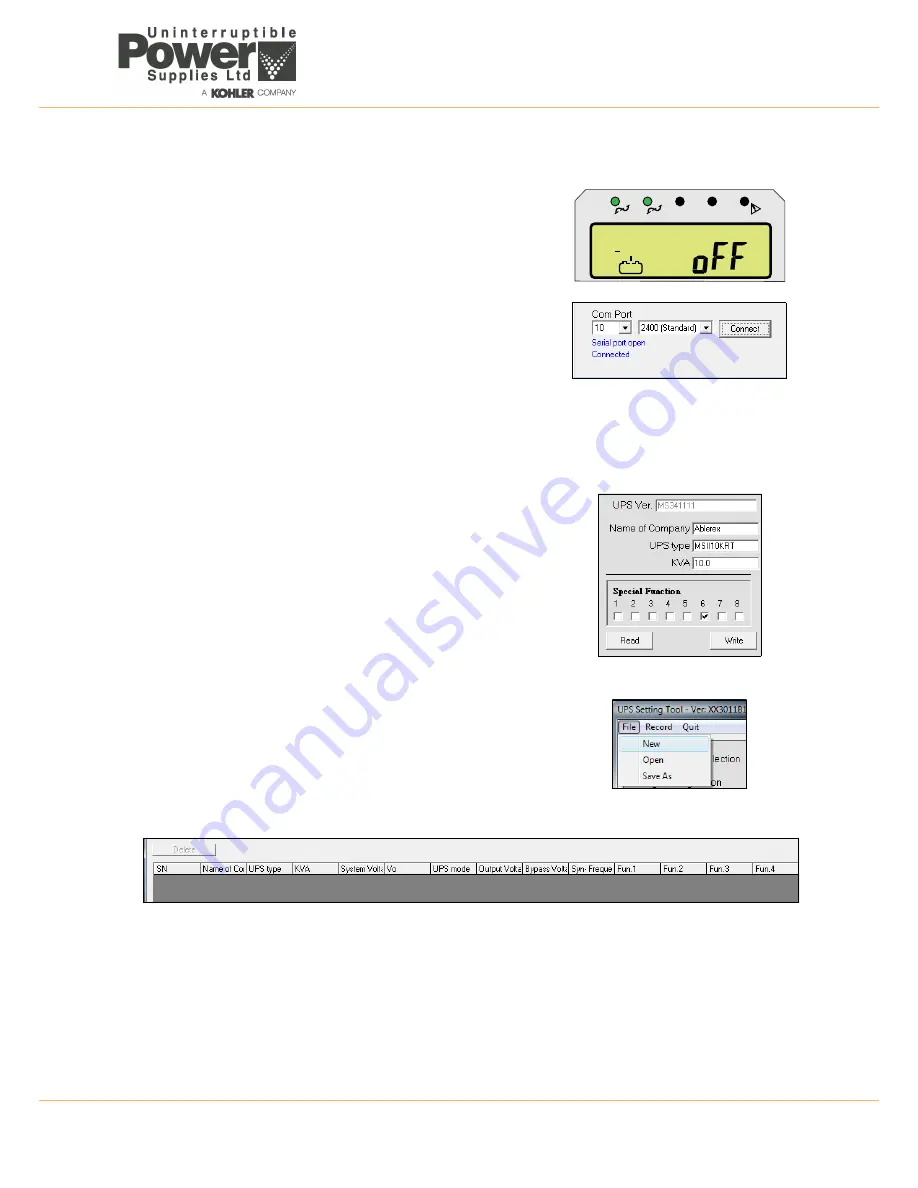
a) The UPS will run through its start-up self tests and then adopt its
off
status.
b) Run the UPS Setting Tool application on the computer.
3. Select the appropriate
Com Port
in the UPS Setting Tool.
a) A communication link should establish automatically, but press the
Connect
button if necessary to force the connection.
b) The
Serial port open
and
Connected
status messages should
appear.
3.8.2 Generating a UPS profile and data file
The UPS settings you apply through this tool can be saved to a data file on your computer for later recall. This allows you
to observe the changes you’ve made over time, and provides an easy way to restore a previous configuration profile if
required. This procedure shows you how to set up a data file for the specific UPS machine, generate a configuration data
record and then access the file to observe the configuration history.
1. In the top right-hand corner of the UPS Setting Tool enter some unique
details to identify the connected UPS.
2. Click the
Write
button to send the identification data to the UPS, where
it will be stored in memory.
a) Click the
Yes
button in the
Writing??
confirmation dialog.
b) The UPS will beep twice to confirm that it has received the data.
c) Click
OK
to clear the
Transmit OK
dialog.
3. To save the machine profile data to the UPS memory, you must reset the
UPS by turning
OFF
its input supply then turning it back
ON
again.
4. At any time when the UPS is re-started you can download the data held
in the UPS memory by clicking the
Read
button. This will then populate
the UPS Setting Tool fields with the stored values.
5. To set up a new data file, click
File>New
from the menu bar.
6. Using standard Windows file navigation methods, select the directory in
which you want to save the file, enter a filename, and click the
Open
button to save the file.
7. The file will be save with a
.ret
filetype.
8. If you open the file (using
File>Open
from the menu bar) you will see an
empty data file, similar to that shown below
.
9. To add a record for the current configuration data, select
Record>Add New
from the menu bar.
10. The new record will now be shown in the data file. The
Name of Company
and
UPS type
details are shown in the
first two fields to identify the UPS machine.
11. In order to associate the data file with the UPS you must once again turn
OFF
the UPS input supply then turn it back
ON
again. This will store a reference to the data filename in the UPS memory and enable quick access when you want
to open the file in the future.
12. To close the data file click the standard Windows
Close
button [X] in the top right of the window.
LINE
UPS
LOAD
1
2
EC
O
N+1

