


Operator Manual
Issue 1
TIL – Eng – Spec – 080
Page 23 of 70
SeaHub
15) Click “OK” to accept changes, or “Cancel” to abort. Changes will only be applied when “OK” is
clicked – not in real-time as the controls are adjusted. Once “OK” is selected, the SeaHub will be
reconfigured, and will reboot. Please allow several seconds for this to occur.
SeaHub Software Settings
Control
Function
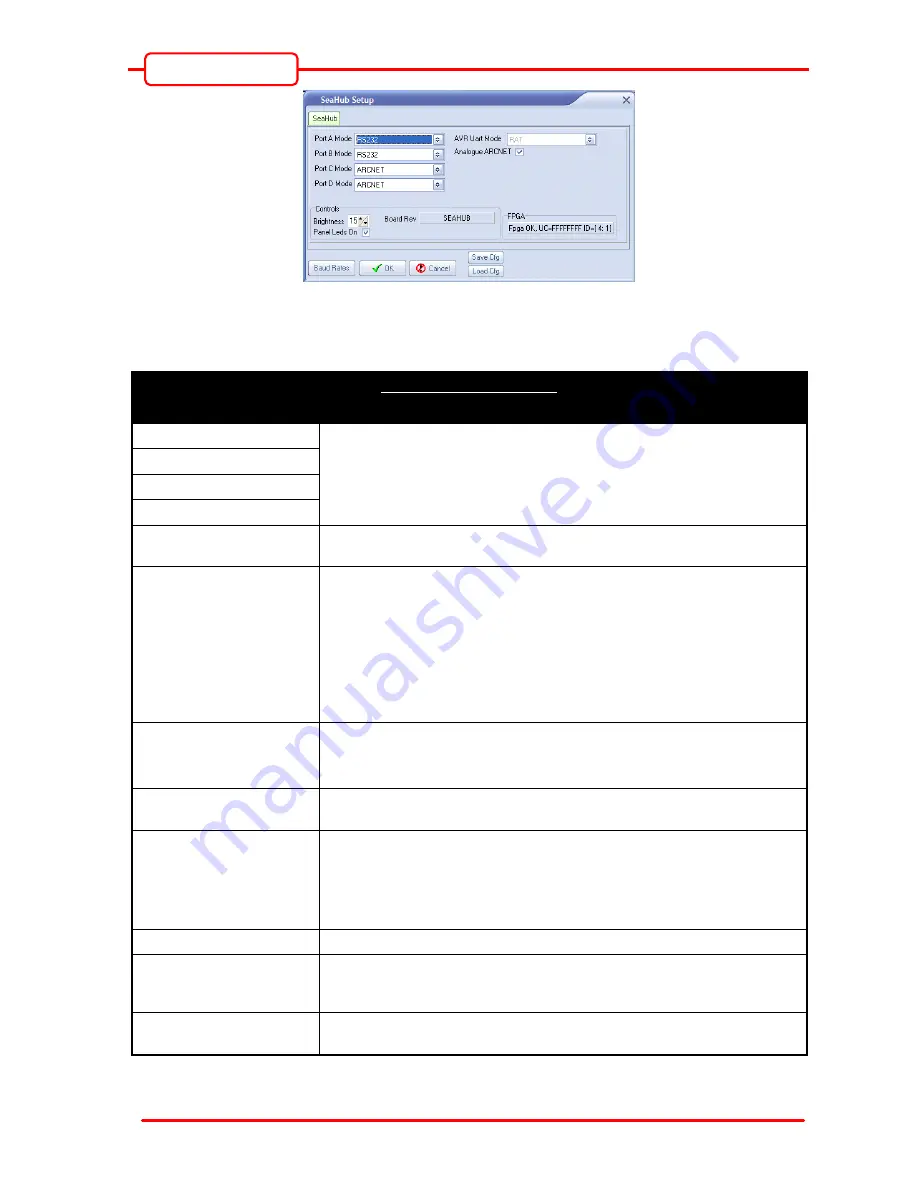
Port A Mode
These four drop down lists allow the hardware mode of each port to be
configured.
The example above shows ports A and B as RS232 mode, while C and D
are configured for ArcNet LAN.
Port B Mode
Port C Mode
Port D Mode
AVR Uart Mode
The Aux Mode control is uses for SeaHub expansion modules and fault-
finding purposes. For normal operation this should be set to “RAT”
Analogue ArcNet
When “ticked” this check-box selects the analogue ArcNet (long-cable
twisted pair) receiver as the ArcNet source, available on Ports C & D and
Pins 8 and 15 of the “AIF (ArcNet)” connector.
When “unticked” the TTL ArcNet source from Pins 14, 4 & 2 of the “AIF
(ArcNet)” connector is used. Ports C and D will not work for ArcNet in this
mode.
Refer to section 6.4 for further details on the “AIF (ArcNet)” connector
function.
Brightness
This control allows the brightness of the front panel LED’s to be adjusted,
and is useful if the SeaHub is being used in low light conditions.
Setting “1” selects the lowest brightness setting, while “15” is the brightest.
Panel Leds On
Tick this box to enable the front panel status indicators. “Unticking” the
‘Panel Leds On’ check-box will turn off the LEDs completely.
FPGA
If the status in the Setup window is reported as “Upgrade FPGA” then use
the ‘Action’ | ‘Program FPGA’ button for the SeaHub node (back on the
‘Seanet Setup’ main page) to upgrade the SeaHub firmware.
Firmware upgrades are issued by Tritech to correct problems with modules,
or to add additional functionality.
Load/Save Config
Use these buttons to load or save settings from or to a file on the PC.
OK
Clicking this button will close the “setup” window and apply changes if any
have been made – this made take up to 5 seconds for the SeaHub to
reboot.
Cancel
Clicking this button will close the “setup” window and cancel any changes
made.


