Trinnov Audio Altitude16 User Manual Download Page 69

User manual

69

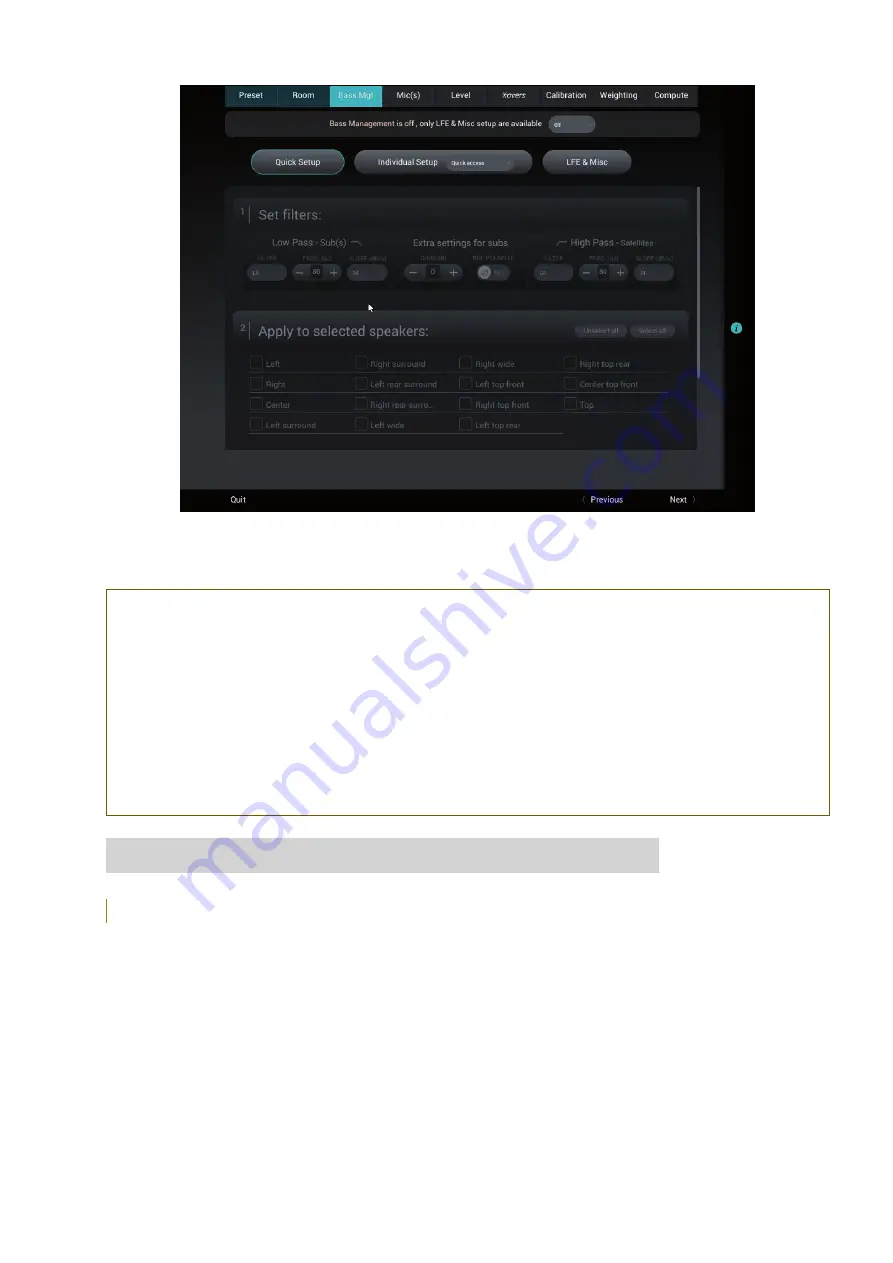
Figure 58: Bass Management step in the Wizard

NOTE: 
• The Altitude

16

 supports any number of subwoofers as long as enough physical outputs and processing channels 

are available, therefore allowing a maximum flexibility in the speaker system design. 
• Bass Management can be activated even if the system has not been calibrated. Note that the automatic time-
alignment of the subwoofers is only performed after a calibration of the whole set of speakers 
 
IMPORTANT NOTE:  
• For optimal results, the bass management should be setup manually based on the characteristics of the speaker 
as well as acoustic measurements of the speaker responses in the room. 
• The Optimizer graphs show what each speaker is capable of doing, which can inform your bass management 
decisions.

6.4.1 _OVERVIEW OF THE BASS MANAGEMENT SETUP PROCEDURE

The recommended bass management setup procedure is as follows: 

•  Analyze the acoustical graphs of the speaker measurements in order to understand the low frequency response of each 

speaker in the room;

•  Decide whether bass management is necessary or not;
• 

To decide to activate bass management:

• Identify the High Pass Frequency that seems appropriate for each channel;
• Configure the bass management options (Off, On, On + Lfe to lr (Legacy));
• Configure each channel to have its lowest frequencies redirected to one or more subwoofers.
• Configure each channel to have its lowest frequencies redirected to one or more bigger speakers.

• 

Last but not least: Save the preset.

• The Bass management is divided into 3 different sections represented as 3 tabs which will be detailed in the following 

chapter:

• 

Quick Setup

: The Quick Setup is the default section of the Bass Management. It allows a global configuration 

Summary of Contents for Altitude16

Page 1: ...Altitude16 www trinnov com User manual Software version v4 2 16...

Page 2: ......

Page 3: ......

Page 4: ...E MENU 21 1 7 8 _UNFOLDED LATERAL MENU 22 1 7 9 _THE SPEAKERS ROOM SETUP TOOL 22 1 7 10 _THE FINE TUNING PANEL 23 1 7 11 _THE ADVANCED SETTINGS INTERFACE 23 1 7 12 _PRODUCT INFORMATION 24 1 7 13 _SOFT...

Page 5: ..._CHECKING THE FORMAT OF INCOMING AUDIO 39 5 _BASIC SETTINGS 40 5 1 _NAMING YOUR SOURCES 40 5 2 _CONFIGURING YOUR SOURCES 41 5 3 _DEFAULT SOURCE CONFIGURATION 43 5 4 _OPTIMIZATION OPTIONS 43 5 5 _REMA...

Page 6: ...ERS 70 6 4 4 _INDIVIDUAL SETUP MENU 71 6 4 4 1 _REGULAR BASS MANAGEMENT 71 6 4 4 2 _INTERMEDIATE BASS MANAGEMENT 72 6 4 5 _LFE MISC 73 6 4 5 1 _LOW FREQUENCY EFFECT SETUP 74 6 4 5 2 _REDIRECT LFE CHAN...

Page 7: ...S 107 7 1 9 1 _AUDIO CLOCK STATUS INFORMATION 107 7 1 9 2 _AUDIO CLOCK SETUP 108 7 1 10 _PROGRAMMABLE TRIGGERS 109 7 1 11 _DOLBY ATMOS OBJECT VIEWER 110 7 1 11 1 OVERVIEW 110 7 1 11 2 OUTPUT PER SPEAK...

Page 8: ...NT 134 10 4 _CALIBRATE THE ACTIVE CROSSOVERS OPTIONAL 135 10 4 1 _OVERVIEW OF THE CROSSOVER SETUP PROCEDURE 135 10 4 2 _CONFIGURE THE ADVANCED SETTINGS OPTIONAL 135 10 4 3 _ADJUST THE MASTER OUTPUT LE...

Page 9: ...YOUR DEALER 148 12 2 2 _SEND US AN EMAIL 148 12 2 3 _CALL US 148 13 _APPENDIX 149 13 1 _INSERT AN EXTERNAL STEREO DAC 149 13 2 _REMOTE START AND STOP 149 13 3 _AUTOMATION 149 13 4 _SIGNAL FLOW OF THE...

Page 10: ...ates and or other countries DTS Inc All Rights Reserved The Altitude16 is manufactured under license from Auro Technologies Trinnov Audio is certified by Auro Technologies to implement its technology...

Page 11: ...equipment near and around it _ Remote control battery use trademark GP Batteries International Panasonic or Varta reference Renata CR2032 or trademark Duracell reference DL2032 CAUTION Risk of explos...

Page 12: ...erful and scalable 3D AV Preamplifier ever manufactured Thanks to a unique hardware platform Trinnov Audio offers the first implementations of the latest home theater audio technologies The Altitude16...

Page 13: ......

Page 14: ...ings Provides necessary information on the different decoders supported their upmixer and the settings available Getting ready for calibration Provides important tips and recommendations you need to k...

Page 15: ...ware platform Revolutionary architecture scalable processing platform Software oriented upgrades provided over the internet no DSP upgrade required Robust design inspired by our professional audio pro...

Page 16: ...nd easy to use automatic compensation system or an incredibly flexible and powerful tool including numerous advanced filter parameters target curves and manual EQs all being re computable on the fly B...

Page 17: ...1 5 _UNPACKING THE ALTITUDE16 You will find in the Altitude16 packaging 3D Microphone Optional Remote control Power Cord Rack ears CR2032 Battery...

Page 18: ...The Trinnov Altitude16 preamplifier Back Button Select Button Menu Button Source Item Selection Knob Volume knob Mute button Power Switch Current Source Output Meters Optimizer status Audio Format Au...

Page 19: ...pin XLR 5 POWER AC Input Fuse Master Power Switch 6 AUDIO NETWORK Dual network audio connector available soon 7 PC CONNECTORS may change following the motherboard reference Video output DVI HDMI VGA...

Page 20: ...ORMAT Playback mode selection OPTIMIZER PRESETS Preset selection LIGHT Switches off the backlight on the front panel BYPASS Optimizer bypass VOL Volume control 1dB step DIM Decreases the volume by 20d...

Page 21: ...ace of the Altitude16 is specifically designed for touch screen use but it is just as easy to use with your mouse or the trackpad of your laptop Figure 2 The graphical user interface of the Altitude16...

Page 22: ...PS 2 or USB ports A physical monitor can be connected through the VGA DVI D or HDMI ports The PC video outputs may change following the motherboard reference HDMI VGA DVI D DVI I NOTE The screens nee...

Page 23: ...provides information about the current status of the Altitude16 It can be folded or unfolded depending on the task you wish to perform 1 7 7 _FOLDED SIDE MENU When folded the side menu provides the f...

Page 24: ...t RES the current video resolution COLOR color settings used on the HDMI video output HDR shows if HDR is activated OPT displays the current status of the Optimizer CLOCK displays the current sampling...

Page 25: ...NCED SETTINGS INTERFACE The advanced settings of the Altitude16 are currently available through a specific user interface Use this button to go back to the Main screen Figure 5 the advanced settings u...

Page 26: ...ation page Version software version currently installed Build date software release build date Product ID Trinnov unique id number Serial serial number of the device Microphone default microphone comp...

Page 27: ...or is connected to the internet and that outgoing connections to port 22 are open The Trinnov technical operator will also need the serial number of your Altitude16 When the processor is connected to...

Page 28: ...6 To connect the Altitude16 to your local Ethernet network Use an Ethernet cable to connect the Altitude16 to your router or ISP Box Use the Altitude16 front panel to check that it now has an IP addre...

Page 29: ...hernet page Turn the Source Item selection knob to scroll through the settings Figure 21 IP address in the Setup Network Ethernet page via the front panel In order to access your unit you will have to...

Page 30: ...ates the IP address of the Ethernet interface of the Altitude16 Netmask indicates the netmask of the local area network joined as a DHCP client via Ethernet Gateway indicates the address of the Gatewa...

Page 31: ...er This is the case in most domestic environments To configure the Ethernet connection manually select the Manually specify Network parameters option and hit Apply Figure 24 Ethernet Network Interface...

Page 32: ...working technology that makes it easy to setup use devices and services on a network Because zeroconf enabled devices indicate their availability it s easy for you or an app or service to find devices...

Page 33: ...6 can decode and play high resolution 24 bit 96 kHz WAV AIFF FLAC 16 bit 96 kHz OGG music files 3 2 _UPNP NETWORK ARCHITECTURE This architecture represents the most common and comfortable method to pl...

Page 34: ...Linux or on other products which include Roon Core Being Roon Ready means that Trinnov Audio s network players transparently discover and connect to Roon Application without any configuration and bit...

Page 35: ...know the maximum usual listening level setting the Max Volume at 20dB will be a good start 3 3 3 _ALTITUDE16 IS ROON READY The Roon Ready source is directly available on the main page of the user int...

Page 36: ...directly connected to the Altitude16 back panel NOTE For a detailed step by step explanation of how to connect with a VNC Client please see the subchapter First Network Connection to the Altitude16 i...

Page 37: ...me up or down Push the Mute button to mute all audio outputs of the Altitude16 There are two methods to select sources from the front panel on the Altitude16 Turn the source selection knob to scroll t...

Page 38: ...of the Altitude16 below the Optimizer status The Sampling Rate of the audio being played is indicated on the left side of the front panel display of the Altitude16 The current Upmixer used is shown o...

Page 39: ...SELECTION Switching presets 1 Browse through the presets with the Optimizer Preset arrow buttons 2 Push the OK button 4 3 5 _ACCESS TO THE FRONT PANEL MENU To access the Menu 1 Press on Menu to acces...

Page 40: ...hical user interface A Mute button allows you to mute all audio outputs of the Altitude16 A Dim button allows you to decrease the volume by 20dB on a default configuration NOTE The last used by defaul...

Page 41: ...set selection in the graphical user interface 4 4 4 _CHECKING THE FORMAT OF INCOMING AUDIO The format of incoming audio is displayed in the lateral menu bar and in the Sources page of the Main user in...

Page 42: ...connectors but set with different names to recall different settings The Home Source Config page consists of one vertical tab per source on the left and source specific parameters on the right Use thi...

Page 43: ...ustic optimization filters decoding modes or bass management modes In order to change one of the parameters of the selected source configuration click on the corresponding arrow Figure 34 Editing a so...

Page 44: ...allows you to link a source to one of the presets you created No Change no preset is associated to this source configuration 1 to 29 choose one of the 29 presets to load a preset when this source is s...

Page 45: ...the Save button to apply the new parameter of the source 5 4 _OPTIMIZATION OPTIONS The Altitude16 optimization of the system can be switched on off via the Main interface To switch on off the optimiza...

Page 46: ...puts page of the Advanced interface are bypassed Level Alignment ON OFF disable the automatic alignment of speaker levels meaning that no automatic gain changes will be applied to the outputs Delay Al...

Page 47: ...Presets page consists of four vertical tabs Presets 1 9 includes the Built in preset and presets 1 to 9 Presets 10 19 includes presets 10 to 19 Presets 20 29 includes presets 20 to 29 Preset Info sho...

Page 48: ...pty preset to copy it NOTES The Built in preset is locked and cannot be overwritten A specific preset can be linked to each source Please refer to the Basic Settings chapter Presets can be backed up a...

Page 49: ...um volume possible with the Altitude16 is 20dB which is extremely loud and likely to overload most consumer power amplifiers 5 9 _SET THE DIM LEVEL By default the Dim is applying a 20dB on the master...

Page 50: ...before and after correction Save a Bug report to the USB Key when an unexpected error occurred the system is halted to prevent damage to your system and a bug report is generated After the restart of...

Page 51: ...nd quick configuration of your system The following steps are here more detailed than in the software If you want to configure your system manually you can go to section 10 of the manual To start the...

Page 52: ...his chapter we assume that a specific set of speakers have already been defined and installed in a room In order to support multiple surround and 3D formats we recommend relying on the expertise of a...

Page 53: ...er of the window allows you to navigate through the 3D view You can rotate the view zoom in and zoom out IMPORTANT NOTE it is important to understand that because the Altitude16 automated process meas...

Page 54: ...eaming media and file based media Below is an example of a specific speaker layout designed to support multiple formats Figure 46 Example of a specific configuration with 16 speakers This configuratio...

Page 55: ...n hybrid layout designed by Trinnov This layout based on a 7 1 surround layout with additional speakers to support multiple surround and 3D formats such as Dolby Atmos DTS X and Auro 3D The 16 speaker...

Page 56: ...y your system To add one or more speakers from the drop down list click on the Add Speaker button in the From Layout drop down list select the speaker template from which you want to add one or more s...

Page 57: ...op down list those speakers end with an e which stands for enabled Here are the available Dolby Enabled speakers Le Left up firing Dolby Enabled speaker Re Right up firing Dolby Enabled speaker Lse Le...

Page 58: ...NGS OF EACH SPEAKER Once the complete set of speakers in your system is defined you can configure the settings of each speaker The speaker configuration table located in the lower part of the Speaker...

Page 59: ...efault NOTES The Altitude16 handles up to 4 way active crossovers The default crossover filters are Linkwitz Riley 4th order 24dB Oct Advanced crossover settings are available in the Setup Active Xove...

Page 60: ...nly helps to verify that the routing is correct from the Altitude16 to the speakers In addition to this procedure when a new source is connected to the Altitude16 you should also verify that the routi...

Page 61: ...ed Figure 55 Shelving high in blue 1st order low in red 2nd order Each parametric equalization band will have the following settings Frequency the center of the frequency range to be cut or boosted Ga...

Page 62: ...nel The overall procedure to configure a PEQ is as shown below Open the PEQ editor of the speaker or driver you want to edit Add as many bands as needed using the Add Set the parameters of each band a...

Page 63: ...ving filters cut or boost all frequencies equally below a desired cutoff point Frequency the center of the frequency range to be cut or boosted Gain the amount of boost or cut in dB Q the sharpness of...

Page 64: ...hat the EQ Group has been saved It is available in the Select and EQ Group drop down list To load it check the next chapter Load a PEQ Group Once an EQ group has been saved it is possible to load it o...

Page 65: ...Close the PEQ editor by clicking on the Ok button 6 3 12 5_OVERWRITE A PEQ GROUP If an existing EQ group needs modification it is possible to overwrite it with the new parameters To do so please foll...

Page 66: ...has been declared configured and fully tested you can now setup your arrays of speakers The Altitude16 is able to duplicate the incoming channel from the decoders on several speakers The setup of an a...

Page 67: ...ide speakers will play Ls and Rs channels simultaneously with Left and Right Surround speakers For DTS X content Left and Right Wide speakers will play Lss and Rss channel simultaneously with Left and...

Page 68: ...6 4 _SETUP BASS MANAGEMENT This chapter explains how to setup bass management in the Altitude16 The Altitude16 provides very flexible options that help you to optimally configure the bass management...

Page 69: ...ent decisions 6 4 1 _OVERVIEW OF THE BASS MANAGEMENT SETUP PROCEDURE The recommended bass management setup procedure is as follows Analyze the acoustical graphs of the speaker measurements in order to...

Page 70: ...aged signal redirected to one or more subwoofer s or speaker s Setup the gain for each subwoofer Invert the polarity for each subwoofer Route the LFE channel to one or more subwoofer s or speaker s Th...

Page 71: ...Access to the Bass Management options 6 4 3 _QUICK SETUP MENU The Quick Setup menu is a powerful tool allowing to configure the bass management for several speakers in one manipulation Figure 61 Bass...

Page 72: ...ent groups of settings Low Pass Sub s These settings will determine the cutoff frequency below which the signal from the channel will be redirected and played by the subwoofer s You can here select th...

Page 73: ...y the subwoofer s You can select the type of filter Linkwitz Riley Bessel or Butterworth the cutoff frequency and the slope used by this filter These settings are only applied to the signal redirected...

Page 74: ...redirect the LFE to every speaker may be mandatory to keep the integrity on the content NOTE Bass Management mode must be set to On in order for these settings to be taken into account NOTE Be aware t...

Page 75: ...ker Left Surround will have its own bass management You can also apply the parameter on a bigger speaker and bass manage the bigger one to one or more subwoofer s 6 4 5 _LFE MISC Every setting in the...

Page 76: ...fer but several speakers with the ability to reproduce very low frequen cies it is possible to redirect the LFE channel to one or more satellite s To do so simply select the speakers in which the LFE...

Page 77: ...y to maintain a consistent level NUMBERSUBWOOFERS INTHESYSTEM ATTENUATIONIF STACKEDSUBS ISDISABLED ATTENUATIONIF STACKEDSUBS ISENABLED 2 subwoofers 3 dB 6 dB 3 subwoofers 4 8 dB 9 5 dB 4 subwoofers 6...

Page 78: ...localization Loudspeaker 2D 3D remapping Loudspeaker relative delay level alignment Master delay level calculation A reference measurement point defines the central point of your whole room Generally...

Page 79: ...put signal RTA MIC dB SPL shows the strength of the signal regarding the frequency on the capsule 0 of the microphone the top one of the microphone MIC dB SPL shows the strength of the signal received...

Page 80: ...ers and multi amplified speakers and is not intended as a course If you are not using the active crossover functionality of the Altitude16 please skip to the next chapter DELAY POLARITY DELAY POLARITY...

Page 81: ...goal is to raise the level of the test signal far enough above the background noise in the room that we can be certain of a high quality measurement Make sure to calibrate your setup with the same vol...

Page 82: ...ght number of MLS burst please go back to the Room step of the Wizard to configure the correct number of ways The following settings are available for each loudspeaker The type of high pass or and low...

Page 83: ...resented as follows The green curve represents the theoretical low pass filter response The red curve represents the theoretical high pass filter response The blue curve represents the theoretical hi...

Page 84: ...r system is not yet calibrated the time response and power direct are not available The system will indicate Need to calibrate Once you have set the frequency cut and the type of the filter you want t...

Page 85: ...taken with a 5 1 speaker Layout where L C R are two way speakers Figure 79 Crossover after calibration As we can see the Optimizer has modified the curve with the applied results Also the Optimizer h...

Page 86: ...will have no effect on the result Under some circumstances the automatic crossover algorithm may suggest inverted polarities for a driver from one speaker to another This can be explained by various f...

Page 87: ...ibration goes wrong please see the section 6 10 3 of this manual The calibration will add the speaker position related to the reference point during the calibration The calibration status has 3 possib...

Page 88: ...a but also to get more information from measurements and increase reliability by taking into account important variations in the listening area NOTE The multi point approach ensures a more reliable ca...

Page 89: ...Generally it will be used for the armchair of the main user or a central area in front of the screen NOTE The reference point does not mean that it is the most used point in the calibration The impor...

Page 90: ...o low for capsules Check the Input Meters in the Processor Meters page If the Input level is null on at least one of the 4 channels go back to the Optimizer Settings Calibration page and stop the cali...

Page 91: ...t or retrieve another one This step will depend on the utilization that you planned If the Automatic distribution is on NO you can exceed 100 Remember that the weighting compares the relative differen...

Page 92: ...ed and set to 40dB for safety 6 10 _ANALYZING THE RESULTS The Altitude16 is a complete and flexible tool for displaying the correction filters as well as the responses of the speakers before and after...

Page 93: ...APHS DISPLAY OPTIONS The Optimizer Graphs page consists of a display area on the left and a Config area on the right The Display area is organized in Tabs Sub tabs Graphs Frames The Configuration area...

Page 94: ...nfiguration you can visualize the response measured on each position and the effect the optimization has on it The type of response speaker response before optimization speaker response after optimiza...

Page 95: ...after calibration As the calibration is performed the real position of each speaker is displayed after the 3rd MLS burst The Top View helps to identify the wrong speaker placements It might be necess...

Page 96: ...e 94 Elevation view of a system after calibration NOTE If one speaker cannot be located during calibration it will be displayed in the center of the circle A non located speaker cannot be used for lou...

Page 97: ...onds to the delay of the speaker Bandwidth corresponds to the measured bandwidth of the speaker Correction details Level A Compensated corresponds to the A weighted compensated level of the speaker Le...

Page 98: ...he top menu to open the Advanced Settings interface Go to the Processor tab of the graphical user interface The main page of the Processor tab displays the input and output meters and a set of lateral...

Page 99: ...ce from the Processor Inputs page To play pink noise from the Speakers Room setup tool click on the Pink Noise button of the corresponding output channel Figure 97 playing Pink Noise from the Speakers...

Page 100: ...advanced calibrator to perform custom time alignment 7 1 3 _SOLO MUTE AN INPUT OR AN OUTPUT The Inputs page and the Outputs page include Mute and Solo buttons that allow you to mute or solo any input...

Page 101: ...ts page of the Processor menu In the menu Processor Inputs you can increase or decrease the Input volume of each channel by steps of 1dB or 0 1dB Those settings are offsets from the current calibratio...

Page 102: ...the current calibration of the Optimizer TThis might affect your overall calibra tion We recommend leaving the Output at 0 0 The Outputs section also allows you to invert the polarity of each speaker...

Page 103: ...e Outputs page of the Processor menu The FIR EQ are available in the menu Processor Outputs You can link several speakers Every FIR EQ set to one speaker will automatically be applied to the other spe...

Page 104: ...ND GRAPHIC EQS In addition to manually setting levels the Processor Inputs and the Processor Outputs pages include 34 band 1 3 oc tave Graphic Equalizers that allows manual equalization of each input...

Page 105: ...tom of the Processor Output page This gives you the flexibility of having one reference EQ User EQ that can be used on top of Optimizer presets As an example User EQ could be recalled for a specific r...

Page 106: ...n of the Optimizer This might affect your overall calibration We strongly recommend letting the Output Delay to 0 7 1 7 _SWITCHING OPTIMIZATION ON OFF The Altitude16 offers two different ways to compa...

Page 107: ...ptimizer Remapping page Bypass button the bypass button located at the top right corner of the graphical user interface is equivalent to the Optimization Off button IMPORTANT NOTE the Optimization On...

Page 108: ...Once the dBC option activated the level adjustment is disabled Output SPL adjust affects both displayed and effective Level Used along with Level display offset it allows you for instance to set a re...

Page 109: ...you please set the clock to internal mode or simply switch to an analog input 7 1 9 1 _AUDIO CLOCK STATUS INFORMATION The Word Clock page in the main window provides information about the status of th...

Page 110: ...phical user interface The Clock page of the Setup tab includes all the clock settings Figure 111 Clock settings page in the Advanced Settings The Setup Clock page includes Status Information the same...

Page 111: ...ependently to start when an input is selected As a reminder output 1 follows the state of the Altitude itself device on trigger on device off trigger off The configuration of the triggers takes place...

Page 112: ...ich objects to display Display volume see next section NOTE We are using the metadata in the Atmos stream to give an indication of what the objects are doing It is not perfect but it is intended as a...

Page 113: ...at low volume This doesn t have any impact on the sound 7 1 12 _USING ARC EARC HDMI ARC eARC removes the need for an HDMI input cable and allows you to send audio downstream from a compatible HDMI so...

Page 114: ...g the automatic equalization will only use IIR filters up to the frequency defined in the advanced settings Default 150Hz The automatic FIR filter is disabled but manual FIR EQ can still be applied Ac...

Page 115: ...ly the overall tonal balance of the room will be corrected 7 3 _TARGET CURVE The Altitude16 implements Target Curves as a powerful tool for achieving the required frequency response from your system F...

Page 116: ...and attenuations This curve is not engaged by default To define a specific limiter curve go to Optimizer Settings Settings Excursion Curve Use the Add point mode and your mouse to create editing point...

Page 117: ...TTINGS IMPORTANT NOTE Change these parameters from the recommended settings only if you know what you re doing Random changes can lead to unexpected results The Altitude16 provides a large set of adva...

Page 118: ...y the Optimizer Both IIR and FIR filters are used to work on the speaker responses full range FIR only No IIR filters are used which means that the Optimizer will only work on the mid and high range o...

Page 119: ...rates the Optimized frequency range from the unfiltered frequency range in the low end The upper boundary of this auto transition bandwidth is the minimal frequency of the bandwidth of the speaker Roo...

Page 120: ...der In this case they will remain silent while this decoder is active For example the Top speaker is not used by Dolby Atmos so this speaker will only be used while playing DTS X and Auro 3D content a...

Page 121: ...o Upmix Layout Used Dolby Bed Original 7 1 Layout Used Dolby None No Upmix 2 Layout Used DTS Bed Original 7 1 Layout Used DTS Bed Original 7 1 Layout Used Auro 3D Figure 118 Chart of the behavior betw...

Page 122: ...mat using the Select knob Validate using the Enter button The current listening format is underlined 8 3 2 _DECODERS CONFIGURATION To configure the Decoders from the front panel press the Menu button...

Page 123: ...INTERFACE 8 4 1 _LISTENING FORMAT SELECTION To activate a surround upmixer Click on the IN sources menu item of the lateral menu to go to the Sources page Select a Listening Format in the drop down li...

Page 124: ...and Auro 3D decoders Click on the IN sources menu item of the lateral menu to go to the Sources page In the Sources page click on the Manage button in the Decoders section This gives you access to th...

Page 125: ...t When this option is activated the Altitude16 will automatically switch to the input format of the decoder The Altitude16 virtually replaces the speakers at their ideal position recommended by the cu...

Page 126: ...ying musical content Loud Mgmt use the loudness management information provided in the incoming signal s metadata DRC Settings Auto Automatic DRC low level boost and high level cut Enabled Enable the...

Page 127: ...oming metadata to adjust the level of the center channel LFE in stereo send the LFE to a pair of subwoofers Disable downmix downmix surround formats into stereo is disabled Audio description switch on...

Page 128: ...back on the surround speaker layout so that height speakers are disabled Incoming stereo content is upmixed to a surround format and incoming Auro 3D content is downmixed to a surround format Stereo e...

Page 129: ...it will extend on the right as other menus accessible through the left panel NOTE an HDR indicator has been added to the OUT HDMI VIDEO section of the left panel menu it will display HDR10 DV or HLG...

Page 130: ...ovides information to the host for the pixel repetition of the input video stream Horizontal res vertical res interlaced Frame rate Actual numbers for input timing format status HDCP type HDR EOTF HDR...

Page 131: ...nnov com they will send you the HDMI troubleshooting form to fill 9 2 1 1_ VIDEO INPUTS The basic idea is to check that video features match what you expect from the source configuration Also it is ve...

Page 132: ...yed in the Detect field It simply indicates if something is plugged into the connector If that s not the case check your connections Figure 127 Video outputs Next State and Copy Protect are important...

Page 133: ...nents on their outputs HDMI connectors are shown as on the Altitude16 back panel Green connectors are HDMI 1 4 and gold connectors are HDMI 2 0 To change the state of a connector just click on it It w...

Page 134: ...oard s EDID setup The video input section basically only reports if something has been overridden compared to the EDID built automatically by the HDMI board from the EDID received from its outputs Thu...

Page 135: ...or not HDMI FORUM DATA BLOCK an extension of the previous for HDMI 2 0 only content A max_tmds field inferior to 600 in that section indicates that the display does not support 18Gbps signal COLORIMET...

Page 136: ...angerous level jumps 10 2 _CHECKLIST BEFORE YOU START Please go through the following checklist to make sure you are ready to start the calibration process You ve read carefully the whole chapter abou...

Page 137: ...Altitude16 active crossovers is performed through two different tools Use the Speaker Room Setup Tool to Configure the number of ways and the crossover frequencies Verify the routing of the Altitude16...

Page 138: ...are available for each loudspeaker The type of high pass or and low pass filters is chosen in the dropdown menu using The cut off frequency of each filter is set by using the arrows or by manually ent...

Page 139: ...unwanted press the Cancel Changes button to cancel your modifications If change is accepted press the Save button of the preset of your choice in the Presets page Otherwise changes will be lost The t...

Page 140: ...off the cover and switch on the microphone 4 Press the Calibrate button in the Setup Active Xovers page of the Advanced Settings interface Adjust the output level 1 Increase the master level until th...

Page 141: ...bration tool will automatically setup the level delay and polarity of each driver Figure 136 Performing the calibration of the active crossovers Before calibration please note The calibration procedur...

Page 142: ...s Visualize the acoustic graphs of the speakers connected to the active crossover Listen to the speakers connected to the active crossover 10 4 5 1 _VISUALIZE THE ACOUSTICAL GRAPHS FOR EACH SPEAKER Yo...

Page 143: ...ion suggested by the Optimizer should be applied to improve audio quality Two adjacent drivers for instance Mid and High are phase shifted by an amount of about 90 In this case the Optimizer provides...

Page 144: ...tings user interface Go to the Optimizer Settings Calibration page The Optimizer requires a minimum Sound Pressure Level for proper calibration Until that minimum SPL is reached the test signal will k...

Page 145: ...ttings interface to perform the final calibration Follow the microphone placement instructions Make sure the measurement environment is silent Press the Mute button to cut the outputs this step must A...

Page 146: ...alibration was stopped in the middle of the measurement process No When no measurement has been performed yet Figure 141 Calibration status 10 5 6 _CHECKING THE SPEAKER POSITIONS DURING AFTER CALIBRAT...

Page 147: ...tes that the Optimizer is ready Computation time varies depending on the number of speakers in the system and on the Optimizer parameters IMPORTANT NOTE Once the speaker system has been calibrated eve...

Page 148: ...The Speaker Configuration page can be accessed through the Top Menu of the Altitude16 s graphic user interface highlighted below Please see chapter 6 4 NOTE To avoid repetitions the use of the speaker...

Page 149: ...R L Figure 143 a serial number as printed on the back panel of the Altitude16 The device is connected to the network This is not an obligation but as Trinnov Audio can perform maintenance remotely hav...

Page 150: ...ealer will contact us directly if he can t help in the first place If by any chance it s not the case you can email us at support trinnov com We will do our best to respond to you quickly 12 2 3 _CALL...

Page 151: ...an experienced IT technician for technical support It can also be switched off remotely over the network using the command provided within our automation protocol for that purpose available for downlo...

Page 152: ...e be modified outside of the Optimization process 13 5 _3D SPEAKER PLACEMENT RECOMMENDATIONS For detailed information about speaker placement recommendations please refer to the following documents Au...

Page 153: ...L COMPENSATION FILE The individual compensation file of the microphone used by the Altitude16 can be modified in the Optimizer Settings Calibration page Figure 145 Calibration page Always make sure th...

Page 154: ...Altitude16 154...

Page 155: ...User manual 155...

Page 156: ...rdware platform Trinnov Audio offers the first implementations of the latest home theater audio technologies The Altitude16 has established a new leadership position within the luxury home cinema proc...

Reviews: