


9
General Information
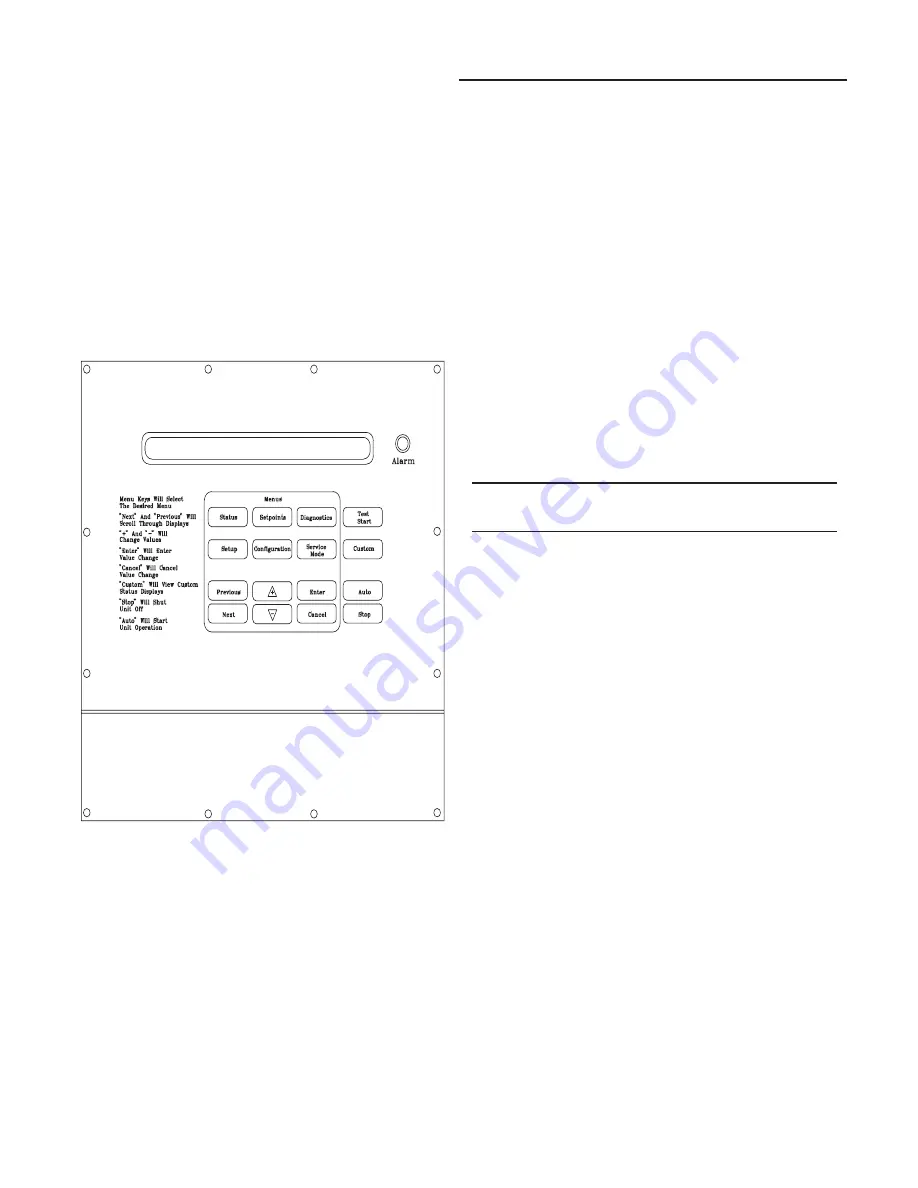
Menu Keys
The six keys illustrated in Figure 2 in the MENU area (STA-
TUS, SETPOINTS, SETUP, CONFIGURATION, DIAGNOS-
TICS, and SERVICE MODE) are used to bring up the vari-
ous interactive menus where the user inputs and accesses
unit operating data. Pressing these keys will display the ini-
tial screen for the menu designated by the key’s name. The
following information describes the keys and their functions
when viewing the various menus.
If no key is pressed for 30 minutes while the LCD is display-
ing a menu screen, it will revert back to the unit operating
status screen.
Figure 2
Human Interface Keypad
STATUS Key
Pressing the STATUS key causes the LCD to display the
operating status screen; i.e. "On", "Unit Stop", "External
Stop", "Emergency Stop", "Service Mode". Pressing the
NEXT key allows the operator to scroll through the screens
which provide information such as air and refrigerant tem-
peratures, pump operation, compressor operation, as well
as active cooling and compressor lockout setpoints. Press-
ing the STATUS key while viewing any of the data screens
will cause the LCD to go back to the operating status
screen.
SETPOINTS Key
Pressing the SETPOINTS key will cause the LCD screen to
display the first of the setpoint screens where the operator
will designate default temperature setpoints and setpoint
source information. While scrolling through the setpoint
screens, pressing this key again will cause the LCD to dis-
play the first setpoint screen.
DIAGNOSTICS Key
Pressing the DIAGNOSTICS key at any time will allow the
operator to view any unit function failures. The LCD screen
will display one of the diagnostic screens (depending on
which diagnostic, if any, is present). If no key is pressed for
30 minutes while the screen is displaying diagnostic infor-
mation, it will revert back to the operating status display.
CONFIGURATION Key
Pressing the CONFIGURATION key will cause the LCD
screen to display the first of the configuration screens
where the operator will designate unit configuration data
such as unit type, capacity, installed options, etc...
This information was programmed at the factory. Pressing
the configuration key at any level in the configuration menu
will display the first configuration screen.
Note: This key should be used if the unit's
configuration data is lost or new options are added
in the field, and to view current configuration.
SETUP Key
Pressing the SETUP key will cause the LCD screen to dis-
play screens where the operator will designate various op-
erating parameters such as temperature ranges, limits, per-
centages, etc. for the control of the unit’s various operating
modes. Pressing the SETUP key at any level in the SETUP
menu will display the first SETUP screen.
SERVICE MODE Key
Pressing the SERVICE MODE key causes the LCD to dis-
play the first of the service test mode screens showing vari-
ous unit components which may be turned on or off for the
particular test being performed. Once the status of these
components is designated, the LCD will display screens
that allow the operator to designate the TEST START time
delay for each test.
Data Manipulation Keys
The six data manipulation keys illustrated inFigure 2, (EN-
TER, CANCEL, + (Plus), - (Minus), PREVIOUS, and NEXT
are used to modify the data within the screens (change val-
ues, move the cursor, confirm choices, etc...)
ENTER Key
This key will confirm the new values that were designated
by pressing the + (Plus) or - (Minus) keys at all edit points.
When viewing status and diagnostics screens, it has no
function.
CANCEL Key
After changing data, at an editable screen, but before con-
firming it with the ENTER key, pressing the CANCEL key
will return the data to its previous value. This key shall also
function to clear active diagnostics.
Summary of Contents for IntelliPak CGAF Series
Page 68: ...68...


