4 Replacement Procedures
4.18 Fluorescent Lamp
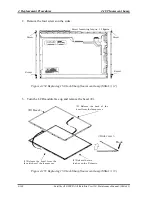
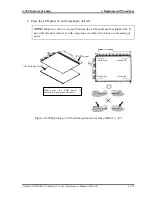
5. Turn the LCD module face up and remove the LCD panel (I) from the backlight unit
(H).
NOTE:
Wear finger sacks or gloves during the work not to soil or scratch the
LCD panel or backlight unit.
(H) Backlight unit
(I) LCD panel
Figure 4-158 Replacing 15.0 Inch Sharp fluorescent lamp (SXGA+) (6)
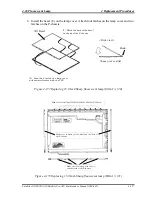
6. Turn the backlight unit (H) removed face down and remove two screws (D) and lamp
cover (J).
NOTE:
Be careful not to scratch or soil the sheets.
Screw loosening torque: 1.1kg
•
cm
(H) Backlight unit
(J) Lamp cover
(D) Screw
(D) Screw
Figure 4-159 Replacing 15.0 Inch Sharp fluorescent lamp (SXGA+) (7)
4-148
Satellite A10/TECRA A1/Satellite Pro A10 Maintenance Manual (960-445)
Summary of Contents for Satellite Pro A10 series
Page 11: ...Satellite A10 TECRA A1 Satellite Pro A10 Maintenance Manual 960 445 xi ...
Page 12: ...Chapter 1 Hardware Overview ...
Page 46: ...Chapter 2 Troubleshooting Procedures ...
Page 112: ...Chapter 3 Tests and Diagnostics ...
Page 199: ...Chapter 4 Replacement Procedures ...
Page 368: ...Appendices ...
Page 369: ...Appendices App ii Satellite A10 TECRA A1 Satellite Pro A10 Maintenance Manual 960 445 ...


