background image

Basic Operations on Each Screen    19

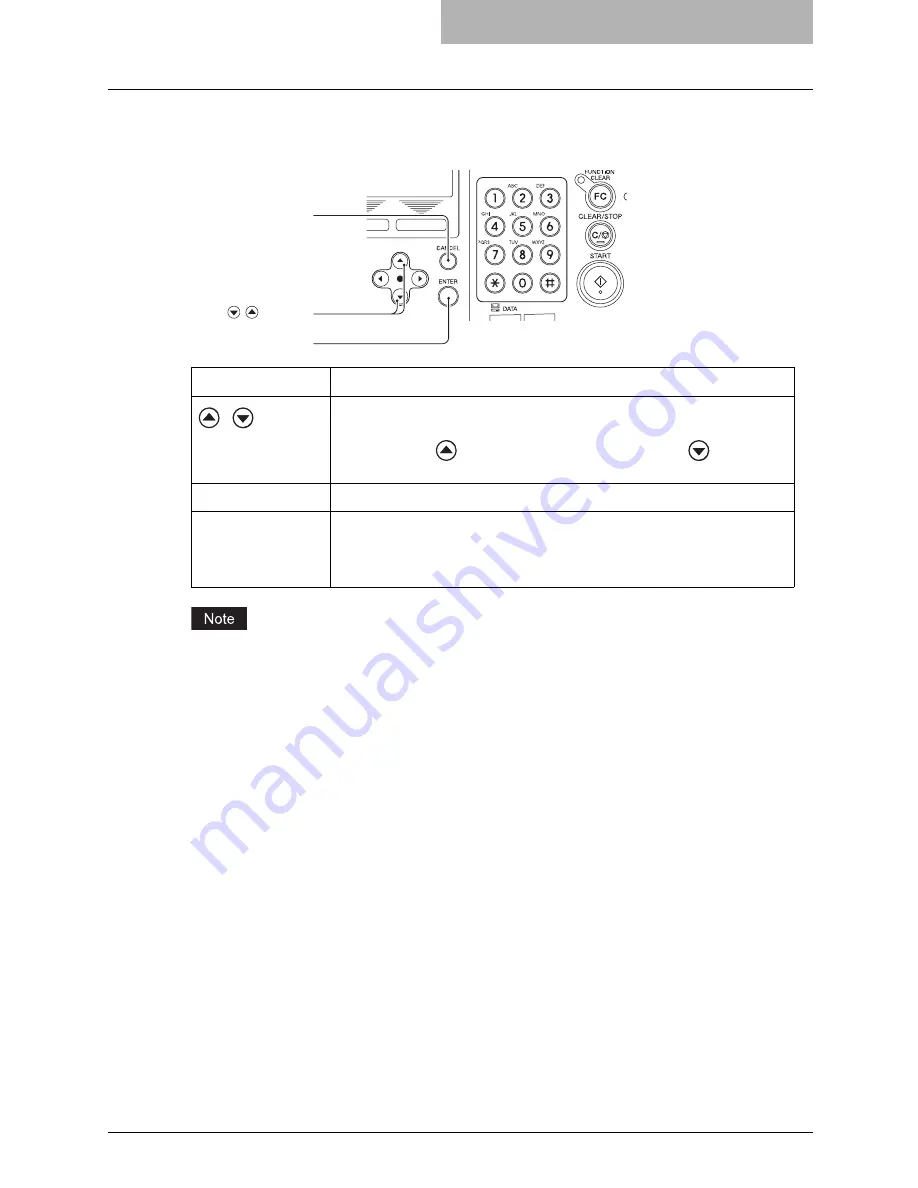
To select each menu

You can select the desired menu or item in the menu selection screen.

The menus displayed in the screen differ depending on which options are installed. Some 
menus displayed in the menu selection screen shown in this manual may not be displayed in the 
actual screen, if the corresponding option is not installed.

Button

Function

 / 

Press these buttons to select menus or items. The cursor moves to the menu 
or item selected. The selected menu or item is highlighted.

When you press 

, the cursor scrolls up. When you press 

, it scrolls 

down.

[ENTER]

Press this button to execute the selected menu or item.

[CANCEL]

Press this button to cancel the selected operation. The screen returns to the 
previous one.
(If you press this several times, the screen returns to the main screen for the 
current mode.)

[ENTER] button

[CANCEL] button

/    buttons

Summary of Contents for GA-1200

Page 1: ...MULTIFUNCTIONAL DIGITAL SYSTEMS Setup Guide for Scanning Functions GA 1200 ...

Page 2: ......

Page 3: ...rade Kit y External Keyboard This section also explains about functions available with the above options and the Fax Kit optional This Setup Guide for Scanning Functions describes the following y Scan related settings using the control panel of this equipment y Settings and management of this equipment from a computer using TopAccess Be sure to read this manual before using the e STUDIO165 205 or ...

Page 4: ...as installed System in accordance with the terms con tained in this Agreement This Software is proprietary to TTEC and or its suppliers TTEC and its suppliers disclaim responsibility for the installation and or use of this Software and for the results obtained by using this Software You may use one copy of the Software as installed on a single System and may not copy the Software for any reason ex...

Page 5: ...ubject to restrictions set forth in subdivision b 3 ii or c i ii of the Rights in Technical Data and Computer Software Clause set forth in 252 227 7013 or 52 227 19 c 2 of the DOD FAR as appropriate Contractor Manufacturer is TOSHIBA TEC Corporation 6 78 Minami cho Mishima shi Shizuoka ken 411 8520 Japan General You may not sublicense lease rent assign or transfer this license or the Software Any ...

Page 6: ...s safety precautions to ensure correct and safe use of this equipment Be sure to read this before you use the equip ment Operator s Manual for Facsimile Function Booklet This manual describes how to use the Fax functions Various functions both basic and advanced regarding Fax transmission reception are avail able Quick Start Guide for Printing Functions Booklet This manual gives basic information ...

Page 7: ... for sending a Fax from a computer via a net work such as the installation of the client software use of the N W Fax driver and the co packed application software AddressBook Viewer Quick Start Guide for Scanning Functions PDF file This manual gives the basic information regarding the scanning functions such as the GA 1200 accessories necessary environmental conditions and outline of network conne...

Page 8: ...zilla Firefox and Firefox logo are trademarks or registered trademarks of Mozilla Founda tion in the U S and other countries y Netscape is a trademark of Netscape Communications Corporation y IBM AT and AIX are trademarks of International Business Machines Corporation y NOVELL NetWare and NDS are trademarks of Novell Inc y TopAccess is a trademark of Toshiba Tec Corporation y Other company names a...

Page 9: ...6 Basic Operations on Each Screen 18 To select mode main screen 18 To select each menu 19 To key in digits 21 Chapter 3 SETTING TEMPLATES EQUIPMENT To Enable Templates 24 Chapter 4 PRINTING LISTS EQUIPMENT To Print Lists 26 Configuration Page 26 Menu List 27 Chapter 5 THE MODE OF TopAccess The Mode of TopAccess 30 End User Mode 30 Administrator Mode 31 Chapter 6 TopAccess REGISTRATION TAB PAGE Che...

Page 10: ...TAB PAGE SETUP MENU Scanning Function Setting up Network Settings Scanning Function 70 Setting up the SMB Session 72 Setting up the SMTP Client 73 Setting up the SMTP Server 74 Setting up the POP3 Network Service 75 Setting up the FTP Client 76 Setting up Save As File Settings 77 Setting up Remote 1 and Remote 2 78 Setting up Email Settings 80 Email Settings 81 Setting up InternetFax Settings 83 I...

Page 11: ...estination Setting Public Template 120 Email Setting Public Template 123 Save As File Setting Public Template 124 TWAIN Setting 126 Scan Setting 126 Resetting Public Templates 127 Registering Fax and InternetFax Received Forward 130 Destination Setting Fax InternetFax Received Forward 132 Email Setting Fax InternetFax Received Forward 135 Save As File Setting Fax InternetFax Received Forward 136 C...

Page 12: ...10 CONTENTS ...

Page 13: ...1 OVERVIEW This chapter describes the contents of this manual and the required use environments of TopAccess Overview 12 Contents 12 Use environments of TopAccess 13 ...

Page 14: ...TopAccess The latter part of this manual describes how to set up and manage this equipment from your computer through a network using a web based utility TopAccess TopAccess has 2 access lev els the end user level and administrator level All the setting and maintenance functions of TopAccess can be utilized in the administrator level The following functions of this equipment are described y Scanni...

Page 15: ...STRATORS For the lists printed by this equipment see Appendix P 141 APPENDIX Use environments of TopAccess This section describes the use environment of a co packed utility TopAccess that comes with this equipment Systems shown below enable you to access the TopAccess using your web browser so that you can set up or manage this equipment from a computer on the network Network Before using the TopA...

Page 16: ...rer 5 5 SP2 or later Mozilla Firefox 1 5 0 4 or later Macintosh Safari 2 0 412 2 or later Mozilla Firefox 1 5 0 4 or later UNIX Mozilla Firefox 1 5 0 4 or later Settings on equipment side and settings management of this equipment using TopAccess Windows TopAccess Windows Macintosh UNIX Equipment s settings Settings management of this equipment using TopAccess ...

Page 17: ...S EQUIPMENT This chapter describes the basic operations on the control panel screens of this equipment Various Screens 16 Basic Operations on Each Screen 18 To select mode main screen 18 To select each menu 19 To key in digits 21 ...

Page 18: ... below appears after you turn the power ON Ready screen for Fax functions Fax mode main screen Mode Main Screens The mode selection main screens are 5 screens the copy mode main screen printer mode main screen scan mode main screen user functions mode main screen and Fax mode main screen In these main screens menus selectable in the subject mode appear To select and operate the mode selection main...

Page 19: ...n this screen Example of ON OFF selection screen Digit Entry Screen This screen appears when you key in any digits Enter digits using the digital keys on the control panel Error Message Screen This screen appears when an error has occurred TEMPLATE 1 ON 2 OFF DEPARTMENT CODE ENTER DEPARTMENT NUMBER 1 99 6 DRAWER1 empty Open DRAWER1 Load paper Close DRAWER1 ...

Page 20: ...e ready screen copy mode main screen or scan mode main screen Also if you press the CANCEL button when the user function main screen is displayed the screen returns to the previously selected main screen SCAN button and screen transition When you press the SCAN button while you are operating each menu the screen shifts to the scan mode main screen For example when you press it while you are operat...

Page 21: ...sponding option is not installed Button Function Press these buttons to select menus or items The cursor moves to the menu or item selected The selected menu or item is highlighted When you press the cursor scrolls up When you press it scrolls down ENTER Press this button to execute the selected menu or item CANCEL Press this button to cancel the selected operation The screen returns to the previo...

Page 22: ...ocedure substitutes for the entry by pressing and the ENTER button With this function you can select a menu located at the bottom of the hierarchical menu tree structure by enter ing a series of numbers e g 03 03 02 SELECT SCAN MENU 1 SCAN TO E MAIL 2 SCAN TO FILE 3 SCAN TO TWAIN ENTER E MAIL ADDRESS 192MAX AUG 20 2006 11 56 M 100 COMM OPTION RESOLUTION 200dpi ENTER button or a digital key 1 1 FUN...

Page 23: ...this button to determine the digits keyed in Press these buttons to move the cursor to the right or left When you press the cursor moves to the left When you press it moves to the right When you want to correct a digit already keyed in move the cursor to the digit and then key in a new digit The digit is replaced with a new one CLEAR STOP Digits keyed in are all cleared ENTER button Digital keys C...

Page 24: ......

Page 25: ...3 SETTING TEMPLATES EQUIPMENT This chapter describes how to set a template using the control panel of this equipment To Enable Templates 24 ...

Page 26: ...screen 1 Press the USER FUNCTIONS button 2 Press or to select INITIAL SETUP and press the ENTER button 3 Press or to select TEMPLATE and press the ENTER button 4 Press or to select ON and press the ENTER button The screen returns to the menu in step 3 USER FUNCTIONS 00001216 01 DEFAULT SETTINGS 02 LISTS 03 INITIAL SETUP INITIAL SETUP 04 TERMINAL ID 05 NETWORK 06 TEMPLATE TEMPLATE 1 ON 2 OFF ...

Page 27: ...4 PRINTING LISTS EQUIPMENT This chapter describes how to print scan related lists from the control panel of this equipment To Print Lists 26 Configuration Page 26 Menu List 27 ...

Page 28: ...nting again after the completion of the print job y The lists are printed on A4 LT or A4 R LT R size paper Check that paper of the specified size is set Configuration Page You can print out the setting status of the Network Printer Kit optional and the Scanner Upgrade Kit optional See the following Operator s Manual for details of the setting items regarding scanning func tions Quick Start Guide f...

Page 29: ...ENTER button Printing accepted appears and the configuration page is printed out LISTS 4 ITU MAILBOX 5 CONFIGURATION PAGE 6 NIC STATUS PAGE 1 Press the USER FUNCTIONS button The user functions mode main screen is displayed 2 Press or to select MENU LIST and then press the ENTER button Printing accepted appears and the menu list is printed out USER FUNCTIONS 1216 02 LISTS 03 INITIAL SETUP 04 MENU L...

Page 30: ......

Page 31: ... THE MODE OF TopAccess This chapter describes the mode of TopAccess when the Scanner Upgrade Kit and the Extension Key Board are installed The Mode of TopAccess 30 End User Mode 30 Administrator Mode 31 ...

Page 32: ...nal is installed in this equipment When the setting or operation given in this manual is performed do not turn the power of the equipment OFF until the TopAccess screen is automatically updated End User Mode The following settings and management are available in the end user mode y Managing address book Registration tab page On the Registration tab page you can add or edit destinations of the addr...

Page 33: ... PAGE SETUP MENU Scanning Function Maintenance menu Installation of language Backup Address book Template Restore Address book Template Notification Import Address book Department code data Export Address book Department code data P 91 TopAccess ADMINISTRATION TAB PAGE MAINTENANCE MENU Registration menu Public Templates Fax Received Forward InternetFax Received Forward P 113 TopAccess ADMINISTRATI...

Page 34: ......

Page 35: ...ic Templates 34 Checking public templates from the Panel View 34 Checking public templates from the List View 35 Managing Address Book 36 Managing contacts in the address book 36 Managing groups in the address book 41 Managing Mailboxes 44 Setting up an Open Mailbox 45 Deleting an Open Mailbox 52 Managing Inbound FAX Routing By TSI 54 Setting up Inbound FAX routing by TSI 54 Deleting Inbound FAX r...

Page 36: ...List View P 34 Checking public templates from the Panel View P 35 Checking public templates from the List View Public templates can be registered in the Registration menu of the Administration tab P 115 Registering Public Templates Checking public templates from the Panel View 1 Click the Registration tab and the Template menu 2 Click the Panel View submenu The public template list is displayed in...

Page 37: ...king Public Templates 35 Checking public templates from the List View 1 Click the Registration tab and the Template menu 2 Click the List View submenu The public template list is displayed in the List View ...

Page 38: ...e the Operator s Manual for Facsimile Functions or Scanning Guide Managing contacts in the address book You can add or edit a contact by entering recipient information You can also delete the contact from the Address Book P 36 Adding or editing a contact P 40 Deleting a contact Adding or editing a contact 1 Click the Registration tab and the Address Book menu The Address Book menu page is displaye...

Page 39: ...bers You can specify a different number between 1 to 999 One Touch Number Key in the one touch number of the recipient Up to 75 different numbers y To register contact information you must enter the Name and either the Email Address or Fax Number Also you must key in either of ABB Number or One Touch Number y Usually enter the Fax number in Fax Number and 2nd Fax Number without a hyphen If a hyphe...

Page 40: ...etters including numbers and Delayed Transmit You can specify the time 00 00 to 23 59 to transmit documents Quality Transmit Select if you want to send documents in the Quality TX mode This feature sends documents at a slower speed than a normal so that the transmission will be less affected by line condition Select the value from 4800 9600 14400bps The smaller the value is the slower the speed be...

Page 41: ...int the transmission report after completion of the Email transmission 8 In the Contact Properties page click Save to add new contact A message notifying you that an abbreviated number or a one touch number you keyed in is already registered may be displayed In this case click Return and key in the cor rect number ...

Page 42: ... a contact 1 Click the Registration tab and the Address Book menu The Address Book menu page is displayed 2 Click the link that you want to delete in the contacts list The Contact Properties page is displayed 3 Click Delete The contact is deleted from the Address Book ...

Page 43: ...ating Fax or Inter netFax transmission You can also delete groups P 41 Adding or editing a group P 43 Deleting a group Adding or editing a group 1 Click the Registration tab and the Address Book menu The Address Book menu page is displayed 2 Click the Group submenu The Group submenu page is displayed 3 Click New to add new group or click the group link that you want to edit in the groups list The ...

Page 44: ...r of the group Up to 50 different numbers You can specify a different numbers between 1 to 75 y You can clear the entered values in each field by clicking Reset y You can cancel adding or editing a group by clicking Cancel y Fax numbers and Email addresses cannot be registered in the same group 5 Check the Fax or Email boxes of users to add the recipients 6 Click OK The group is created A message ...

Page 45: ...and the Address Book menu The Address Book menu page is displayed 2 Click the Group submenu The Group submenu page is displayed 3 Click the group link that you want to delete in the groups list The Group Properties page is displayed 4 Click Delete Selected group is deleted ...

Page 46: ...x it replaces the existing one You can set up a password requirement for accessing the Bulletin Board Box for document reservation Forward Mailbox The Forward mailbox allows you to transmit a received Fax to various destinations using the fol lowing agent Internet Fax Relay Agent When a document has been sent to a mailbox this equipment can call up the remote Fax via the public switched telephone ...

Page 47: ...age is displayed 2 Click New to set up new mailbox or click the box number link that you want to edit in the mailboxes list y If you click New skip to step 5 y If you click the box number link that is not protected by a password skip to step 4 y If you click the box number link that is protected by a password go to step 3 You cannot edit the Confidential mailbox and Bulletin Board mailbox but you ...

Page 48: ...orward is selected 6 Click the button of each item to set the mailbox properties MailBox Setting Click this to specify the mailbox settings P 47 MailBox setting Destination Setting Click this to specify the destinations to be sent This can be set only when creating the InternetFax Fax Relay agent P 48 Destination setting Mailbox Relay End Terminal Report Click this to specify where the transmissio...

Page 49: ... can enter up to 20 letters numbers only 2 Password Enter the box password if you want to protect the mailbox by the password You can enter up to 20 letters including numbers sharp marks and asterisks 1 Click Mailbox Setting to open the Mailbox Setting page 2 Enter the box number Enter the box password as required 3 Click Save Mailbox setting is made 1 2 ...

Page 50: ...n select recipients from the address book in this equipment 1 Click Destination Setting to open the Recipient List page 2 Select the Fax or InternetFax radio button 3 Click Address Book The Address Book page is displayed 4 To specify the destination for InternetFax transmission select the Email check box of the desired destination For Fax transmission select the Fax check box of the desired destin...

Page 51: ...e contacts from the recipient list 6 Click Save The contacts are added as the destinations Selecting the groups from the address book By this method you can select groups from the address book 1 Click Destination Setting to open the Recipient List page 2 Select the Fax or InternetFax radio button 3 Click Address Group The Address Group page is displayed 4 Check the Group boxes that contains the de...

Page 52: ...ded in the recipient list before submitting the destination settings P 50 Removing the contacts from the recipient list 6 Click Save The contacts are added as the destinations Removing the contacts from the recipient list 1 Check the check boxes of the contacts that you want to remove from the recipient list and click Delete The selected contacts are removed from the recipient list ...

Page 53: ...rminal Report page is displayed 2 Enter the Fax number for the destination to which the Relay End Terminal Report is to be sent or select the destination from a list and then click ADD The selected recipient is set for the transmission result list destination You can clear the selected option button by clicking Reset You cannot specify more than 1 recipient for the destination of the Relay End Ter...

Page 54: ...he Registration tab and the MailBoxes menu The MailBoxes menu page is displayed 2 Click the box number link that you want to delete in the mailboxes list y If you click the box number link that is not protected by a password skip to step 4 y If you click the box number link that is protected by a password go to step 3 3 Enter the password for the mailbox and click OK The MailBoxes Properties page ...

Page 55: ...Managing Mailboxes 53 5 Click OK Selected mailbox is deleted ...

Page 56: ...in this mailbox are forwarded to the Email addresses recipients specified in the mailbox To manage the Inbound FAX routing by TSI the Fax Kit optional must be installed in this equip ment Setting up Inbound FAX routing by TSI To perform the Inbound FAX routing by TSI you must first set up an Open Mailbox in the mail box hub You can set up a maximum of 100 mailboxes Setting up or editing a mailbox ...

Page 57: ...he Save as file agent Email Select this to create the Email agent In the Save as file agent the Inbound FAX Setting and Save as file Setting are per formed P 57 Inbound FAX Setting P 62 Save As File Setting Inbound FAX routing by TSI In the Email agent Inbound FAX Setting Destination Setting and Email Setting are performed P 57 Inbound FAX Setting P 58 Destination Setting Inbound FAX routing by TS...

Page 58: ...il agent P 58 Destination Setting Inbound FAX routing by TSI Email Setting Click this to specify how the document will be sent This can be set only when creating the Email agent P 61 Email Setting Inbound FAX routing by TSI Save As File Setting Click this to specify how the document will be stored in the Save as file This can be set when creating the Save as file agent P 62 Save As File Setting In...

Page 59: ...to the transmission and it is processed according to the specified a TSI number or sub address settings 2 User Name Enter the user name of this mailbox You can enter up to 30 letters 3 Comment Enter the comment You can enter up to 30 letters 4 Notification This specifies how the notification message will be sent when an error occurs Send email when an error occurs Select this to send a notificatio...

Page 60: ...ing the recipients manually 1 Click To Destination Setting or Cc Destination Setting to open the Recipient List page 2 Click New The Contact Property page is displayed 3 Enter the email address of the recipient in the Destination field 4 Click OK Entered recipient is added in the Recipient List page 5 Repeat step 2 to 4 to add all additional recipients that you require You can remove the contacts ...

Page 61: ...ok The Address Book page is displayed 3 Check the Email boxes of users you want to add as the Email recip ients 4 Click ADD Selected recipients are added in the Recipient List page You can remove the contacts that you added in the recipient list before submitting the destination settings P 60 Removing the contacts from the recipient list 5 Click Save The contacts are added as the destinations ...

Page 62: ...pients 4 Click ADD All recipients in the selected groups are added in the Recipient List page You can remove the contacts that you added in the recipient list before submitting the destination settings P 60 Removing the contacts from the recipient list 5 Click Save The contacts are added as the destinations Removing the contacts from the recipient list 1 Check the check boxes of the contacts that ...

Page 63: ...ment 4 Body Enter the body message of the Scan to Email documents You can enter up to 1000 letters including spaces When sending the Scan to Email document the body message entered in this field will be applied to the Email 5 File Format Select the file format of the Scan to Email document PDF Select this to attach scanned images to Email as a PDF file TIFF Multi Select this to attach scanned imag...

Page 64: ... The protocol and the network path are displayed below this item Protocol Select the protocol to be used for uploading a received Fax to the Save as file SMB Select it to send a received Fax to the Save as file using the SMB protocol FTP Select it to send a received Fax to the FTP server NetWare IPX SPX Select it to send a file to the NetWare file server using the IPX SPX protocol NetWare TCP IP S...

Page 65: ...ter the folder path in the NetWare file server For example to specify the sys scan folder in the NetWare file server enter sys scan Login User Name Enter the login user name to access an SMB server or an FTP server if required When you select FTP as the protocol an anonymous login is assumed if you leave this field blank Password Enter the password to access a SMB server or an FTP server if requir...

Page 66: ...om TopAccess 1 Click the Registration tab and the Inbound FAX routing by TSI The Inbound FAX routing by TSI menu page is displayed 2 Click the TSI Number link that you want to delete in the mailboxes list The Inbound FAX routing by TSI menu page is displayed 3 Click Delete The confirmation dialog box appears 4 Click OK The selected mailbox is deleted ...

Page 67: ... TopAccess COUNTER TAB PAGE This chapter describes how to display total counters on the TopAccess Counter tab page Viewing Counters 66 Displaying the total counter 66 Displaying the department counter 67 ...

Page 68: ...unt menu The Total Count menu page is displayed 2 You can check the total counter in this page The shown above is the details of the values of the print counter and the scan counter Note that these values are unresettable Print Counter Copy Displays the number of pages printed with copying operations Fax Displays the number of pages printed with the reception of fax data Printer Displays the numbe...

Page 69: ...ng this equipment The administrator can view all departments including respective counter information P 140 Click the Counters tab and the Department menu 1 Click the Counters tab and the Department menu The Department menu page is displayed 2 Enter a department code that you want to display the counter in the Department Code field and click Enter The department counter for specified department is...

Page 70: ......

Page 71: ...n 72 Setting up the SMTP Client 73 Setting up the SMTP Server 74 Setting up the POP3 Network Service 75 Setting up the FTP Client 76 Setting up Save As File Settings 77 Setting up Remote 1 and Remote 2 78 Setting up Email Settings 80 Email Settings 81 Setting up InternetFax Settings 83 InternetFax Setting 84 Setting up Print Service Settings Scanning Function 86 Setting up the Email Print 87 Displ...

Page 72: ...menu Setting the network settings 1 Select the Administration tab enter the administrator s password and click Login To access the TopAccess administrator mode see the Setup Guide for Printing Functions 2 Click the Setup menu and Network submenu The Network submenu page is displayed 3 In the Network submenu page click link or scroll the page to find the setting table and click the button of the se...

Page 73: ...cel cannot restore the defaults This can only clear the changes and restore the current settings before saving the changes 5 Click OK to save the settings and close the sub window 6 Click Save The confirmation dialog box appears 7 Click OK to apply the changes This equipment starts initializing the NIC Network Interface Card to apply the changes When using Internet Explorer even if you change the ...

Page 74: ...r only when the SMB Sign ing of SMB Server that this equipment accesses is enabled If the SMB Signing of SMB Server is disabled in a SMB server the communication is performed without the digital signa ture Digital signature is always done for the communication on the client side Select this to make that this equipment always accesses a SMB server with a digital signature When the SMB Signing of SM...

Page 75: ...d enable the DNS in the DNS Session 3 POP Before SMTP Select whether the POP Before SMTP authentication is enabled or disabled 4 Authentication Select the type of the authentication to access the SMTP server Disable Select this to access the SMTP server using no authentication Plain Select this to access the SMTP server using the plain authentication Login Select this to access the SMTP server usi...

Page 76: ...hat is forwarded through the SMTP to the domain of this equipment 2 Port Number Enter the port number to receive an InternetFax or Email Generally 25 is used 3 Email Address Enter the Email address of this equipment When this equipment works as an SMTP server it can receive all the InternetFaxes and Emails that contain its domain name When the Email address of the received InternetFaxes or Emails ...

Page 77: ...e DNS in the DNS Session 3 Type POP3 Login Select the POP3 login type Auto Select this to automatically designate the POP3 login type by the POP3 server POP3 Select this to use the general POP3 login type APOP Select this to use APOP login type APOP allows users to access the POP3 server by encrypting the user name and password If it is not possible to log in the mail server using Auto manually se...

Page 78: ...tting up the FTP Client In the FTP Client menu you can specify the default port number used for the Save as file using the FTP protocol 1 Default Port Number Enter the port number to access the network folder using FTP The port number used for FTP may differ depending on the FTP Server setting Generally 21 is used 1 ...

Page 79: ...ing the FUNCTION CLEAR button on the control panel or after the Auto Clear time period Setting up Save as file settings 1 Select the Administration tab enter the administrator s password and click Login To access the TopAccess administrator mode see the Setup Guide for Printing Functions 2 Click the Setup menu and Save as file submenu The Save as file submenu page is displayed 3 In the Save as fil...

Page 80: ...en the page will then display the current settings in each field Setting up Remote 1 and Remote 2 In Remote 1 and Remote 2 you can specify how users can select the network folders for Save as file destinations when you select Use Network Folder Destination in the Destination setting You can specify two network folders Remote 1 and Remote 2 The setting items are the same in Remote 1 and Remote 2 1 ...

Page 81: ...n set in the FTP Client in the Network menu page of the Setup tab will be used Change this option if you want to use another port number 5 Network Path If you select SMB as the protocol enter the network path to the network folder For example to specify the 192 168 1 1 user scanned folder enter 192 168 1 1 user scanned When you select FTP as the protocol enter the directory in the specified FTP se...

Page 82: ...saving The settings will be updated by pressing the FUNCTION CLEAR button on the control panel or after an Auto Clear time period Setting up Email settings 1 Select the Administration tab enter the administrator s password and click Login To access the TopAccess administrator mode see the Setup Guide for Printing Functions 2 Click the Setup menu and Email submenu The Email submenu page is displaye...

Page 83: ... the current settings in each field Email Settings You can specify the From address From name File format Fragment message size and Default body strings that apply to the Scan to Email documents 1 From Address Enter the email address of this equipment You need to enter the email address in the From Address field to enable Scan to Email 2 From Name Enter the name of this equipment 3 File Format Sel...

Page 84: ...ll be automatically entered in the Body field when users operate Scan to Email from the control panel of this equipment This body text will be applied to the Email In the Inbound FAX routing by TSI Template Fax Received Forward and Internet Fax Received Forward the body text can be entered when the Email settings of each function are performed ...

Page 85: ...l or after an Auto Clear time period y The settings in the InternetFax submenu page are applied only when the Fax Kit optional is installed Setting up InternetFax settings 1 Select the Administration tab enter the administrator s password and click Login To access the TopAccess administrator mode see the Setup Guide for Printing Functions 2 Click the Setup menu and InternetFax submenu The Internet...

Page 86: ...se alterations may not be reflected in the display However the settings have actually been changed in the equipment In such a case click the InternetFax submenu and the page will then display the current settings in each field InternetFax Setting You can specify the From address From name Fragment page size Default body strings and Body strings Transmission that apply to the InternetFaxes 1 From A...

Page 87: ...ered in the Body field when users operate Scan to InternetFax from the control panel of this equipment This body text will be applied to all of the InternetFaxes It cannot be changed by users who have no administrative privi leges 5 Body Strings Transmission Select whether the body strings will be sent or not ...

Page 88: ...save the settings The settings will be updated by pressing the FUNCTION CLEAR button on the Control Panel or after an Auto Clear time period Setting the print service settings 1 Select the Administration tab enter the administrator s password and click Login To access the TopAccess administrator mode see the Setup Guide for Printing Functions 2 Click the Setup menu and Print Service submenu The Sc...

Page 89: ...ed in each field may not be changed even if you change the settings and click Save However the settings have been changed in the equipment In that case click the Print Service submenu then the page displays the current settings in each field Setting up the Email Print In the Email Print you can set how the Email print jobs are printed Setting up the Email print is available only when the Fax Kit o...

Page 90: ... when Email printing is not completed properly 6 Email Error Transfer Address Enter an administrative Email address where the error message is sent to if Email Error For ward is enabled 7 Enable Partial Email Select whether to print Email jobs that are partially received 8 Partial Wait Time Enter how long the equipment should wait for before printing a partial Email job This should be entered in h...

Page 91: ...be displayed from the Setup menu page 1 Select the Administration tab enter the administrator s password and click Login To access the TopAccess administrator mode see the Setup Guide for Printing Functions 2 Click the Setup menu and Version submenu The Version submenu page is displayed 3 In the Version submenu page you can confirm the version informa tion of the system software ...

Page 92: ......

Page 93: ... by the TopAccess administrator About the Maintenance Functions 92 Switching Languages 93 Backing up Data 95 Restoring Data from Backup File 98 Setting up Notification Functions 101 Importing Address Book Data 103 Exporting Address Book Data 106 Importing Department Code Data 108 Exporting Department Code Data 110 ...

Page 94: ... notification functions with Emails and also can set on which event each notification will be sent P 101 Setting up Notification Functions Importing address book data This equipment allows you to import address book data in CSV format P 103 Importing Address Book Data Exporting address book data The address book data can be exported in a CSV format P 106 Exporting Address Book Data Importing depar...

Page 95: ...cluded in the Network Printer Kit do not support the scanning function 1 Insert the Scan Utilities CD ROM into a client computer When inserting the Scan Utilities CD ROM the installer may automatically start Click Cancel to make the installer exit and continue the operation 2 Select the Administration tab enter the administrator s password and click Login To access the TopAccess administrator mode...

Page 96: ...anguage file and click Open TopAccess language Scan Utilities CD ROM TopAccess Language data If the language selected in the drop down box and the one selected from the Scan Utili ties CD ROM differ the error message dialog box shown below appears Click OK in this message dialog box and then select the correct language 6 Click Upload Uploading starts When it is completed the language is switched ...

Page 97: ...dministration tab enter the administrator s password and click Login To access the TopAccess administrator mode see the Setup Guide for Printing Functions 2 Click the Maintenance menu and Backup submenu The Backup submenu page is displayed 3 Click Create New File for the data that you want to backup Backup or restoration process in progress appears and the backup process begins If you create a tem...

Page 98: ... file is created and its name and size will be displayed If the screen is not refreshed by clicking the REFRESH icon please wait a while and then try again Creating the backup file may take a few minutes depending on its size 5 Right click the File Name link and select Save Target As The Save As dialog box appears ...

Page 99: ...e name the equipment cannot restore the data from the backup files The file name of each backup data must be the following name Address Book BACKUP_ADDR date tbf Template BACKUP_TEMP date tbf Combined Backup BACKUP_ALL date tbf 7 Click Save The backup file is saved in the selected location If you turn the power of the equipment OFF the backup files in the equipment will be lost ...

Page 100: ... cannot be restored if there are any jobs that have been pro cessed 1 Select the Administration tab enter the administrator s password and click Login To access the TopAccess administrator mode see the Setup Guide for Printing Functions 2 Click the Maintenance menu and Restore submenu The Restore submenu page is displayed 3 Click Browse in the data section that you want to restore or click Browse ...

Page 101: ...e backup file name is not the name as shown below the equipment cannot restore the data from the backup files Address Book BACKUP_ADDR date tbf Template BACKUP_TEMP date tbf Combined Backup BACKUP_ALL date tbf 5 Click Upload The Restore screen displays the backup file information ...

Page 102: ...d click Restore Backup or restoration process in progress appears and the restoration process begins 7 Click REFRESH on the right side The address book data are restored in this equipment If the screen is not refreshed by clicking the REFRESH icon please wait a while and then try again Restoration may take a few minutes depending on the file size ...

Page 103: ...istrator s password and click Login To access the TopAccess administrator mode see the Setup Guide for Printing Functions 2 Click the Maintenance menu and the Notification submenu The Notification submenu page is displayed 3 In the Email Setting check the desired box of Notify administrator at Email Address from 1 to 3 to enable the notification function and enter the administrator s Email address...

Page 104: ...otified 7 In the Scan Notification Event check the boxes for the levels of scan errors you want to be notified 8 In the Fax Received Forward Notification Events check either or both of the boxes Send email when an error occurs and Send email when job is completed When the Fax Kit optional has not been installed this menu is not displayed 9 In the InternetFax Received Forward Notification Events ch...

Page 105: ...e Function y The imported address book data do not include the items for groups y When address book data are imported the imported data are added to the existing data Before importing the address book data confirm that this equipment meets the conditions shown below If this equipment does not meet any of the following conditions the address book data will not be imported y The main screen of any o...

Page 106: ... s password and click Login To access the TopAccess administrator mode see the Setup Guide for Printing Functions 2 Click the Maintenance menu and Import submenu The Import submenu page is displayed 3 Click Browse in the Address Book area The Choose File dialog box appears 4 Select the CSV file that contains address book data and click Open ...

Page 107: ...ears and the import process begins 6 Click REFRESH on the right side The address book data are imported from the CSV file to this equipment If the screen is not refreshed by clicking the REFESH icon please wait a while and then try again Import may take a few minutes depending on the file size ...

Page 108: ...dress book data and each item see the following page P 103 Importing Address Book Data 1 Select the Administration tab enter the administrator s password and click Login To access the TopAccess administrator mode see the Setup Guide for Printing Functions 2 Click the Maintenance menu and the Export submenu The Export submenu page is displayed 3 Click Create New File in the Address Book area The in...

Page 109: ... As dialog box is displayed 5 Specify where the file is to be saved and select All Files in the Save as type drop down box 6 Click Save The address book data file in a CSV format is saved in the location you specified If you turn the power of the equipment OFF the export files in the equipment will be lost ...

Page 110: ...following conditions the department code data will not be imported y The department code function is enabled y The department code entry screen is displayed or this equipment has entered into the energy saving mode from the status displaying the department code entry screen y No reserved jobs or jobs in process exist 1 Select the Administration tab enter the administrator s password and click Logi...

Page 111: ...port Backup or restoration process in progress appears and the import process begins 6 Click the REFRESH on the right side The department code data are imported from the CSV file to this equipment If the screen is not refreshed by clicking the REFRESH wait for a while and then try again Import may take a few minutes depending on the file size ...

Page 112: ... backing up the department code data to prepare for failure Do not edit or delete the exported data because they will be needed at the time of importing them back 1 Select the Administration tab enter the administrator s password and click Login To access the TopAccess administrator mode see the Setup Guide for Printing Functions 2 Click the Maintenance menu and the Export submenu The Export subme...

Page 113: ... As dialog box is displayed 5 Specify where the file is to be saved and select All Files in the Save as type drop down box 6 Click Save The department code data file in a CSV format is saved in the location you specified If you turn the power of the equipment OFF the export files in the equipment will be lost ...

Page 114: ......

Page 115: ...nel Setting 119 Destination Setting Public Template 120 Email Setting Public Template 123 Save As File Setting Public Template 124 TWAIN Setting 126 Scan Setting 126 Resetting Public Templates 127 Registering Fax and InternetFax Received Forward 130 Destination Setting Fax InternetFax Received Forward 132 Email Setting Fax InternetFax Received Forward 135 Save As File Setting Fax InternetFax Recei...

Page 116: ...strator can create and register public templates P 115 Registering Public Templates y Registration and settings of Fax Received Forward and InternetFax Received Forward The administrator can register agents for forwarding the received Fax and InternetFax to the specified destinations P 130 Registering Fax and InternetFax Received Forward The Fax Received Forward function and the InternetFax Receiv...

Page 117: ...g or editing public templates 1 Select the Administration tab enter the administrator s password and click Login To access the TopAccess administrator mode see the Setup Guide for Printing Functions 2 Click the Registration menu and the Public Template submenu The Public Template submenu page is displayed Note that the public template numbers 1 10 correspond to the one touch numbers on the Externa...

Page 118: ... template click an existing template icon in the same area the template name is shown on its right If you click a blank template icon the Template Properties page for selecting agents is displayed Go to step 5 If you click an existing template icon the Template Properties page for editing template information is displayed Go to step 4 4 Click Edit in the Template Properties page for editing templa...

Page 119: ...y the Panel setting Destination setting Email setting and Scan setting P 119 Panel Setting P 120 Destination Setting Public Template P 123 Email Setting Public Template P 126 Scan Setting In the Save as file agent setting you can specify the Panel setting Save as file setting and Scan setting P 119 Panel Setting P 124 Save As File Setting Public Template P 126 Scan Setting In the TWAIN agent setti...

Page 120: ...istering Email agents P 123 Email Setting Public Template Save As File Setting Click this to specify the method to save documents in a network folder when registering Save as file agents P 124 Save As File Setting Public Template TWAIN Setting Click this to specify the method to save documents using TWAIN driver when registering TWAIN agents P 126 TWAIN Setting Scan Setting Click this to specify t...

Page 121: ...ist display Up to 11 one byte letters and up to 5 two byte letters can be entered 4 User Name Enter the owner name of the template Up to 30 one byte letters and up to 15 two byte letters can be entered 5 Notification Send email when an error occurs Select this to send a notification message to the specified Email addresses when an error has occurred 6 Notification Send email when job is completed ...

Page 122: ... from address book P 121 Selecting destination group from address book P 122 Deleting destination from Recipient List Entering destinations manually 1 Click To Destination Setting or Cc Destination Setting and open the Recipient List page 2 Click New The Contact Property page is displayed 3 Enter the Email address of the destination in the Destination field 4 Click OK The entered destination is ad...

Page 123: ...Email field 4 Click Add The selected destination is added to the Recipient List page You can delete a destination added to the Recipient List page before saving the destina tion setting P 122 Deleting destination from Recipient List 5 Click Save The destination setting is saved Selecting destination group from address book 1 Click To Destination Setting or Cc Destination Setting and open the Recip...

Page 124: ...age You can delete a destination added to the Recipient List page before saving the destina tion setting P 122 Deleting destination from Recipient List 5 Click Save The destination setting is saved Deleting destination from Recipient List 1 Check the box for a destination that you want to delete from the Recipient List and then click Delete The selected destination is deleted from the Recipient Li...

Page 125: ...00 letters including spaces can be entered When a template is used a main body entered in this field will be applied to the Email 5 File Format Select the file format of scanned images to be sent as Emails PDF Select this to attach scanned images to Email as a PDF file TIFF Multi Select this to attach scanned images to Email as a Multi page TIFF file TIFF Single Select this to attach scanned image...

Page 126: ...table In this case a protocol for saving files and the network path of the network folder are displayed under this field Protocol Select a protocol to use for forwarding a scan file to the network folder SMB Select it to use an SMB protocol FTP Select it to forward a scan file to an FTP server NetWare IPX SPX Select it to send a file to the NetWare file server using the IPX SPX protocol NetWare TC...

Page 127: ...ter sys scan Login User Name Enter a login user name to access an SMB server or an FTP server If no login user name is entered in this field while FTP is selected above it will be treated as an anonymous login Password Enter a password to access an SMB server or an FTP server Retype password Retype the password entered in the Password field above for confirmation 3 Destination Remote 2 Check this ...

Page 128: ...ting In the Scan Setting page you can specify how originals are scanned when the Scan agents are selected 1 Single 2 Sided Scan Select whether only one side or both sides of the original are to be scanned Single Only one side of the original is scanned Duplex Book Both sides of the original are scanned in a booklet form Duplex Tablet Both sides of the original are scanned in a tablet form To enabl...

Page 129: ...y detected and the mixed size originals can be used To enable the Original Size function the Reversing Automatic Document Feeder optional is required Resetting Public Templates You can reset a template already defined to the undefined one You can reset either all templates or only the selected one P 127 Resetting selected public templates P 129 Resetting all public templates in one go Resetting se...

Page 130: ... link to display the Panel View and then click the icon of a defined template that you want to reset The Template Properties page is displayed 4 Click Reset Template A confirmation dialog box is displayed 5 Click OK The setting of the selected template is reset and the template is returned to the undefined one ...

Page 131: ...rator s password and click Login To access the TopAccess administrator mode see the Setup Guide for Printing Functions 2 Click the Registration menu and the Public Template submenu The Public Template submenu page is displayed 3 Click Reset A confirmation dialog box is displayed 4 Click OK All the public templates are reset ...

Page 132: ...nstalled y If the Inbound FAX routing by TSI is set up this function is given priority The Fax Received Forward function and the InternetFax Received Forward function are operated only when Faxes are received from Fax numbers which are not registered in the Inbound FAX routing by TSI y Since the image process of the forwarded Fax and Internet Fax is not the same as that of the usual Fax the qualit...

Page 133: ... only when an error occurred 5 Click the button of each item to configure or edit the properties of the Fax InternetFax Received Forward Destination Setting Click this to specify the destinations of the document to be for warded P 132 Destination Setting Fax InternetFax Received For ward Email Setting Click this to specify the method to forward the document as an Email when registering Email agent...

Page 134: ...Email address of each destination manually or select from the address book by person or by group P 132 Entering destinations manually P 133 Selecting destinations from address book P 134 Selecting destination group from address book P 134 Deleting destination from Recipient List Entering destinations manually 1 Click Destination Setting to open the Recipient List page 2 Click New The Contact Prope...

Page 135: ...st page 2 Click Address Book The Address Book page is displayed 3 Check the box for the desired destination in the Email field 4 Click Add The selected destination is added to the Recipient List page You can delete a destination added to the Recipient List page before saving the destina tion setting P 134 Deleting destination from Recipient List 5 Click Save The destination setting is saved ...

Page 136: ...ed destination belongs 4 Click Add All the destinations belong to the selected group are added to the Recipient List page You can delete a destination added to the Recipient List page before saving the destina tion setting P 134 Deleting destination from Recipient List 5 Click Save The destination setting is saved Deleting destination from Recipient List 1 Check the box for a destination that you ...

Page 137: ... Name Enter the sender s name 4 Body Enter the main body of the Email Up to 1 000 letters including spaces can be entered 5 File Format Select the file format of scanned images to be sent as Emails PDF Select this to attach scanned images to Email as a PDF file TIFF Multi Select this to attach scanned images to Email as a Multi page TIFF file TIFF Single Select this to attach scanned images to Ema...

Page 138: ...e Setup menu If the administrator has set this to use a network folder that he or she had spec ified only Use Administrator Setting is selectable In this case a protocol for saving files and the network path of the network folder are displayed under this field If the administrator has set this to use any network folder select Use User Setting and specify the destinations to which the received Fax ...

Page 139: ...he folder path in the NetWare file server For example to specify the sys scan folder in the NetWare file server enter sys scan Login User Name Enter a login user name to access an SMB server or an FTP server If no login user name is entered in this field while FTP is selected above it will be treated as an anonymous login Password Enter a password to access an SMB server or an FTP server Retype Pa...

Page 140: ...e TopAccess administrator mode see the Setup Guide for Printing Functions 2 Click the Registration menu and the InternetFax Received Forward submenu The InternetFax Received Forward submenu page is displayed The registration procedures from this step and after for the InternetFax Received For ward and the Fax Received Forward are the same See the procedure from step 3 of Registering Fax Received F...

Page 141: ...11 MANAGING DEPARTMENT CODES ON TopAccess FOR ADMINISTRATORS This chapter describes how to have department codes managed by an administrator Managing Department Codes For Administrators 140 ...

Page 142: ...e only when a department code is set by using this equipment To register or delete the department codes use the control panel of this equipment For depart ment code settings in this equipment see Operator s Manual for Copying Functions 1 Click the Counters tab and the Department menu The Department menu page is displayed 2 Enter the master code in the Department Code field and click Enter The Depa...

Page 143: ...12 APPENDIX This chapter has been prepared to give additional information List Print Format 142 ...

Page 144: ...SPX FRAME TYPE APPLE TALK ENABLE APPLE TALK DEVICE NAME DESIRED ZONE SESSION DNS SESSION ENABLE DNS PRIMARY DNS SERVER ADDRESS SECONDARY DNS SERVER ADDRESS DDNS SESSION ENABLE DDNS HOST NAME DOMAIN NAME NETWARE SESSION ENABLE BINDERY ENABLE NDS CONTEXT TREE SEARCH ROOT BONJOUR SESSION ENABLE BONJOUR LINK LOCAL HOST NAME 256MB SCANNER UPGRADE KIT 10BASE FULL DYNAMIC XXX XXX XXX XXX XXX XXX XXX XXX ...

Page 145: ...02 DOWNLOAD FIRMWARE 03 RDC PASSWORD 04 SUPPLY NOTICE 01 MANUAL OUTPUT 02 AUTOMATIC JOURNAL 02 COMMUNICATION REPORT 01 TX REPORT 02 MEMORY TX REPORT 03 MULTI ADD REPORT 04 MULTIPOLL REPORT 05 RELAY ORIGINATOR REPORT 06 RELAY STATION REPORT 07 RELAY END REPORT 03 RECEPTION LIST 01 LOCAL MAILBOX LIST 02 REMOTE MAILBOX LIST 03 RELAY RECEPTION LIST 01 MENU CUSTOMIZE 02 APS AMS 03 IMAGE MODE 04 LIGHT D...

Page 146: ......

Page 147: ...1 Email Address 37 74 Email Error Transfer Address 88 Email Setting 56 61 118 123 131 135 Email Settings 81 Enable Email Error Forward 88 Enable OffRamp Gateway 74 Enable Partial Email 88 Enable POP3 Client 75 Enable Print Email Error 88 Enable Print Header 87 Enable Print Message Body 87 Enable SMTP Client 73 Enable SMTP Server 74 End User Mode 30 Export 106 110 Exposure 127 F Fax Number 37 Fax S...

Page 148: ...blic Templates 34 PWD 38 Q Quality Transmit 38 R Registering Fax Received Forward 130 Registration 114 Fax Received Forward 130 InternetFax Received Forward 138 Public Template 115 Relay End Terminal Report 46 51 Remote 1 62 78 124 136 Remote 2 63 78 125 137 Resetting Public Templates 127 Resolution 126 Restore 98 Retype Password 63 79 137 Rotation 126 S Save As File 55 117 131 Save As File Agent ...

Page 149: ...INDEX 147 TSI Number 57 TWAIN 117 TWAIN Setting 118 126 Type POP3 Login 75 U User Name 57 119 ...

Page 150: ...148 INDEX ...

Page 151: ...GA 1200 OME060185B0 ...

Page 152: ...HIGASHIGOTANDA SHINAGAWA KU TOKYO 141 8664 JAPAN MULTIFUNCTIONAL DIGITAL SYSTEMS Setup Guide for Scanning Functions GA 1200 2007 2008 TOSHIBA TEC CORPORATION All rights reserved R061120D1202 TTEC Ver02 2008 06 ...

Reviews: